Operation Manual
Page 7
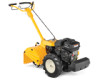
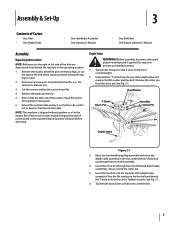
... the control cable and lay it rests on the floor. Raise the tine shield hinge flap assembly and insert the depth stake assembly in the operating position. 1. Assembly & Set-Up 3 Contents of Carton • One Tiller • One Depth Stake • One Handlebar Assembly • One Operator's Manual • ...References to the right or left side of the tiller are determined from behind the machine in the slot, under the tine shield and up through the tine shield and depth stake assemblies. Tip the tiller forward so that it on the tines. 7 Insert the hex bolt into the top...
... the control cable and lay it rests on the floor. Raise the tine shield hinge flap assembly and insert the depth stake assembly in the operating position. 1. Assembly & Set-Up 3 Contents of Carton • One Tiller • One Depth Stake • One Handlebar Assembly • One Operator's Manual • ...References to the right or left side of the tiller are determined from behind the machine in the slot, under the tine shield and up through the tine shield and depth stake assemblies. Tip the tiller forward so that it on the tines. 7 Insert the hex bolt into the top...
Operation Manual
Page 11
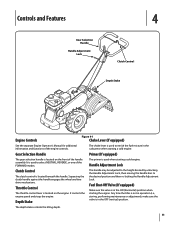
...tiller is not in the OFF (vertical) position. Gear Selection Handle Primer (If equipped) The gear selection handle is in operation (i.e., storing, performing maintenance or adjustment), make sure the valve is located on the engine. Controls and Features Gear Selection Handle Handle Adjustment Lock 4 Clutch Control Depth Stake...the ON (horizontal) position when starting the engine. Squeezing the clutch handle against the handle engages the wheel and tine drive mechanisms. Throttle Control The throttle control lever is located beneath the handle. The primer is in the carburetor ...
...tiller is not in the OFF (vertical) position. Gear Selection Handle Primer (If equipped) The gear selection handle is in operation (i.e., storing, performing maintenance or adjustment), make sure the valve is located on the engine. Controls and Features Gear Selection Handle Handle Adjustment Lock 4 Clutch Control Depth Stake...the ON (horizontal) position when starting the engine. Squeezing the clutch handle against the handle engages the wheel and tine drive mechanisms. Throttle Control The throttle control lever is located beneath the handle. The primer is in the carburetor ...
Operation Manual
Page 12
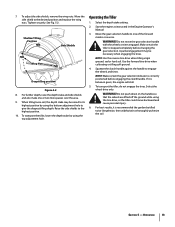
... the starter handle rapidly. See Figure 5-1. Place the side shields in the START position. 3. To transport the tiller, lower the depth stake by the depth stake which gives 1" of tilling depth). See Figure 5-1. 12 Read, understand, and follow all the instructions and warnings on the starter handle. 6. ...the bottom adjustment hole) to recoil slowly while keeping a firm hold on the machine and in front of the tiller. For further depth, raise the depth stake and side shields and also make one is standing in this position for more passes over the area. 4. ...
... the starter handle rapidly. See Figure 5-1. Place the side shields in the START position. 3. To transport the tiller, lower the depth stake by the depth stake which gives 1" of tilling depth). See Figure 5-1. 12 Read, understand, and follow all the instructions and warnings on the starter handle. 6. ...the bottom adjustment hole) to recoil slowly while keeping a firm hold on the machine and in front of the tiller. For further depth, raise the depth stake and side shields and also make one is standing in this position for more passes over the area. 4. ...
Operation Manual
Page 13
.... 10. When tilling loose soil, the depth stake may be raised to its highest position by using the tine drive, or the tiller could move the gear selection handle with the wheels or tines engaged. Make certain the tiller is correctly positioned before changing the gear selection...engine will stall. 5. Operation 13 Select the depth stake setting. 2. Do not move backward and cause personal injury. 6. NOTE: Use the reverse tine drive when tilling virgin ground, sod or hard soil. To transport the tiller, lower the depth stake by using the bottom adjustment hole to thoroughly...
.... 10. When tilling loose soil, the depth stake may be raised to its highest position by using the tine drive, or the tiller could move the gear selection handle with the wheels or tines engaged. Make certain the tiller is correctly positioned before changing the gear selection...engine will stall. 5. Operation 13 Select the depth stake setting. 2. Do not move backward and cause personal injury. 6. NOTE: Use the reverse tine drive when tilling virgin ground, sod or hard soil. To transport the tiller, lower the depth stake by using the bottom adjustment hole to thoroughly...
Operation Manual
Page 22
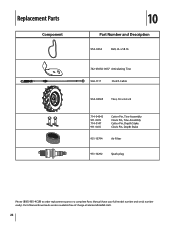
Replacement Parts Component 10 Part Number and Description 954-0434 Belt, 4L x 58.16 742-0305A-0637 Articulating Tine 946-1117 Clutch Cable 934-04365 Tires, 16 x 4.6 x 8 714-04043 911-0415 714-0147 911-0415 Cotter Pin, Tine Assembly Clevis Pin, Tine Assembly Cotter Pin, Depth Stake Clevis Pin, Depth Stake 951-10794 Air Filter 951-10292 Spark plug Phone (800) 965-4CUB to order replacement parts or a complete Parts Manual (have your full model number and serial number ready). Parts Manual downloads are also available free of charge at www.cubcadet.com. 22
Replacement Parts Component 10 Part Number and Description 954-0434 Belt, 4L x 58.16 742-0305A-0637 Articulating Tine 946-1117 Clutch Cable 934-04365 Tires, 16 x 4.6 x 8 714-04043 911-0415 714-0147 911-0415 Cotter Pin, Tine Assembly Clevis Pin, Tine Assembly Cotter Pin, Depth Stake Clevis Pin, Depth Stake 951-10794 Air Filter 951-10292 Spark plug Phone (800) 965-4CUB to order replacement parts or a complete Parts Manual (have your full model number and serial number ready). Parts Manual downloads are also available free of charge at www.cubcadet.com. 22
