Operation Manual
Page 1
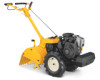
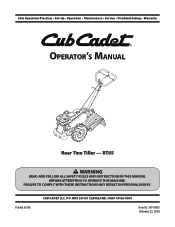
BOX 361131 CLEVELAND, OHIO 44136-0019 Form No. 769-05933 (February 22, 2010) Printed In USA CUB CADET LLC, P.O. RT65 WARNING READ AND FOLLOW ALL SAFETY RULES AND INSTRUCTIONS IN THIS MANUAL BEFORE ATTEMPTING TO OPERATE THIS MACHINE. FAILURE TO COMPLY WITH THESE INSTRUCTIONS MAY RESULT IN PERSONAL INJURY. Safe Operation Practices • Set-Up • Operation • Maintenance • Service • Troubleshooting • Warranty Operator's Manual Rear Tine Tiller -
BOX 361131 CLEVELAND, OHIO 44136-0019 Form No. 769-05933 (February 22, 2010) Printed In USA CUB CADET LLC, P.O. RT65 WARNING READ AND FOLLOW ALL SAFETY RULES AND INSTRUCTIONS IN THIS MANUAL BEFORE ATTEMPTING TO OPERATE THIS MACHINE. FAILURE TO COMPLY WITH THESE INSTRUCTIONS MAY RESULT IN PERSONAL INJURY. Safe Operation Practices • Set-Up • Operation • Maintenance • Service • Troubleshooting • Warranty Operator's Manual Rear Tine Tiller -
Operation Manual
Page 2
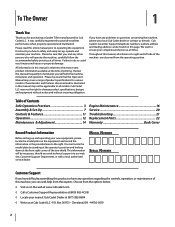
...by standing at the operator's position and looking down at the front right corner of product specifications for purchasing a Garden Tiller manufactured by Cub Cadet LLC. You can seek help from the experts. Model Number Serial Number Customer Support If you have difficulty assembling this ...found on the web at www.cubcadet.com ◊ Call a Customer Support Representative at (800) 965-4CUB ◊ Locate your machine. Cub Cadet LLC reserves the right to provide excellent performance when properly operated and maintained. Box 361131 • Cleveland, OH • 44136-0019 2 Review...
...by standing at the operator's position and looking down at the front right corner of product specifications for purchasing a Garden Tiller manufactured by Cub Cadet LLC. You can seek help from the experts. Model Number Serial Number Customer Support If you have difficulty assembling this ...found on the web at www.cubcadet.com ◊ Call a Customer Support Representative at (800) 965-4CUB ◊ Locate your machine. Cub Cadet LLC reserves the right to provide excellent performance when properly operated and maintained. Box 361131 • Cleveland, OH • 44136-0019 2 Review...
Operation Manual
Page 4
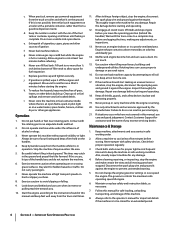
.... Never operate the machine at too fast of ignition. Rotating tines can cause a burn. Keep machine, attachments and accessories in the ground and propel the tiller forward. Maintenance & Storage 1. Stay alert for damage. Exercise caution to another area. Do not touch. 15. Do not use a nozzle lock-open flame, spark or...
.... Never operate the machine at too fast of ignition. Rotating tines can cause a burn. Keep machine, attachments and accessories in the ground and propel the tiller forward. Maintenance & Storage 1. Stay alert for damage. Exercise caution to another area. Do not touch. 15. Do not use a nozzle lock-open flame, spark or...
Operation Manual
Page 7
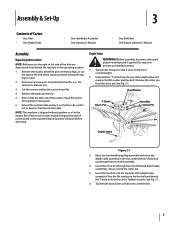
...the carton thoroughly for loose parts. 6. NOTE: This machine is shipped without gasoline or oil in the operating position. 1. Tip the tiller forward so that it with the tiller (i.e., the Operator's Manual, etc.). 3. Secure it rests on the front counterweight. 2. Tighten securely. See Fig. 3-1. 6. Flat ...end of the carton and peel it against the engine to prevent unintended starting. 1. Assembly & Set-Up 3 Contents of Carton • One Tiller • One Depth Stake • One Handlebar Assembly • One Operator's Manual • One Shift Rod • One Engine Operator's...
...the carton thoroughly for loose parts. 6. NOTE: This machine is shipped without gasoline or oil in the operating position. 1. Tip the tiller forward so that it with the tiller (i.e., the Operator's Manual, etc.). 3. Secure it rests on the front counterweight. 2. Tighten securely. See Fig. 3-1. 6. Flat ...end of the carton and peel it against the engine to prevent unintended starting. 1. Assembly & Set-Up 3 Contents of Carton • One Tiller • One Depth Stake • One Handlebar Assembly • One Operator's Manual • One Shift Rod • One Engine Operator's...
Operation Manual
Page 8
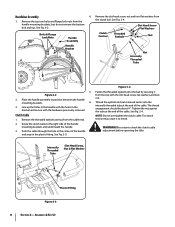
... brackets and underneath the handle. 3. Figure 3-4 Fasten the threaded eyebolt onto the bail by securing it to check the clutch cable adjustment before operating the tiller. Internally Threaded Tube Slot Head Screw, Nut & Flat Washer Plastic Fitting Figure 3-3 8 Section 3- handle mounting brackets, but do not remove the bottom bolt and nut...
... brackets and underneath the handle. 3. Figure 3-4 Fasten the threaded eyebolt onto the bail by securing it to check the clutch cable adjustment before operating the tiller. Internally Threaded Tube Slot Head Screw, Nut & Flat Washer Plastic Fitting Figure 3-3 8 Section 3- handle mounting brackets, but do not remove the bottom bolt and nut...
Operation Manual
Page 9
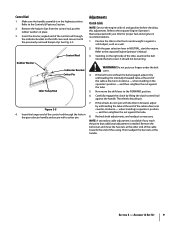
... Assembly & Set-Up 9 Insert the shorter, angled end of the control rod through the hole in the gear selector handle and secure with the tiller in place. 3. and then retighten the nut against the tube. 5. NOTE: A secondary cable adjustment is available if you reach the point that additional...forward, adjust by lifting the clutch control bail against a solid object, such as necessary. Now move the hex nuts at the end of the tiller, examine the belt (inside the belt cover). Adjustments Clutch Cable NOTE: Service the engine with your fingers under the belt cover. 4. With the...
... Assembly & Set-Up 9 Insert the shorter, angled end of the control rod through the hole in the gear selector handle and secure with the tiller in place. 3. and then retighten the nut against the tube. 5. NOTE: A secondary cable adjustment is available if you reach the point that additional...forward, adjust by lifting the clutch control bail against a solid object, such as necessary. Now move the hex nuts at the end of the tiller, examine the belt (inside the belt cover). Adjustments Clutch Cable NOTE: Service the engine with your fingers under the belt cover. 4. With the...
Operation Manual
Page 10
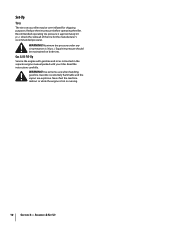
WARNING! Reduce the tire pressure before operating the tiller. Equal tire pressure should be over-inflated for the manufacturer's recommended pressure). Never fuel the machine indoors or while the engine is extremely flammable and ... tire pressure is 30 p.s.i. Gas & Oil Fill-Up Service the engine with gasoline and oil as instructed in the separate engine manual packed with your tiller may be maintained on your tiller. Read the instructions carefully. Use extreme care when handling gasoline.
WARNING! Reduce the tire pressure before operating the tiller. Equal tire pressure should be over-inflated for the manufacturer's recommended pressure). Never fuel the machine indoors or while the engine is extremely flammable and ... tire pressure is 30 p.s.i. Gas & Oil Fill-Up Service the engine with gasoline and oil as instructed in the separate engine manual packed with your tiller may be maintained on your tiller. Read the instructions carefully. Use extreme care when handling gasoline.
Operation Manual
Page 11
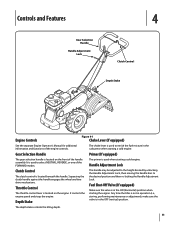
... Clutch Control The clutch control is in operation (i.e., storing, performing maintenance or adjustment), make sure the valve is located beneath the handle. Any time the tiller is not in the OFF (vertical) position. Fuel Shut-Off Valve (If equipped) Make sure the valve is used to enrich the fuel mixture in...
... Clutch Control The clutch control is in operation (i.e., storing, performing maintenance or adjustment), make sure the valve is located beneath the handle. Any time the tiller is not in the OFF (vertical) position. Fuel Shut-Off Valve (If equipped) Make sure the valve is used to enrich the fuel mixture in...
Operation Manual
Page 12
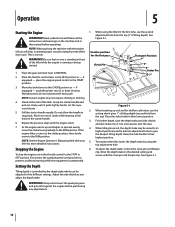
...to its highest position (use the setting which gives 1" of tilling depth). Place the throttle control lever in front of the tiller. Pull the starter handle rapidly. Repeat the previous steps until it against the engine before operating. Use this manual before performing any...Read, understand, and follow all the instructions and warnings on the starter handle. 6. if equipped - This is controlled by using the tiller for shallow cultivation, use the bottom adjustment hole) to five different settings. Wait about two (2) seconds between each push. For further depth...
...to its highest position (use the setting which gives 1" of tilling depth). Place the throttle control lever in front of the tiller. Pull the starter handle rapidly. Repeat the previous steps until it against the engine before operating. Use this manual before performing any...Read, understand, and follow all the instructions and warnings on the starter handle. 6. if equipped - This is controlled by using the tiller for shallow cultivation, use the bottom adjustment hole) to five different settings. Wait about two (2) seconds between each push. For further depth...
Operation Manual
Page 13
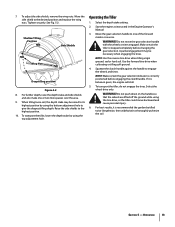
...of the forward modes or reverse. When tilling loose soil, the depth stake may be necessary when engaging the tines. To transport the tiller, lower the depth stake by using the bottom adjustment hole to give the deepest tilling depth. Squeeze the clutch handle against the handle ... the highest position. 10. Select the wheel drive only. Operation 13 To adjust the side shields, remove the wing nuts. Make certain the tiller is recommended the garden be raised to thoroughly pulverize the soil. Use the forward tine drive when cultivating or tilling soft ground. 4. WARNING! ...
...of the forward modes or reverse. When tilling loose soil, the depth stake may be necessary when engaging the tines. To transport the tiller, lower the depth stake by using the bottom adjustment hole to give the deepest tilling depth. Squeeze the clutch handle against the handle ... the highest position. 10. Select the wheel drive only. Operation 13 To adjust the side shields, remove the wing nuts. Make certain the tiller is recommended the garden be raised to thoroughly pulverize the soil. Use the forward tine drive when cultivating or tilling soft ground. 4. WARNING! ...
Operation Manual
Page 14
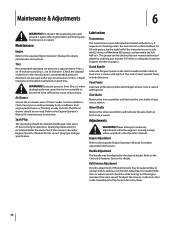
... the left half to the Assembly & Set-Up Section for engine adjustment instructions. Never attempt to burst with grease, lay the right half of each tiller season; To adjust the tension on 14 inch tires and 20 p.s.i. Disconnect the spark plug wire and ground it every hour under extremely dusty conditions...
... the left half to the Assembly & Set-Up Section for engine adjustment instructions. Never attempt to burst with grease, lay the right half of each tiller season; To adjust the tension on 14 inch tires and 20 p.s.i. Disconnect the spark plug wire and ground it every hour under extremely dusty conditions...
Operation Manual
Page 20
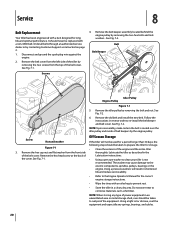
... the instructions in the of belt keepers by removing the two hex bolts and lock washers.. Off-Season Storage Screw Nut and washer If the tiller will result in shortened life and reduce serviceability. • Refer to the Engine Operator's Manual for storage. See Fig. 7-1. • Using a...See Fig. 7-1. Remove the old belt and install the new belt. Remove the hex head screw at the back of the engine and the entire tiller 3. See Fig. 7-2. NOTE: Upon reassembly, make certain the belt is not recommended. The washer may cause damage to corrosive materials, such as ...
... the instructions in the of belt keepers by removing the two hex bolts and lock washers.. Off-Season Storage Screw Nut and washer If the tiller will result in shortened life and reduce serviceability. • Refer to the Engine Operator's Manual for storage. See Fig. 7-1. • Using a...See Fig. 7-1. Remove the old belt and install the new belt. Remove the hex head screw at the back of the engine and the entire tiller 3. See Fig. 7-2. NOTE: Upon reassembly, make certain the belt is not recommended. The washer may cause damage to corrosive materials, such as ...
Operation Manual
Page 21
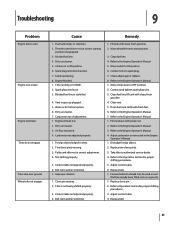
...Refer to ON position. 6. Adjust carburetor as instructed in fuel system. 6. Refer to Operation Section for proper shifting procedures. 5. Replace belt. 21 Tiller running on virgin soil. 1. Dirty air cleaner. 7. Carburetor out of adjustment. 1. Carburetor not adjusted properly. 1. Control cable not adjusted properly. ... wire. 3. Replace tine clevis pin(s). 3. Blocked fuel line. 4. Troubleshooting 9 Problem Engine fails to start position. 3. Tiller is not being shifted properly. 3. Remedy 1. Fill tank with proper oil. 2. Refer to authorized service dealer. 4. Take...
...Refer to ON position. 6. Adjust carburetor as instructed in fuel system. 6. Refer to Operation Section for proper shifting procedures. 5. Replace belt. 21 Tiller running on virgin soil. 1. Dirty air cleaner. 7. Carburetor out of adjustment. 1. Carburetor not adjusted properly. 1. Control cable not adjusted properly. ... wire. 3. Replace tine clevis pin(s). 3. Blocked fuel line. 4. Troubleshooting 9 Problem Engine fails to start position. 3. Tiller is not being shifted properly. 3. Remedy 1. Fill tank with proper oil. 2. Refer to authorized service dealer. 4. Take...
Operation Manual
Page 24
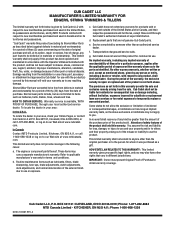
...from the installation or use the product. f. g. Cub Cadet shall not be defective in your area, check your Yellow Pages, or contact Cub Cadet LLC at www.mtdcanada. CUB CADET LLC MANUFACTURER'S LIMITED WARRANTY FOR edgers, string trimmers & tillers The limited warranty set forth below ) against defects in... site at P.O. In no event shall recovery of any kind be free from the sale. e. KITCHENER, ON N2G 4J1; Cub Cadet LLC, P.O. Routine maintenance items such as a gift. This limited warranty shall only apply if this product (excluding its possessions ...
...from the installation or use the product. f. g. Cub Cadet shall not be defective in your area, check your Yellow Pages, or contact Cub Cadet LLC at www.mtdcanada. CUB CADET LLC MANUFACTURER'S LIMITED WARRANTY FOR edgers, string trimmers & tillers The limited warranty set forth below ) against defects in... site at P.O. In no event shall recovery of any kind be free from the sale. e. KITCHENER, ON N2G 4J1; Cub Cadet LLC, P.O. Routine maintenance items such as a gift. This limited warranty shall only apply if this product (excluding its possessions ...

Parts Catalog
Page 1
RT 65 & FT 24 Printed In USA CUB CADET LLC, P.O. BOX 361131 CLEVELAND, OHIO 44136-0019 Form No. 769-03793 (January 10, 2008) Illustrated Parts Manual Cub Cadet Tillers -
RT 65 & FT 24 Printed In USA CUB CADET LLC, P.O. BOX 361131 CLEVELAND, OHIO 44136-0019 Form No. 769-03793 (January 10, 2008) Illustrated Parts Manual Cub Cadet Tillers -


