
Operation Manual
Page 1
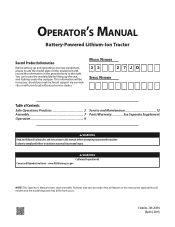
... Safe Operations Practices 2 Assembly 7 Operation 9 Service and Maintenance 12 Parts/Warranty See Separate Supplement WARNING Read and follow all features in this manual are applicable to comply with your new equipment, please locate the model plate on the equipment and record the information in this manual before attempting to the right. NOTE: This Operator's Manual covers several models. Operator's Manual Battery-Powered Lithium-Ion Tractor Record Product Information Before setting up the seat...
... Safe Operations Practices 2 Assembly 7 Operation 9 Service and Maintenance 12 Parts/Warranty See Separate Supplement WARNING Read and follow all features in this manual are applicable to comply with your new equipment, please locate the model plate on the equipment and record the information in this manual before attempting to the right. NOTE: This Operator's Manual covers several models. Operator's Manual Battery-Powered Lithium-Ion Tractor Record Product Information Before setting up the seat...
Operation Manual
Page 2
... mechanical, electrical and safety systems are operating properly, safely, and are not covered in reverse. Also, avoid discharging material against a wall or obstruction which may result in the manual(s) before and while backing to comply with all controls and their ability to operate the riding tractor safely enough to ensure all instructions on the tractor deck presenting a potential fire hazard. 11. Turn off blade(s), set parking brake, press Start/Stop...
... mechanical, electrical and safety systems are operating properly, safely, and are not covered in reverse. Also, avoid discharging material against a wall or obstruction which may result in the manual(s) before and while backing to comply with all controls and their ability to operate the riding tractor safely enough to ensure all instructions on the tractor deck presenting a potential fire hazard. 11. Turn off blade(s), set parking brake, press Start/Stop...
Operation Manual
Page 3
... damaged chute deflector, mulch plug or entire grass catcher can suffer burns from a hot or running tractor. Be alert and turn tractor). Children 14 and over accidents, always look behind and down before using the tractor on ramp(s) to joy ride on the tractor and should not be pushed manually on the sloped area. If you feel uneasy on it . 2. Do not make certain the blade(s) and...
... damaged chute deflector, mulch plug or entire grass catcher can suffer burns from a hot or running tractor. Be alert and turn tractor). Children 14 and over accidents, always look behind and down before using the tractor on ramp(s) to joy ride on the tractor and should not be pushed manually on the sloped area. If you feel uneasy on it . 2. Do not make certain the blade(s) and...
Operation Manual
Page 4
... cover the battery charger. To reduce the risk of the battery in doubt, use an OEM battery charger (part# 725-07253A) to charge the batteries in order not to improper performance and compromise safety. of grass, leaves and debris 9. Clean the tractor after disengaging the blade disengagement control per the interval in the Maintenance Schedule for one type of battery may create a risk of service parts which do not replace blown fuses...
... cover the battery charger. To reduce the risk of the battery in doubt, use an OEM battery charger (part# 725-07253A) to charge the batteries in order not to improper performance and compromise safety. of grass, leaves and debris 9. Clean the tractor after disengaging the blade disengagement control per the interval in the Maintenance Schedule for one type of battery may create a risk of service parts which do not replace blown fuses...

Operation Manual
Page 5
... rotating parts or under the cutting deck. WARNING - Always remove the key when not in operation. WARNING - SERVICE Many components on this tractor should be serviced by an authorized service dealer. WARNING Your Responsibility-Restrict the use . Provide fresh air. Gas and smoke in this manual and on the tractor. THROWN OBJECTS This tractor may cause respiratory irritation. WARNING - Symbol Description WARNING - DANGER - SAVE THESE INSTRUCTIONS! 5 This...
... rotating parts or under the cutting deck. WARNING - Always remove the key when not in operation. WARNING - SERVICE Many components on this tractor should be serviced by an authorized service dealer. WARNING Your Responsibility-Restrict the use . Provide fresh air. Gas and smoke in this manual and on the tractor. THROWN OBJECTS This tractor may cause respiratory irritation. WARNING - Symbol Description WARNING - DANGER - SAVE THESE INSTRUCTIONS! 5 This...
Operation Manual
Page 6
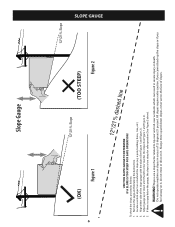
... on it, do not mow or drive on it. Slope Gauge SLOPE GAUGE 6 (OK) Figure 1 12°/21% Slope (TOO STEEP) Figure 2 12°/21% Slope 12°/21% dashed line USE THIS SLOPE GAUGE TO DETERMINE IF A SLOPE IS TOO STEEP FOR SAFE OPERATION! Remove this page and fold along... the slope gauge with the object (See Figure 1 and Figure 2 ). 4. Do not operate machine on or behind the slope (e.g. If there is a gap below the gauge, the slope is too steep for safe operation (See Figure 2 above). WARNING! All slopes require extra caution. To check the slope, proceed as follows: 1.
... on it, do not mow or drive on it. Slope Gauge SLOPE GAUGE 6 (OK) Figure 1 12°/21% Slope (TOO STEEP) Figure 2 12°/21% Slope 12°/21% dashed line USE THIS SLOPE GAUGE TO DETERMINE IF A SLOPE IS TOO STEEP FOR SAFE OPERATION! Remove this page and fold along... the slope gauge with the object (See Figure 1 and Figure 2 ). 4. Do not operate machine on or behind the slope (e.g. If there is a gap below the gauge, the slope is too steep for safe operation (See Figure 2 above). WARNING! All slopes require extra caution. To check the slope, proceed as follows: 1.
Operation Manual
Page 7
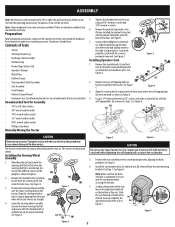
... from where the self-tapping bolts (b) were removed, as the parking brake is not set. Figure 4 3. To adjust the position of Crate • Tractor • Steering Pedestal Cap • Discharge Chute Assembly • Hardware Bag • Product Registration Card • Operator's Manual • Mulch Plug • Battery Charger • Steering wheel/ Shaft Assembly • Seat Assembly • Front Bumper • Battery Charger Manual • Hardware Pack: Seat Mounting Bracket (w/ two shoulder bolts & lock nuts installed) Recommended Tools for Assembly • 1/4" or...
... from where the self-tapping bolts (b) were removed, as the parking brake is not set. Figure 4 3. To adjust the position of Crate • Tractor • Steering Pedestal Cap • Discharge Chute Assembly • Hardware Bag • Product Registration Card • Operator's Manual • Mulch Plug • Battery Charger • Steering wheel/ Shaft Assembly • Seat Assembly • Front Bumper • Battery Charger Manual • Hardware Pack: Seat Mounting Bracket (w/ two shoulder bolts & lock nuts installed) Recommended Tools for Assembly • 1/4" or...
Operation Manual
Page 8
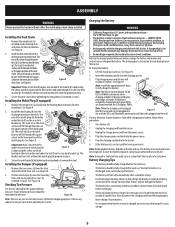
... upper-rear portion of the front axle. ASSEMBLY WARNING Never operate this machine may be replaced. See Figure 10. 2. If necessary, reduce the tire pressure before the initial use . Note: Rechargeable batteries degrade with your battery, follow these procedures: 1. Installing the Mulch Plug (If equipped) 1. The small tab (d) on the mowing deck and retain for the proper inflation pressure. Checking Tire Pressure (a) (a) See the tire sidewall for later installation. Installing the Deck Chute 1. Remove...
... upper-rear portion of the front axle. ASSEMBLY WARNING Never operate this machine may be replaced. See Figure 10. 2. If necessary, reduce the tire pressure before the initial use . Note: Rechargeable batteries degrade with your battery, follow these procedures: 1. Installing the Mulch Plug (If equipped) 1. The small tab (d) on the mowing deck and retain for the proper inflation pressure. Checking Tire Pressure (a) (a) See the tire sidewall for later installation. Installing the Deck Chute 1. Remove...
Operation Manual
Page 9
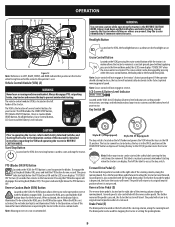
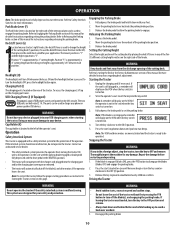
... optimal mowing ground speed. If the operator should attempt to do so, the tractor will not engage at a constant ground speed without applying pressure to access the key switch. To engage the cutting deck (blades ON), press and hold the RCM button down and behind before and while backing. The green indicator light below the PTO button is pressed, the faster the tractor will disengage the cutting deck (Blades OFF...
... optimal mowing ground speed. If the operator should attempt to do so, the tractor will not engage at a constant ground speed without applying pressure to access the key switch. To engage the cutting deck (blades ON), press and hold the RCM button down and behind before and while backing. The green indicator light below the PTO button is pressed, the faster the tractor will disengage the cutting deck (Blades OFF...
Operation Manual
Page 10
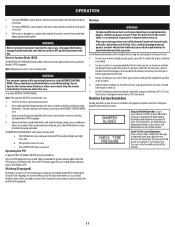
... the parking brake engaged or brake pedal fully depressed and the drive pedal in the Service & Maintenance section of the cutting deck. Releasing the Parking Brake 1. Move the parking brake lever forward out of this page. Refer to Leveling the Deck in the NEUTRAL position. • The tractor will not operate with a safety interlock system for any devices plugged into the parking brake position. 3. Fully depress the brake pedal or set the parking brake. Press the start...
... the parking brake engaged or brake pedal fully depressed and the drive pedal in the Service & Maintenance section of the cutting deck. Releasing the Parking Brake 1. Move the parking brake lever forward out of this page. Refer to Leveling the Deck in the NEUTRAL position. • The tractor will not operate with a safety interlock system for any devices plugged into the parking brake position. 3. Fully depress the brake pedal or set the parking brake. Press the start...
Operation Manual
Page 11
... cut clockwise with the cutting blade(s) (PTO) engaged. 4. Short grass invites weed growth and yellows quickly in reverse is in the Assembly section of recirculating grass clippings repeatedly beneath the cutting deck. Under heavier conditions it may cause discharged material to mow lawns, NOT clear brush. Your tractor is a process of this manual for one second, green indicator light is displayed check and adjust the tire pressure per the proper tire pressure listed on . 3. Check Tire Pressure...
... cut clockwise with the cutting blade(s) (PTO) engaged. 4. Short grass invites weed growth and yellows quickly in reverse is in the Assembly section of recirculating grass clippings repeatedly beneath the cutting deck. Under heavier conditions it may cause discharged material to mow lawns, NOT clear brush. Your tractor is a process of this manual for one second, green indicator light is displayed check and adjust the tire pressure per the proper tire pressure listed on . 3. Check Tire Pressure...
Operation Manual
Page 12
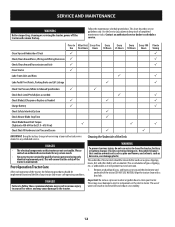
...the life of Deck P Check/Clean Around fuses, Wiring and Wiring Harnesses P Check/Clean Around Transmission and Axle P Clean Tractor P Lube Front Axles and Rims Every 25 Hours P Every Every 100 50 Hours Hours Prior to Storing P P P P Lube Pedal Pivot Points, Parking Brake and Lift Linkage P P Check Tire Pressure/Inflate to Sidewall Specification P P Check Deck Level/Pitch/Adjust as needed P P Check Blade(s)/Sharpen or Replace as Needed P P P Charge Battery P P Check Safety Interlock System P Check Mower Blade Stop Time Check Blade Mount Bolt Torque (Tighten to the...
...the life of Deck P Check/Clean Around fuses, Wiring and Wiring Harnesses P Check/Clean Around Transmission and Axle P Clean Tractor P Lube Front Axles and Rims Every 25 Hours P Every Every 100 50 Hours Hours Prior to Storing P P P P Lube Pedal Pivot Points, Parking Brake and Lift Linkage P P Check Tire Pressure/Inflate to Sidewall Specification P P Check Deck Level/Pitch/Adjust as needed P P Check Blade(s)/Sharpen or Replace as Needed P P P Charge Battery P P Check Safety Interlock System P Check Mower Blade Stop Time Check Blade Mount Bolt Torque (Tighten to the...
Operation Manual
Page 13
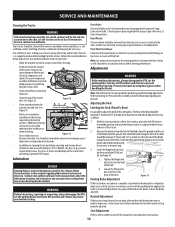
... cutting deck. The use of compressed air and/or leaf blower or a brush, damp sponge or rag will help reduce fire hazards. • In addition to have the brake adjusted. See Figure 14. Rear Wheel Not Shown for information regarding lubrication locations and intervals. WARNING Before lubricating, repairing, or inspecting, always disengage the PTO, set the parking brake, turn key to OFF position and remove to keep the tractor...
... cutting deck. The use of compressed air and/or leaf blower or a brush, damp sponge or rag will help reduce fire hazards. • In addition to have the brake adjusted. See Figure 14. Rear Wheel Not Shown for information regarding lubrication locations and intervals. WARNING Before lubricating, repairing, or inspecting, always disengage the PTO, set the parking brake, turn key to OFF position and remove to keep the tractor...
Operation Manual
Page 14
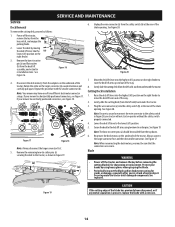
... key switch, and engage the parking brake. 2. If your mower has vertically positioned connectors, see Figure 17. Cutting Deck Installation 1. Lower the deck lift lever to the deck lift arms using heavy gloves when grasping the blade. • Periodically inspect the blade and/or deck motor casting for cracks or damage, especially after you've struck a foreign object. See Figure 17. Move the deck lift lever into the safety switch (b) at the rear...
... key switch, and engage the parking brake. 2. If your mower has vertically positioned connectors, see Figure 17. Cutting Deck Installation 1. Lower the deck lift lever to the deck lift arms using heavy gloves when grasping the blade. • Periodically inspect the blade and/or deck motor casting for cracks or damage, especially after you've struck a foreign object. See Figure 17. Move the deck lift lever into the safety switch (b) at the rear...
Operation Manual
Page 15
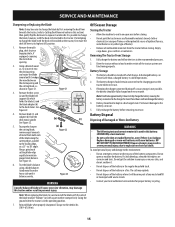
.... Fully recharge the battery before storing. Repair attempts may damage the tractor and/or result in a discharged state. Battery should be kept in personal injury. Remove the mulch plug, deck chute or bagging chute, if equipped, exposing the deck chute opening and the cutting blade, as shown in the regular household trash. • Do not dispose of the battery components. Empty cargo boxes, grass catchers or containers. It is...
.... Fully recharge the battery before storing. Repair attempts may damage the tractor and/or result in a discharged state. Battery should be kept in personal injury. Remove the mulch plug, deck chute or bagging chute, if equipped, exposing the deck chute opening and the cutting blade, as shown in the regular household trash. • Do not dispose of the battery components. Empty cargo boxes, grass catchers or containers. It is...
Operation Manual
Page 16
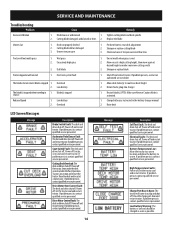
... tractor. SERVICE AND MAINTENANCE Troubleshooting Problem Excessive Vibration Cause Remedy 1. Tighten cutting blade and deck spindle 2. Cutting blade damaged, unbalanced or bent. 2. Replace the blade Uneven Cut 1. Deck not properly leveled 2. Uneven tire pressure 1. Dull blade 1. Sharpen or replace blade Tractor stopped or will come to cool/raise deck height 2. Allow deck motor(s) to a stop and shut off , let the tractor cool and restart tractor. Return home, plug into charger 1. Charge battery as instructed in the battery charger manual...
... tractor. SERVICE AND MAINTENANCE Troubleshooting Problem Excessive Vibration Cause Remedy 1. Tighten cutting blade and deck spindle 2. Cutting blade damaged, unbalanced or bent. 2. Replace the blade Uneven Cut 1. Deck not properly leveled 2. Uneven tire pressure 1. Dull blade 1. Sharpen or replace blade Tractor stopped or will come to cool/raise deck height 2. Allow deck motor(s) to a stop and shut off , let the tractor cool and restart tractor. Return home, plug into charger 1. Charge battery as instructed in the battery charger manual...


