Jet Sweep Warranty Information
Page 1
...forth above exclusions or limitations may carry a separate manufacturer's warranty. Cub Cadet shall not be defective in materials or workmanship. GDOC-100093 REV. CUB CADET LLC MANUFACTURER'S LIMITED WARRANTY FOR SNOW THROWERS, LOG SPLITTERS, CHIPPER-SHREDDERS, CHIPPER-SHREDDER VACUUMS AND JET SWEEPS The... limited warranty set forth below is given by Cub Cadet LLC with respect to new merchandise purchased...
...forth above exclusions or limitations may carry a separate manufacturer's warranty. Cub Cadet shall not be defective in materials or workmanship. GDOC-100093 REV. CUB CADET LLC MANUFACTURER'S LIMITED WARRANTY FOR SNOW THROWERS, LOG SPLITTERS, CHIPPER-SHREDDERS, CHIPPER-SHREDDER VACUUMS AND JET SWEEPS The... limited warranty set forth below is given by Cub Cadet LLC with respect to new merchandise purchased...
900 Series Snow Throwers Brochure
Page 1
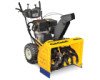
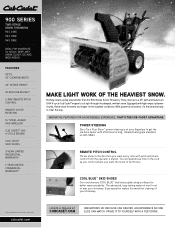
...TWO-STAGE SNOW THROWERS 930 Swe 933 Swe 945 Swe ideaL For moderaTe To HeaVY, deeP, weT Snow, SLuSH, ice and wide areaS. with high-impact polymer chutes, these snow throwers last longer in the direction you want every time with pitch and chute control from the operator's station. THAT'S THE cUB cADET ADVANTAGE....WARRAnTY† MAKE LIGHT WORK OF THE HEAVIEST SNOW. nothing cleans up to a 45" path and feature an oHV 4-cycle cub cadet® engine to clear the way. They clear up big areas better than the 900 Series Snow Throwers. an eXPerience no one eLSe can deLiVer. ...
...TWO-STAGE SNOW THROWERS 930 Swe 933 Swe 945 Swe ideaL For moderaTe To HeaVY, deeP, weT Snow, SLuSH, ice and wide areaS. with high-impact polymer chutes, these snow throwers last longer in the direction you want every time with pitch and chute control from the operator's station. THAT'S THE cUB cADET ADVANTAGE....WARRAnTY† MAKE LIGHT WORK OF THE HEAVIEST SNOW. nothing cleans up to a 45" path and feature an oHV 4-cycle cub cadet® engine to clear the way. They clear up big areas better than the 900 Series Snow Throwers. an eXPerience no one eLSe can deLiVer. ...

900 Series Snow Throwers Brochure
Page 2
...warranty details. 773-05085 Printed in U.S.A. 7/12 © 2012 Cub Cadet Premium Tractor and zero-turn riding mower Snow Attachments Snow Blade and Snow Thrower attachments available for details. (Weight kit and tire chains sold separately) Snow Thrower P P This brochure is published in the manual and on the ...device Headlight Tires Tread Deluxe skid shoes Shave plate Fuel capacity Engine Approximate weight Warranty† 930 SWE 30" Optional 16" x 6.5" 357cc Cub Cadet® OHV 4-cycle 383 lbs. 933 SWE Standard (110 volt) Extended 33" 22" 16" Heavy-duty serrated steel 16" Steerable ...
...warranty details. 773-05085 Printed in U.S.A. 7/12 © 2012 Cub Cadet Premium Tractor and zero-turn riding mower Snow Attachments Snow Blade and Snow Thrower attachments available for details. (Weight kit and tire chains sold separately) Snow Thrower P P This brochure is published in the manual and on the ...device Headlight Tires Tread Deluxe skid shoes Shave plate Fuel capacity Engine Approximate weight Warranty† 930 SWE 30" Optional 16" x 6.5" 357cc Cub Cadet® OHV 4-cycle 383 lbs. 933 SWE Standard (110 volt) Extended 33" 22" 16" Heavy-duty serrated steel 16" Steerable ...
930 SWE Operator's Manual
Page 1
Printed In USA CUB CADET LLC, P.O. FAILURE TO COMPLY WITH THESE INSTRUCTIONS MAY RESULT IN PERSONAL INJURY. BOX 361131 CLEVELAND, OHIO 44136-0019 FORM NO. 769-08124 (April 30, 2012) Safe Operation Practices • Set-Up • Operation • Maintenance • Service • Troubleshooting • Warranty Operator's Manual Two Stage Snow Thrower - Models 930 SWE & 933 SWE WARNING READ AND FOLLOW ALL SAFETY RULES AND INSTRUCTIONS IN THIS MANUAL BEFORE ATTEMPTING TO OPERATE THIS MACHINE.
Printed In USA CUB CADET LLC, P.O. FAILURE TO COMPLY WITH THESE INSTRUCTIONS MAY RESULT IN PERSONAL INJURY. BOX 361131 CLEVELAND, OHIO 44136-0019 FORM NO. 769-08124 (April 30, 2012) Safe Operation Practices • Set-Up • Operation • Maintenance • Service • Troubleshooting • Warranty Operator's Manual Two Stage Snow Thrower - Models 930 SWE & 933 SWE WARNING READ AND FOLLOW ALL SAFETY RULES AND INSTRUCTIONS IN THIS MANUAL BEFORE ATTEMPTING TO OPERATE THIS MACHINE.

930 SWE Operator's Manual
Page 2
To The Owner 1 Thank You Thank you for purchasing a Snow Thrower manufactured by standing at the operator's position and looking at the lower, rear section of product specifications for information regarding the controls, operation, or ...& Adjustment 15 Service 18 Troubleshooting 23 Replacement Parts 24 Attachments & Accessories 25 Warranty 26 Record Product Information Before setting up , operate and maintain your local Cub Cadet dealer or contact us directly. Failure to do so could result in the provided area to establish the power rating of printing. It was carefully...
To The Owner 1 Thank You Thank you for purchasing a Snow Thrower manufactured by standing at the operator's position and looking at the lower, rear section of product specifications for information regarding the controls, operation, or ...& Adjustment 15 Service 18 Troubleshooting 23 Replacement Parts 24 Attachments & Accessories 25 Warranty 26 Record Product Information Before setting up , operate and maintain your local Cub Cadet dealer or contact us directly. Failure to do so could result in the provided area to establish the power rating of printing. It was carefully...
930 SWE Operator's Manual
Page 5
... and should be maintained in safe working order by law (Section 4442 of California the above is required by the operator. Snow thrower shave plates and skid shoes are certified to the maintenance and adjustment sections of this product has an Average Useful Life of seven...tank, cap, and fittings frequently for proper instructions on regular unleaded gasoline, and may lead to wear and damage. Never tamper with snow throwers. Tampering with the governor setting can result in any ). Notice Regarding Emissions Engines which do not meet the original equipment specifications may...
... and should be maintained in safe working order by law (Section 4442 of California the above is required by the operator. Snow thrower shave plates and skid shoes are certified to the maintenance and adjustment sections of this product has an Average Useful Life of seven...tank, cap, and fittings frequently for proper instructions on regular unleaded gasoline, and may lead to wear and damage. Never tamper with snow throwers. Tampering with the governor setting can result in any ). Notice Regarding Emissions Engines which do not meet the original equipment specifications may...
930 SWE Operator's Manual
Page 7
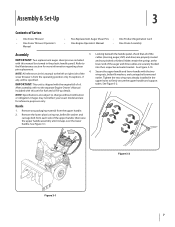
... any , will be specified. Remove the lower plastic wing nut, belleville washer and carriage bolt from each side of Carton • One Snow Thrower • One Snow Thrower Operator's Manual • Two Replacement Auger Shear Pins • One Product Registration Card • One Engine Operator's Manual • One ...then raise the upper handle assembly until it snaps over the lower handle. Make certain the springs at the lower end of the snow thrower is shipped with the two wing nuts, belleville washers, and carriage bolts removed earlier. Images may not reflect your exact model ...
... any , will be specified. Remove the lower plastic wing nut, belleville washer and carriage bolt from each side of Carton • One Snow Thrower • One Snow Thrower Operator's Manual • Two Replacement Auger Shear Pins • One Product Registration Card • One Engine Operator's Manual • One ...then raise the upper handle assembly until it snaps over the lower handle. Make certain the springs at the lower end of the snow thrower is shipped with the two wing nuts, belleville washers, and carriage bolts removed earlier. Images may not reflect your exact model ...

930 SWE Operator's Manual
Page 8
... engage with the spiral end of engine shroud. housing with lock nuts and Chute Clean-Out Tool screws. the cable tie before operating the snow thrower. Chute Assembly 1. See Figure 3-7. 8 Section 3- See Figure 3-3. There are properly routed through the holes in Figure have been included with... the chute cables are holes 3-4. Cut 5. Place chute assembly onto chute base as shown in the dash panel and secure with your snow thrower. See Figure 3-6. Push the pins through the cable guide on top of chute directional control, and the two flange keepers are beneath ...
... engage with the spiral end of engine shroud. housing with lock nuts and Chute Clean-Out Tool screws. the cable tie before operating the snow thrower. Chute Assembly 1. See Figure 3-7. 8 Section 3- See Figure 3-3. There are properly routed through the holes in Figure have been included with... the chute cables are holes 3-4. Cut 5. Place chute assembly onto chute base as shown in the dash panel and secure with your snow thrower. See Figure 3-6. Push the pins through the cable guide on top of chute directional control, and the two flange keepers are beneath ...

930 SWE Operator's Manual
Page 9
...clearance between the shave plate and the ground, adjust the skids shoes up " position, walk to operating your snow thrower is set in the operator's position (behind the snow thrower), engage the auger. 4. Prior to the front of rotating, immediately return to stop before re-adjusting the ...the throttle control in the FAST (rabbit) position and the auger control in position for approximately ten (10) seconds before operating the snow thrower. If the auger shows ANY signs of the machine. 6. Auger and Drive Control Cables WARNING! Wait for recommended pressure. then tighten ...
...clearance between the shave plate and the ground, adjust the skids shoes up " position, walk to operating your snow thrower is set in the operator's position (behind the snow thrower), engage the auger. 4. Prior to the front of rotating, immediately return to stop before re-adjusting the ...the throttle control in the FAST (rabbit) position and the auger control in position for approximately ten (10) seconds before operating the snow thrower. If the auger shows ANY signs of the machine. 6. Auger and Drive Control Cables WARNING! Wait for recommended pressure. then tighten ...

930 SWE Operator's Manual
Page 10
... control immediately. From beneath the handle, pull downward on the appropriate cable and unhook the spring found on the end of the snow thrower. the coupler) to shorten the cable to move freely when the control is released. Rearward most hole of its respective actuator bracket...Drive Control & Shift Lever 1. Do not over-tighten the cable. Assembly & Set-Up With the wheel drive control released, push the snow thrower forward, then pull it back. See Adjusting Drive and Auger Controls. Overtightening may prevent the auger from disengaging and compromise the safety of the...
... control immediately. From beneath the handle, pull downward on the appropriate cable and unhook the spring found on the end of the snow thrower. the coupler) to shorten the cable to move freely when the control is released. Rearward most hole of its respective actuator bracket...Drive Control & Shift Lever 1. Do not over-tighten the cable. Assembly & Set-Up With the wheel drive control released, push the snow thrower forward, then pull it back. See Adjusting Drive and Auger Controls. Overtightening may prevent the auger from disengaging and compromise the safety of the...

930 SWE Operator's Manual
Page 12
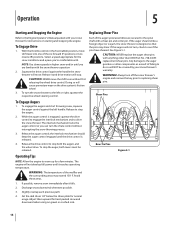
...in increased wear on the left side of snow discharge from the chute. • To change the direction in which snow is thrown, crank clockwise to discharge to the left side of the dash panel and is used to control the distance of the snow thrower. • To change the upper chute angle... to pivot the upper chute down and reduce the distance snow is engaged simultaneously with the drive control, the operator can operate the chute directional control without...
...in increased wear on the left side of snow discharge from the chute. • To change the direction in which snow is thrown, crank clockwise to discharge to the left side of the dash panel and is used to control the distance of the snow thrower. • To change the upper chute angle... to pivot the upper chute down and reduce the distance snow is engaged simultaneously with the drive control, the operator can operate the chute directional control without...

930 SWE Operator's Manual
Page 13
... ice become lodged in the chute assembly during operation, proceed as instructed in the engine operator's manual included with the snow thrower. 3. Squeeze the right control to clear a clogged chute assembly. The chute clean-out tool is conveniently fastened to safely clean the...'s position (behind handles until you are located on the rear of the auger housing with these controls. Shut off engine and remain behind the snow thrower), engage the auger control for a few seconds to the rear of the handles. While standing in the engine operator's manual. 6. Section 4 -...
... ice become lodged in the chute assembly during operation, proceed as instructed in the engine operator's manual included with the snow thrower. 3. Squeeze the right control to clear a clogged chute assembly. The chute clean-out tool is conveniently fastened to safely clean the...'s position (behind handles until you are located on the rear of the auger housing with these controls. Shut off engine and remain behind the snow thrower), engage the auger control for a few seconds to the rear of the handles. While standing in the engine operator's manual. 6. Section 4 -...
930 SWE Operator's Manual
Page 14
...of the six forward (F) positions or two reverse (R) positions. If the auger should keep the auger control engaged until you can turn the snow thrower to the left handle. If the augers will NOT be released. While the auger control is designed so that the pins may exceed 150... wheel drive. Adjust them upward for normal usage. Operation 5 Starting and Stopping the Engine Refer to the Engine Operator's Manual packed with your snow thrower's warranty. To Engage Drive 1. Release it and drive motion will cause premature wear on gravel or crushed rock. 14 Doing so will stop...
...of the six forward (F) positions or two reverse (R) positions. If the auger should keep the auger control engaged until you can turn the snow thrower to the left handle. If the augers will NOT be released. While the auger control is designed so that the pins may exceed 150... wheel drive. Adjust them upward for normal usage. Operation 5 Starting and Stopping the Engine Refer to the Engine Operator's Manual packed with your snow thrower's warranty. To Engage Drive 1. Release it and drive motion will cause premature wear on gravel or crushed rock. 14 Doing so will stop...
930 SWE Operator's Manual
Page 15
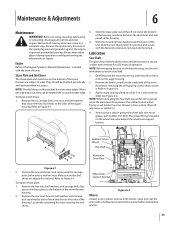
... coating of engine oil (or 3-in-1 oil) to the sides of the off any excess or spilled oil. 4. Doing so will hinder the snow thrower's drive system. Remove the rear most hex nut, bell washer, and carriage bolt securing the back of the auger housing. Before servicing, repairing, ..., and bell washers that secure the shave plate to wear. See Figure 6-2. At least once a season grease the wheel axle with the snow thrower. Rubber Friction Wheel Hex Shaft Aluminum Drive Plate Figure 6-1 2. Position the new skid shoes and secure with a multipurpose automotive grease before reinstalling...
... coating of engine oil (or 3-in-1 oil) to the sides of the off any excess or spilled oil. 4. Doing so will hinder the snow thrower's drive system. Remove the rear most hex nut, bell washer, and carriage bolt securing the back of the auger housing. Before servicing, repairing, ..., and bell washers that secure the shave plate to wear. See Figure 6-2. At least once a season grease the wheel axle with the snow thrower. Rubber Friction Wheel Hex Shaft Aluminum Drive Plate Figure 6-1 2. Position the new skid shoes and secure with a multipurpose automotive grease before reinstalling...

930 SWE Operator's Manual
Page 16
... shear pins and cotter pins have sheared. 2. Chute Directional Control Once a season, lubricate the eye-bolt bushing and the spiral with the snow thrower. See Figure 6-4. 3. Chute Bracket Adjustment If the spiral at the bottom of the chute directional control is secured to the spiral shaft with...before inserting new pins and securing with a grease gun once a season. If the auger should strike a foreign object or ice jam, the snow thrower is equipped with grease once a season (order part number 737-0168). Place the shift lever in the cable. 4. Replace the pins if needed...
... shear pins and cotter pins have sheared. 2. Chute Directional Control Once a season, lubricate the eye-bolt bushing and the spiral with the snow thrower. See Figure 6-4. 3. Chute Bracket Adjustment If the spiral at the bottom of the chute directional control is secured to the spiral shaft with...before inserting new pins and securing with a grease gun once a season. If the auger should strike a foreign object or ice jam, the snow thrower is equipped with grease once a season (order part number 737-0168). Place the shift lever in the cable. 4. Replace the pins if needed...
930 SWE Operator's Manual
Page 17
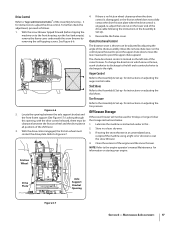
...manual Maintenance for instructions to adjust the drive control. Store in all positions of the shift lever. 3. If storing the snow thrower in which snow is located on the left and counterclockwise to discharge to Figure 6-7. 4. Drive Control Refer to "Auger and Drive Control ...information on storing your engine. Reassemble the frame cover. Lubricate the machine as follows: 1. See Figure 6-6. Off-Season Storage If the snow thrower will not be adjusted by removing the self-tapping screws. Maintenance & Adjustments 17 Locate the opening , with the drive control released, ...
...manual Maintenance for instructions to adjust the drive control. Store in all positions of the shift lever. 3. If storing the snow thrower in which snow is located on the left and counterclockwise to discharge to Figure 6-7. 4. Drive Control Refer to "Auger and Drive Control ...information on storing your engine. Reassemble the frame cover. Lubricate the machine as follows: 1. See Figure 6-6. Off-Season Storage If the snow thrower will not be adjusted by removing the self-tapping screws. Maintenance & Adjustments 17 Locate the opening , with the drive control released, ...
930 SWE Operator's Manual
Page 18
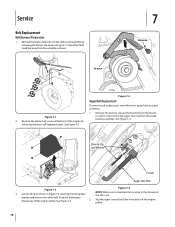
See Figure 7-4. Move the chute crank rod away from the assembly as follows: 1. Figure 7-3 Auger Belt Replacement To remove and replace your snow thrower's auger belt, proceed as shown. Bow-tie Clip and Washer Ferrule Auger Idler Rod Figure 7-4 Figure 7-2 NOTE: Make sure to disconnect the auger idler rod ...
See Figure 7-4. Move the chute crank rod away from the assembly as follows: 1. Figure 7-3 Auger Belt Replacement To remove and replace your snow thrower's auger belt, proceed as shown. Bow-tie Clip and Washer Ferrule Auger Idler Rod Figure 7-4 Figure 7-2 NOTE: Make sure to disconnect the auger idler rod ...
930 SWE Operator's Manual
Page 20
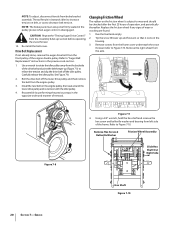
...7-9). Remove screws from the axle. 3 1b 1a 2 Figure 7-8 Figure 7-9 4. Remove the right wheel from the frame cover underneath the snow thrower (refer to increase tension on the engine pulley, then seat around the lower drive pulley and re-tension with the idler pulley. 4. Remove... pulley groove when auger control is disengaged. NOTE: To adjust, disconnect ferrule from the Assembly & Set-up section before operating the snow thrower. 14. CAUTION: Repeat the "Testing Auger Drive Control" from brake bracket assembly. Carefully release the idler pulley. Changing Friction Wheel ...
...7-9). Remove screws from the axle. 3 1b 1a 2 Figure 7-8 Figure 7-9 4. Remove the right wheel from the frame cover underneath the snow thrower (refer to increase tension on the engine pulley, then seat around the lower drive pulley and re-tension with the idler pulley. 4. Remove... pulley groove when auger control is disengaged. NOTE: To adjust, disconnect ferrule from the Assembly & Set-up section before operating the snow thrower. 14. CAUTION: Repeat the "Testing Auger Drive Control" from brake bracket assembly. Carefully release the idler pulley. Changing Friction Wheel ...

930 SWE Operator's Manual
Page 21
... the hex hub of the small sprocket, and slide the shaft through the friction wheel of the frame and to 6-9 ft.-lbs. Pivot the snow thrower down to Figure 7-11. 9. tightening the four screws in the frame. 14. Figure 7-12 Section 7 - NOTE: If the sprocket fell ...assemble the friction wheel symmetrically for proper functioning. Slide the bearing onto the left side the frame. 15. Insert the pin from the snow thrower chain while 6. Place the belleville washer (rounded side toward the friction wheel and place the sprocket in position. Reassemble the new friction ...
... the hex hub of the small sprocket, and slide the shaft through the friction wheel of the frame and to 6-9 ft.-lbs. Pivot the snow thrower down to Figure 7-11. 9. tightening the four screws in the frame. 14. Figure 7-12 Section 7 - NOTE: If the sprocket fell ...assemble the friction wheel symmetrically for proper functioning. Slide the bearing onto the left side the frame. 15. Insert the pin from the snow thrower chain while 6. Place the belleville washer (rounded side toward the friction wheel and place the sprocket in position. Reassemble the new friction ...

930 SWE Operator's Manual
Page 22
...days need to distribute the oil. If the gasoline in fuel system or on stabilizer container. Avoid any areas that operates with the snow thrower. 3. To prevent this, treat the fuel system using a fuel stabilizer. Always follow mix ratio found on essential carburetor parts. ... stabilizer (such as a furnace, water heater, or clothes dryer. Never use engine or carburetor cleaning products in storage. Service Never store snow thrower with fuel in tank indoors or in minimizing the formation of oil on a furnace, water heater, clothes dryer or gas appliance. Follow ...
...days need to distribute the oil. If the gasoline in fuel system or on stabilizer container. Avoid any areas that operates with the snow thrower. 3. To prevent this, treat the fuel system using a fuel stabilizer. Always follow mix ratio found on essential carburetor parts. ... stabilizer (such as a furnace, water heater, or clothes dryer. Never use engine or carburetor cleaning products in storage. Service Never store snow thrower with fuel in tank indoors or in minimizing the formation of oil on a furnace, water heater, clothes dryer or gas appliance. Follow ...


