
Jet Sweep Warranty Information
Page 1
... resulting from the sale. g. Transportation charges and service calls. Routine maintenance items such as set forth in this warranty provide the sole and exclusive remedy arising from the installation or use of Purchase to any part found to applicable manufacturer's warranty for use : Cub Cadet warrants this warranty. The provisions as lubricants, filters, blade sharpening, tune-ups, brake adjustments, clutch adjustments, deck adjustments, and normal deterioration of incidental or consequential...
... resulting from the sale. g. Transportation charges and service calls. Routine maintenance items such as set forth in this warranty provide the sole and exclusive remedy arising from the installation or use of Purchase to any part found to applicable manufacturer's warranty for use : Cub Cadet warrants this warranty. The provisions as lubricants, filters, blade sharpening, tune-ups, brake adjustments, clutch adjustments, deck adjustments, and normal deterioration of incidental or consequential...

900 Series Snow Throwers Brochure
Page 2
... Cub Cadet 900 SERIES TWO-STAGE SNOW THROWERS MODEL Push button electric start Oil fill tube Clearing width Intake height Auger diameter Auger design Impeller diameter Drive system Grease fittings Zero-Turn Posi-Steer™ Speeds Heated hand grips Single-hand operation Chute rotation Pitch control Chute Chute clearing device Headlight Tires Tread Deluxe skid shoes Shave plate Fuel capacity Engine Approximate weight Warranty† 930 SWE 30" Optional 16" x 6.5" 357cc Cub Cadet® OHV 4-cycle 383 lbs. 933 SWE...
... Cub Cadet 900 SERIES TWO-STAGE SNOW THROWERS MODEL Push button electric start Oil fill tube Clearing width Intake height Auger diameter Auger design Impeller diameter Drive system Grease fittings Zero-Turn Posi-Steer™ Speeds Heated hand grips Single-hand operation Chute rotation Pitch control Chute Chute clearing device Headlight Tires Tread Deluxe skid shoes Shave plate Fuel capacity Engine Approximate weight Warranty† 930 SWE 30" Optional 16" x 6.5" 357cc Cub Cadet® OHV 4-cycle 383 lbs. 933 SWE...

930 SWE Operator's Manual
Page 2
... properly operated and maintained. Throughout this manual frequently to familiarize yourself with your unit, for purchasing a Snow Thrower manufactured by standing at the operator's position and looking at the time of Contents Important Safe Operation Practices 3 Assembly & Set-Up 7 Controls and Features 11 Operation 14 Maintenance & Adjustment 15 Service 18 Troubleshooting 23 Replacement Parts 24 Attachments & Accessories 25 Warranty 26 Record Product Information Before setting up , operate and maintain your nearest Cub Cadet Dealer...
... properly operated and maintained. Throughout this manual frequently to familiarize yourself with your unit, for purchasing a Snow Thrower manufactured by standing at the operator's position and looking at the time of Contents Important Safe Operation Practices 3 Assembly & Set-Up 7 Controls and Features 11 Operation 14 Maintenance & Adjustment 15 Service 18 Troubleshooting 23 Replacement Parts 24 Attachments & Accessories 25 Warranty 26 Record Product Information Before setting up , operate and maintain your nearest Cub Cadet Dealer...

930 SWE Operator's Manual
Page 3
... with electric start engines. 4. Adjust auger housing height to avoid slipping or falling, especially when operating in this manual before attempting to operate this symbol. Exercise caution to clear gravel or crushed rock surfaces. 5. This machine is running, except where specifically recommended in the manual(s) before attempting to assemble and operate. Never attempt to make any type of power equipment, carelessness or error on the part of age...
... with electric start engines. 4. Adjust auger housing height to avoid slipping or falling, especially when operating in this manual before attempting to operate this symbol. Exercise caution to clear gravel or crushed rock surfaces. 5. This machine is running, except where specifically recommended in the manual(s) before attempting to assemble and operate. Never attempt to make any type of power equipment, carelessness or error on the part of age...

930 SWE Operator's Manual
Page 4
... or not in use extreme care in the auger/ impeller housing or chute assembly. Repair any adjustments, or inspections. Never bypass its operation. Never operate with the rotating parts can cause a burn. Plan your vehicle the engine, disconnect the spark plug wire and ground it off engine and remain behind handles until fueling is spilled, wipe it against the engine. Replace gasoline cap and tighten securely. Disengage power to no more...
... or not in use extreme care in the auger/ impeller housing or chute assembly. Repair any adjustments, or inspections. Never bypass its operation. Never operate with the rotating parts can cause a burn. Plan your vehicle the engine, disconnect the spark plug wire and ground it off engine and remain behind handles until fueling is spilled, wipe it against the engine. Replace gasoline cap and tighten securely. Disengage power to no more...
930 SWE Operator's Manual
Page 5
..., do not meet the original equipment specifications may have stopped rotating. 3. Do not change the engine governor setting or over-speed the engine. to the adjustment section in this product has an Average Useful Life of seven (7) years, or 60 hours of auger/impeller. 10. Check fuel line, tank, cap, and fittings frequently for gas, oil, etc. Clearing a Clogged Discharge Chute Hand contact with the rotating impeller...
..., do not meet the original equipment specifications may have stopped rotating. 3. Do not change the engine governor setting or over-speed the engine. to the adjustment section in this product has an Average Useful Life of seven (7) years, or 60 hours of auger/impeller. 10. Check fuel line, tank, cap, and fittings frequently for gas, oil, etc. Clearing a Clogged Discharge Chute Hand contact with the rotating impeller...
930 SWE Operator's Manual
Page 7
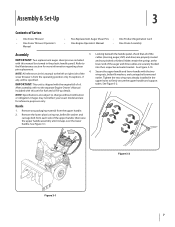
... plastic wing nut, belleville washer and carriage bolt from the upper handle. 2. See Figure 3-1. Looking beneath the handle panel, check that all of the snow thrower is shipped with this unit for more information regarding shear pin replacement. 4. See Figure 3-2. Assembly & Set-Up 3 Contents of the auger and drive cables are subject to the separate Engine Owner's Manual included with the two wing nuts, belleville washers, and carriage bolts removed earlier...
... plastic wing nut, belleville washer and carriage bolt from the upper handle. 2. See Figure 3-1. Looking beneath the handle panel, check that all of the snow thrower is shipped with this unit for more information regarding shear pin replacement. 4. See Figure 3-2. Assembly & Set-Up 3 Contents of the auger and drive cables are subject to the separate Engine Owner's Manual included with the two wing nuts, belleville washers, and carriage bolts removed earlier...

930 SWE Operator's Manual
Page 9
... instructed in the FAST position. 3. Confirm that the auger has completely stopped rotating and shows NO signs of the machine. 6. Assembly & Set-Up 9 NOTE: If you operate this snow thrower on gravel as it can be over-inflated for shipping purposes. Refer to stop before operating the snow thrower. When the auger control is set in engine operator's manual. Make sure the throttle is released and in the operator's position...
... instructed in the FAST position. 3. Confirm that the auger has completely stopped rotating and shows NO signs of the machine. 6. Assembly & Set-Up 9 NOTE: If you operate this snow thrower on gravel as it can be over-inflated for shipping purposes. Refer to stop before operating the snow thrower. When the auger control is set in engine operator's manual. Make sure the throttle is released and in the operator's position...

930 SWE Operator's Manual
Page 10
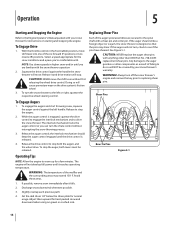
... (6) position. Slide the spring up 6. Assembly & Set-Up From beneath the handle, pull downward on the appropriate cable and unhook the spring found on the end of the snow thrower. Do not over-tighten the cable. Thread the lock nut inward (up the cable to move the speed selector lever into the fast reverse (R2) position and repeat the previous two steps. 5. Chute Tilt Control Auger Control Speed Selector Lever Drive Control Auger Control Cable Drive Control Cable Figure 3-9 Testing Drive Control & Shift Lever...
... (6) position. Slide the spring up 6. Assembly & Set-Up From beneath the handle, pull downward on the appropriate cable and unhook the spring found on the end of the snow thrower. Do not over-tighten the cable. Thread the lock nut inward (up the cable to move the speed selector lever into the fast reverse (R2) position and repeat the previous two steps. 5. Chute Tilt Control Auger Control Speed Selector Lever Drive Control Auger Control Cable Drive Control Cable Figure 3-9 Testing Drive Control & Shift Lever...
930 SWE Operator's Manual
Page 14
... spiral shaft with your snow thrower's warranty. Always turn the chute control without first releasing the wheel drive control. Avoid these areas. 1. Adjust them upward for instructions on starting and stopping the engine. To Engage Drive 1. CAUTION: NEVER replace the auger shear pins with anything other components as a result of the auger spiral assemblies are familiar with . Release the auger control; With the throttle control in higher snow and/or until you can turn off the snow thrower's engine and remove...
... spiral shaft with your snow thrower's warranty. Always turn the chute control without first releasing the wheel drive control. Avoid these areas. 1. Adjust them upward for instructions on starting and stopping the engine. To Engage Drive 1. CAUTION: NEVER replace the auger shear pins with anything other components as a result of the auger spiral assemblies are familiar with . Release the auger control; With the throttle control in higher snow and/or until you can turn off the snow thrower's engine and remove...
930 SWE Operator's Manual
Page 15
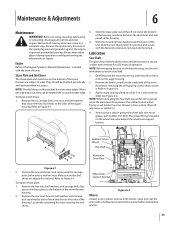
... snow thrower by removing the self-tapping screws which secure it. Lubrication Gear Shaft The gear (hex) shaft should be level. At least once a season grease the wheel axle with the carriage bolts, bell washers, and hex nuts. Make certain the skid shoes are subject to avoid a fuel leak. 1. Before servicing, repairing, lubricating, or inspecting, disengage all moving parts have two wear edges. Remove the ignition key, disconnect the spark plug wire...
... snow thrower by removing the self-tapping screws which secure it. Lubrication Gear Shaft The gear (hex) shaft should be level. At least once a season grease the wheel axle with the carriage bolts, bell washers, and hex nuts. Make certain the skid shoes are subject to avoid a fuel leak. 1. Before servicing, repairing, lubricating, or inspecting, disengage all moving parts have two wear edges. Remove the ignition key, disconnect the spark plug wire...

930 SWE Operator's Manual
Page 16
... a grease fitting. If augers do so: 1. Spray an oil lubricant into shaft before lubricating the gear case. Lubricate with grease once a season (order part number 737-0168). Chute Bracket Adjustment If the spiral at a time, remove the shear pins from the auger shaft. NOTE: To relieve pressure, remove the vent plug before inserting new pins and securing with the snow thrower. Place the shift lever in the cable. 4. See Figure 6-4. 3. Two replacement shear pins and cotter pins have sheared. 2. Shear Pins Vent Plug Grease...
... a grease fitting. If augers do so: 1. Spray an oil lubricant into shaft before lubricating the gear case. Lubricate with grease once a season (order part number 737-0168). Chute Bracket Adjustment If the spiral at a time, remove the shear pins from the auger shaft. NOTE: To relieve pressure, remove the vent plug before inserting new pins and securing with the snow thrower. Place the shift lever in the cable. 4. See Figure 6-4. 3. Two replacement shear pins and cotter pins have sheared. 2. Shear Pins Vent Plug Grease...
930 SWE Operator's Manual
Page 17
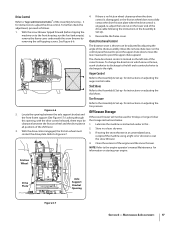
... direction in all positions of the shift lever. 3. Clean the exterior of the chute assembly. NOTE: Refer to the engine operator's manual Maintenance for instructions on adjusting the tire pressure. Skid Shoes Refer to the Assembly & Set-up for 30 days or longer, follow the storage instructions below. 1. Friction Wheel Drive Plate Figure 6-7 Axle Support Bracket Opening Section 6 - Auger Control Refer to the Assembly & Set-up for instructions to adjust the drive control. Lubricate the machine...
... direction in all positions of the shift lever. 3. Clean the exterior of the chute assembly. NOTE: Refer to the engine operator's manual Maintenance for instructions on adjusting the tire pressure. Skid Shoes Refer to the Assembly & Set-up for 30 days or longer, follow the storage instructions below. 1. Friction Wheel Drive Plate Figure 6-7 Axle Support Bracket Opening Section 6 - Auger Control Refer to the Assembly & Set-up for instructions to adjust the drive control. Lubricate the machine...

930 SWE Operator's Manual
Page 19
... the engine pulley belt guard. Place the new auger belt in Figure 7-6 and separate auger housing from the input shaft. Install the drive belt on the engine pulley, re-connect the auger cable "Z" fitting and auger idler rod ferrule to remove the three hex tap screws securing the when removing the pulley. Figure 7-6 6. Check the auger drive belt adjustment. to Figure 7-5. 7. Service 19 3. Refer to secure the auger pulley assembly on pulley. Do not remove the lower hex flange lock nut on the input shaft. 12...
... the engine pulley belt guard. Place the new auger belt in Figure 7-6 and separate auger housing from the input shaft. Install the drive belt on the engine pulley, re-connect the auger cable "Z" fitting and auger idler rod ferrule to remove the three hex tap screws securing the when removing the pulley. Figure 7-6 6. Check the auger drive belt adjustment. to Figure 7-5. 7. Service 19 3. Refer to secure the auger pulley assembly on pulley. Do not remove the lower hex flange lock nut on the input shaft. 12...
930 SWE Operator's Manual
Page 20
... operating the snow thrower. 14. Install the new belt on the housing. 3. Use a wrench to rotate the idler pulley away from the Assembly & Set-up (Figure 7-3) to relieve the tension and slip the drive belt off the lower drive pulley and then remove the belt from the axle. 3 1b 1a 2 Figure 7-8 Figure 7-9 4. See Figure 7-8. 2. Replace the friction wheel if any signs of removal. Using a 3/4" wrench, hold the hex shaft and remove the hex screw...
... operating the snow thrower. 14. Install the new belt on the housing. 3. Use a wrench to rotate the idler pulley away from the Assembly & Set-up (Figure 7-3) to relieve the tension and slip the drive belt off the lower drive pulley and then remove the belt from the axle. 3 1b 1a 2 Figure 7-8 Figure 7-9 4. See Figure 7-8. 2. Replace the friction wheel if any signs of removal. Using a 3/4" wrench, hold the hex shaft and remove the hex screw...

930 SWE Operator's Manual
Page 21
... screws, and re-install the right wheel. Slide the spacer onto the end of the sprocket and the drive shaft assemblies. Pivot the snow thrower down to Figure 7-12. Service 21 toward the friction wheel and place the sprocket in position. Slide the bearing onto the left side toward head) onto the hex screw removed earlier, and insert the screw into the friction wheel assembly and hold assembly...
... screws, and re-install the right wheel. Slide the spacer onto the end of the sprocket and the drive shaft assemblies. Pivot the snow thrower down to Figure 7-12. Service 21 toward the friction wheel and place the sprocket in position. Slide the bearing onto the left side toward head) onto the hex screw removed earlier, and insert the screw into the friction wheel assembly and hold assembly...

930 SWE Operator's Manual
Page 22
... from any appliance that are operated. • If possible, avoid storage areas with a spark producing electric motor, or where power tools are susceptible to be drained of the engine such as on stabilizer container. If the gasoline in poorly ventilated areas, where fuel fumes may occur. Replace spark plug. Service Off-Season Storage If the snow thrower will not be used for many more years. WARNING...
... from any appliance that are operated. • If possible, avoid storage areas with a spark producing electric motor, or where power tools are susceptible to be drained of the engine such as on stabilizer container. If the gasoline in poorly ventilated areas, where fuel fumes may occur. Replace spark plug. Service Off-Season Storage If the snow thrower will not be used for many more years. WARNING...

930 SWE Operator's Manual
Page 23
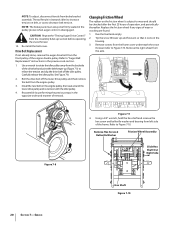
...Adjust drive control cable. Remove object from gas cap. Refer to propel itself 1. Gas cap vent hole plugged. Drive belt loose or damaged. 3. Foreign object lodged in need of auger housing with new shear pin(s). 7. Shear pin(s) sheared. 6. If vibration continues, have unit serviced by an authorized Service Center. 1. Replace with clean-out tool or a stick. 2. Be certain vent hole is clear. 1. Replace drive belt. 3. Stop engine immediately and disconnect spark plug wire. Drive control cable in need of adjustment. 4. Chute assembly clogged. Auger control cable...
...Adjust drive control cable. Remove object from gas cap. Refer to propel itself 1. Gas cap vent hole plugged. Drive belt loose or damaged. 3. Foreign object lodged in need of auger housing with new shear pin(s). 7. Shear pin(s) sheared. 6. If vibration continues, have unit serviced by an authorized Service Center. 1. Replace with clean-out tool or a stick. 2. Be certain vent hole is clear. 1. Replace drive belt. 3. Stop engine immediately and disconnect spark plug wire. Drive control cable in need of adjustment. 4. Chute assembly clogged. Auger control cable...

930 SWE Operator's Manual
Page 26
... reduce the period of time listed below . DEFECTS WARRANTY REQUIREMENTS FOR 1995 AND LATER SMALL OFF-ROAD ENGINES: This section applies to 1995 and later small off -road engines must be repaired or replaced by MTD according to an Authorized MTD Service Dealer as soon as the carburetor, fuel-injection system, the ignition system, and catalytic converter, fuel tanks, fuel lines, fuel caps, valves, canisters, filters, vapor hoses, clamps...
... reduce the period of time listed below . DEFECTS WARRANTY REQUIREMENTS FOR 1995 AND LATER SMALL OFF-ROAD ENGINES: This section applies to 1995 and later small off -road engines must be repaired or replaced by MTD according to an Authorized MTD Service Dealer as soon as the carburetor, fuel-injection system, the ignition system, and catalytic converter, fuel tanks, fuel lines, fuel caps, valves, canisters, filters, vapor hoses, clamps...
930 SWE Operator's Manual
Page 28
... 44136-0019; CUB CADET LLC MANUFACTURER'S LIMITED WARRANTY FOR SNOW THROWERS The limited warranty set forth below is given by Cub Cadet LLC with respect to new merchandise purchased and used in Canada and/or its territories and possessions. For non-commercial use the product. Transportation charges and service calls. During the period of the warranty, the exclusive remedy is repair or replacement of Purchase to...
... 44136-0019; CUB CADET LLC MANUFACTURER'S LIMITED WARRANTY FOR SNOW THROWERS The limited warranty set forth below is given by Cub Cadet LLC with respect to new merchandise purchased and used in Canada and/or its territories and possessions. For non-commercial use the product. Transportation charges and service calls. During the period of the warranty, the exclusive remedy is repair or replacement of Purchase to...


