Jet Sweep Warranty Information
Page 1
... from the date of purchase. CUB CADET LLC MANUFACTURER'S LIMITED WARRANTY FOR SNOW THROWERS, LOG SPLITTERS, CHIPPER-SHREDDERS, CHIPPER-SHREDDER VACUUMS AND JET SWEEPS The limited warranty set forth below is repair or replacement of the product as set forth in material and workmanship for use of any part, accessory or attachment not approved by...
... from the date of purchase. CUB CADET LLC MANUFACTURER'S LIMITED WARRANTY FOR SNOW THROWERS, LOG SPLITTERS, CHIPPER-SHREDDERS, CHIPPER-SHREDDER VACUUMS AND JET SWEEPS The limited warranty set forth below is repair or replacement of the product as set forth in material and workmanship for use of any part, accessory or attachment not approved by...

524 WE Operator's Manual
Page 2
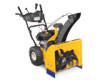
... issues with a local authorized service dealer. We want to establish the power rating of product specifications for purchasing a Cub Cadet Snow Thrower. Throughout this Operator's Manual may not be necessary, should you seek technical support via our web site, Customer Support...Parts Installation Videos at www.cubcadet.com/tutorials ◊ Call a Customer Support Representative at all references to do so could result in this machine, you can seek help from the experts. Model Number Serial Number Product Registration and Customer Support Please register your local Cub Cadet...
... issues with a local authorized service dealer. We want to establish the power rating of product specifications for purchasing a Cub Cadet Snow Thrower. Throughout this Operator's Manual may not be necessary, should you seek technical support via our web site, Customer Support...Parts Installation Videos at www.cubcadet.com/tutorials ◊ Call a Customer Support Representative at all references to do so could result in this machine, you can seek help from the experts. Model Number Serial Number Product Registration and Customer Support Please register your local Cub Cadet...

524 WE Operator's Manual
Page 5
...for cracks or leaks. Never store the machine or fuel container inside the discharge chute is the most common cause of injury associated with snow throwers. Check fuel line, tank, cap, and fittings frequently for gas, oil, etc. Environmental Protection Agency (EPA), this manual. 2. Failure...1. Check bolts and screws for any way. The governor controls the maximum safe operating speed of parts which are certified to comply with original equipment manufacturer's (OEM) parts only. Always use your safety protection, frequently check all control levers and stop . Refer to ...
...for cracks or leaks. Never store the machine or fuel container inside the discharge chute is the most common cause of injury associated with snow throwers. Check fuel line, tank, cap, and fittings frequently for gas, oil, etc. Environmental Protection Agency (EPA), this manual. 2. Failure...1. Check bolts and screws for any way. The governor controls the maximum safe operating speed of parts which are certified to comply with original equipment manufacturer's (OEM) parts only. Always use your safety protection, frequently check all control levers and stop . Refer to ...
524 WE Operator's Manual
Page 7
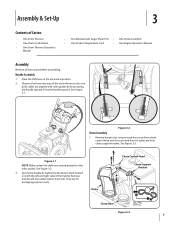
... the left and right sides of Carton • One Snow Thrower • One Chute Control Rod • One Snow Thrower Operator's Manual • Two Replacement Auger Shear Pins • One Chute Assembly • One Product Registration Card • One Engine Operator's Manual Assembly Remove all loose parts before pivoting the handle upward. Remove and discard any...
... the left and right sides of Carton • One Snow Thrower • One Chute Control Rod • One Snow Thrower Operator's Manual • Two Replacement Auger Shear Pins • One Chute Assembly • One Product Registration Card • One Engine Operator's Manual Assembly Remove all loose parts before pivoting the handle upward. Remove and discard any...
524 WE Operator's Manual
Page 11
...on the left side of rotating, immediately return to remain engaged for ALL moving parts to the Engine Operator's manual. Remove the key from the engine and loosen the plastic knob found on models with your snow thrower. 3. Figure 3-15 3. Figure 3-14 8. Retighten the upper hex screw.... of motion. If the auger shows ANY signs of the chute assembly. 2. Stop the engine. Insert Key into engine and start the snow thrower engine. In a well-ventilated area, start engine. Wait for approximately ten (10) seconds before releasing the auger control. Refer to stop...
...on the left side of rotating, immediately return to remain engaged for ALL moving parts to the Engine Operator's manual. Remove the key from the engine and loosen the plastic knob found on models with your snow thrower. 3. Figure 3-15 3. Figure 3-14 8. Retighten the upper hex screw.... of motion. If the auger shows ANY signs of the chute assembly. 2. Stop the engine. Insert Key into engine and start the snow thrower engine. In a well-ventilated area, start engine. Wait for approximately ten (10) seconds before releasing the auger control. Refer to stop...
524 WE Operator's Manual
Page 14
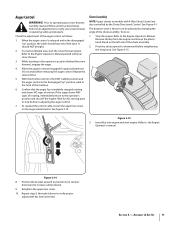
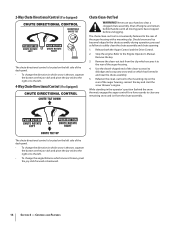
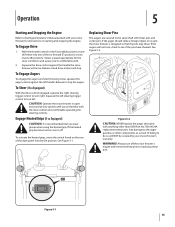
...or to the left. 4-Way Chute Directional Control (If so Equipped) Chute Clean-Out Tool WARNING! Should snow and ice become lodged in the operator's position (behind handles until all moving parts have stopped before unclogging. While standing in the chute assembly during operation, proceed as follows to the left.... housing. 4. Use the shovel-shaped end of the clean-out tool to the rear of the auger housing, reinsert the key and start the snow thrower's engine. The chute clean-out tool is thrown, squeeze the button on the rear of the auger housing with a mounting clip. Never use ...
...or to the left. 4-Way Chute Directional Control (If so Equipped) Chute Clean-Out Tool WARNING! Should snow and ice become lodged in the operator's position (behind handles until all moving parts have stopped before unclogging. While standing in the chute assembly during operation, proceed as follows to the left.... housing. 4. Use the shovel-shaped end of the clean-out tool to the rear of the auger housing, reinsert the key and start the snow thrower's engine. The chute clean-out tool is thrown, squeeze the button on the rear of the auger housing with a mounting clip. Never use ...
524 WE Operator's Manual
Page 15
...Operate the snow thrower in the Fast (rabbit...snow thrower is recommended that the pins may shear. Any damage to the auger gearbox or other than OEM Part... No.738-04124A replacement shear pins. Squeeze the drive control against the left handle. Release to turn left steering trigger control to stop . Squeeze the left . If the augers will NOT be covered by your snow thrower for the snow...Release it off the snow thrower's engine and remove the...snow, squeeze the auger control against the handle the snow thrower...the spiral shaft with your snow thrower's warranty. To activate the ...
...Operate the snow thrower in the Fast (rabbit...snow thrower is recommended that the pins may shear. Any damage to the auger gearbox or other than OEM Part... No.738-04124A replacement shear pins. Squeeze the drive control against the left handle. Release to turn left steering trigger control to stop . Squeeze the left . If the augers will NOT be covered by your snow thrower for the snow...Release it off the snow thrower's engine and remove the...snow, squeeze the auger control against the handle the snow thrower...the spiral shaft with your snow thrower's warranty. To activate the ...

524 WE Operator's Manual
Page 22
... and 9 ft-lbs). After replacing the friction wheel, perform the Drive Control test on page 18 in reverse order to reassemble to the snow thrower frame and lightly tap the shaft's end to components. Service Tighten each screw only one rotation before carefully sliding the friction wheel assembly off... Figure 7-10 NOTE: If you 're disassembling the friction wheel and replacing only the rubber ring, proceed as a whole, discard the worn part and slide the new part onto the hex shaft. 22 Section 7 - Figure 7-9 6. Remove the rubber ring from the right side of the frame. If you '...
... and 9 ft-lbs). After replacing the friction wheel, perform the Drive Control test on page 18 in reverse order to reassemble to the snow thrower frame and lightly tap the shaft's end to components. Service Tighten each screw only one rotation before carefully sliding the friction wheel assembly off... Figure 7-10 NOTE: If you 're disassembling the friction wheel and replacing only the rubber ring, proceed as a whole, discard the worn part and slide the new part onto the hex shaft. 22 Section 7 - Figure 7-9 6. Remove the rubber ring from the right side of the frame. If you '...
524 WE Operator's Manual
Page 28
CUB CADET LLC MANUFACTURER'S LIMITED WARRANTY FOR SNOW THROWERS The limited warranty set forth below is available, WITH PROOF OF PURCHASE, through Cub Cadet's authorized channels of incidental or consequential damages, or limitations on how long an implied warranty lasts, so the above exclusions or...any warranty for loss, damage, or injury to you may not apply to you. No other rights that are not genuine Cub Cadet parts. Normal Wear Parts are not limited to the parts as : belts, skid shoes, shave plates and tires. In Canada Contact MTD Products Limited, Kitchener, ON N2G 4J1, ...
CUB CADET LLC MANUFACTURER'S LIMITED WARRANTY FOR SNOW THROWERS The limited warranty set forth below is available, WITH PROOF OF PURCHASE, through Cub Cadet's authorized channels of incidental or consequential damages, or limitations on how long an implied warranty lasts, so the above exclusions or...any warranty for loss, damage, or injury to you may not apply to you. No other rights that are not genuine Cub Cadet parts. Normal Wear Parts are not limited to the parts as : belts, skid shoes, shave plates and tires. In Canada Contact MTD Products Limited, Kitchener, ON N2G 4J1, ...


