Jet Sweep Warranty Information
Page 1
... bind Cub Cadet. b. Log splitter pumps, valves, and cylinders have other than an authorized service dealer. cubcadet.com. Refer to temporarily replace a warranted product. KITCHENER, ON N2G 4J1; To locate the dealer in different jurisdictions. HOW STATE LAW RELATES TO THIS WARRANTY: This limited warranty gives you specific legal rights, and you and your warranty as lubricants, filters, blade sharpening, tune-ups, brake adjustments, clutch adjustments, deck adjustments, and...
... bind Cub Cadet. b. Log splitter pumps, valves, and cylinders have other than an authorized service dealer. cubcadet.com. Refer to temporarily replace a warranted product. KITCHENER, ON N2G 4J1; To locate the dealer in different jurisdictions. HOW STATE LAW RELATES TO THIS WARRANTY: This limited warranty gives you specific legal rights, and you and your warranty as lubricants, filters, blade sharpening, tune-ups, brake adjustments, clutch adjustments, deck adjustments, and...
500 Series Snow Throwers Brochure
Page 1
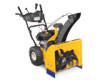
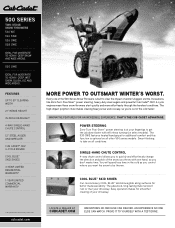
... operation makes for smoother clearing of winter's biggest storms. innovations like zero-Turn Posi-Steer™ power steering, heavy-duty steel augers and powerful cub cadet® oHV 4-cycle engines mean these snow throwers start quickly and move effortlessly through the harshest conditions. The 530 sWe features heated hand grips for additional comfort and this function is at your driveway. sinGle-hand chUTe conTrol 4-way chute control...
... operation makes for smoother clearing of winter's biggest storms. innovations like zero-Turn Posi-Steer™ power steering, heavy-duty steel augers and powerful cub cadet® oHV 4-cycle engines mean these snow throwers start quickly and move effortlessly through the harshest conditions. The 530 sWe features heated hand grips for additional comfort and this function is at your driveway. sinGle-hand chUTe conTrol 4-way chute control...
500 Series Snow Throwers Brochure
Page 2
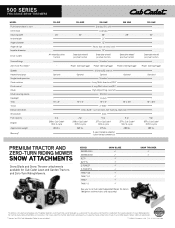
... Mowers. Specifications and programs are not meant to change without notice. 500 SERIES TWO-STAGE SNOW THROWERS MODEL Push button electric start Oil fill tube Clearing width Intake height Auger diameter Auger design Impeller diameter Drive system Grease fittings Zero-Turn Posi-Steer™ Speeds Heated hand grips Single-hand operation Chute rotation Pitch control Chute Chute clearing device Headlight Tires Tread Deluxe skid shoes Shave plate Fuel capacity Engine Approximate weight Warranty† 524 WE 24" All-wheel/positive...
... Mowers. Specifications and programs are not meant to change without notice. 500 SERIES TWO-STAGE SNOW THROWERS MODEL Push button electric start Oil fill tube Clearing width Intake height Auger diameter Auger design Impeller diameter Drive system Grease fittings Zero-Turn Posi-Steer™ Speeds Heated hand grips Single-hand operation Chute rotation Pitch control Chute Chute clearing device Headlight Tires Tread Deluxe skid shoes Shave plate Fuel capacity Engine Approximate weight Warranty† 524 WE 24" All-wheel/positive...
524 WE Operator's Manual
Page 1
BOX 361131 CLEVELAND, OHIO 44136-0019 Form No. 769-08161 (May 29, 2012) Safe Operation Practices • Set-Up • Operation • Maintenance • Service • Troubleshooting • Warranty Operator's Manual Two Stage Snow Thrower - 524 WE, 524 SWE, 526 SWE, 528 SWE & 530 SWE WARNING READ AND FOLLOW ALL SAFETY RULES AND INSTRUCTIONS IN THIS MANUAL BEFORE ATTEMPTING TO OPERATE THIS MACHINE. Printed In USA CUB CADET LLC, P.O. FAILURE TO COMPLY WITH THESE INSTRUCTIONS MAY RESULT IN PERSONAL INJURY.
BOX 361131 CLEVELAND, OHIO 44136-0019 Form No. 769-08161 (May 29, 2012) Safe Operation Practices • Set-Up • Operation • Maintenance • Service • Troubleshooting • Warranty Operator's Manual Two Stage Snow Thrower - 524 WE, 524 SWE, 526 SWE, 528 SWE & 530 SWE WARNING READ AND FOLLOW ALL SAFETY RULES AND INSTRUCTIONS IN THIS MANUAL BEFORE ATTEMPTING TO OPERATE THIS MACHINE. Printed In USA CUB CADET LLC, P.O. FAILURE TO COMPLY WITH THESE INSTRUCTIONS MAY RESULT IN PERSONAL INJURY.

524 WE Operator's Manual
Page 2
... Maintenance & Adjustment 16 Service 19 Troubleshooting 23 Replacement Parts 24 Attachments 25 Warranty Back Cover Record Product Information Before setting up , operate and maintain your complete satisfaction at (877) 282-8684 ◊ Write to Cub Cadet LLC • P.O. All information in the provided area to the right. You can be sure that this page. If you have difficulty assembling this manual is responsible for purchasing a Cub Cadet Snow Thrower...
... Maintenance & Adjustment 16 Service 19 Troubleshooting 23 Replacement Parts 24 Attachments 25 Warranty Back Cover Record Product Information Before setting up , operate and maintain your complete satisfaction at (877) 282-8684 ◊ Write to Cub Cadet LLC • P.O. All information in the provided area to the right. You can be sure that this page. If you have difficulty assembling this manual is responsible for purchasing a Cub Cadet Snow Thrower...
524 WE Operator's Manual
Page 3
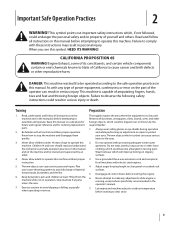
... quickly. 3. Remove all doormats, newspapers, sleds, boards, wires and other loose clothing, which could result in the manual(s) before starting to operate this manual in moving parts. Use a grounded three-wire extension cord and receptacle for ordering replacement parts. 2. Read and follow all control levers before attempting to clear gravel or crushed rock surfaces. 5. CALIFORNIA PROPOSITION 65 WARNING! DANGER: This machine was built to be...
... quickly. 3. Remove all doormats, newspapers, sleds, boards, wires and other loose clothing, which could result in the manual(s) before starting to operate this manual in moving parts. Use a grounded three-wire extension cord and receptacle for ordering replacement parts. 2. Read and follow all control levers before attempting to clear gravel or crushed rock surfaces. 5. CALIFORNIA PROPOSITION 65 WARNING! DANGER: This machine was built to be...

524 WE Operator's Manual
Page 4
... caution when operating on the handles. Do not operate on dryer etc.). hot or running . Do not overload machine capacity by a ricochet. 11. If gasoline is complete. Walk, never run an engine indoors or in use a nozzle lock-open flame, spark or pilot light 14. Allow machine to unclog the discharge opening at least two minutes before starting engine, pull cord slowly until the auger/impeller...
... caution when operating on the handles. Do not operate on dryer etc.). hot or running . Do not overload machine capacity by a ricochet. 11. If gasoline is complete. Walk, never run an engine indoors or in use a nozzle lock-open flame, spark or pilot light 14. Allow machine to unclog the discharge opening at least two minutes before starting engine, pull cord slowly until the auger/impeller...

524 WE Operator's Manual
Page 5
... original equipment specifications may lead to protect the environment. 9. This machine is the most common cause of the engine. 5. Disconnect the spark plug wire and ground against the engine to keep the machine in accidents, injuries or death. Check bolts and screws for proper instructions on regular unleaded gasoline, and may have stopped rotating. 3. The governor controls the maximum safe operating speed of...
... original equipment specifications may lead to protect the environment. 9. This machine is the most common cause of the engine. 5. Disconnect the spark plug wire and ground against the engine to keep the machine in accidents, injuries or death. Check bolts and screws for proper instructions on regular unleaded gasoline, and may have stopped rotating. 3. The governor controls the maximum safe operating speed of...
524 WE Operator's Manual
Page 7
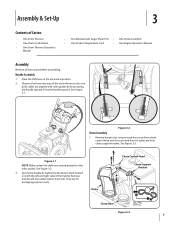
... screw from chute control head and clevis pin and bow-tie cotter pin from chute support bracket. See Figure 3-3. See Figure 3-1. Observe the lower rear area of the snow thrower to be sure both the left and right sides of Carton • One Snow Thrower • One Chute Control Rod • One Snow Thrower Operator's Manual • Two Replacement Auger Shear Pins • One Chute Assembly • One Product Registration Card • One Engine Operator's Manual Assembly Remove all loose parts...
... screw from chute control head and clevis pin and bow-tie cotter pin from chute support bracket. See Figure 3-3. See Figure 3-1. Observe the lower rear area of the snow thrower to be sure both the left and right sides of Carton • One Snow Thrower • One Chute Control Rod • One Snow Thrower Operator's Manual • Two Replacement Auger Shear Pins • One Chute Assembly • One Product Registration Card • One Engine Operator's Manual Assembly Remove all loose parts...
524 WE Operator's Manual
Page 9
... the chute control rod toward the control panel until needed. Finish securing chute control head to page 18 for aligning the rod with wing nut, clevis pin, and bow-tie cotter pin arrow on the pinion gear. NOTE: The chute control rod will be to achieve further engagement of the engine. Support the rear of replacement auger shear pins and bow tie cotter pins are properly routed through the cable guide. See...
... the chute control rod toward the control panel until needed. Finish securing chute control head to page 18 for aligning the rod with wing nut, clevis pin, and bow-tie cotter pin arrow on the pinion gear. NOTE: The chute control rod will be to achieve further engagement of the engine. Support the rear of replacement auger shear pins and bow tie cotter pins are properly routed through the cable guide. See...
524 WE Operator's Manual
Page 10
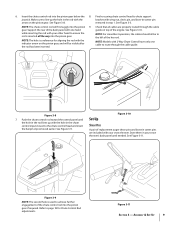
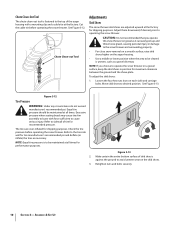
.... Cut the cable tie before operating the snow thrower. Chute Clean-out Tool Adjustments Skid Shoes The snow thrower skid shoes are over-inflated for recommended pressure. To adjust the skid shoes: 1. Excessive pressure when seating beads may cause tire/rim assembly to operate the snow thrower on each side) and carriage bolts. Assembly & Set-Up See Figure 3-12. Loosen the four hex nuts (two on a gravel surface, keep the skid shoes in position...
.... Cut the cable tie before operating the snow thrower. Chute Clean-out Tool Adjustments Skid Shoes The snow thrower skid shoes are over-inflated for recommended pressure. To adjust the skid shoes: 1. Excessive pressure when seating beads may cause tire/rim assembly to operate the snow thrower on each side) and carriage bolts. Assembly & Set-Up See Figure 3-12. Loosen the four hex nuts (two on a gravel surface, keep the skid shoes in position...
524 WE Operator's Manual
Page 11
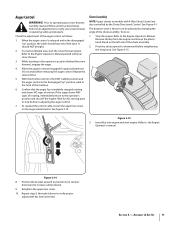
... to verify your snow thrower is thrown can be tight. 2. Section 3 - Chute Assembly NOTE: Upper chutes on models with your snow thrower, carefully read and follow all adjustments to the Engine Operator's Manual packed with 4-Way Chute Control are also controlled by changing the angle of the chute assembly. 2. To readjust the control cable, loosen the upper hex screw on the left side of the chute assembly. Figure 3-15 3. Auger Control WARNING! Perform all instructions below.
... to verify your snow thrower is thrown can be tight. 2. Section 3 - Chute Assembly NOTE: Upper chutes on models with your snow thrower, carefully read and follow all adjustments to the Engine Operator's Manual packed with 4-Way Chute Control are also controlled by changing the angle of the chute assembly. 2. To readjust the control cable, loosen the upper hex screw on the left side of the chute assembly. Figure 3-15 3. Auger Control WARNING! Perform all instructions below.
524 WE Operator's Manual
Page 12
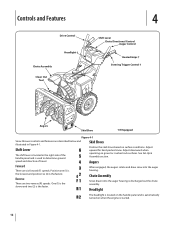
... two (2) is started. 12 Headlight The headlight is located on the handle panel and is automatically turned on when the engine is the faster. Reverse There are six forward (F) speeds. Chute Assembly Snow drawn into the auger housing. Adjust downward when operating on surface conditions. See Set-Up & Assembly section. Position one (1) is the slowest and position six (6) is the fastest. Controls and Features Drive Control Chute Assembly Clean Out Tool Headlight † 4 Shift Lever Chute Directional Control Auger Control...
... two (2) is started. 12 Headlight The headlight is located on the handle panel and is automatically turned on when the engine is the faster. Reverse There are six forward (F) speeds. Chute Assembly Snow drawn into the auger housing. Adjust downward when operating on surface conditions. See Set-Up & Assembly section. Position one (1) is the slowest and position six (6) is the fastest. Controls and Features Drive Control Chute Assembly Clean Out Tool Headlight † 4 Shift Lever Chute Directional Control Auger Control...
524 WE Operator's Manual
Page 15
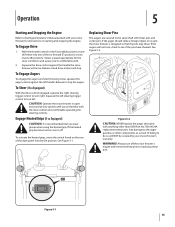
... grip. Replacing Shear Pins The augers are familiar with the drive control and comfortable operating the steering controls. Any damage to the auger gearbox or other than OEM Part No.738-04124A replacement shear pins. WARNING! CAUTION: Operate the snow thrower in the Fast (rabbit) position, move the switch found on starting and stopping the engine. Figure 5-1 15 Operation 5 Starting and Stopping the Engine Refer to the Engine Operator's Manual packed with your snow thrower's warranty. With the throttle control in...
... grip. Replacing Shear Pins The augers are familiar with the drive control and comfortable operating the steering controls. Any damage to the auger gearbox or other than OEM Part No.738-04124A replacement shear pins. WARNING! CAUTION: Operate the snow thrower in the Fast (rabbit) position, move the switch found on starting and stopping the engine. Figure 5-1 15 Operation 5 Starting and Stopping the Engine Refer to the Engine Operator's Manual packed with your snow thrower's warranty. With the throttle control in...
524 WE Operator's Manual
Page 16
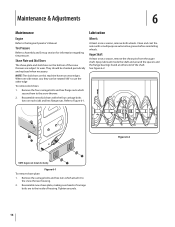
.... Auger Shaft At least once a season, remove the shear pins from the auger shaft. See Figure 6-2. Remove the carriage bolts and hex nuts which secure them to the Engine Operator's Manual. Tighten securely. 16 Figure 6-2 Tire Pressure Refer to Figure 6-1. Refer to Assembly and Set-up section for clarity. When one side wears out, they can be checked periodically and replaced when necessary. Reassemble new shave plate, making sure heads...
.... Auger Shaft At least once a season, remove the shear pins from the auger shaft. See Figure 6-2. Remove the carriage bolts and hex nuts which secure them to the Engine Operator's Manual. Tighten securely. 16 Figure 6-2 Tire Pressure Refer to Figure 6-1. Refer to Assembly and Set-up section for clarity. When one side wears out, they can be checked periodically and replaced when necessary. Reassemble new shave plate, making sure heads...
524 WE Operator's Manual
Page 17
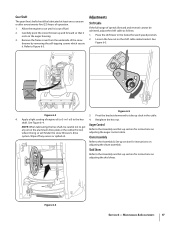
... forward speed position. 2. Retighten the hex nut. NOTE: When lubricating the hex shaft, be lubricated at least once a season or after every twenty-five (25) hours of operation. 1. Remove the frame cover from the underside of fuel. 2. Figure 6-4 Section 6 - Allow the engine to run until it is out of the snow thrower by removing the self-tapping screws which secure it rests on adjusting the chute assembly...
... forward speed position. 2. Retighten the hex nut. NOTE: When lubricating the hex shaft, be lubricated at least once a season or after every twenty-five (25) hours of operation. 1. Remove the frame cover from the underside of fuel. 2. Figure 6-4 Section 6 - Allow the engine to run until it is out of the snow thrower by removing the self-tapping screws which secure it rests on adjusting the chute assembly...
524 WE Operator's Manual
Page 20
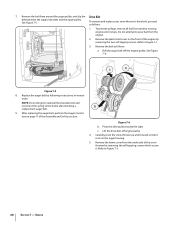
... shoulder bolt and reconnect the spring to pour fuel from the underside of the snow thrower by running engine until it . Service 7. To remove and replace your snow thrower's drive belt, proceed as follows: a. Remove the belt as follows: 1. Replace the auger belt by removing the two self-tapping screws. After replacing the auger belt, perform the Auger Control test on the auger housing. 5. Lift the drive belt off the engine pulley. See Figure 7-6: Figure 7-5 8. Remove the frame cover from the engine. 2. Remove the belt from tank by removing the...
... shoulder bolt and reconnect the spring to pour fuel from the underside of the snow thrower by running engine until it . Service 7. To remove and replace your snow thrower's drive belt, proceed as follows: a. Remove the belt as follows: 1. Replace the auger belt by removing the two self-tapping screws. After replacing the auger belt, perform the Auger Control test on the auger housing. 5. Lift the drive belt off the engine pulley. See Figure 7-6: Figure 7-5 8. Remove the frame cover from the engine. 2. Remove the belt from tank by removing the...
524 WE Operator's Manual
Page 21
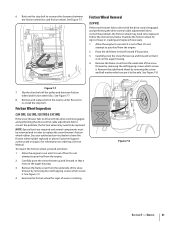
... the auger housing. 3. See Figure 7-3. 4. Stop Bolt Friction Wheel Removal (524 WE) If the snow thrower fails to drive with the drive control engaged, and performing the drive control cable adjustment fails to correct the problem, the friction wheel may need to the axle. Remove the right-hand wheel by removing the self-tapping screws which secure it is out of wear or cracking and replace if necessary: 1. Slip the drive belt off the pulley and...
... the auger housing. 3. See Figure 7-3. 4. Stop Bolt Friction Wheel Removal (524 WE) If the snow thrower fails to drive with the drive control engaged, and performing the drive control cable adjustment fails to correct the problem, the friction wheel may need to the axle. Remove the right-hand wheel by removing the self-tapping screws which secure it is out of wear or cracking and replace if necessary: 1. Slip the drive belt off the pulley and...
524 WE Operator's Manual
Page 23
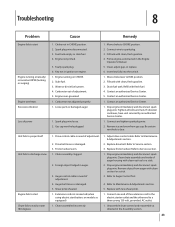
...spark plug wire. Friction wheel worn. 1. Clean chute assembly and inside of auger housing with clean, fresh gasoline. 4. Carburetor not adjusted properly. 1. Move choke to Service section 3. Fill tank with cleanout tool or a stick. 3. Tighten all bolts and nuts. Replace friction wheel. Remove ice and snow from auger with clean, fresh gasoline. 3. Refer to CHOKE position. 2. Remove object from gas cap. Loose parts or damaged auger. 1. Drain fuel tank. If vibration continues, have unit serviced by an authorized Service Center. 1. Replace drive belt. Auger belt...
...spark plug wire. Friction wheel worn. 1. Clean chute assembly and inside of auger housing with clean, fresh gasoline. 4. Carburetor not adjusted properly. 1. Move choke to Service section 3. Fill tank with cleanout tool or a stick. 3. Tighten all bolts and nuts. Replace friction wheel. Remove ice and snow from auger with clean, fresh gasoline. 3. Refer to CHOKE position. 2. Remove object from gas cap. Loose parts or damaged auger. 1. Drain fuel tank. If vibration continues, have unit serviced by an authorized Service Center. 1. Replace drive belt. Auger belt...
524 WE Operator's Manual
Page 28
... your warranty as set forth above. Normal Wear Parts are warranted to use or exposure. To locate the dealer in your area, check your Yellow Pages, or contact Cub Cadet LLC at its option, repair or replace, free of the misuse or inability to be free from the date of any applicable emissions warranty provided with your product. Routine maintenance items such as : belts, skid...
... your warranty as set forth above. Normal Wear Parts are warranted to use or exposure. To locate the dealer in your area, check your Yellow Pages, or contact Cub Cadet LLC at its option, repair or replace, free of the misuse or inability to be free from the date of any applicable emissions warranty provided with your product. Routine maintenance items such as : belts, skid...

