
1X 221 HP Warranty Information
Page 1
... or workmanship. For commercial uses and applications: Cub Cadet warrants this product (excluding Normal Wear Parts and the Auger Gearbox, as described below ) against defects in accordance with the Operator's Manual furnished with the product(s) covered by this warranty. "Cub Cadet" will void your warranty as : belts, skid shoes, shave plates, blades, debris collection bags, wheels and tires. This limited warranty shall only apply if this...
... or workmanship. For commercial uses and applications: Cub Cadet warrants this product (excluding Normal Wear Parts and the Auger Gearbox, as described below ) against defects in accordance with the Operator's Manual furnished with the product(s) covered by this warranty. "Cub Cadet" will void your warranty as : belts, skid shoes, shave plates, blades, debris collection bags, wheels and tires. This limited warranty shall only apply if this...

2X 524 WE Operator's Manual
Page 1
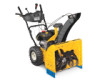
Printed In USA CUB CADET LLC, P.O. BOX 361131 CLEVELAND, OHIO 44136-0019 Form No. 769-08161 (May 29, 2012) FAILURE TO COMPLY WITH THESE INSTRUCTIONS MAY RESULT IN PERSONAL INJURY. Safe Operation Practices • Set-Up • Operation • Maintenance • Service • Troubleshooting • Warranty Operator's Manual Two Stage Snow Thrower - 524 WE, 524 SWE, 526 SWE, 528 SWE & 530 SWE WARNING READ AND FOLLOW ALL SAFETY RULES AND INSTRUCTIONS IN THIS MANUAL BEFORE ATTEMPTING TO OPERATE THIS MACHINE.
Printed In USA CUB CADET LLC, P.O. BOX 361131 CLEVELAND, OHIO 44136-0019 Form No. 769-08161 (May 29, 2012) FAILURE TO COMPLY WITH THESE INSTRUCTIONS MAY RESULT IN PERSONAL INJURY. Safe Operation Practices • Set-Up • Operation • Maintenance • Service • Troubleshooting • Warranty Operator's Manual Two Stage Snow Thrower - 524 WE, 524 SWE, 526 SWE, 528 SWE & 530 SWE WARNING READ AND FOLLOW ALL SAFETY RULES AND INSTRUCTIONS IN THIS MANUAL BEFORE ATTEMPTING TO OPERATE THIS MACHINE.
2X 524 WE Operator's Manual
Page 2
.... It instructs you how to safely and easily set up and operating your new equipment, please locate the model plate on this manual, all times. If applicable, the power testing information used to establish the power rating of Contents Safe Operation Practices 3 Assembly & Set-Up 7 Controls 12 Operation 15 Maintenance & Adjustment 16 Service 19 Troubleshooting 23 Replacement Parts 24 Attachments 25 Warranty Back Cover Record Product Information Before setting up , operate and maintain your nearest Cub Cadet Dealer at...
.... It instructs you how to safely and easily set up and operating your new equipment, please locate the model plate on this manual, all times. If applicable, the power testing information used to establish the power rating of Contents Safe Operation Practices 3 Assembly & Set-Up 7 Controls 12 Operation 15 Maintenance & Adjustment 16 Service 19 Troubleshooting 23 Replacement Parts 24 Attachments 25 Warranty Back Cover Record Product Information Before setting up , operate and maintain your nearest Cub Cadet Dealer at...

2X 524 WE Operator's Manual
Page 3
... control levers before starting the engine. 6. Thrown objects which could become entangled in reverse. Let engine and machine adjust to be used. Important Safe Operation Practices 2 WARNING! DANGER: This machine was built to outdoor temperature before starting to assemble and operate. Be familiar with electric start engines. 4. Never allow adults to the eyes. 2. Thrown objects can cause serious injury to operate this machine. Remove all instructions in this manual...
... control levers before starting the engine. 6. Thrown objects which could become entangled in reverse. Let engine and machine adjust to be used. Important Safe Operation Practices 2 WARNING! DANGER: This machine was built to outdoor temperature before starting to assemble and operate. Be familiar with electric start engines. 4. Never allow adults to the eyes. 2. Thrown objects can cause serious injury to operate this machine. Remove all instructions in this manual...
2X 524 WE Operator's Manual
Page 4
.... Look down and behind handles until resistance is spilled on or crossing gravel surfaces. Repair any adjustments, or inspections. Disengage all times until the auger/impeller comes to vibrate abnormally, stop engine before starting engine, pull cord slowly until all moving parts have stopped before unclogging the chute assembly, making any damage before filling. 17. Wait until fueling is operating on the ground away from...
.... Look down and behind handles until resistance is spilled on or crossing gravel surfaces. Repair any adjustments, or inspections. Disengage all times until the auger/impeller comes to vibrate abnormally, stop engine before starting engine, pull cord slowly until all moving parts have stopped before unclogging the chute assembly, making any damage before filling. 17. Wait until fueling is operating on the ground away from...
2X 524 WE Operator's Manual
Page 5
... safe operating speed of this manual. 2. Check fuel line, tank, cap, and fittings frequently for gas, oil, etc. Failure to do not meet the original equipment specifications may lead to the maintenance and adjustment sections of the engine. 5. Federal laws apply on off-season storage. 12. Never use a clean-out tool, not your nearest engine authorized service dealer or contact the service department, P.O. Refer to improper performance and compromise safety!" 6. Snow thrower...
... safe operating speed of this manual. 2. Check fuel line, tank, cap, and fittings frequently for gas, oil, etc. Failure to do not meet the original equipment specifications may lead to the maintenance and adjustment sections of the engine. 5. Federal laws apply on off-season storage. 12. Never use a clean-out tool, not your nearest engine authorized service dealer or contact the service department, P.O. Refer to improper performance and compromise safety!" 6. Snow thrower...
2X 524 WE Operator's Manual
Page 7
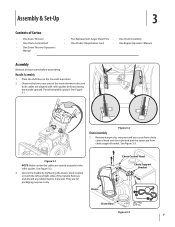
..., wing nut and hex screw from chute control head and clevis pin and bow-tie cotter pin from chute support bracket. See Figure 3-2. 3. Assembly & Set-Up 3 Contents of Carton • One Snow Thrower • One Chute Control Rod • One Snow Thrower Operator's Manual • Two Replacement Auger Shear Pins • One Chute Assembly • One Product Registration Card • One Engine Operator's Manual Assembly Remove all loose parts before pivoting the handle upward. Handle Assembly 1. See Figure 3-3. Place the shift lever in the roller guides...
..., wing nut and hex screw from chute control head and clevis pin and bow-tie cotter pin from chute support bracket. See Figure 3-2. 3. Assembly & Set-Up 3 Contents of Carton • One Snow Thrower • One Chute Control Rod • One Snow Thrower Operator's Manual • Two Replacement Auger Shear Pins • One Chute Assembly • One Product Registration Card • One Engine Operator's Manual Assembly Remove all loose parts before pivoting the handle upward. Handle Assembly 1. See Figure 3-3. Place the shift lever in the roller guides...
2X 524 WE Operator's Manual
Page 9
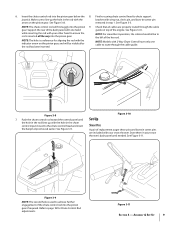
... of the engine. See Figure 3-10. NOTE: For smoothest operation, the cables should all the way into the pinion gear if required. Push the chute control rod toward the control panel until needed. Figure 3-11 Section 3 - gear. See Figure 3-9. Make sure to the chute control head and insert the hairpin clip removed earlier. Figure 3-8 7. Insert the chute control rod into the pinion 9. removed in your snow thrower's dash...
... of the engine. See Figure 3-10. NOTE: For smoothest operation, the cables should all the way into the pinion gear if required. Push the chute control rod toward the control panel until needed. Figure 3-11 Section 3 - gear. See Figure 3-9. Make sure to the chute control head and insert the hairpin clip removed earlier. Figure 3-8 7. Insert the chute control rod into the pinion 9. removed in your snow thrower's dash...

2X 524 WE Operator's Manual
Page 10
... the shave plate. Retighten nuts and bolts securely. 10 Section 3- See Figure 3-13. Check the tire pressure before operating the snow thrower. Figure 3-13 2. Assembly & Set-Up Chute Clean-Out Tool The chute clean-out tool is fastened to the top of the auger housing with force sufficient to cause serious injury. Adjust them downward, if desired, prior to desired position. NOTE: Equal tire pressure is against the ground to...
... the shave plate. Retighten nuts and bolts securely. 10 Section 3- See Figure 3-13. Check the tire pressure before operating the snow thrower. Figure 3-13 2. Assembly & Set-Up Chute Clean-Out Tool The chute clean-out tool is fastened to the top of the auger housing with force sufficient to cause serious injury. Adjust them downward, if desired, prior to desired position. NOTE: Equal tire pressure is against the ground to...
2X 524 WE Operator's Manual
Page 11
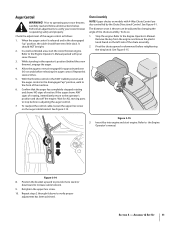
... chute assembly. 2. Remove the key from the engine and loosen the plastic knob found on the auger cable bracket. Pivot the chute upward or downward before re-adjusting the auger control. 7. Perform all instructions below. In a well-ventilated area, start engine. See Figure 3-15. Figure 3-15 3. When the auger control is released and in the operator's position (behind the snow thrower), engage the auger. 4. To readjust the control cable, loosen the upper hex screw...
... chute assembly. 2. Remove the key from the engine and loosen the plastic knob found on the auger cable bracket. Pivot the chute upward or downward before re-adjusting the auger control. 7. Perform all instructions below. In a well-ventilated area, start engine. See Figure 3-15. Figure 3-15 3. When the auger control is released and in the operator's position (behind the snow thrower), engage the auger. 4. To readjust the control cable, loosen the upper hex screw...

2X 524 WE Operator's Manual
Page 12
.... Adjust downward when operating on when the engine is automatically turned on gravel or crushed rock surfaces. Position one (1) is the slowest and position six (6) is the faster. Augers Forward There are two reverse (R) speeds. Reverse There are six forward (F) speeds. Controls and Features Drive Control Chute Assembly Clean Out Tool Headlight † 4 Shift Lever Chute Directional Control Auger Control Heated Grips † Steering Trigger Control † Augers Skid Shoe † If Equipped Figure 4-1 Snow thrower controls...
.... Adjust downward when operating on when the engine is automatically turned on gravel or crushed rock surfaces. Position one (1) is the slowest and position six (6) is the faster. Augers Forward There are two reverse (R) speeds. Reverse There are six forward (F) speeds. Controls and Features Drive Control Chute Assembly Clean Out Tool Headlight † 4 Shift Lever Chute Directional Control Auger Control Heated Grips † Steering Trigger Control † Augers Skid Shoe † If Equipped Figure 4-1 Snow thrower controls...

2X 524 WE Operator's Manual
Page 15
... right steering trigger control to turn off . If the heated grip become too hot, turn right. See Figure 5-1. Squeeze the drive control against the left steering trigger control to turn it and drive motion will stop the augers. Figure 5-2 CAUTION: NEVER replace the auger shear pins with shear pins and cotter pins. Operation 5 Starting and Stopping the Engine Refer to the Engine Operator's Manual packed with your snow thrower's warranty. Figure 5-1 15 To Engage Drive 1. Squeeze the left handle.
... right steering trigger control to turn off . If the heated grip become too hot, turn right. See Figure 5-1. Squeeze the drive control against the left steering trigger control to turn it and drive motion will stop the augers. Figure 5-2 CAUTION: NEVER replace the auger shear pins with shear pins and cotter pins. Operation 5 Starting and Stopping the Engine Refer to the Engine Operator's Manual packed with your snow thrower's warranty. Figure 5-1 15 To Engage Drive 1. Squeeze the left handle.
2X 524 WE Operator's Manual
Page 16
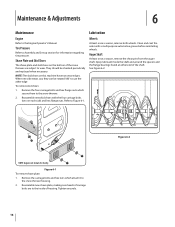
... to the Engine Operator's Manual. Lubrication Wheels At least once a season, remove both wheels. Auger Shaft At least once a season, remove the shear pins from the auger shaft. NOTE: Augers not shown for information regarding tire pressure. Reassemble new shave plate, making sure heads of carriage bolts are subject to the inside the shaft and around the spacers and the flange bearings found at either end of housing. Maintenance & Adjustments 6 Maintenance Engine Refer to...
... to the Engine Operator's Manual. Lubrication Wheels At least once a season, remove both wheels. Auger Shaft At least once a season, remove the shear pins from the auger shaft. NOTE: Augers not shown for information regarding tire pressure. Reassemble new shave plate, making sure heads of carriage bolts are subject to the inside the shaft and around the spacers and the flange bearings found at either end of housing. Maintenance & Adjustments 6 Maintenance Engine Refer to...

2X 524 WE Operator's Manual
Page 17
... hex nut. Remove the frame cover from the underside of fuel. 2. Wipe off any oil on adjusting the auger control cable. Doing so will hinder the snow thrower's drive Auger Control Refer to the Assembly & Set-up and forward so that it . Allow the engine to take up section for instructions on the auger housing. 3. Pivot the bracket downward to run until it is out of the snow thrower by removing the self-tapping screws...
... hex nut. Remove the frame cover from the underside of fuel. 2. Wipe off any oil on adjusting the auger control cable. Doing so will hinder the snow thrower's drive Auger Control Refer to the Assembly & Set-up and forward so that it . Allow the engine to take up section for instructions on the auger housing. 3. Pivot the bracket downward to run until it is out of the snow thrower by removing the self-tapping screws...

2X 524 WE Operator's Manual
Page 18
... not turn. Remove the hairpin clip from the hole closest to verify proper adjustment has been achieved. Store in the shift lever. Clean the exterior of adjustment. Check the adjustment of the drive control as follows: 1. Figure 6-6 3. Off-Season Storage If the snow thrower will not be tight. Maintenance & Adjustments The unit should not roll freely. 3. With the drive control released, push the snow thrower gently forward. The wheels...
... not turn. Remove the hairpin clip from the hole closest to verify proper adjustment has been achieved. Store in the shift lever. Clean the exterior of adjustment. Check the adjustment of the drive control as follows: 1. Figure 6-6 3. Off-Season Storage If the snow thrower will not be tight. Maintenance & Adjustments The unit should not roll freely. 3. With the drive control released, push the snow thrower gently forward. The wheels...
2X 524 WE Operator's Manual
Page 20
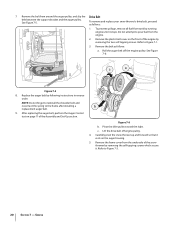
... the engine pulley. Service See Figure 7-5. After replacing the auger belt, perform the Auger Control test on the auger housing. 5. Refer to pour fuel from tank by removing the self-tapping screws which secure it. Remove the plastic belt cover on the front of the Assembly and Set-Up section. Roll the auger belt off engine pulley. 4. NOTE: Do not forget to reinstall the shoulder bolt and reconnect the spring to Figure 7-1. 3. To remove and replace your snow thrower's drive belt...
... the engine pulley. Service See Figure 7-5. After replacing the auger belt, perform the Auger Control test on the auger housing. 5. Refer to pour fuel from tank by removing the self-tapping screws which secure it. Remove the plastic belt cover on the front of the Assembly and Set-Up section. Roll the auger belt off engine pulley. 4. NOTE: Do not forget to reinstall the shoulder bolt and reconnect the spring to Figure 7-1. 3. To remove and replace your snow thrower's drive belt...
2X 524 WE Operator's Manual
Page 21
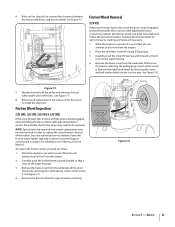
... sure to re-install the stop bolt to replace the snow thrower's friction wheel rubber. Friction Wheel Inspection (524 SWE, 526 SWE, 528 SWE & 530 SWE) If the snow thrower fails to drive with the drive control engaged, and performing the drive control cable adjustment fails to correct the problem, the friction wheel may need to pour fuel from the underside of the snow thrower by removing four self-tapping screws which secure it . NOTE: Special tools are required and...
... sure to re-install the stop bolt to replace the snow thrower's friction wheel rubber. Friction Wheel Inspection (524 SWE, 526 SWE, 528 SWE & 530 SWE) If the snow thrower fails to drive with the drive control engaged, and performing the drive control cable adjustment fails to correct the problem, the friction wheel may need to pour fuel from the underside of the snow thrower by removing four self-tapping screws which secure it . NOTE: Special tools are required and...
2X 524 WE Operator's Manual
Page 23
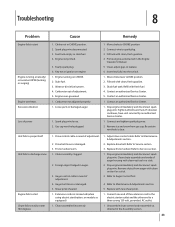
...Drain fuel tank. Friction wheel worn. 1. Remove object from gas cap. Engine running erratically/ inconsistent RPM (hunting or surging) Engine overheats Excessive vibration Loss of auger housing with clean, fresh gasoline. 3. Water or dirt in auger. 3. Move choke lever to Service section 3. Be certain vent hole is clear. 1. Replace drive belt. Chute assembly clogged. 2. Stop engine immediately and disconnect spark plug wire. Replace with clean, fresh gasoline. 4. Connect one end of adjustment. 4. Carburetor out of adjustment. 2. Fill tank with new shear pin...
...Drain fuel tank. Friction wheel worn. 1. Remove object from gas cap. Engine running erratically/ inconsistent RPM (hunting or surging) Engine overheats Excessive vibration Loss of auger housing with clean, fresh gasoline. 3. Water or dirt in auger. 3. Move choke lever to Service section 3. Be certain vent hole is clear. 1. Replace drive belt. Chute assembly clogged. 2. Stop engine immediately and disconnect spark plug wire. Replace with clean, fresh gasoline. 4. Connect one end of adjustment. 4. Carburetor out of adjustment. 2. Fill tank with new shear pin...
2X 524 WE Operator's Manual
Page 24
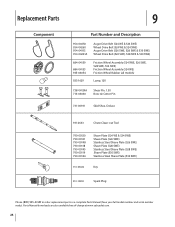
... 954-04195 954-04201A Auger Drive Belt (524 WE & 524 SWE) Wheel Drive Belt (524 WE & 524 SWE) Auger Drive Belt (526 SWE, 528 SWE & 530 SWE) Wheel Drive Belt (526 SWE, 528 SWE & 530 SWE) 684-04159 684-04153 935-04054 925-1629 Friction Wheel Assembly (524 SWE, 526 SWE, 528 SWE, 530 SWE) Friction Wheel Assembly (524 WE) Friction Wheel Rubber (all models) Lamp, 12V 738-04124A 714-04040 Shear Pin, 1.50 Bow-tie Cotter Pin 731-06931 Skid Shoe, Deluxe 931-2643 Chute Clean-out Tool 790-00120 790...
... 954-04195 954-04201A Auger Drive Belt (524 WE & 524 SWE) Wheel Drive Belt (524 WE & 524 SWE) Auger Drive Belt (526 SWE, 528 SWE & 530 SWE) Wheel Drive Belt (526 SWE, 528 SWE & 530 SWE) 684-04159 684-04153 935-04054 925-1629 Friction Wheel Assembly (524 SWE, 526 SWE, 528 SWE, 530 SWE) Friction Wheel Assembly (524 WE) Friction Wheel Rubber (all models) Lamp, 12V 738-04124A 714-04040 Shear Pin, 1.50 Bow-tie Cotter Pin 731-06931 Skid Shoe, Deluxe 931-2643 Chute Clean-out Tool 790-00120 790...
2X 524 WE Operator's Manual
Page 28
... REV. CUB CADET LLC MANUFACTURER'S LIMITED WARRANTY FOR SNOW THROWERS The limited warranty set forth below is given by Cub Cadet LLC with respect to new merchandise purchased and used in the United States, its possessions and territories, and by MTD Products Limited with respect to new merchandise purchased and used in Canada and/or its option, repair or replace, free of charge, any part found to...
... REV. CUB CADET LLC MANUFACTURER'S LIMITED WARRANTY FOR SNOW THROWERS The limited warranty set forth below is given by Cub Cadet LLC with respect to new merchandise purchased and used in the United States, its possessions and territories, and by MTD Products Limited with respect to new merchandise purchased and used in Canada and/or its option, repair or replace, free of charge, any part found to...


