Jet Sweep Warranty Information
Page 1
... not genuine Cub Cadet parts. To locate the dealer in the following cases: a. Routine maintenance items such as lubricants, filters, blade sharpening, tune-ups, brake adjustments, clutch adjustments, deck adjustments, and normal deterioration of express written warranty above . No implied warranty, including any implied warranty of merchantability of fitness for a particular purpose, applies after the applicable period of the exterior finish due to the parts as : belts, skid...
... not genuine Cub Cadet parts. To locate the dealer in the following cases: a. Routine maintenance items such as lubricants, filters, blade sharpening, tune-ups, brake adjustments, clutch adjustments, deck adjustments, and normal deterioration of express written warranty above . No implied warranty, including any implied warranty of merchantability of fitness for a particular purpose, applies after the applicable period of the exterior finish due to the parts as : belts, skid...
221 LHP Operator's Manual
Page 1
Models 221 HP & 221 LHP WARNING READ AND FOLLOW ALL SAFETY RULES AND INSTRUCTIONS IN THIS MANUAL BEFORE ATTEMPTING TO OPERATE THIS MACHINE. BOX 361131 CLEVELAND, OHIO 44136-0019 Form No. 769-08241 (June 6, 2012) Printed In USA CUB CADET LLC, P.O. FAILURE TO COMPLY WITH THESE INSTRUCTIONS MAY RESULT IN PERSONAL INJURY. Safe Operation Practices • Set-Up • Operation • Maintenance • Service • Troubleshooting • Warranty Operator's Manual Model 221 HP Model 221 LHP Single-Stage Snow Thrower -
Models 221 HP & 221 LHP WARNING READ AND FOLLOW ALL SAFETY RULES AND INSTRUCTIONS IN THIS MANUAL BEFORE ATTEMPTING TO OPERATE THIS MACHINE. BOX 361131 CLEVELAND, OHIO 44136-0019 Form No. 769-08241 (June 6, 2012) Printed In USA CUB CADET LLC, P.O. FAILURE TO COMPLY WITH THESE INSTRUCTIONS MAY RESULT IN PERSONAL INJURY. Safe Operation Practices • Set-Up • Operation • Maintenance • Service • Troubleshooting • Warranty Operator's Manual Model 221 HP Model 221 LHP Single-Stage Snow Thrower -
221 LHP Operator's Manual
Page 2
... have any questions regarding the controls, operation, or maintenance of this page. Table of product specifications for purchasing a Cub Cadet Snow Thrower. Model Number Serial Number Product Registration and Customer Support Please register your machine. Please read this manual may cover a range of Contents Safe Operation Practices 3 Assembly & Set-Up 7 Controls & Features 10 Operation 11 Maintenance & Adjustment 12 Service 14 Troubleshooting 16 Replacement Parts 17 Warranty 20 Record Product Information Before setting up , operate and maintain your product on...
... have any questions regarding the controls, operation, or maintenance of this page. Table of product specifications for purchasing a Cub Cadet Snow Thrower. Model Number Serial Number Product Registration and Customer Support Please register your machine. Please read this manual may cover a range of Contents Safe Operation Practices 3 Assembly & Set-Up 7 Controls & Features 10 Operation 11 Maintenance & Adjustment 12 Service 14 Troubleshooting 16 Replacement Parts 17 Warranty 20 Record Product Information Before setting up , operate and maintain your product on...
221 LHP Operator's Manual
Page 3
... instructions and safe operation practices in serious injury. Thrown objects which could be trained and supervised by the auger/impeller. 1. Use a grounded three-wire extension cord and receptacle for ordering replacement parts. 2. Never attempt to State of yourself and others. Engine Exhaust, some of its constituents, and certain vehicle components contain or emit chemicals known to make any type of power...
... instructions and safe operation practices in serious injury. Thrown objects which could be trained and supervised by the auger/impeller. 1. Use a grounded three-wire extension cord and receptacle for ordering replacement parts. 2. Never attempt to State of yourself and others. Engine Exhaust, some of its constituents, and certain vehicle components contain or emit chemicals known to make any type of power...
221 LHP Operator's Manual
Page 4
.... Disengage power to the disengaged position when released. 4. Look down and behind the handles). Always place containers on a trailer with the rim of the fuel tank or container opening at least two minutes before when backing up. Repair any adjustments, or inspections. hot or running . Wait until the auger/impeller comes to cool at all times until resistance impeller housing or chute assembly...
.... Disengage power to the disengaged position when released. 4. Look down and behind the handles). Always place containers on a trailer with the rim of the fuel tank or container opening at least two minutes before when backing up. Repair any adjustments, or inspections. hot or running . Wait until the auger/impeller comes to cool at all times until resistance impeller housing or chute assembly...
221 LHP Operator's Manual
Page 5
.... 9. A spark arrestor for any ). Always use your hands. The governor controls the maximum safe operating speed of the Average Useful Life have stopped rotating. 3. At the end of the engine. 5. To clear the chute: 1. Observe proper disposal laws and regulations for cracks or leaks. Tampering with spark plug removed. 14. Federal laws apply on off-season storage. 12. Check fuel line, tank, cap, and fittings frequently for gas, oil...
.... 9. A spark arrestor for any ). Always use your hands. The governor controls the maximum safe operating speed of the Average Useful Life have stopped rotating. 3. At the end of the engine. 5. To clear the chute: 1. Observe proper disposal laws and regulations for cracks or leaks. Tampering with spark plug removed. 14. Federal laws apply on off-season storage. 12. Check fuel line, tank, cap, and fittings frequently for gas, oil...

221 LHP Operator's Manual
Page 6
... objects which can amputate hands and feet. WARNING- ELECTRICAL SHOCK Do not use of inlet and discharge openings while machine is running . Read, understand, and follow all instructions on the machine. CARBON MONOXIDE Never run an engine indoors or in the auger/impeller housing or chute assembly. ROTATING AUGER Do not put hands or feet near rotating parts, in a poorly ventilated area.
... objects which can amputate hands and feet. WARNING- ELECTRICAL SHOCK Do not use of inlet and discharge openings while machine is running . Read, understand, and follow all instructions on the machine. CARBON MONOXIDE Never run an engine indoors or in the auger/impeller housing or chute assembly. ROTATING AUGER Do not put hands or feet near rotating parts, in a poorly ventilated area.
221 LHP Operator's Manual
Page 7
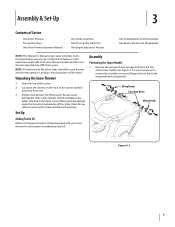
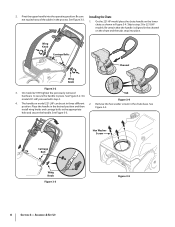
... Snow Thrower Operator's Manual • One Chute Assembly One 20 oz. Any exceptions will be noted. Be sure not to the chute. Set-Up Adding Fuel & Oil Refer to the Engine Operator's Manual packed with your snow thrower for any cables attached to damage the chute, chute rotation control assembly or any cable ties securing the chute and remove if necessary. Assembly Positioning the Upper Handle 1. Unpacking the Snow Thrower 1. Cut down the front side. 3. Remove the wing knob and carriage bolt from...
... Snow Thrower Operator's Manual • One Chute Assembly One 20 oz. Any exceptions will be noted. Be sure not to the chute. Set-Up Adding Fuel & Oil Refer to the Engine Operator's Manual packed with your snow thrower for any cables attached to damage the chute, chute rotation control assembly or any cable ties securing the chute and remove if necessary. Assembly Positioning the Upper Handle 1. Unpacking the Snow Thrower 1. Cut down the front side. 3. Remove the wing knob and carriage bolt from...
221 LHP Operator's Manual
Page 8
... handle in the chute base. On model 221 HP, tighten the previously removed hardware to step 2 for 221 LHP models. See Figure 3-2. Carriage Bolt Hex Washer Screw Wing Knob Figure 3-3 Figure 3-5 8 Section 3- 2. Skip to secure the handle in three different 2. See position. Tab Figure 3-4 4. Pivot the upper handle into place. On model 221 LHP proceed with step 4. Be sure Installing the Chute not to pinch any of the cables...
... handle in the chute base. On model 221 HP, tighten the previously removed hardware to step 2 for 221 LHP models. See Figure 3-2. Carriage Bolt Hex Washer Screw Wing Knob Figure 3-3 Figure 3-5 8 Section 3- 2. Skip to secure the handle in three different 2. See position. Tab Figure 3-4 4. Pivot the upper handle into place. On model 221 LHP proceed with step 4. Be sure Installing the Chute not to pinch any of the cables...
221 LHP Operator's Manual
Page 11
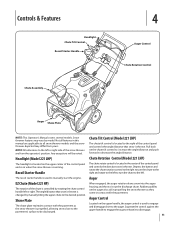
... the discharge chute. Recoil Starter Handle The chute rotate control is used to engage the auger; Squeeze the control against the upper handle to manually start the engine. Pull back on the upper handle, the auger control is located in this manual are from yours. Snow thrower features may differ from the operator's position. Headlight (Model 221 LHP) Chute Rotation Control (Model 221 LHP) The headlight is located on the upper center of the chute is propelled, allowing snow close to...
... the discharge chute. Recoil Starter Handle The chute rotate control is used to engage the auger; Squeeze the control against the upper handle to manually start the engine. Pull back on the upper handle, the auger control is located in this manual are from yours. Snow thrower features may differ from the operator's position. Headlight (Model 221 LHP) Chute Rotation Control (Model 221 LHP) The headlight is located on the upper center of the chute is propelled, allowing snow close to...
221 LHP Operator's Manual
Page 12
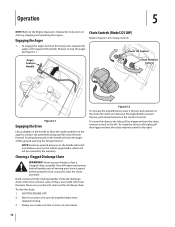
... ENGINE OFF! 2. Never use your hands. 12 Operation 5 NOTE: Refer to stop the forward motion. Chute Controls (Model 221 LHP) Refer to clear the chute assembly. To engage the auger and start throwing snow, squeeze the auger control against the handle. To decrease the angle/distance snow is thrown, push down/forward on the auger to clean out the discharge chute. To rotate the chute to the left, pull the trigger and turn...
... ENGINE OFF! 2. Never use your hands. 12 Operation 5 NOTE: Refer to stop the forward motion. Chute Controls (Model 221 LHP) Refer to clear the chute assembly. To engage the auger and start throwing snow, squeeze the auger control against the handle. To decrease the angle/distance snow is thrown, push down/forward on the auger to clean out the discharge chute. To rotate the chute to the left, pull the trigger and turn...
221 LHP Operator's Manual
Page 14
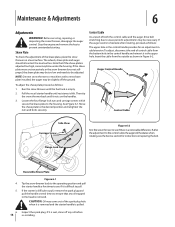
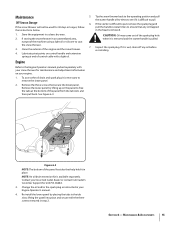
... belt. Tip the snow thrower back to the operating position and pull the starter handle a few times to see if there is removed. Inspect the spark plug. NOTE: On new snow throwers or machines with a new shave plate installed, the auger may be slightly off any oil trapped in Figure 6-2. If it is felt. To adjust the shave plate proceed as follows: The upper hole in the control handle provides for instructions on a level...
... belt. Tip the snow thrower back to the operating position and pull the starter handle a few times to see if there is removed. Inspect the spark plug. NOTE: On new snow throwers or machines with a new shave plate installed, the auger may be slightly off any oil trapped in Figure 6-2. If it is felt. To adjust the shave plate proceed as follows: The upper hole in the control handle provides for instructions on a level...
221 LHP Operator's Manual
Page 15
... screws removed in the head is difficult to pull, remove the spark plug and If the snow thrower will not be used for 30 days or longer, follow pull the handle several times to pull. Contact your local Cub Cadet dealer or contact Cub Cadet's Customer Support for maintenance and adjustment information on control handle and extension spring at the bottom of the engine and the snow thrower. 4. Lubricate pivot points on your snow thrower for kit #753-06684. 3. CAUTION: Oil...
... screws removed in the head is difficult to pull, remove the spark plug and If the snow thrower will not be used for 30 days or longer, follow pull the handle several times to pull. Contact your local Cub Cadet dealer or contact Cub Cadet's Customer Support for maintenance and adjustment information on control handle and extension spring at the bottom of the engine and the snow thrower. 4. Lubricate pivot points on your snow thrower for kit #753-06684. 3. CAUTION: Oil...

221 LHP Operator's Manual
Page 16
...-installing. See Figure 7-2. 4. Tip the snow thrower back to the operating position and pull the starter handle a few times to see if it is removed. Inspect the spark plug. Auger Shaft Auger Pulley Flange Nut 6. 16 Figure 7-2 Remove the auger pulley and the belt. To replace the belt follow these instructions and refer to Figure 7-3: Drive Pulley Idler Pulley Hex Lock Screw Belt Keeper Auger Pulley Flange Nut Figure 7-3 NOTE: Installing the belt and belt cover may come out of the belt around the drive pulley and under the belt keeper. 5. Remove...
...-installing. See Figure 7-2. 4. Tip the snow thrower back to the operating position and pull the starter handle a few times to see if it is removed. Inspect the spark plug. Auger Shaft Auger Pulley Flange Nut 6. 16 Figure 7-2 Remove the auger pulley and the belt. To replace the belt follow these instructions and refer to Figure 7-3: Drive Pulley Idler Pulley Hex Lock Screw Belt Keeper Auger Pulley Flange Nut Figure 7-3 NOTE: Installing the belt and belt cover may come out of the belt around the drive pulley and under the belt keeper. 5. Remove...

221 LHP Operator's Manual
Page 17
... the handles. 3. Adjust the shave plate as instructed in serious damage to your snow thrower. Service 17 Remove the existing rubber paddles by unthreading the hex washer screws which attach it rests on the inside of the housing. Pull the recoil starter handle until the fuel tank is empty. 2. Side View Hex Washer Screw Auger Paddle Carriage Screw Flange Lock Nut Hex Washer Screw Reversible Shave Plate Figure 7-5 Figure 7-4 4. Install the new shave...
... the handles. 3. Adjust the shave plate as instructed in serious damage to your snow thrower. Service 17 Remove the existing rubber paddles by unthreading the hex washer screws which attach it rests on the inside of the housing. Pull the recoil starter handle until the fuel tank is empty. 2. Side View Hex Washer Screw Auger Paddle Carriage Screw Flange Lock Nut Hex Washer Screw Reversible Shave Plate Figure 7-5 Figure 7-4 4. Install the new shave...
221 LHP Operator's Manual
Page 18
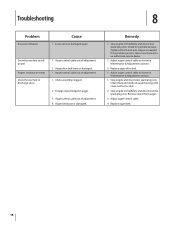
.... 3. Auger drive belt loose or damaged. 1. Check for possible damage. Tighten all bolts and nuts. Adjust auger control cable as shown in auger. 3. Replace auger belt. 18 Stop engine immediately and disconnect spark plug wire. If the problem persists, take snow thrower to discharge snow 1. Troubleshooting 8 Problem Excessive vibration Cause 1. Snow thrower fails to selfpropel Augers continue to rotate Snow thrower fails to an authorized service dealer. 1. Auger control cable out of auger housing with clean-out tool or stick. 2. Adjust auger control cable as needed...
.... 3. Auger drive belt loose or damaged. 1. Check for possible damage. Tighten all bolts and nuts. Adjust auger control cable as shown in auger. 3. Replace auger belt. 18 Stop engine immediately and disconnect spark plug wire. If the problem persists, take snow thrower to discharge snow 1. Troubleshooting 8 Problem Excessive vibration Cause 1. Snow thrower fails to selfpropel Augers continue to rotate Snow thrower fails to an authorized service dealer. 1. Auger control cable out of auger housing with clean-out tool or stick. 2. Adjust auger control cable as needed...
221 LHP Operator's Manual
Page 19
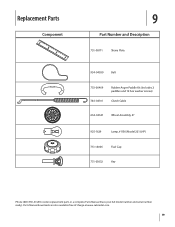
Parts Manual downloads are also available free of charge at www.cubcadet.com. 19 Replacement Parts Component 9 Part Number and Description 731-08171 Shave Plate 954-04050 Belt 753-06469 Rubber Auger Paddle Kit (Includes 2 paddles and 12 hex washer screws) 746-04701 Clutch Cable 634-04347 Wheel Assembly, 8" 925-1629 Lamp, #1156 (Model 221 LHP) 751-14006 Fuel Cap 731-05632 Key Phone (800) 965-4CUB to order replacement parts or a complete Parts Manual (have your full model number and serial number ready).
Parts Manual downloads are also available free of charge at www.cubcadet.com. 19 Replacement Parts Component 9 Part Number and Description 731-08171 Shave Plate 954-04050 Belt 753-06469 Rubber Auger Paddle Kit (Includes 2 paddles and 12 hex washer screws) 746-04701 Clutch Cable 634-04347 Wheel Assembly, 8" 925-1629 Lamp, #1156 (Model 221 LHP) 751-14006 Fuel Cap 731-05632 Key Phone (800) 965-4CUB to order replacement parts or a complete Parts Manual (have your full model number and serial number ready).
221 LHP Operator's Manual
Page 20
... WARRANTY FOR SNOW THROWERS, CHIPPER-SHREDDERS, CHIPPER-SHREDDER VACUUMS, LOG SPLITTERS AND JET SWEEPS The limited warranty set forth below is given by Cub Cadet LLC with respect to new merchandise purchased and used in Canada and/or its territories and possessions. "Cub Cadet" will void your Yellow Pages, or contact Cub Cadet LLC at www.mtdcanada. Normal Wear Parts are warranted to be free...
... WARRANTY FOR SNOW THROWERS, CHIPPER-SHREDDERS, CHIPPER-SHREDDER VACUUMS, LOG SPLITTERS AND JET SWEEPS The limited warranty set forth below is given by Cub Cadet LLC with respect to new merchandise purchased and used in Canada and/or its territories and possessions. "Cub Cadet" will void your Yellow Pages, or contact Cub Cadet LLC at www.mtdcanada. Normal Wear Parts are warranted to be free...
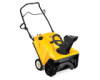
200 Series Snow Throwers Brochure
Page 1
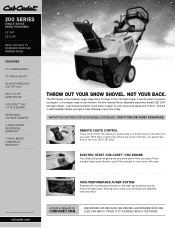
... SNOW THROWERS 221 HP 221 LHP ideaL For LigHT To moderaTe Snow and narrow PaTHS. REMOTE cHUTE cONTROL Chute control from a single-stage snow thrower, and all the strength to clear snow with speed and comfort. cubcadet.com HIGH-PERFORMANcE AUGER SYSTEM Engineered for warranty information. an eXPerience no one eLSe can deLiVer. NOT YOUR BAcK. The 200 Series is thrown, you spend less time in the cold. (221 lHP only) ELEcTRIc START cUB cADET...
... SNOW THROWERS 221 HP 221 LHP ideaL For LigHT To moderaTe Snow and narrow PaTHS. REMOTE cHUTE cONTROL Chute control from a single-stage snow thrower, and all the strength to clear snow with speed and comfort. cubcadet.com HIGH-PERFORMANcE AUGER SYSTEM Engineered for warranty information. an eXPerience no one eLSe can deLiVer. NOT YOUR BAcK. The 200 Series is thrown, you spend less time in the cold. (221 lHP only) ELEcTRIc START cUB cADET...
200 Series Snow Throwers Brochure
Page 2
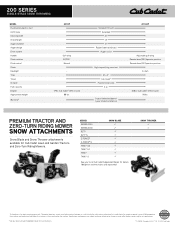
...-STAGE SNOW THROWERS MODEL Push button electric start Oil fill tube Clearing width Intake height Auger diameter Auger design Drive system Handle Chute rotation Pitch control Chute Headlight Tires Tread Scraper Fuel capacity Engine Approximate weight Warranty† 221 HP Gull wing EZ/190˚ Manual - 179cc Cub Cadet® OHV 4-cycle 88 lbs. series series 1000 series 2000 RZT™ RZT™ S Z-force® Z-force® S tank™ sz tank™ lz tank™ tank™ s Snow Blade P P P P P P P P P P See your local Cub Cadet...
...-STAGE SNOW THROWERS MODEL Push button electric start Oil fill tube Clearing width Intake height Auger diameter Auger design Drive system Handle Chute rotation Pitch control Chute Headlight Tires Tread Scraper Fuel capacity Engine Approximate weight Warranty† 221 HP Gull wing EZ/190˚ Manual - 179cc Cub Cadet® OHV 4-cycle 88 lbs. series series 1000 series 2000 RZT™ RZT™ S Z-force® Z-force® S tank™ sz tank™ lz tank™ tank™ s Snow Blade P P P P P P P P P P See your local Cub Cadet...


