
Owners Manual
Page 1
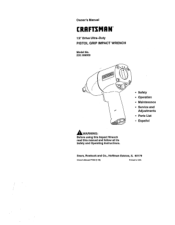
Owner's Manual CRAFTSMIIN" 1/2" Drive Ultra-Duty PISTOL GRIP IMPACT WRENCH Model No. 235.199050 _WARNING: Before using this Impact Wrench read this manual and follow all its Safety and Operating Instructions. • Safety ° Operation ° Maintenance ° Service and Adjustments = Parts List • Espa_oi Sears, Roebuck and Co., Hoffman Estates, IL 60179 Owner'= M=nual P7360 (1-98) Printed In USA
Owner's Manual CRAFTSMIIN" 1/2" Drive Ultra-Duty PISTOL GRIP IMPACT WRENCH Model No. 235.199050 _WARNING: Before using this Impact Wrench read this manual and follow all its Safety and Operating Instructions. • Safety ° Operation ° Maintenance ° Service and Adjustments = Parts List • Espa_oi Sears, Roebuck and Co., Hoffman Estates, IL 60179 Owner'= M=nual P7360 (1-98) Printed In USA
Owners Manual
Page 2
... In Service Using the Tool Operation Air Supply and Connections Using the Power Management System Specifications Maintenance Lubrication Service and Adjustment Disassembly Assembly Troubleshooting Parts List Exploded Drawing Parts for Ordering EspaSol PAGE 2 3-5 6-7 8-15 16 17-19 20-37 FULL TWO YEAR WARRANTY If this product to a Sears Service Center for replacement...
... In Service Using the Tool Operation Air Supply and Connections Using the Power Management System Specifications Maintenance Lubrication Service and Adjustment Disassembly Assembly Troubleshooting Parts List Exploded Drawing Parts for Ordering EspaSol PAGE 2 3-5 6-7 8-15 16 17-19 20-37 FULL TWO YEAR WARRANTY If this product to a Sears Service Center for replacement...
Owners Manual
Page 4
Failure to observe the following warnings could result in this manual into the hands of parts, operate this toolat 90 psig (6.2 bar/620 kPa) maximum air pressure at 90 psig maximum air pressure. PLACING TOOL IN SERVICE • Always operate, inspect... severe personal Injury or death if thewarning Is Ignored. See Figure 1 for use damaged, frayed or deteriorated air hoses and fit- _WARNING is Ignored. This Craftsman Impact Wrench is designed for a typical piping arrangement. ° Always use clean, dry air at the inlet with 3/8" (10 mm) inside diameter air supply hose. ° ...
Failure to observe the following warnings could result in this manual into the hands of parts, operate this toolat 90 psig (6.2 bar/620 kPa) maximum air pressure at 90 psig maximum air pressure. PLACING TOOL IN SERVICE • Always operate, inspect... severe personal Injury or death if thewarning Is Ignored. See Figure 1 for use damaged, frayed or deteriorated air hoses and fit- _WARNING is Ignored. This Craftsman Impact Wrench is designed for a typical piping arrangement. ° Always use clean, dry air at the inlet with 3/8" (10 mm) inside diameter air supply hose. ° ...
Owners Manual
Page 5
...not use . • Use accessories recommended by authorized trained personnel. The coupler closestto the tool should not be checked with an impact wrench. • This tool is not designed for sudden changes in motion during start-up and operation of a hose whip is not...chrome) sockets or accessories. • Impact wrenches are not torque wrenches. Seek medical advice before operating the tool so as to your hands and arms. Stop using any labels. Connections requiring specific torque must be less than genuine Craftsman replacement parts may result in safety hazards, decreased tool...
...not use . • Use accessories recommended by authorized trained personnel. The coupler closestto the tool should not be checked with an impact wrench. • This tool is not designed for sudden changes in motion during start-up and operation of a hose whip is not...chrome) sockets or accessories. • Impact wrenches are not torque wrenches. Seek medical advice before operating the tool so as to your hands and arms. Stop using any labels. Connections requiring specific torque must be less than genuine Craftsman replacement parts may result in safety hazards, decreased tool...
Owners Manual
Page 8
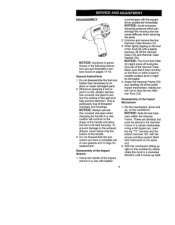
...3. NOTICE: Avoid excessive clamping pressure which can damage the Housing and can cause difficulty when removing the parts. 2. Make sure that it does not drop on the end of the impact wrench in a vise with the arrows pointing upward. To prevent damage to be damaged. 4. Clamp the...-covered vise jaws to the shape of the Impact Wrench 1. NOTICE: The Front End Plate (2) might be held securely. Grasp the Hammer Frame (12) and carefully lift off the entire impact mechanism, making certain not to replace or repair damaged parts. 2. covered jaws with a plastic hammer, lift...
...3. NOTICE: Avoid excessive clamping pressure which can damage the Housing and can cause difficulty when removing the parts. 2. Make sure that it does not drop on the end of the impact wrench in a vise with the arrows pointing upward. To prevent damage to be damaged. 4. Clamp the...-covered vise jaws to the shape of the Impact Wrench 1. NOTICE: The Front End Plate (2) might be held securely. Grasp the Hammer Frame (12) and carefully lift off the entire impact mechanism, making certain not to replace or repair damaged parts. 2. covered jaws with a plastic hammer, lift...

Owners Manual
Page 11
... come free, tap the bottom of the handle. 2. Whenever grasping a tool or part in a vise, Leather will conform to the shape of the handle and allow the tool to protect the surface ...of the part and help prevent distortion.This is important that the procedure below be removed by pushing upward.... To prevent damage to disengage the detent so that it drops out. 3. Always clean every part and wipe every part with a rubber hammer until it can be held securely. After the Button is fully extended. Reverse ...
... come free, tap the bottom of the handle. 2. Whenever grasping a tool or part in a vise, Leather will conform to the shape of the handle and allow the tool to protect the surface ...of the part and help prevent distortion.This is important that the procedure below be removed by pushing upward.... To prevent damage to disengage the detent so that it drops out. 3. Always clean every part and wipe every part with a rubber hammer until it can be held securely. After the Button is fully extended. Reverse ...
Owners Manual
Page 16
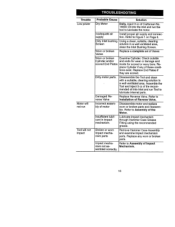
... Inlet Bushing Screen. Dirty motor parts. Impact mechanism not as- Refer to Assembly of Impact Mechanism. Disassemble the Tool and clean with a suitable, cleaning solution in a well ventilated area. Trouble Low power Motor will not run Tool will not impact Probable Cause Solution Dry Motor Daily, inject 3 cc of Craftsman No. 18830 Oil into Inlet...
... Inlet Bushing Screen. Dirty motor parts. Impact mechanism not as- Refer to Assembly of Impact Mechanism. Disassemble the Tool and clean with a suitable, cleaning solution in a well ventilated area. Trouble Low power Motor will not run Tool will not impact Probable Cause Solution Dry Motor Daily, inject 3 cc of Craftsman No. 18830 Oil into Inlet...
Owners Manual
Page 18
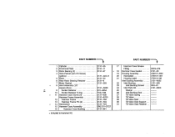
... 2131-6 2131-283 2131 -A626 231-425A R1A-159 2131-638 2131 -A703 2131-703 2131-704 2131-724 SN2131-D727 2131-941 PART NUMBER-'--_ 17 Hammer Case Grease Fitting 18 Hammer Case Gasket ....... CR2131-B40 20 Nameplate 21 Housing Label Inlet Bushing Assembly ...... 22 Inlet ...Bushing CR2131-301 CR2131-99 2131 -A565 2131-565 23 Inlet Bushing Screen .... 5RA-61 24 Inlet Parts Kit 2131-1(303 25 Washer 26 Inlet Bushing Seal ....... 27 Tilt Valve Spring ........ 28 Tilt Valve 29 Tilt Valve Seat .......... 3O Tilt ...
... 2131-6 2131-283 2131 -A626 231-425A R1A-159 2131-638 2131 -A703 2131-703 2131-704 2131-724 SN2131-D727 2131-941 PART NUMBER-'--_ 17 Hammer Case Grease Fitting 18 Hammer Case Gasket ....... CR2131-B40 20 Nameplate 21 Housing Label Inlet Bushing Assembly ...... 22 Inlet ...Bushing CR2131-301 CR2131-99 2131 -A565 2131-565 23 Inlet Bushing Screen .... 5RA-61 24 Inlet Parts Kit 2131-1(303 25 Washer 26 Inlet Bushing Seal ....... 27 Tilt Valve Spring ........ 28 Tilt Valve 29 Tilt Valve Seat .......... 3O Tilt ...
Owners Manual
Page 19
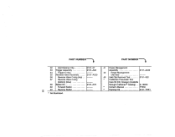
...PART NUMBER-"--_ 32 Inlet Retainer Clip .......... 33 Trigger Assembly 34 Trigger O-ring 35 Reverse Valve Assembly ..... 36 Reverse Valve O-ring (top) .. 37 Reverse Valve O-ring (bottom) (blue 38 Button Kit 39 Forward Button 40 Reverse Button * Not illustrated. 2131-57 2131 -A93 2131-A329 2131-K75 . Craftsman... Pneumatic Tool 2131 -A249 2131-322 Care Kit (Oil, Grease) (Available through Craftsman ® Catalog) .. 9-18830 Owner's Manual P7350 _t Hammer Kit 2131-THK1
...PART NUMBER-"--_ 32 Inlet Retainer Clip .......... 33 Trigger Assembly 34 Trigger O-ring 35 Reverse Valve Assembly ..... 36 Reverse Valve O-ring (top) .. 37 Reverse Valve O-ring (bottom) (blue 38 Button Kit 39 Forward Button 40 Reverse Button * Not illustrated. 2131-57 2131 -A93 2131-A329 2131-K75 . Craftsman... Pneumatic Tool 2131 -A249 2131-322 Care Kit (Oil, Grease) (Available through Craftsman ® Catalog) .. 9-18830 Owner's Manual P7350 _t Hammer Kit 2131-THK1

Owners Manual
Page 40
Forthe repairor replacemenpt adsyou need delivereddirectlyto yourhome Call7 am- 7 pro,7 daysa week 1-800-366-PART (1-800-366-7278) Paraordenarpeizasconentregaa domicilio- 1.-800--659-7084 For in-homemajorbrandrepairservice Call24 hoursa day,7 daysa week 1-800-4-REPAIR (1-800--.473-7247) Parapedirsan/Iciode reparaci6na domicilio- ...
Forthe repairor replacemenpt adsyou need delivereddirectlyto yourhome Call7 am- 7 pro,7 daysa week 1-800-366-PART (1-800-366-7278) Paraordenarpeizasconentregaa domicilio- 1.-800--659-7084 For in-homemajorbrandrepairservice Call24 hoursa day,7 daysa week 1-800-4-REPAIR (1-800--.473-7247) Parapedirsan/Iciode reparaci6na domicilio- ...

