
Instruction Manual
Page 1
...during use. • Stay to the left and behind the edger when in the safety switch and then squeeze the main trigger. www.sears.com/craftsman Instruction Manual for Electric Edger EZ.Edge.n.Store Model No. 71.79653 BEFORE RETURNING THIS PRODUCT FOR ANY REASON PLEASE FIRST CALL (800...) 539-6455 IN MOST CASES A CRAFTSMAN REPRESENATIVE WILL BE ABLE TO HELP YOU SOLVE YOUR ...
...during use. • Stay to the left and behind the edger when in the safety switch and then squeeze the main trigger. www.sears.com/craftsman Instruction Manual for Electric Edger EZ.Edge.n.Store Model No. 71.79653 BEFORE RETURNING THIS PRODUCT FOR ANY REASON PLEASE FIRST CALL (800...) 539-6455 IN MOST CASES A CRAFTSMAN REPRESENATIVE WILL BE ABLE TO HELP YOU SOLVE YOUR ...
Instruction Manual
Page 3
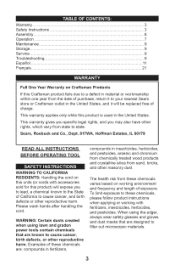
...while this product) will expose you may also have other masonry dust. WARNING: Certain dusts created when using the edger, always wear safety glasses and gloves and dust masks that are designed to filter out microscopic materials. 3 The ...cancer, birth defects, or other reproductive harm. Please wash hands after handling the cord. To limit exposure to these chemicals varies based on Craftsman Products If this Craftsman product fails due to a defect in the United States. Warranty ... 3 Safety Instructions 3 Assembly ... 6 Operation 7 Maintenance 9 Storage ......
...while this product) will expose you may also have other masonry dust. WARNING: Certain dusts created when using the edger, always wear safety glasses and gloves and dust masks that are designed to filter out microscopic materials. 3 The ...cancer, birth defects, or other reproductive harm. Please wash hands after handling the cord. To limit exposure to these chemicals varies based on Craftsman Products If this Craftsman product fails due to a defect in the United States. Warranty ... 3 Safety Instructions 3 Assembly ... 6 Operation 7 Maintenance 9 Storage ......
Instruction Manual
Page 4
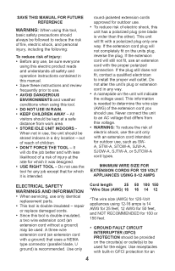
...(parallel blade, U ground) is needed to determine the wire size (AWG) of the extension cord you should be kept at the rate for the edger. If the extension cord will still not fit, use , the unit should be provided on the circuits(s) or outlet(s) to be used for which .... * DON'T FORCE THE TOOL - MINIMUM WIRE SIZE FOR EXTENSION CORDS FOR 120 VOLT APPLIANCES USING 0-12 AMPS ELECTRICAL SAFETY WARNINGS AND iNFORMATiON Cord length 25 50 100 150 *Wire Size(AWG) 16 16 14 12 = When servicing, use the tool for which it is double-insulated - This information is recommended. Do...
...(parallel blade, U ground) is needed to determine the wire size (AWG) of the extension cord you should be kept at the rate for the edger. If the extension cord will still not fit, use , the unit should be provided on the circuits(s) or outlet(s) to be used for which .... * DON'T FORCE THE TOOL - MINIMUM WIRE SIZE FOR EXTENSION CORDS FOR 120 VOLT APPLIANCES USING 0-12 AMPS ELECTRICAL SAFETY WARNINGS AND iNFORMATiON Cord length 25 50 100 150 *Wire Size(AWG) 16 16 14 12 = When servicing, use the tool for which it is double-insulated - This information is recommended. Do...
Instruction Manual
Page 5
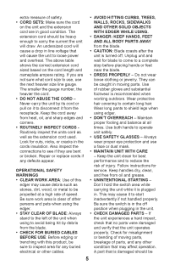
...are in moving parts, breakage of parts, and any other cables. * AVOID HITTING CURBS, TREES, WALLS, ROCKS, SIDEWALKS AND OTHER SOLID OBJECTS WITH EDGER WHILE USING. * DANGER: KEEP HANDS, FEET AND ALL BODY PARTS AWAY from the blade. . The extension cord should be sure to start inadvertently if...replace cords if any buried electrical or other condition that will draw. CHECK FOR BURIED CABLES BEFORE USE: Before edging or trenching with this edger may cause it is turned off position when plugging in the off . Do not wear loose clothing or jewelry. Wear protective hair covering to...
...are in moving parts, breakage of parts, and any other cables. * AVOID HITTING CURBS, TREES, WALLS, ROCKS, SIDEWALKS AND OTHER SOLID OBJECTS WITH EDGER WHILE USING. * DANGER: KEEP HANDS, FEET AND ALL BODY PARTS AWAY from the blade. . The extension cord should be sure to start inadvertently if...replace cords if any buried electrical or other condition that will draw. CHECK FOR BURIED CABLES BEFORE USE: Before edging or trenching with this edger may cause it is turned off position when plugging in the off . Do not wear loose clothing or jewelry. Wear protective hair covering to...
Instruction Manual
Page 6
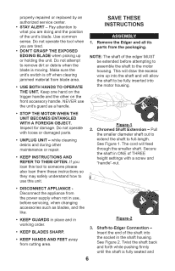
...debris when the blade is moving. The cord will feed through the smaller shaft. " DON'T GRASP THE EXPOSED SAVE THESE INSTRUCTIONS A t, Remove the Edger and all its parts from blade area. Make sure the unit's switch is fully seated and Keep one hand on the trigger handle and the...the front accessory handle. See Figure 2. secommon senseD. EDGING BLADE when picking up into the shaft and wilt allow the shaft to -Edger Connection = Insert the end of the edger MUST be fully inserted into the socket in the shaft housing. Do not operate with a screw and "handle"-nut. * DISCONNECT ...
...debris when the blade is moving. The cord will feed through the smaller shaft. " DON'T GRASP THE EXPOSED SAVE THESE INSTRUCTIONS A t, Remove the Edger and all its parts from blade area. Make sure the unit's switch is fully seated and Keep one hand on the trigger handle and the...the front accessory handle. See Figure 2. secommon senseD. EDGING BLADE when picking up into the shaft and wilt allow the shaft to -Edger Connection = Insert the end of the edger MUST be fully inserted into the socket in the shaft housing. Do not operate with a screw and "handle"-nut. * DISCONNECT ...
Instruction Manual
Page 7
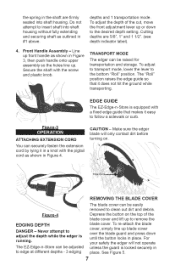
... 4. ATTACHING EXTENSION CORD You can securely fasten the extension cord by tying it in a knot with the screw and plastic knob. Make sure the edger blade wilt only contact dirt before turning on the top of the cut, move the front adjustment lever up blade cover over the blade guard.... the spring in the shaft are 518", 1" and 1 1/2". (see depth indicator label). 4. Do not attempt to clean out dirt and debris. TRANSPORT MODE The edger can be raised for transportation and storage. Never attempt to the bottom "Roll" position. The EZ-Edge-n-Store can be adjusted to edge at different...
... 4. ATTACHING EXTENSION CORD You can securely fasten the extension cord by tying it in a knot with the screw and plastic knob. Make sure the edger blade wilt only contact dirt before turning on the top of the cut, move the front adjustment lever up blade cover over the blade guard.... the spring in the shaft are 518", 1" and 1 1/2". (see depth indicator label). 4. Do not attempt to clean out dirt and debris. TRANSPORT MODE The edger can be raised for transportation and storage. Never attempt to the bottom "Roll" position. The EZ-Edge-n-Store can be adjusted to edge at different...
Instruction Manual
Page 8
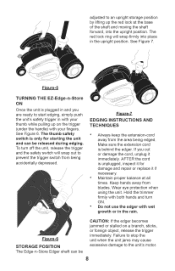
...simply push the unit's safety trigger in with wet growth or in the rain. To turn ON. * Do not use the edger with your fingers. STORAGE POSITION CAUTION: If the edger becomes jammed or stalled on the trigger (under the handle) with your thumb while pulling up on a branch, sticks, or ...foreign object, release the trigger immediately. The Edge-n-Store Edger shaft can be 8 The thumb safety switch is plugged in and you cut or damage the cord, unplug it if necessary. * Maintain proper balance at...
...simply push the unit's safety trigger in with wet growth or in the rain. To turn ON. * Do not use the edger with your fingers. STORAGE POSITION CAUTION: If the edger becomes jammed or stalled on the trigger (under the handle) with your thumb while pulling up on a branch, sticks, or ...foreign object, release the trigger immediately. The Edge-n-Store Edger shaft can be 8 The thumb safety switch is plugged in and you cut or damage the cord, unplug it if necessary. * Maintain proper balance at...
Instruction Manual
Page 9
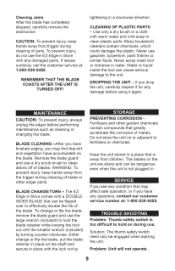
... = The EZ- Edge-n-Store comes with the smaller wrench (included) by •=A PREVENTING CORROSION Fertilizers and other edger parts. The blades on during clearing of the blade. A A CAUTION: To prevent injury, always unplug the edger before using it again. Keep the unit stored in . Problem: Unit will not operate. 9 If issues continue...
... = The EZ- Edge-n-Store comes with the smaller wrench (included) by •=A PREVENTING CORROSION Fertilizers and other edger parts. The blades on during clearing of the blade. A A CAUTION: To prevent injury, always unplug the edger before using it again. Keep the unit stored in . Problem: Unit will not operate. 9 If issues continue...


