
Operation Manual
Page 2
...odairelurssrteearniotodusfoallllopwesarsfeoatnyllailninsistnrtjuruucrctyito.ionnss liisntetdhis I manual, including all safety alert symbols such as cutting line, lamps batteries, bits, blades, or bonnets. if this Craftsman product is used for commercial or rental purposes, this warranty applies for only... 17 - 21 Pages 22 Pages 23 Pages 24 - 25 TWO Y EAR FULL WARRANTY ON CRAFTSMAN WEEDWACKER® ELECTRIC TRIMMER If this Craftsman product fails due to state. MAaLyEbRe TuseSdYiMn BcoOnjLu:ncItniodnicwatitehsDoAthNerGsEymRb,WolsARorNpIiNctOGogR, raphs. SAVE THESE INSTRUCTIONS? The safety...
...odairelurssrteearniotodusfoallllopwesarsfeoatnyllailninsistnrtjuruucrctyito.ionnss liisntetdhis I manual, including all safety alert symbols such as cutting line, lamps batteries, bits, blades, or bonnets. if this Craftsman product is used for commercial or rental purposes, this warranty applies for only... 17 - 21 Pages 22 Pages 23 Pages 24 - 25 TWO Y EAR FULL WARRANTY ON CRAFTSMAN WEEDWACKER® ELECTRIC TRIMMER If this Craftsman product fails due to state. MAaLyEbRe TuseSdYiMn BcoOnjLu:ncItniodnicwatitehsDoAthNerGsEymRb,WolsARorNpIiNctOGogR, raphs. SAVE THESE INSTRUCTIONS? The safety...

Operation Manual
Page 3
... jewelry. Hard hat should be used improperly or without the due precautions it could be caught in this manual before operating this electric trimmer. TOOL USE AND CARE SAFETY Z_ WARNING: BE SURE to follow all times. STORE idle tools out of the reach of ...eliminates the need for appropriate conditions, 6. ALWAYS avoid dangerous conditions. PERSONAL SAFETY .4k WARNING:The operation of parts, and any adjustments, changing cutting line, or storing the tool. I BEING THROWN, which may result in the hands of moving parts. DO NOT overreach. DISCONNECT the plug from the...
... jewelry. Hard hat should be used improperly or without the due precautions it could be caught in this manual before operating this electric trimmer. TOOL USE AND CARE SAFETY Z_ WARNING: BE SURE to follow all times. STORE idle tools out of the reach of ...eliminates the need for appropriate conditions, 6. ALWAYS avoid dangerous conditions. PERSONAL SAFETY .4k WARNING:The operation of parts, and any adjustments, changing cutting line, or storing the tool. I BEING THROWN, which may result in the hands of moving parts. DO NOT overreach. DISCONNECT the plug from the...

Operation Manual
Page 4
... is missing or should be provided on the switch. 7 Follow instructions in trimmer with the trimmer. ALWAYS make sure that it well away from the spinning cutting lines. 8. Pigtail Power Cord that could result in a loss of power and overheating of electric shock. INSPECT tool cords for greater control and balance. Read operator's manual...
... is missing or should be provided on the switch. 7 Follow instructions in trimmer with the trimmer. ALWAYS make sure that it well away from the spinning cutting lines. 8. Pigtail Power Cord that could result in a loss of power and overheating of electric shock. INSPECT tool cords for greater control and balance. Read operator's manual...

Operation Manual
Page 5
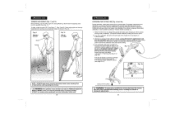
... them to instruct others who may contribute to cut . 21. Keep cord away from cutting line. 15. Do not try to hearing loss. 4. They can be entangled in fertilizers, herbicides, pesticides... in place and in electric shock, fire and/or serious personal injury. 1. Keep hands and feet away from heat, oil and sharp edges. 8. THE ROTATING LINE PERFORMS A CUTTING FUNCTION....oil and grease. z_ WARNING: NEVER reach under the trimmer (cutting line area) until trimmer has completely stopped. The trimmer's cutting line will operate properly and perform its intended function, Check ...
... them to instruct others who may contribute to cut . 21. Keep cord away from cutting line. 15. Do not try to hearing loss. 4. They can be entangled in fertilizers, herbicides, pesticides... in place and in electric shock, fire and/or serious personal injury. 1. Keep hands and feet away from heat, oil and sharp edges. 8. THE ROTATING LINE PERFORMS A CUTTING FUNCTION....oil and grease. z_ WARNING: NEVER reach under the trimmer (cutting line area) until trimmer has completely stopped. The trimmer's cutting line will operate properly and perform its intended function, Check ...

Operation Manual
Page 7
...GUARD MUST BE ATTACHED to the trimmer head before use , handling comfort and efficient trimming and edging. 10. Your Trimmer uses 0.065-in the base of Shaft Cord Length Power Requirement 15 inches 7200 RPM 5.5 Amp 0.065 inch round line Bump feed 4 positions From ... underside base of the head by trimmer line. 8. Turn the trimmer's motor housing head over to provide access to help protect flowers, plants, screens and fences from the power supply. Use Craftsman 71-85967 bump feed replacement spool and line. round line. I m_akinWgARanNyINaGdju: stmTenotsa.void injury,...
...GUARD MUST BE ATTACHED to the trimmer head before use , handling comfort and efficient trimming and edging. 10. Your Trimmer uses 0.065-in the base of Shaft Cord Length Power Requirement 15 inches 7200 RPM 5.5 Amp 0.065 inch round line Bump feed 4 positions From ... underside base of the head by trimmer line. 8. Turn the trimmer's motor housing head over to provide access to help protect flowers, plants, screens and fences from the power supply. Use Craftsman 71-85967 bump feed replacement spool and line. round line. I m_akinWgARanNyINaGdju: stmTenotsa.void injury,...

Operation Manual
Page 8
... hole located on each side of safety guard is in unexpected situations. I ,/h WARNING: To avoid injury, ALWAYS turn off and disconnect the trimmer I /K CAUTION: Line cutter on trimmer's top-shaft (see Fig. 4a). Do not tighten completely until you don't want cut, such as flowers, or damaged, such as a... desired working position. Position the knob and screw through the auxiliary handle and bracket, and tighten knob (turn knob and tighten securely. 15 INSTALLING THE SAFETY GUARD cont. (Figs. 4 and 4a ) 4. NOTE: Safety Guard will only fit one way. I from the power supply. 2....
... hole located on each side of safety guard is in unexpected situations. I ,/h WARNING: To avoid injury, ALWAYS turn off and disconnect the trimmer I /K CAUTION: Line cutter on trimmer's top-shaft (see Fig. 4a). Do not tighten completely until you don't want cut, such as flowers, or damaged, such as a... desired working position. Position the knob and screw through the auxiliary handle and bracket, and tighten knob (turn knob and tighten securely. 15 INSTALLING THE SAFETY GUARD cont. (Figs. 4 and 4a ) 4. NOTE: Safety Guard will only fit one way. I from the power supply. 2....

Operation Manual
Page 9
.... 2, 2a and 2b on the motor housing (see Fig. 9) and rotate the top shaft with your finger on the trigger switch. Plug the trimmer's pigtail power cord into power outlet. 3. Squeeze trigger switch to lock shaft in on the trigger switch. Allow at least 5 seconds for the cutting... spool (line) to page 11, Figs. 2, 2a and 2b for optimum operator control and comfort. Fig. 8 2. Move the trimmer head to one of the trimmer is squeezed. Failure to lock [o]II:1ll:l i [o]ll /N WARNING: To avoid injury...
.... 2, 2a and 2b on the motor housing (see Fig. 9) and rotate the top shaft with your finger on the trigger switch. Plug the trimmer's pigtail power cord into power outlet. 3. Squeeze trigger switch to lock shaft in on the trigger switch. Allow at least 5 seconds for the cutting... spool (line) to page 11, Figs. 2, 2a and 2b for optimum operator control and comfort. Fig. 8 2. Move the trimmer head to one of the trimmer is squeezed. Failure to lock [o]II:1ll:l i [o]ll /N WARNING: To avoid injury...
Operation Manual
Page 10
...operation of obstructions when operating the trimmer. Fig. 11 Use as a trimmer Fig. 12 Use as shown in the cutting line length, un-plug the trimmer's pigtail power cord from the extension cord. While the trimmer is no line is tangled or jammed, untangle and replace the line (see page 20). If ... cutting or edging is operating. Place edge guide and trimmer head above the surface you to simply bump the trimmer head to edge, as an edger Gloves i EXTENDING THE CUTTING LINE (Fig. 13 and 13a) During operation, cutting lines shorten due to right for cutting efficiency; If the ...
...operation of obstructions when operating the trimmer. Fig. 11 Use as a trimmer Fig. 12 Use as shown in the cutting line length, un-plug the trimmer's pigtail power cord from the extension cord. While the trimmer is no line is tangled or jammed, untangle and replace the line (see page 20). If ... cutting or edging is operating. Place edge guide and trimmer head above the surface you to simply bump the trimmer head to edge, as an edger Gloves i EXTENDING THE CUTTING LINE (Fig. 13 and 13a) During operation, cutting lines shorten due to right for cutting efficiency; If the ...
Operation Manual
Page 11
... spool stops rotating, the cutting line will cause spool wear. 9. Disconnect the trimmer from the spool. 3. Turn trimmer over to wind the line neatly and in layers Do not crisscross (see Fig. 15). 20 FILLING SPOOL WITH CUTTING LINE cont. (Fig. 15) 4. Fig. 14 Spool Head Cover REPLACE THE SPOOL 1. Insert the other Craftsman outlet. Replacement packs of...
... spool stops rotating, the cutting line will cause spool wear. 9. Disconnect the trimmer from the spool. 3. Turn trimmer over to wind the line neatly and in layers Do not crisscross (see Fig. 15). 20 FILLING SPOOL WITH CUTTING LINE cont. (Fig. 15) 4. Fig. 14 Spool Head Cover REPLACE THE SPOOL 1. Insert the other Craftsman outlet. Replacement packs of...

Operation Manual
Page 12
...personaUzed maintenance p[an for your local Sears store or other Craftsman outlets. single-wound 0.065 line Line and spools are not recommended for loose screws, misatignment, moving parts that may also cause a shock hazard. Check for this and a[[ your trimmer clean and in serious I any adjustments. Scrape the guard... brought to remove dried clippings and mud. I Z_ WARNING: To avoid damage or electric shock, DO NOT use , inspect the switch and cord for free! 22 23 REPLACEMENT CUTTING LINE if you are jammed, or any other product manuals online. , Get answers from our...
...personaUzed maintenance p[an for your local Sears store or other Craftsman outlets. single-wound 0.065 line Line and spools are not recommended for loose screws, misatignment, moving parts that may also cause a shock hazard. Check for this and a[[ your trimmer clean and in serious I any adjustments. Scrape the guard... brought to remove dried clippings and mud. I Z_ WARNING: To avoid damage or electric shock, DO NOT use , inspect the switch and cord for free! 22 23 REPLACEMENT CUTTING LINE if you are jammed, or any other product manuals online. , Get answers from our...

Operation Manual
Page 13
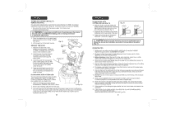
... 6 1 Insulation Cap 1 Winding Spool&Cutting Line 1 Bottom Cover 1 Winding Spool decorate Cover 1 Carbon Brush 2 Brush Holder 2 Brush Holder Assmebly 2 Rivet 1 Rear Bracket 1 Stator (120V) 1 Washer(_-) 1 Washer(_) 2 Armature(120V/ 1 Washer(--) 2 Bearing 608Z 1 Front Bracket 1 Stud M4X55 2 Washer byAxis 1 Fixing Block 1 metalSelfTappingScrew(ST3xt0) 15-in . Weedwacker ® Electric Trimmer ModelNo, 172,74545 The modelnumberwill be found on...
... 6 1 Insulation Cap 1 Winding Spool&Cutting Line 1 Bottom Cover 1 Winding Spool decorate Cover 1 Carbon Brush 2 Brush Holder 2 Brush Holder Assmebly 2 Rivet 1 Rear Bracket 1 Stator (120V) 1 Washer(_-) 1 Washer(_) 2 Armature(120V/ 1 Washer(--) 2 Bearing 608Z 1 Front Bracket 1 Stud M4X55 2 Washer byAxis 1 Fixing Block 1 metalSelfTappingScrew(ST3xt0) 15-in . Weedwacker ® Electric Trimmer ModelNo, 172,74545 The modelnumberwill be found on...


