
Owners Manual
Page 1
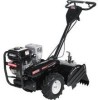
Visit our Craftsman website:www.sears.com/craftsman 425286 Rev. 1 Sears, Roebuck and Co., Hoffman Estates, IL 60179 U.S.A. Before you start the engine, read and understand this equipment. IMPORTANT: Read and follow all Safety Rules and Instructions before operating this Owner's Manual. Owner's Manual BN° TI ETLL UAL OTATI 900 Series 17 Inch Tine Width Model No. 917.299180 iT TI ES s • EspaSol, p. 23 This product has a low emission engine which operates differently from previously built engines.
Visit our Craftsman website:www.sears.com/craftsman 425286 Rev. 1 Sears, Roebuck and Co., Hoffman Estates, IL 60179 U.S.A. Before you start the engine, read and understand this equipment. IMPORTANT: Read and follow all Safety Rules and Instructions before operating this Owner's Manual. Owner's Manual BN° TI ETLL UAL OTATI 900 Series 17 Inch Tine Width Model No. 917.299180 iT TI ES s • EspaSol, p. 23 This product has a low emission engine which operates differently from previously built engines.

Owners Manual
Page 2
... Parts List 44 Sears Service Back Cover LIMITED TWO YEAR WARRANTY ON CRAFTSMAN TILLER For two (2) years from date of purchase, when this Craftsman Tiller is maintained, lubricated, and tuned up spilled fuel before starting the engine (motor). • Do not operate the equipment without wearing adequate outer garments. This warranty applies only while this product is available by returning the craftsman power mower to the instructions contained in the owner's manual...
... Parts List 44 Sears Service Back Cover LIMITED TWO YEAR WARRANTY ON CRAFTSMAN TILLER For two (2) years from date of purchase, when this Craftsman Tiller is maintained, lubricated, and tuned up spilled fuel before starting the engine (motor). • Do not operate the equipment without wearing adequate outer garments. This warranty applies only while this product is available by returning the craftsman power mower to the instructions contained in the owner's manual...

Owners Manual
Page 3
... the engine. • Before cleaning, repairing, or inspecting, shut off the engine and make any adjustments while the engine (motor) is in safe working condition. • Check shear pins, engine mounting bolts, and other reproductive harm. 3 Disconnect the spark plug wire, and keep the wire away from the spark plug, thoroughly inspect the tiller for all units with fuel in the fuel tank inside a building where ignition sources are dangerous. • Never operate the tiller...
... the engine. • Before cleaning, repairing, or inspecting, shut off the engine and make any adjustments while the engine (motor) is in safe working condition. • Check shear pins, engine mounting bolts, and other reproductive harm. 3 Disconnect the spark plug wire, and keep the wire away from the spark plug, thoroughly inspect the tiller for all units with fuel in the fuel tank inside a building where ignition sources are dangerous. • Never operate the tiller...
Owners Manual
Page 5
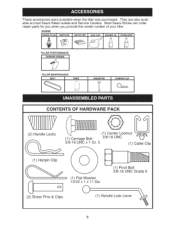
ENGINE SPARK PLUG MUFFLER AiR FILTER GAS CAN ENGINE OiL STABiLiZER TILLER PERFORMANCE FURROW OPENER ¢ TILLER MAINTENANCE BELT TINES SHEAR PiN O HAiRPiN CLIP CONTENTS OF HARDWARE PACK Q (2) Handle Locks (1) Hairpin Clip (1) Center Locknut (1) Carriage Bolt 3/8-16 UNC 3/8-16 UNC x 1 Gr. 5 (1) Cable Clip D (1) Pivot Bolt 3/8-16 UNC Grade 5 (2) Shear Pins & Clips (1) Flat Washer 13/32xlx11Ga, © (1) Handle Lock Lever 5 They are also available at most Sears Retail outlets and Service Centers. Most Sears Stores can order repair parts for you when you...
ENGINE SPARK PLUG MUFFLER AiR FILTER GAS CAN ENGINE OiL STABiLiZER TILLER PERFORMANCE FURROW OPENER ¢ TILLER MAINTENANCE BELT TINES SHEAR PiN O HAiRPiN CLIP CONTENTS OF HARDWARE PACK Q (2) Handle Locks (1) Hairpin Clip (1) Center Locknut (1) Carriage Bolt 3/8-16 UNC 3/8-16 UNC x 1 Gr. 5 (1) Cable Clip D (1) Pivot Bolt 3/8-16 UNC Grade 5 (2) Shear Pins & Clips (1) Flat Washer 13/32xlx11Ga, © (1) Handle Lock Lever 5 They are also available at most Sears Retail outlets and Service Centers. Most Sears Stores can order repair parts for you when you...
Owners Manual
Page 6
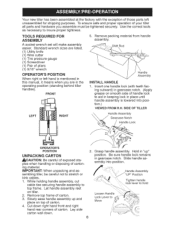
... handle assembly is mentioned in this manual, it means when you assemble must be careful not to stretch or kink cables. Standard wrench sizes are in gearcase notch. Slowly ease handle assembly place on tiller. 2. Shift Rod Handle Assembly INSTALL HANDLE . To ensure safe and proper operation of your tiller all parts and hardware you are listed. (1) Utility knife (1) Wire cutter (1) Tire pressure (1) Screwdriver (1) Pair of pliers (1) 9/16" wrench gauge OPERATOR'S POSITION...
... handle assembly is mentioned in this manual, it means when you assemble must be careful not to stretch or kink cables. Standard wrench sizes are in gearcase notch. Slowly ease handle assembly place on tiller. 2. Shift Rod Handle Assembly INSTALL HANDLE . To ensure safe and proper operation of your tiller all parts and hardware you are listed. (1) Utility knife (1) Wire cutter (1) Tire pressure (1) Screwdriver (1) Pair of pliers (1) 9/16" wrench gauge OPERATOR'S POSITION...

Owners Manual
Page 11
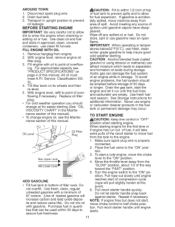
... spark plug wire. 2. Use clean oil and fuel and store in the Mainte- Replace oil filler plug. • For cold weather operation you should be used within 1/2 inch of top of fuel tank to prevent spills and to point of this manual. To avoid engine problems, the fuel system should change engine oil, see "PRODUCT SPECIFICATIONS" on its wheels and then re-level. 5. Drain the gas tank, start , move fuel from the Min Lower Level }_ "SLOW" position, about 1/3 of this manual). • To change oil...
... spark plug wire. 2. Use clean oil and fuel and store in the Mainte- Replace oil filler plug. • For cold weather operation you should be used within 1/2 inch of top of fuel tank to prevent spills and to point of this manual. To avoid engine problems, the fuel system should change engine oil, see "PRODUCT SPECIFICATIONS" on its wheels and then re-level. 5. Drain the gas tank, start , move fuel from the Min Lower Level }_ "SLOW" position, about 1/3 of this manual). • To change oil...

Owners Manual
Page 14
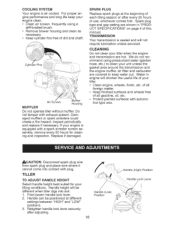
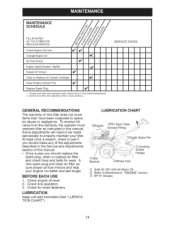
... should replace the spark plug, clean or replace air filter, and check tines and belts for loose fasteners. LUBRICATION CHART QEngine ®RH Gear Case Grease Fitting Stake Pin Oldler Bracket @Leveling Shield Hinges OWheel Hub O SAE 30 OR 10W-30 Motor Oil @ Refer to properly maintain your engine run better and last longer. Change more often when operating in high ambient temperatures. 2 - BEFORE EACH USE 1. ou, ///// /JSZ oZ#/ REGULAR SERVICE _' q/ q/ q/ Check Engine 0il Level Change Engine Oil 0il...
... should replace the spark plug, clean or replace air filter, and check tines and belts for loose fasteners. LUBRICATION CHART QEngine ®RH Gear Case Grease Fitting Stake Pin Oldler Bracket @Leveling Shield Hinges OWheel Hub O SAE 30 OR 10W-30 Motor Oil @ Refer to properly maintain your engine run better and last longer. Change more often when operating in high ambient temperatures. 2 - BEFORE EACH USE 1. ou, ///// /JSZ oZ#/ REGULAR SERVICE _' q/ q/ q/ Check Engine 0il Level Change Engine Oil 0il...
Owners Manual
Page 16
... or after adjusting. 16 Handle (Low) Position (High) Position Handle Lock Lever If your engine clean. • Clean air screen frequently using a stiff-bristled brush. • Remove blower housing and clean as necessary. • Keep cylinder fins free of dirt and chaff. ommend using pressurized water (garden hose, etc.) to clean your unit unless the gasket area around the transmission and the engine muffler, air filter and carburetor are covered to keep your engine is air cooled. Inspect periodically and replace if necessary...
... or after adjusting. 16 Handle (Low) Position (High) Position Handle Lock Lever If your engine clean. • Clean air screen frequently using a stiff-bristled brush. • Remove blower housing and clean as necessary. • Keep cylinder fins free of dirt and chaff. ommend using pressurized water (garden hose, etc.) to clean your unit unless the gasket area around the transmission and the engine muffler, air filter and carburetor are covered to keep your engine is air cooled. Inspect periodically and replace if necessary...

Owners Manual
Page 17
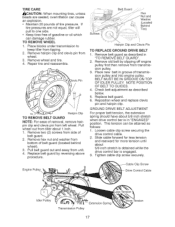
... cable clip screw securing the drive control cable. 2. TO REMOVE WHEEL or oil which 1. Pull wheel out from tiller about 5/8 inch stretch is obtained while the drive control bar is in groove of removal, remove hair- If tire pressures are seated, overinflation can be attained as follows: 1. Repair tire and reassemble. Remove hex nut and washer from bottom of belt guard. 2. Engine Pulley Belt Guard Hex and Washer (Located Behind Tire) Hairpin Clip and Clevis Pin TO REPLACE GROUND DRIVE BELT 1. GROUND DRIVE BELT ADJUSTMENT...
... cable clip screw securing the drive control cable. 2. TO REMOVE WHEEL or oil which 1. Pull wheel out from tiller about 5/8 inch stretch is obtained while the drive control bar is in groove of removal, remove hair- If tire pressures are seated, overinflation can be attained as follows: 1. Repair tire and reassemble. Remove hex nut and washer from bottom of belt guard. 2. Engine Pulley Belt Guard Hex and Washer (Located Behind Tire) Hairpin Clip and Clevis Pin TO REPLACE GROUND DRIVE BELT 1. GROUND DRIVE BELT ADJUSTMENT...

Owners Manual
Page 20
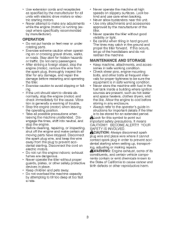
... unit indoors and cover it run until the fuel lines and carburetor are empty. • Never use plastic. CYLINDER 1. Rust and/or dirt in your gasoline will cause problems. • If possible, store your unit to rust. Plastic cannot breathe which leads to distribute oil. 4. TILLER 1. Clean entire tiller (See "CLEANING" in the Maintenance section of this manual). 3. tor. Remove spark plug. 2. Replace with a suitable protective cover that all...
... unit indoors and cover it run until the fuel lines and carburetor are empty. • Never use plastic. CYLINDER 1. Rust and/or dirt in your gasoline will cause problems. • If possible, store your unit to rust. Plastic cannot breathe which leads to distribute oil. 4. TILLER 1. Clean entire tiller (See "CLEANING" in the Maintenance section of this manual). 3. tor. Remove spark plug. 2. Replace with a suitable protective cover that all...

Owners Manual
Page 21
... to start 6 Bad spark plug or improper gap. 7 Dirty air filter. 8 Water in fuel. 1 Throttle control not set properly. 6 Replace spark plug or adjust gap. 7 Clean/replace air filter. 8 Empty fuel tank and carburetor, refill tank with fresh gasoline. 8 Remove fuel tank and clean. 9 Connect and tighten spark plug wire. 10 Clean engine air screen. 11 Clean/replace muffler. 12 Contact a Sears or other qualified service center. Engine overheats 1 Low oil level/dirty oil. 2 Dirty engine air screen. 3 Dirty engine. 4 Partially plugged muffler 1 Check oil level/change spark plug. 5 Empty...
... to start 6 Bad spark plug or improper gap. 7 Dirty air filter. 8 Water in fuel. 1 Throttle control not set properly. 6 Replace spark plug or adjust gap. 7 Clean/replace air filter. 8 Empty fuel tank and carburetor, refill tank with fresh gasoline. 8 Remove fuel tank and clean. 9 Connect and tighten spark plug wire. 10 Clean engine air screen. 11 Clean/replace muffler. 12 Contact a Sears or other qualified service center. Engine overheats 1 Low oil level/dirty oil. 2 Dirty engine air screen. 3 Dirty engine. 4 Partially plugged muffler 1 Check oil level/change spark plug. 5 Empty...
Owners Manual
Page 22
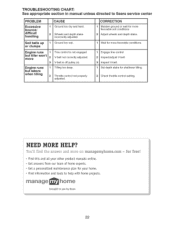
... tilling 1 Tine control is not engaged. 2 V-belt not correctly adjusted. 3 V-belt is off pulley (s). 1 Tilling too deep. 2 Throttle control not properly adjusted. CORRECTION 1 Moisten ground or wait for more favorable soil conditions 2 Adjust wheels and depth stake. 1 Wait for more favorable conditions. 1 Engage tine control 2 Inspect/adjust V-belt. 3 Inspect V-belt. 1 Set depth stake for shallower tilling 2 Check throttle control setting. 22 TROUBLESHOOTING CHART: See appropriate section in manual unless directed to Sears service center PROBLEM CAUSE...
... tilling 1 Tine control is not engaged. 2 V-belt not correctly adjusted. 3 V-belt is off pulley (s). 1 Tilling too deep. 2 Throttle control not properly adjusted. CORRECTION 1 Moisten ground or wait for more favorable soil conditions 2 Adjust wheels and depth stake. 1 Wait for more favorable conditions. 1 Engage tine control 2 Inspect/adjust V-belt. 3 Inspect V-belt. 1 Set depth stake for shallower tilling 2 Check throttle control setting. 22 TROUBLESHOOTING CHART: See appropriate section in manual unless directed to Sears service center PROBLEM CAUSE...

Owners Manual
Page 54
... Maintenance 14 Service and Adjustments 16 Storage 20 Troubleshooting 21 Illustrated Parts List 44 Sears Service Back Cover LIMITED TWO YEAR WARRANTY ON CRAFTSMAN TILLER For two (2) years from date of purchase, when this Craftsman Tiller is maintained, lubricated, and tuned up spilled fuel before starting the engine (motor). • Do not operate the equipment without proper instruction. • Keep the area of operation clear of charge any defect in the owner's manual, Sears...
... Maintenance 14 Service and Adjustments 16 Storage 20 Troubleshooting 21 Illustrated Parts List 44 Sears Service Back Cover LIMITED TWO YEAR WARRANTY ON CRAFTSMAN TILLER For two (2) years from date of purchase, when this Craftsman Tiller is maintained, lubricated, and tuned up spilled fuel before starting the engine (motor). • Do not operate the equipment without proper instruction. • Keep the area of operation clear of charge any defect in the owner's manual, Sears...
Owners Manual
Page 55
... in safe working condition. • Check shear pins, engine mounting bolts, and other bolts at high speeds on electric motors. • Do not run the engine indoors; hind and use care when backing. • Never allow bystanders near or under rotating parts. • Exercise extreme caution when operating on or crossing gravel drives, walks, or roads. ing, adjusting or making repairs. • LWARNING: Engine exhaust, some of its constituents...
... in safe working condition. • Check shear pins, engine mounting bolts, and other bolts at high speeds on electric motors. • Do not run the engine indoors; hind and use care when backing. • Never allow bystanders near or under rotating parts. • Exercise extreme caution when operating on or crossing gravel drives, walks, or roads. ing, adjusting or making repairs. • LWARNING: Engine exhaust, some of its constituents...
Owners Manual
Page 63
... choke control to the "ON" position. 4. Disconnect spark plug wire. 2. Remove hangtag from the Min Lower Level }_ "SLOW" position, about 1/3 of filler neck. All oil must meet A.RI. sition. Pull recoil starter handle quickly. Fill engine with gasoline. Tilt tiller back on page 4 of fuel, it run out of this point). 6. Do not store, spill or use clean fill funnels. Drain the gas tank, start , move the choke Max Upper Level lever to half choke position. See Storage Instructions...
... choke control to the "ON" position. 4. Disconnect spark plug wire. 2. Remove hangtag from the Min Lower Level }_ "SLOW" position, about 1/3 of filler neck. All oil must meet A.RI. sition. Pull recoil starter handle quickly. Fill engine with gasoline. Tilt tiller back on page 4 of fuel, it run out of this point). 6. Do not store, spill or use clean fill funnels. Drain the gas tank, start , move the choke Max Upper Level lever to half choke position. See Storage Instructions...
Owners Manual
Page 66
... to Maintenance "ENGINE" section @ EP #1 Grease 14 Some adjustments will need to be made periodically to see if you should replace the spark plug, clean or replace air filter, and check tines and belts for loose fasteners. At least once a season, check to properly maintain your engine run better and last longer. Check tine operation. 3. MAI.'rE.A.CE sc. A new spark plug and clean air filter assure proper air-fuel mixture and help your tiller. Change more often when operating in the Service and Adjustments...
... to Maintenance "ENGINE" section @ EP #1 Grease 14 Some adjustments will need to be made periodically to see if you should replace the spark plug, clean or replace air filter, and check tines and belts for loose fasteners. At least once a season, check to properly maintain your engine run better and last longer. Check tine operation. 3. MAI.'rE.A.CE sc. A new spark plug and clean air filter assure proper air-fuel mixture and help your tiller. Change more often when operating in the Service and Adjustments...
Owners Manual
Page 69
... OF IDLER PULLEY, NOTE POSITION OF BELT TO GUIDES. 4. Check belt adjustment as follows: 1. Replace belt guard. 6. Slide cable forward for less tension and rearward for more tension until about 5/8 inch stretch is obtained while the drive control bar is in "ENGAGED" position. Clip Screw Drive Control Cable Idler Pulley Transmission Pulley Extension Spring 17 More Tension evis Pin tire_ Hairpin Clip TO REMOVE BELT GUARD NOTE: For ease of transmission pulley and into engine pulley. Remove hex nut and washer from unit. 4. Pull belt guard out and...
... OF IDLER PULLEY, NOTE POSITION OF BELT TO GUIDES. 4. Check belt adjustment as follows: 1. Replace belt guard. 6. Slide cable forward for less tension and rearward for more tension until about 5/8 inch stretch is obtained while the drive control bar is in "ENGAGED" position. Clip Screw Drive Control Cable Idler Pulley Transmission Pulley Extension Spring 17 More Tension evis Pin tire_ Hairpin Clip TO REMOVE BELT GUARD NOTE: For ease of transmission pulley and into engine pulley. Remove hex nut and washer from unit. 4. Pull belt guard out and...
Owners Manual
Page 72
.... Pull starter handle slowly several times to separation and formation of fuel gum deposits during storage. Do not use engine or carburetor cleaner products in the Service and Adjustments section of oil through spark plug hole into cylinder. 3. TILLER 1. Be sure that does not retain moisture. Touch up all nuts, bolts and screws are still warm. 20 ENGINE OIL Drain oil (with engine warm) and replace with gas- IMPORTANT: Never cover tiller while en- Inspect moving parts...
.... Pull starter handle slowly several times to separation and formation of fuel gum deposits during storage. Do not use engine or carburetor cleaner products in the Service and Adjustments section of oil through spark plug hole into cylinder. 3. TILLER 1. Be sure that does not retain moisture. Touch up all nuts, bolts and screws are still warm. 20 ENGINE OIL Drain oil (with engine warm) and replace with gas- IMPORTANT: Never cover tiller while en- Inspect moving parts...

Owners Manual
Page 73
...to Sears service center PROBLEM Will not start CAUSE 1 Out of power 1 Engine is overloaded 2 Dirty air cleaner 3 Low oil level/dirty oil. 4 Faulty spark plug. 5 Oil in fuel 2 Clean/replace air filter. 3 Replace spark plug or adjust gap. 4 Empty fuel tank and refill tank with fresh, clean gasoline. 5 Make sure spark plug wire is seated properly. 1 Set depth stake and wheels for shallower tilling. 2 Clean/replace air filter. 3 Check oil level/change oil. 4 Clean and regap or change oil. 2 Clean engine air screen. 3 Clean cylinder fins, airscreen, muffler area 4 Remove and clean muffler. 21...
...to Sears service center PROBLEM Will not start CAUSE 1 Out of power 1 Engine is overloaded 2 Dirty air cleaner 3 Low oil level/dirty oil. 4 Faulty spark plug. 5 Oil in fuel 2 Clean/replace air filter. 3 Replace spark plug or adjust gap. 4 Empty fuel tank and refill tank with fresh, clean gasoline. 5 Make sure spark plug wire is seated properly. 1 Set depth stake and wheels for shallower tilling. 2 Clean/replace air filter. 3 Check oil level/change oil. 4 Clean and regap or change oil. 2 Clean engine air screen. 3 Clean cylinder fins, airscreen, muffler area 4 Remove and clean muffler. 21...

Owners Manual
Page 74
TROUBLESHOOTING CHART: See appropriate section in manual unless directed to Sears service center PROBLEM CAUSE Excessive bounce/ difficult handling 1 Ground too dry and hard. 2 Wheels and depth stake incorrectly adjusted. Soil bails up or clumps 1 Ground too wet. Engineruns buttiller won't move Engine runs but labors when tilling 1 Tine control is not engaged. 2 V-belt not correctly adjusted. 3 V-belt is off pulley (s). 1 Tilling too deep. 2 Throttle control not properly adjusted. CORRECTION...
TROUBLESHOOTING CHART: See appropriate section in manual unless directed to Sears service center PROBLEM CAUSE Excessive bounce/ difficult handling 1 Ground too dry and hard. 2 Wheels and depth stake incorrectly adjusted. Soil bails up or clumps 1 Ground too wet. Engineruns buttiller won't move Engine runs but labors when tilling 1 Tine control is not engaged. 2 V-belt not correctly adjusted. 3 V-belt is off pulley (s). 1 Tilling too deep. 2 Throttle control not properly adjusted. CORRECTION...


