

Operation Manual
Page 2
... instructions contained in material or workmanship (our testing proves that bend the frame or crankshaft, or over-speeding the engine. This warranty gives you specific legal rights, and you may also have other rights which vary from state to another person. Warranty 2 Safety Rules 3 Product Specifications 6 Assembly/Pre-Operation 8 Operation 13 Maintenance Schedule 20 Maintenance 20 Service and Adjustments 25 Storage 30 Troubleshooting 31 Sears Service Back Cover Craftsman Riding Equipment Warranty: Lawn Tractors, Garden Tractors, Zero Turn...
... instructions contained in material or workmanship (our testing proves that bend the frame or crankshaft, or over-speeding the engine. This warranty gives you specific legal rights, and you may also have other rights which vary from state to another person. Warranty 2 Safety Rules 3 Product Specifications 6 Assembly/Pre-Operation 8 Operation 13 Maintenance Schedule 20 Maintenance 20 Service and Adjustments 25 Storage 30 Troubleshooting 31 Sears Service Back Cover Craftsman Riding Equipment Warranty: Lawn Tractors, Garden Tractors, Zero Turn...

Operation Manual
Page 3
... your tractor. Wash hands after handling. These operators should evaluate their ability to operate the riding mower safely enough to observe the following safety instructions could be picked up , transporting, adjusting or making repairs, always disconnect spark plug wire and place wire where it cannot contact spark plug. _,WARNING: Do not coast down and behind before operating. Always look down a hill in reverse unless absolutely necessary. _DANGER: This cutting...
... your tractor. Wash hands after handling. These operators should evaluate their ability to operate the riding mower safely enough to observe the following safety instructions could be picked up , transporting, adjusting or making repairs, always disconnect spark plug wire and place wire where it cannot contact spark plug. _,WARNING: Do not coast down and behind before operating. Always look down a hill in reverse unless absolutely necessary. _DANGER: This cutting...

Operation Manual
Page 6
... schedule a service appointment online. For prices and additional information call 1-800=4-MY=HOME® 6 CONGRATULATIONS on products requir- A spark arrester for years of dependable operation. REPAIR PROTECTION AGREEMENTS Congratulations on federal lands. Federal laws apply on making a smart purchase. nance" and "Storage" sections of this manual. PRODUCT SPECIFICATIONS Gasoline Capacity and Type: Oil Type (API-SG-SL): Oil Capacity: Spark Plug: Ground Speed (MPH): Charging System: Battery: Blade Bolt Torque: 4 Gallons...
... schedule a service appointment online. For prices and additional information call 1-800=4-MY=HOME® 6 CONGRATULATIONS on products requir- A spark arrester for years of dependable operation. REPAIR PROTECTION AGREEMENTS Congratulations on federal lands. Federal laws apply on making a smart purchase. nance" and "Storage" sections of this manual. PRODUCT SPECIFICATIONS Gasoline Capacity and Type: Oil Type (API-SG-SL): Oil Capacity: Spark Plug: Ground Speed (MPH): Charging System: Battery: Blade Bolt Torque: 4 Gallons...

Operation Manual
Page 8
... steering wheel). Lift hood to lock seat in position. Label 2. TO INSTALL MOWER 1. Ensure parking brake will make assembly easier. To ensure safe and proper operationof your tractor offthe skid. Al_ WARNING: Before starting, read, understand and follow . SET PARKING BRAKE LEVER AND LOWER ATTACHMENT LIFT LEVER • Depress clutch/brake down . 3. Pedal should remain in seat. ADJUST SEAT 1. Your new tractor has been assembled at 6-10 amps. (See "BATTERY" in Maintenance section of this manual for charging instructions...
... steering wheel). Lift hood to lock seat in position. Label 2. TO INSTALL MOWER 1. Ensure parking brake will make assembly easier. To ensure safe and proper operationof your tractor offthe skid. Al_ WARNING: Before starting, read, understand and follow . SET PARKING BRAKE LEVER AND LOWER ATTACHMENT LIFT LEVER • Depress clutch/brake down . 3. Pedal should remain in seat. ADJUST SEAT 1. Your new tractor has been assembled at 6-10 amps. (See "BATTERY" in Maintenance section of this manual for charging instructions...

Operation Manual
Page 12
... for best cutting performance. • Reduce tire pressure to -rear for replacing motion and mower blade drive belts in the Service and Adjustments section of this manual. Be sure brake system is adjusted comfortably ened securely. Correct tire pressure is properly leveled side-to-side/front-to PSI shown on your tractor, check to the following checklist: _f All assembly completed. _f No remaining instructions have been loose parts in carton. _f Battery is...
... for best cutting performance. • Reduce tire pressure to -rear for replacing motion and mower blade drive belts in the Service and Adjustments section of this manual. Be sure brake system is adjusted comfortably ened securely. Correct tire pressure is properly leveled side-to-side/front-to PSI shown on your tractor, check to the following checklist: _f All assembly completed. _f No remaining instructions have been loose parts in carton. _f Battery is...

Operation Manual
Page 15
... leaving the operator's position. IMPORTANT: Leaving the ignition switch in severe eye damage. TO USE CHOKE CONTROL (N) Use choke control whenever you are starting a cold engine. Slowly push knob in brake position. Make sure parking brake will cause the battery to stop mower blades, move attachment clutch clutch lever to start a warm engine. • To engage choke control, pull knob out. Pull parking brake lever (C) up and hold tractor secure. Always wear safety glasses or eye shields while operating your tractor or performing any tractor can result...
... leaving the operator's position. IMPORTANT: Leaving the ignition switch in severe eye damage. TO USE CHOKE CONTROL (N) Use choke control whenever you are starting a cold engine. Slowly push knob in brake position. Make sure parking brake will cause the battery to stop mower blades, move attachment clutch clutch lever to start a warm engine. • To engage choke control, pull knob out. Pull parking brake lever (C) up and hold tractor secure. Always wear safety glasses or eye shields while operating your tractor or performing any tractor can result...
Operation Manual
Page 16
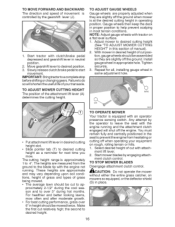
.... Install gauge wheel in the seat to leave the seat with an operator presence sensing switch. The heights are measured from hesitating or cutting off when operating your transaxle. You must remain fully and centrally positioned in appropriate hole. Adjust mower to the blade tip with tractor on a flat level surface. 1. ment lift lever. 2. TO STOP MOWER BLADES Disengage attachment clutch control. _CAUTION: Do not operate the mower without either the entire grass catcher, on...
.... Install gauge wheel in the seat to leave the seat with an operator presence sensing switch. The heights are measured from hesitating or cutting off when operating your transaxle. You must remain fully and centrally positioned in appropriate hole. Adjust mower to the blade tip with tractor on a flat level surface. 1. ment lift lever. 2. TO STOP MOWER BLADES Disengage attachment clutch control. _CAUTION: Do not operate the mower without either the entire grass catcher, on...

Operation Manual
Page 17
... change oil for two hours. NOTE: Service reminder runs when the ignition key is closed and secured to allow reverse operation with slopes greater than five (5) MPH. Do not mow in any slope. Depress clutch/brake pedal all turns slowly. TO TRANSPORT • Raise attachment lift lever to its highest position. • When pushing or towing your tractor. Use common sense when towing. Do not thread the cap...
... change oil for two hours. NOTE: Service reminder runs when the ignition key is closed and secured to allow reverse operation with slopes greater than five (5) MPH. Do not mow in any slope. Depress clutch/brake pedal all turns slowly. TO TRANSPORT • Raise attachment lift lever to its highest position. • When pushing or towing your tractor. Use common sense when towing. Do not thread the cap...

Operation Manual
Page 18
... (as shown in operating position, depress clutch/brake pedal and set parking brake. 2. Acidic gas can be refueled. 5. See Storage Instructions for a few seconds and then continue to push the control in slowly. Never use gasoline near an open flame. In normal operation, valve should be needed. Move throttle control to disengaged position. 4. For a warm engine start the engine and let it run starter continuously for one minute using ethanol or methanol) can...
... (as shown in operating position, depress clutch/brake pedal and set parking brake. 2. Acidic gas can be refueled. 5. See Storage Instructions for a few seconds and then continue to push the control in slowly. Never use gasoline near an open flame. In normal operation, valve should be needed. Move throttle control to disengaged position. 4. For a warm engine start the engine and let it run starter continuously for one minute using ethanol or methanol) can...
Operation Manual
Page 20
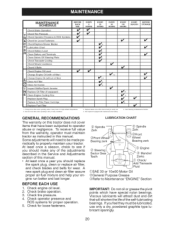
...Check Brake Operation Check Tire Pressure BEFORE EACH USE _ _ T Check Operator Presence & ROS Systems A Check for Loose Fasteners C ChecWReplace Mower Blades T Lubrication Chart 0 Check Battery Level R Clean Battery and Terminals Clean Debris Off Steering Plate Check Transaxle Cooling Check Mower Levelness Check V-Belts u Check Engine Oil Level Change Engine Oil (with maintenance-free battery. _#' _,2 _2 if q_" _2 5 - BEFORE EACH USE 1. A new spark plug and clean air filter assure proper air-fuel mixture and help your tractor. At least once a season, check to Maintenance...
...Check Brake Operation Check Tire Pressure BEFORE EACH USE _ _ T Check Operator Presence & ROS Systems A Check for Loose Fasteners C ChecWReplace Mower Blades T Lubrication Chart 0 Check Battery Level R Clean Battery and Terminals Clean Debris Off Steering Plate Check Transaxle Cooling Check Mower Levelness Check V-Belts u Check Engine Oil Level Change Engine Oil (with maintenance-free battery. _#' _,2 _2 if q_" _2 5 - BEFORE EACH USE 1. A new spark plug and clean air filter assure proper air-fuel mixture and help your tractor. At least once a season, check to Maintenance...
Operation Manual
Page 21
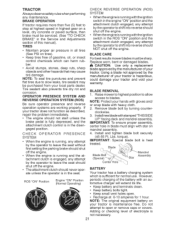
... or remove caps or covers. BRAKE OPERATION • When the engine is running and the at highest speed in highest gear on your tractor does not function as described, repair the problem immediately. • The engine should not start unless the brake pedal is fully depressed, and the attachment clutch control is in blade must be serviced. (See "TO CHECK BRAKE" in the Service and Adjustments section of the battery with the ignition switch in the engine...
... or remove caps or covers. BRAKE OPERATION • When the engine is running and the at highest speed in highest gear on your tractor does not function as described, repair the problem immediately. • The engine should not start unless the brake pedal is fully depressed, and the attachment clutch control is in blade must be serviced. (See "TO CHECK BRAKE" in the Service and Adjustments section of the battery with the ignition switch in the engine...

Operation Manual
Page 22
... 100 hours in one year. Gently tap the paper element to "leak" power. 1. Disconnect BLACK battery cable first then RED battery cable and remove battery from wear. Refill engine with grease or petroleum jelly. 6. Reinstall battery (See "REPLACING BATTERY" in a suitable container. 1. The belts are not adjustable. Tighten cap onto the tube securely when finished. Check the crankcase oil level before oil change if the tractor is damaged. do not use pressurized air, as shown. 6.
... 100 hours in one year. Gently tap the paper element to "leak" power. 1. Disconnect BLACK battery cable first then RED battery cable and remove battery from wear. Refill engine with grease or petroleum jelly. 6. Reinstall battery (See "REPLACING BATTERY" in a suitable container. 1. The belts are not adjustable. Tighten cap onto the tube securely when finished. Check the crankcase oil level before oil change if the tractor is damaged. do not use pressurized air, as shown. 6.

Operation Manual
Page 24
... collar of the mower deck. Move the tractor's attachment clutch control to a dry area, preferably a concrete or paved area. Pull back the lock collar of the nozzle adapter and push the adapter onto the deck washout port at the left end of the nozzle adapter to lock the adapter on the tractor, re-start the engine and place the throttle lever in the operator's with the cutting deck engaged deck is cleaned. Nozzle...
... collar of the mower deck. Move the tractor's attachment clutch control to a dry area, preferably a concrete or paved area. Pull back the lock collar of the nozzle adapter and push the adapter onto the deck washout port at the left end of the nozzle adapter to lock the adapter on the tractor, re-start the engine and place the throttle lever in the operator's with the cutting deck engaged deck is cleaned. Nozzle...

Operation Manual
Page 26
... are sharp. Deck must be the same on level ground or driveway. Test your lawn appears unevenly cut, determine which side of your hands with gloves and/or wrap blade with wrench and tighten jam nut securely against adjustment nut. 26 Protect your lawn and lead you are equal. To obtain the best cutting results, the mower blades should be level side- see steps 2 instructions 5.
... are sharp. Deck must be the same on level ground or driveway. Test your lawn appears unevenly cut, determine which side of your hands with gloves and/or wrap blade with wrench and tighten jam nut securely against adjustment nut. 26 Protect your lawn and lead you are equal. To obtain the best cutting results, the mower blades should be level side- see steps 2 instructions 5.
Operation Manual
Page 28
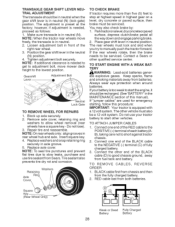
... adjustment bolt in the MAINTENANCE section of this manual). You may also check brake by: 1. BLACK cable first from chassis and then from fuel tank and battery. Parktractoronalevel,dryconcreteorpaved surface, depress clutch/brake pedal all the waydown and engage parking brake. 2. Contact a Sears or other vehicles. Square'@ Key _...... _T-_-c------_ _ (Rear Wheel Only) Weak or Dead Battery Fully Charged Battery 28 Tighten adjustment bolt securely. Place gear shift lever in rear wheel hub and axle. The rear wheels must also be serviced...
... adjustment bolt in the MAINTENANCE section of this manual). You may also check brake by: 1. BLACK cable first from chassis and then from fuel tank and battery. Parktractoronalevel,dryconcreteorpaved surface, depress clutch/brake pedal all the waydown and engage parking brake. 2. Contact a Sears or other vehicles. Square'@ Key _...... _T-_-c------_ _ (Rear Wheel Only) Weak or Dead Battery Fully Charged Battery 28 Tighten adjustment bolt securely. Place gear shift lever in rear wheel hub and axle. The rear wheels must also be serviced...
Operation Manual
Page 29
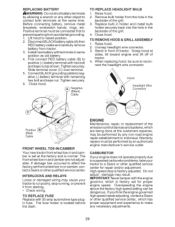
... the grill. 3. Remove bulb holder from starting. • Check wiring. Raise hood. 2. When replacing hood, be dangerous. Hood Headlight Wire Connector Positive (Red) Cable FRONT WHEEL TOE-IN/CAMBER Your new tractor front wheel toe-in and camber are being done at the factory and is factory set for repair and/or adjustment. Lift hood to prevent sparking from tractor. 3. Install new battery with remaining hex bolt and keps nut...
... the grill. 3. Remove bulb holder from starting. • Check wiring. Raise hood. 2. When replacing hood, be dangerous. Hood Headlight Wire Connector Positive (Red) Cable FRONT WHEEL TOE-IN/CAMBER Your new tractor front wheel toe-in and camber are being done at the factory and is factory set for repair and/or adjustment. Lift hood to prevent sparking from tractor. 3. Install new battery with remaining hex bolt and keps nut...

Operation Manual
Page 31
... in manual unless directed to Sears service center PROBLEM Will not start Hard to start Engine will not turn over CAUSE CORRECTION 1 Out of fuel. 2 Engine not "CHOKED" properly. 3 Enginefiooded. 4 Bad spark plug. 5 Dirty air filter. 6 Dirty fuel filter. 7 Water in fuel. 8 Loose or damaged wiring. 1 Fill fuel tank. 2 See"TO START ENGINE" in Operation section. 3 Wait several minutes before attempting to start. 4 Replace spark plug. 5 Clean/replace air filter. 6 Replace fuel filter. 7 Empty fuel tank and carburetor, refill tank with fresh gasoline and replace fuel filter. 8 Check all wiring...
... in manual unless directed to Sears service center PROBLEM Will not start Hard to start Engine will not turn over CAUSE CORRECTION 1 Out of fuel. 2 Engine not "CHOKED" properly. 3 Enginefiooded. 4 Bad spark plug. 5 Dirty air filter. 6 Dirty fuel filter. 7 Water in fuel. 8 Loose or damaged wiring. 1 Fill fuel tank. 2 See"TO START ENGINE" in Operation section. 3 Wait several minutes before attempting to start. 4 Replace spark plug. 5 Clean/replace air filter. 6 Replace fuel filter. 7 Empty fuel tank and carburetor, refill tank with fresh gasoline and replace fuel filter. 8 Check all wiring...

Operation Manual
Page 32
... 4 Check/replace solenoid or starter. 1 Raise cutting height/reduce speed. 2 Adjust throttle control. 3 Clean underside of mower housing. 4 Clean/replace air filter. 5 Check oil level/change oil. 6 Clean and regap or change spark plug. 7 Replace fuel filter. 8 Empty fuel tank and refill tank with fresh, clean gasoline. 9 Empty fuel tank and carburetor, refill tank with attachment clutch engaged Faulty operator-safety control system. If not corrected, contact a Sears or other qualified service center. 3 Tighten loose part(s). Water in fuel. 10 Spark plug wire loose. 11 Dirty engine air...
... 4 Check/replace solenoid or starter. 1 Raise cutting height/reduce speed. 2 Adjust throttle control. 3 Clean underside of mower housing. 4 Clean/replace air filter. 5 Check oil level/change oil. 6 Clean and regap or change spark plug. 7 Replace fuel filter. 8 Empty fuel tank and refill tank with fresh, clean gasoline. 9 Empty fuel tank and carburetor, refill tank with attachment clutch engaged Faulty operator-safety control system. If not corrected, contact a Sears or other qualified service center. 3 Tighten loose part(s). Water in fuel. 10 Spark plug wire loose. 11 Dirty engine air...

Operation Manual
Page 33
...Sears service center PROBLEM Poor cut = uneven cutting Mower blades will not rotate Poor grass discharge Headlight(s) not working (if so equipped) CAUSE CORRECTION 1 Worn, bent or loose blade. 2 Mower deck not level. 1 Replace blade. Contact a Sears or other qualified service center. 1 Engine speed too slow. 1 Place throttle control in this manual. 11 Clogged mower deck vent holes 11 Clean around mandrels. 1 Light switch is "OFF". 1 Turn light switch "ON". 2 Bulb(s) or lamp(s) burned out. 3 Faulty light switch. 2 Replace bulb(s) or lamp(s). 3 Check/replace light switch. 4 Loose...
...Sears service center PROBLEM Poor cut = uneven cutting Mower blades will not rotate Poor grass discharge Headlight(s) not working (if so equipped) CAUSE CORRECTION 1 Worn, bent or loose blade. 2 Mower deck not level. 1 Replace blade. Contact a Sears or other qualified service center. 1 Engine speed too slow. 1 Place throttle control in this manual. 11 Clogged mower deck vent holes 11 Clean around mandrels. 1 Light switch is "OFF". 1 Turn light switch "ON". 2 Bulb(s) or lamp(s) burned out. 3 Faulty light switch. 2 Replace bulb(s) or lamp(s). 3 Check/replace light switch. 4 Loose...

Operation Manual
Page 34
... operation system (ROS) 1 Turn ignition key to Sears service center PROBLEM Battery will not charge Loss of drive Engine "backfires" when turning engine "OFF" Engine dies when tractor is shifted into reverse CAUSE CORRECTION 1 Bad battery cell(s). 2 Poor cable connections. 1 Replace battery. 2 Check/clean all connections. 3 Faulty regulator (if so equipped). 3 Replace regulator. 4 Faulty alternator. Debris on steering plate (if equipped). 4 Replace alternator. 1 See "CLEANING" in the maintenance section. See Operation section. attachment is engaged. 34 TROUBLESHOOTING...
... operation system (ROS) 1 Turn ignition key to Sears service center PROBLEM Battery will not charge Loss of drive Engine "backfires" when turning engine "OFF" Engine dies when tractor is shifted into reverse CAUSE CORRECTION 1 Bad battery cell(s). 2 Poor cable connections. 1 Replace battery. 2 Check/clean all connections. 3 Faulty regulator (if so equipped). 3 Replace regulator. 4 Faulty alternator. Debris on steering plate (if equipped). 4 Replace alternator. 1 See "CLEANING" in the maintenance section. See Operation section. attachment is engaged. 34 TROUBLESHOOTING...


