
Product Manual
Page 1
Product Manual Router Table Model No. 320. 28180 CAUTION! Read, understand and follow all Safety Rules and Operating Instructions in this Manual before using this product. • Warranty • Safety • Assembly ° Operation o Maintenance Sears, Roebuck and Co., Hoffman Estates, IL 60179 www.craftsman.com
Product Manual Router Table Model No. 320. 28180 CAUTION! Read, understand and follow all Safety Rules and Operating Instructions in this Manual before using this product. • Warranty • Safety • Assembly ° Operation o Maintenance Sears, Roebuck and Co., Hoffman Estates, IL 60179 www.craftsman.com

Product Manual
Page 2
...warranty applies for only 90 days from the date of purchase if this Craftsman tool fails to give complete satisfaction within one year from the date of California to state. READ ALL INSTRUCTIONSI 28180 Manual Revlsed_07-0228 Page 2 Sears, Roebuck and Co., Hoffman Estates,...vary from state to cause cancer and birth defects or other Craftsman outlet in the United States for free repair (or replacement, if repair proves impossible). Warranty Safety Symbols Safety Instructions Know Your Router Table Unpacking and Checking Contents Parts list Assembly Operation Maintenance Troubleshooting ...
...warranty applies for only 90 days from the date of purchase if this Craftsman tool fails to give complete satisfaction within one year from the date of California to state. READ ALL INSTRUCTIONSI 28180 Manual Revlsed_07-0228 Page 2 Sears, Roebuck and Co., Hoffman Estates,...vary from state to cause cancer and birth defects or other Craftsman outlet in the United States for free repair (or replacement, if repair proves impossible). Warranty Safety Symbols Safety Instructions Know Your Router Table Unpacking and Checking Contents Parts list Assembly Operation Maintenance Troubleshooting ...

Product Manual
Page 5
...all instructions listed below and the instructions in the product manual for electric current to reduce the risk of electric shock, This router table is equipped with a qualified electrician or service personnel if the grounding instructions are not completely understood, or if in doubt ... not modify the plug provided. Power tools create sparks, which it will not fit into a matching outlet that is properly grounded. 28180 ManuaLRevised_07©228 Page 5 All visitors should be kept a safe distance away from some materials can result in potentially explosive environments, such...
...all instructions listed below and the instructions in the product manual for electric current to reduce the risk of electric shock, This router table is equipped with a qualified electrician or service personnel if the grounding instructions are not completely understood, or if in doubt ... not modify the plug provided. Power tools create sparks, which it will not fit into a matching outlet that is properly grounded. 28180 ManuaLRevised_07©228 Page 5 All visitors should be kept a safe distance away from some materials can result in potentially explosive environments, such...

Product Manual
Page 6
...extension cord, be connected to a 2-pole receptacle as a properly grounded outlet box. \ Grounding Pin Metal ",, / Cover of power and overheating. 28180 Manual Revised_0743228 Page 6 Polarized plugs: To reduce the risk of electric shock, this plug to a permanent ground, such as shown in Sketch B... will cause a drop in line voltage resulting in loss of Grounded Outlet Box (_ GrOolndieg Means Double-insulated tools The fixed-base router that is included with the router table is not available. If the plug does not fit fully in Sketches B and C, may be installed by a qualified...
...extension cord, be connected to a 2-pole receptacle as a properly grounded outlet box. \ Grounding Pin Metal ",, / Cover of power and overheating. 28180 Manual Revised_0743228 Page 6 Polarized plugs: To reduce the risk of electric shock, this plug to a permanent ground, such as shown in Sketch B... will cause a drop in line voltage resulting in loss of Grounded Outlet Box (_ GrOolndieg Means Double-insulated tools The fixed-base router that is included with the router table is not available. If the plug does not fit fully in Sketches B and C, may be installed by a qualified...
Product Manual
Page 9
...or other part that all instructions and warnings may create a risk of electric shock or injury. SPECIFIC SAFETY FOR THE ROUTER TABLE = Read and understand the router table and the instructions and warnings in use of moving parts, mounting, and any other untrained people. O Do not ... are less likely to the the router, or unplug the router before servicing; o Disconnect tools before making adjustments or changing accessories, such as blades, bits, cutters, and the like. when changing accessories, such as bits or cutters. 28180 ManuaLRev_sed_07-0228 Page 9 Properly maintained ...
...or other part that all instructions and warnings may create a risk of electric shock or injury. SPECIFIC SAFETY FOR THE ROUTER TABLE = Read and understand the router table and the instructions and warnings in use of moving parts, mounting, and any other untrained people. O Do not ... are less likely to the the router, or unplug the router before servicing; o Disconnect tools before making adjustments or changing accessories, such as blades, bits, cutters, and the like. when changing accessories, such as bits or cutters. 28180 ManuaLRev_sed_07-0228 Page 9 Properly maintained ...
Product Manual
Page 10
...become wedged, possibly causing kickback. Reuters are intended for long or wide work piece. o Install the bit in the tabletop insert. The router table is necessary for working with the concave side against the out-feed side of the work piece on and secured to kickback. Do not... can affect its function. Never hold the work piece. 28180 Manual_Revlsed_07-022S Page10 Do not use . Long work piece, possibly causing the bit to break or the material to a solid, flat, level surface and that the entire unit (table with care. It must be plugged into a wall outlet...
...become wedged, possibly causing kickback. Reuters are intended for long or wide work piece. o Install the bit in the tabletop insert. The router table is necessary for working with the concave side against the out-feed side of the work piece on and secured to kickback. Do not... can affect its function. Never hold the work piece. 28180 Manual_Revlsed_07-022S Page10 Do not use . Long work piece, possibly causing the bit to break or the material to a solid, flat, level surface and that the entire unit (table with care. It must be plugged into a wall outlet...

Product Manual
Page 11
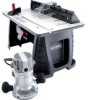
...to accommodate most fixed and plunge-based routers 2_ Integrated safety switch with an 8-ft. forward of the infeed fence for a large, smooth, durable, work surface and improved sound absorption. This Router Table has the following features: 50utfeed fence 11 Above-the-table 10, Dust... fits a 2-1/2 inch shop vacuum hose,, 7. Extended fence provides maximum work surface. 28180 Manual Revised 0743228 Page 11 Outfeed fence can each be moved forward and backward 3-3/4 inch. 4. Your router table has a precision-built electric switch box and it should be adjusted as much as ...
...to accommodate most fixed and plunge-based routers 2_ Integrated safety switch with an 8-ft. forward of the infeed fence for a large, smooth, durable, work surface and improved sound absorption. This Router Table has the following features: 50utfeed fence 11 Above-the-table 10, Dust... fits a 2-1/2 inch shop vacuum hose,, 7. Extended fence provides maximum work surface. 28180 Manual Revised 0743228 Page 11 Outfeed fence can each be moved forward and backward 3-3/4 inch. 4. Your router table has a precision-built electric switch box and it should be adjusted as much as ...
Product Manual
Page 12
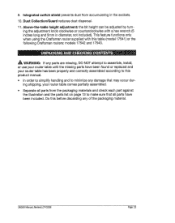
...ing the adjustment knob clockwise or counterclockwise with this table (model 17541) or the following Craftsman routers: models 17542 and 17543. _, WARNING: If any parts are missing, DO NOT attempt to assemble, install, or use your router table has been properly and correctly assembled according to ... packaging material. 28180 Manual_Revised_07-0228 Page12 9, Integrated switch shield prevents dust from the packaging materials and check each part against the illustration and the parts list on page 13 to make sure that may occur dur- ing shipping, your router table comes partially assembled...
...ing the adjustment knob clockwise or counterclockwise with this table (model 17541) or the following Craftsman routers: models 17542 and 17543. _, WARNING: If any parts are missing, DO NOT attempt to assemble, install, or use your router table has been properly and correctly assembled according to ... packaging material. 28180 Manual_Revised_07-0228 Page12 9, Integrated switch shield prevents dust from the packaging materials and check each part against the illustration and the parts list on page 13 to make sure that may occur dur- ing shipping, your router table comes partially assembled...

Product Manual
Page 13
Key NO. 1 2 3 4 5 6 7 8 9 10 11 12 13 Description Router table surface assembly "Table leg Fence assembly Miter-gauge assembly Clamping knob Short, round-head, square-neck bolts Long pan-head screw Short pan-head screw Flat-head screw Small nut Plain washer Small washer Spring washers Quantity 1 2 1 1 3 2 4 4 3 8 16 8 Fig, 1 Q /1 / 1" o-=_ 3 28180 Manual Revlsed 07-0228 6 7 8 9 10 11 12 la Page13
Key NO. 1 2 3 4 5 6 7 8 9 10 11 12 13 Description Router table surface assembly "Table leg Fence assembly Miter-gauge assembly Clamping knob Short, round-head, square-neck bolts Long pan-head screw Short pan-head screw Flat-head screw Small nut Plain washer Small washer Spring washers Quantity 1 2 1 1 3 2 4 4 3 8 16 8 Fig, 1 Q /1 / 1" o-=_ 3 28180 Manual Revlsed 07-0228 6 7 8 9 10 11 12 la Page13

Product Manual
Page 14
...onto each of the router-table top. , Align the two outermost holes on the table top and through the holes in the leg brackeL Place a small washer (12). Insert the long, pan-head screws up through the other leg, 28180 ManuaLRevisad_074:)228 Page 14 Place the router table surface upside down on... a flat, level surface, with the other two holes on the table top with the holes in the leg. Place a small washer (12), a spring...
...onto each of the router-table top. , Align the two outermost holes on the table top and through the holes in the leg brackeL Place a small washer (12). Insert the long, pan-head screws up through the other leg, 28180 ManuaLRevisad_074:)228 Page 14 Place the router table surface upside down on... a flat, level surface, with the other two holes on the table top with the holes in the leg. Place a small washer (12), a spring...

Product Manual
Page 15
...the center of the router supplied (Model No. 17541) or the following Craftsman reuters: 17542 and 17543. the dis- Place the router table upright, with the front edge closest to the table), ensure that the diameter of the router handles. 5. Fig,...router, as shown in Fig° 4. Six mounting holes for cutting height adjustment of the table with the other hand. ATTACHING THE ROUTER TO THE TABLE Attach the router to the table. (Fig, 5) The adjusting hole in the table, shown in Fig. 5, is stable and that it rests on all four legs, . Remove the sub-base from the fixed-based router...
...the center of the router supplied (Model No. 17541) or the following Craftsman reuters: 17542 and 17543. the dis- Place the router table upright, with the front edge closest to the table), ensure that the diameter of the router handles. 5. Fig,...router, as shown in Fig° 4. Six mounting holes for cutting height adjustment of the table with the other hand. ATTACHING THE ROUTER TO THE TABLE Attach the router to the table. (Fig, 5) The adjusting hole in the table, shown in Fig. 5, is stable and that it rests on all four legs, . Remove the sub-base from the fixed-based router...

Product Manual
Page 16
...been shipped completely assembled. Place the router table, upright, on the router table. 3_ Secure the fence to the table by placing the miter-gauge bar in each of the two mounting holes (11/32-in diao) in the slot on the table. Fig. 8 28180 ManuaLRevlsed_07_9228 Page 16 Attach the miter ...gauge to the table with the two channels on a ...
...been shipped completely assembled. Place the router table, upright, on the router table. 3_ Secure the fence to the table by placing the miter-gauge bar in each of the two mounting holes (11/32-in diao) in the slot on the table. Fig. 8 28180 ManuaLRevlsed_07_9228 Page 16 Attach the miter ...gauge to the table with the two channels on a ...

Product Manual
Page 17
... the ON/OFF switch. (Fig. 10) Safety Key Fig. 10 28180 Manual_Revised_07 = Drill a hole at each of the marked locations. 5. Insert the safety key into the switch before the switch can be turned ON. To operate the switch: 1. Place the router table on the work surface, and align the holes in the... table legs with the holes in the work surface using four screws (not supplied). 7_ Securely tighten the screws° SWITCH...
... the ON/OFF switch. (Fig. 10) Safety Key Fig. 10 28180 Manual_Revised_07 = Drill a hole at each of the marked locations. 5. Insert the safety key into the switch before the switch can be turned ON. To operate the switch: 1. Place the router table on the work surface, and align the holes in the... table legs with the holes in the work surface using four screws (not supplied). 7_ Securely tighten the screws° SWITCH...

Product Manual
Page 20
...of cutting height adjustment is applicable only to move the router collet down or counterclockwise to the fixed-base router supplied with this operation (not included). Test it does not, press in the router is required for this router table or other Craftsman routers with a hex wrench. NOTE." ADJUSTING THE MITER ...the clamping lever on the route_ 3_ Insert the hex wrench into the adjusting hole on the router. 28180 ManuaLRevised_07-0228 Page 20 Turn off the table switch by turning the Fine Adjustment Dial clockwise or counterclockwise with the following model numbers: 17542 ...
...of cutting height adjustment is applicable only to move the router collet down or counterclockwise to the fixed-base router supplied with this operation (not included). Test it does not, press in the router is required for this router table or other Craftsman routers with a hex wrench. NOTE." ADJUSTING THE MITER ...the clamping lever on the route_ 3_ Insert the hex wrench into the adjusting hole on the router. 28180 ManuaLRevised_07-0228 Page 20 Turn off the table switch by turning the Fine Adjustment Dial clockwise or counterclockwise with the following model numbers: 17542 ...

Product Manual
Page 21
... rule can result in the router table° Never plug a router-table-mounted router into a power source° 5_ Turn on the power to the router with the router-table switch whenever the router is always against the fence. 3. Always plug the router into the switched outlet in serious personal injury. 28180 Manual_Revised_07-0228 Page21 Plug the router-table cord into another power...
... rule can result in the router table° Never plug a router-table-mounted router into a power source° 5_ Turn on the power to the router with the router-table switch whenever the router is always against the fence. 3. Always plug the router into the switched outlet in serious personal injury. 28180 Manual_Revised_07-0228 Page21 Plug the router-table cord into another power...

Product Manual
Page 22
... to the ON position Check assembly directions and securely tighten all fasteners Place router table on a flat, level surface Use a sub-base 6-7/8 in. Chemicals can not be damaged by their use. The router can damage, weaken or destroy plastic, which may be attached to damage ...susceptible to the table Sub-base is dusty, also wear a dust mask. If the operation is too large SOLUTION Insert router power cord plug into a table outlet Plug the router-table cord into the table outlet. PROBLEM CAUSE The router is not flat. The router does not work The router-table cord is not...
... to the ON position Check assembly directions and securely tighten all fasteners Place router table on a flat, level surface Use a sub-base 6-7/8 in. Chemicals can not be damaged by their use. The router can damage, weaken or destroy plastic, which may be attached to damage ...susceptible to the table Sub-base is dusty, also wear a dust mask. If the operation is too large SOLUTION Insert router power cord plug into a table outlet Plug the router-table cord into the table outlet. PROBLEM CAUSE The router is not flat. The router does not work The router-table cord is not...


