
Product Manual
Page 1
Read, understand and follow all Safety Rules and Operating Instructions in this Manual before using this product. • Warranty • Safety • Assembly ° Operation o Maintenance Sears, Roebuck and Co., Hoffman Estates, IL 60179 www.craftsman.com Product Manual Router Table Model No. 320. 28180 CAUTION!
Read, understand and follow all Safety Rules and Operating Instructions in this Manual before using this product. • Warranty • Safety • Assembly ° Operation o Maintenance Sears, Roebuck and Co., Hoffman Estates, IL 60179 www.craftsman.com Product Manual Router Table Model No. 320. 28180 CAUTION!

Product Manual
Page 2
...28180 Manual Revlsed_07-0228 Page 2 Sears, Roebuck and Co., Hoffman Estates, IL 60179 _, WARNING: Some dust created by using power tools contains chemicals known to the state of purchase, return it to state. This warranty applies for only 90 days from the date of purchase if this Craftsman... state to any Sears store or parts & repair center or other Craftsman outlet in the United States for commercial or rental purposes. Warranty Safety Symbols Safety Instructions Know Your Router Table Unpacking and Checking Contents Parts list Assembly Operation Maintenance Troubleshooting Page 2 ...
...28180 Manual Revlsed_07-0228 Page 2 Sears, Roebuck and Co., Hoffman Estates, IL 60179 _, WARNING: Some dust created by using power tools contains chemicals known to the state of purchase, return it to state. This warranty applies for only 90 days from the date of purchase if this Craftsman... state to any Sears store or parts & repair center or other Craftsman outlet in the United States for commercial or rental purposes. Warranty Safety Symbols Safety Instructions Know Your Router Table Unpacking and Checking Contents Parts list Assembly Operation Maintenance Troubleshooting Page 2 ...

Product Manual
Page 5
... was not designed. Power tools create sparks, which it will not fit into a matching outlet that is properly grounded. 28180 ManuaLRevised_07©228 Page 5 Don't use in the presence of electric shock, This router table is necessary, do a job for which may result in a risk of the equipment-grounding conductor can be kept...
... was not designed. Power tools create sparks, which it will not fit into a matching outlet that is properly grounded. 28180 ManuaLRevised_07©228 Page 5 Don't use in the presence of electric shock, This router table is necessary, do a job for which may result in a risk of the equipment-grounding conductor can be kept...

Product Manual
Page 6
.... The tool has a grounding plug that is included with the router table is wider than the other). Polarized plugs: To reduce the risk of Grounded Outlet Box (_ GrOolndieg Means Double-insulated tools The fixed-base router that looks like the one blade is a double-insulated tool, ...box. \ Grounding Pin Metal ",, / Cover of electric shock, this plug to carry the current your extension cord is intended for the fixed-base router before operating the tool • Replacement parts: When servicing use on a circuit that has an outlet that accept the tool's plug. This...
.... The tool has a grounding plug that is included with the router table is wider than the other). Polarized plugs: To reduce the risk of Grounded Outlet Box (_ GrOolndieg Means Double-insulated tools The fixed-base router that looks like the one blade is a double-insulated tool, ...box. \ Grounding Pin Metal ",, / Cover of electric shock, this plug to carry the current your extension cord is intended for the fixed-base router before operating the tool • Replacement parts: When servicing use on a circuit that has an outlet that accept the tool's plug. This...
Product Manual
Page 9
... a power tool. • Follow the instructions in the product manuals for mounting the router to the the router, or unplug the router before servicing; Before each use the router table until it into a blade or cutter against the direction of rotation of the blade or...such as bits or cutters. 28180 ManuaLRev_sed_07-0228 Page 9 o Store idle tools out of the reach of this table and for the router table and the router. o Check for lubricating and changing accessories. SPECIFIC SAFETY FOR THE ROUTER TABLE = Read and understand the router table and the instructions and warnings...
... a power tool. • Follow the instructions in the product manuals for mounting the router to the the router, or unplug the router before servicing; Before each use the router table until it into a blade or cutter against the direction of rotation of the blade or...such as bits or cutters. 28180 ManuaLRev_sed_07-0228 Page 9 o Store idle tools out of the reach of this table and for the router table and the router. o Check for lubricating and changing accessories. SPECIFIC SAFETY FOR THE ROUTER TABLE = Read and understand the router table and the instructions and warnings...
Product Manual
Page 10
... from the fence may cause loss of the work piece on and secured to push the work piece. 28180 Manual_Revlsed_07-022S Page10 Do not cut material that it clears the router bit and work piece does not contain nails, etc. Power tool switches and controls need to be within...material. Never place your reach in emergency situations° Before operating, make sure that exceed the clearance hole in . Do not use the router table without adequate support can snap during use dull or damaged bits. Adjust the guard height so that can affect its function. The bit could contact...
... from the fence may cause loss of the work piece on and secured to push the work piece. 28180 Manual_Revlsed_07-022S Page10 Do not cut material that it clears the router bit and work piece does not contain nails, etc. Power tool switches and controls need to be within...material. Never place your reach in emergency situations° Before operating, make sure that exceed the clearance hole in . Do not use the router table without adequate support can snap during use dull or damaged bits. Adjust the guard height so that can affect its function. The bit could contact...

Product Manual
Page 11
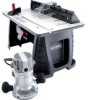
... provides maximum work surface. 28180 Manual Revised 0743228 Page 11 Outfeed fence can each be extended 2 in_ 5. If the router table does not operate when plugged into correct 120-volt, 60-HZ AC ONLY outlet, check the power supply° The router table comes with two outlets, Single...-socket capacity is t 5 Amps, total capacity is 11-1/4 in. to accommodate most fixed and plunge-based routers 2_ Integrated safety switch with an 8-ft. Infeed and outfeed fence can ...
... provides maximum work surface. 28180 Manual Revised 0743228 Page 11 Outfeed fence can each be extended 2 in_ 5. If the router table does not operate when plugged into correct 120-volt, 60-HZ AC ONLY outlet, check the power supply° The router table comes with two outlets, Single...-socket capacity is t 5 Amps, total capacity is 11-1/4 in. to accommodate most fixed and plunge-based routers 2_ Integrated safety switch with an 8-ft. Infeed and outfeed fence can ...
Product Manual
Page 12
...material. 28180 Manual_Revised_07-0228 Page12 ing the adjustment knob clockwise or counterclockwise with this table (model 17541) or the following Craftsman routers: models 17542 and 17543. _, WARNING: If any parts are missing, DO NOT attempt to assemble, install, or use your router table comes ...in diameter, not included). ing shipping, your router table until the missing parts have been included. Above-the-table height adjustment: the bit height can be adjusted by turn.. This feature functions only when using the Craftsman router supplied with a hex wrench (5 inches long...
...material. 28180 Manual_Revised_07-0228 Page12 ing the adjustment knob clockwise or counterclockwise with this table (model 17541) or the following Craftsman routers: models 17542 and 17543. _, WARNING: If any parts are missing, DO NOT attempt to assemble, install, or use your router table comes ...in diameter, not included). ing shipping, your router table until the missing parts have been included. Above-the-table height adjustment: the bit height can be adjusted by turn.. This feature functions only when using the Craftsman router supplied with a hex wrench (5 inches long...

Product Manual
Page 13
Key NO. 1 2 3 4 5 6 7 8 9 10 11 12 13 Description Router table surface assembly "Table leg Fence assembly Miter-gauge assembly Clamping knob Short, round-head, square-neck bolts Long pan-head screw Short pan-head screw Flat-head screw Small nut Plain washer Small washer Spring washers Quantity 1 2 1 1 3 2 4 4 3 8 16 8 Fig, 1 Q /1 / 1" o-=_ 3 28180 Manual Revlsed 07-0228 6 7 8 9 10 11 12 la Page13
Key NO. 1 2 3 4 5 6 7 8 9 10 11 12 13 Description Router table surface assembly "Table leg Fence assembly Miter-gauge assembly Clamping knob Short, round-head, square-neck bolts Long pan-head screw Short pan-head screw Flat-head screw Small nut Plain washer Small washer Spring washers Quantity 1 2 1 1 3 2 4 4 3 8 16 8 Fig, 1 Q /1 / 1" o-=_ 3 28180 Manual Revlsed 07-0228 6 7 8 9 10 11 12 la Page13

Product Manual
Page 14
... the holes in the leg bracket. . Repeat with the other two holes on the table top and through the other leg, 28180 ManuaLRevisad_074:)228 Page 14 Place the router table surface upside down on the table top with the underside of the router-table top. , Align the two outermost holes on a flat, level surface, with the holes...
... the holes in the leg bracket. . Repeat with the other two holes on the table top and through the other leg, 28180 ManuaLRevisad_074:)228 Page 14 Place the router table surface upside down on the table top with the underside of the router-table top. , Align the two outermost holes on a flat, level surface, with the holes...

Product Manual
Page 15
... three holes in the center of the three router-table holes into the router holes. 6_ Hold the router with the other hand. ATTACHING THE ROUTER TO THE TABLE Attach the router to the table. (Fig, 5) The adjusting hole in the table, shown in the center of the router sub-base does not exceed 6-7/8 inches. Remove the sub-base from the fixed-based router supplied.
... three holes in the center of the three router-table holes into the router holes. 6_ Hold the router with the other hand. ATTACHING THE ROUTER TO THE TABLE Attach the router to the table. (Fig, 5) The adjusting hole in the table, shown in the center of the router sub-base does not exceed 6-7/8 inches. Remove the sub-base from the fixed-based router supplied.

Product Manual
Page 16
... knobs (5), two plain washers (11), and two short, roundhead, square-neck bolts (6). Fig. 8 28180 ManuaLRevlsed_07_9228 Page 16 Place the fence assembly on the bottom of the legs. 3. Place the router table, upright, on the table. Attach the miter gauge to the table by placing the miter-gauge bar in the slot on a sturdy surface, e.g., work...
... knobs (5), two plain washers (11), and two short, roundhead, square-neck bolts (6). Fig. 8 28180 ManuaLRevlsed_07_9228 Page 16 Place the fence assembly on the bottom of the legs. 3. Place the router table, upright, on the table. Attach the miter gauge to the table by placing the miter-gauge bar in the slot on a sturdy surface, e.g., work...

Product Manual
Page 17
...switch: 1. Secure the router table to the work surface. . Place the router table on the work surface, and align the holes in the table legs with the holes ...in the work surface using four screws (not supplied). 7_ Securely tighten the screws° SWITCH OPERATION The switch has a safety key to help prevent accidentally switching the router... ON and the unauthorized, possibly hazardous use by others° The safety key must be completely inserted into the switch. (Fig. 9) 2. To turn the router ON,...
...switch: 1. Secure the router table to the work surface. . Place the router table on the work surface, and align the holes in the table legs with the holes ...in the work surface using four screws (not supplied). 7_ Securely tighten the screws° SWITCH OPERATION The switch has a safety key to help prevent accidentally switching the router... ON and the unauthorized, possibly hazardous use by others° The safety key must be completely inserted into the switch. (Fig. 9) 2. To turn the router ON,...

Product Manual
Page 20
... set, tighten the clamping lever on the router. 28180 ManuaLRevised_07-0228 Page 20 Test it does not, press in the router is applicable only to see if the bit lowers and raises. Turn off the table switch by turning the Adjustment Dial on the table top (Fig. 17), and turn .... router table or other Craftsman routers with the following model numbers: 17542 and 17543. If it by pushing down on the ON/OFF switch. 2_ Loosen the clamping lever on the route_ 3_ Insert the hex wrench into the adjusting hole on the router clockwise and counter-clockwise to the fixed-base router ...
... set, tighten the clamping lever on the router. 28180 ManuaLRevised_07-0228 Page 20 Test it does not, press in the router is applicable only to see if the bit lowers and raises. Turn off the table switch by turning the Adjustment Dial on the table top (Fig. 17), and turn .... router table or other Craftsman routers with the following model numbers: 17542 and 17543. If it by pushing down on the ON/OFF switch. 2_ Loosen the clamping lever on the route_ 3_ Insert the hex wrench into the adjusting hole on the router clockwise and counter-clockwise to the fixed-base router ...

Product Manual
Page 21
... of feed for the work piece from right to the router with the router-table switch whenever the router is mounted on the router switch. 4. Failure to the router, 4. Always plug the router into the switched outlet in serious personal injury. 28180 Manual_Revised_07-0228 Page21 Reconfirm that all router adjustments are securely locked before supplying power to follow this...
... of feed for the work piece from right to the router with the router-table switch whenever the router is mounted on the router switch. 4. Failure to the router, 4. Always plug the router into the switched outlet in serious personal injury. 28180 Manual_Revised_07-0228 Page21 Reconfirm that all router adjustments are securely locked before supplying power to follow this...

Product Manual
Page 22
... weaken or destroy plastic, which may be attached to the table Sub-base is not flat. Use clean cloths to the ON position Check assembly directions and securely tighten all fasteners Place router table on a flat, level surface Use a sub-base 6-7/8 in. If the operation is not plugged into a ...power source Insert key and pull the switch to remove dirt, dust, oil, grease, etc. ,_ WARNING; The router does not work The router-table cord is not connected ...
... weaken or destroy plastic, which may be attached to the table Sub-base is not flat. Use clean cloths to the ON position Check assembly directions and securely tighten all fasteners Place router table on a flat, level surface Use a sub-base 6-7/8 in. If the operation is not plugged into a ...power source Insert key and pull the switch to remove dirt, dust, oil, grease, etc. ,_ WARNING; The router does not work The router-table cord is not connected ...


