

Operation Manual
Page 1
... 3.0 Amp / 5-in this manual before using this product. Visit our Craftsman ®website: www.sears.com/craftsman ,,= o 3025736 Certified to CAN/CSAC22o2 No.745-1,745-2-4 Conforms to UL STD 745-1,745-2-4 Double Insulated • WARRANTY • SAFETY • UNPACKING • DESCRIPTION • ASSEMBLY • OPERATION • MAINTENANCE Sears, Roebuck and Co., Hoffman Estates, IL 60179 U.S.A. Diameter Cyclonic Dust-Air Separator (CDS) Collection System Random Orbital Sander Model No...
... 3.0 Amp / 5-in this manual before using this product. Visit our Craftsman ®website: www.sears.com/craftsman ,,= o 3025736 Certified to CAN/CSAC22o2 No.745-1,745-2-4 Conforms to UL STD 745-1,745-2-4 Double Insulated • WARRANTY • SAFETY • UNPACKING • DESCRIPTION • ASSEMBLY • OPERATION • MAINTENANCE Sears, Roebuck and Co., Hoffman Estates, IL 60179 U.S.A. Diameter Cyclonic Dust-Air Separator (CDS) Collection System Random Orbital Sander Model No...

Operation Manual
Page 2
... FREE REPAIR (OR REPLACEMENT IS REPAIR PROVES IMPOSSIBLE), This warranty does not include expendable parts such as lamps, batteries, bits, blades or sandpaper. Warranty Safety Symbols Safety Instructions Unpacking Description Assembly Operation Maintenance Accessories Partlist ...Sears Repair Parts Phone Numbers Page 2 Page 3 Pages 4 - 10 Pages 10 - 11 Pages 11 - 12 Pages 13 - 16 Pages 16 - 19 Pages 20 - 21 Page 21 Pages 22 - 23 Back Cover ONE YEAR FULL WARRANTY ON CRAFTSMAN® PROFESSIONAL TOOL...
... FREE REPAIR (OR REPLACEMENT IS REPAIR PROVES IMPOSSIBLE), This warranty does not include expendable parts such as lamps, batteries, bits, blades or sandpaper. Warranty Safety Symbols Safety Instructions Unpacking Description Assembly Operation Maintenance Accessories Partlist ...Sears Repair Parts Phone Numbers Page 2 Page 3 Pages 4 - 10 Pages 10 - 11 Pages 11 - 12 Pages 13 - 16 Pages 16 - 19 Pages 20 - 21 Page 21 Pages 22 - 23 Back Cover ONE YEAR FULL WARRANTY ON CRAFTSMAN® PROFESSIONAL TOOL...
Operation Manual
Page 3
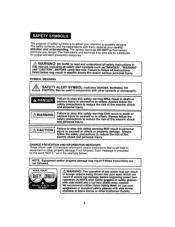
... operation of any danger. The purpose of safety symbols is preceded by themselves eliminate any power tool can result in foreign objects being thrown into your eyes, which can result in this manual, including all instructions listed below : I sFeariilouures toinjoubryeytothyisousrasfeeltfy owr atornointhgerCs.ANAlwreasyuslt fionllodweatthheor safety precautions to reduce the risk of fire, electric shock and personal injury. May be used...
... operation of any danger. The purpose of safety symbols is preceded by themselves eliminate any power tool can result in foreign objects being thrown into your eyes, which can result in this manual, including all instructions listed below : I sFeariilouures toinjoubryeytothyisousrasfeeltfy owr atornointhgerCs.ANAlwreasyuslt fionllodweatthheor safety precautions to reduce the risk of fire, electric shock and personal injury. May be used...
Operation Manual
Page 4
... hold work and that have the switch in this manual before using this tool. 2. USE SAFETY EQUIPMENT. Pull back long hair. REMOVE adjusting keys or blade wrenches before plugging in personal injury. 7. PERSONAL SAFETY 1. STAY ALERT, watch what you can be caught in "OFF" position before turning a tool "ON". Carrying tools with safe operation BEFORE using your finger on the switch. Keep proper footing and balance at all instructions in...
... hold work and that have the switch in this manual before using this tool. 2. USE SAFETY EQUIPMENT. Pull back long hair. REMOVE adjusting keys or blade wrenches before plugging in personal injury. 7. PERSONAL SAFETY 1. STAY ALERT, watch what you can be caught in "OFF" position before turning a tool "ON". Carrying tools with safe operation BEFORE using your finger on the switch. Keep proper footing and balance at all instructions in...
Operation Manual
Page 5
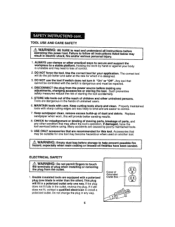
... outlet only one tool may become hazardous when used on another tool. Holding the work by poorly maintained tools. 9. Such preventive safety measures reduce the risk of @ @ Grounded ® Outlet Box ------- 5 Keep cutting tools sharp and clean. If damaged, have the tool serviced before operating this will provide better sanding results. 8. ELECTRICAL SAFETY the terminals of parts, and any adjustments, changing accessories or storing the tool. This plug will...
... outlet only one tool may become hazardous when used on another tool. Holding the work by poorly maintained tools. 9. Such preventive safety measures reduce the risk of @ @ Grounded ® Outlet Box ------- 5 Keep cutting tools sharp and clean. If damaged, have the tool serviced before operating this will provide better sanding results. 8. ELECTRICAL SAFETY the terminals of parts, and any adjustments, changing accessories or storing the tool. This plug will...
Operation Manual
Page 6
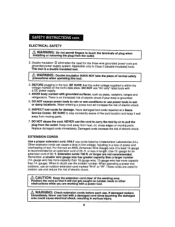
... use the cord to pull the plug from heat, oil, sharp edges or moving parts. 7. DO NOT use "AC only" rated tools with a power tool. EXTENSION CORDS Use a proper extension cord. Remember, a smaller wire gauge size has greater capacity than a larger number (14-gauge wire has more capacity than 16-gauge wire; 12-gauge wire has more capacity than 14-gauge). Position the cord so that the outlet voltage supplied is a double insulated tool. This tool...
... use the cord to pull the plug from heat, oil, sharp edges or moving parts. 7. DO NOT use "AC only" rated tools with a power tool. EXTENSION CORDS Use a proper extension cord. Remember, a smaller wire gauge size has greater capacity than a larger number (14-gauge wire has more capacity than 16-gauge wire; 12-gauge wire has more capacity than 14-gauge). Position the cord so that the outlet voltage supplied is a double insulated tool. This tool...
Operation Manual
Page 7
... tool "live " wire will not move under the sander. Follow instructions in any electrical component fail to perform properly: SHUT OFF the power switch and remove the tool's plug from surface to the sander. 3. Service or maintenance performed by insulated gripping surfaces when sanding where tool may include the following symbols. V Volts A Hz W rain Amps Hertz Watts Minutes no RPM SPM OPM Z Alternating current Direct current No-load speed...
... tool "live " wire will not move under the sander. Follow instructions in any electrical component fail to perform properly: SHUT OFF the power switch and remove the tool's plug from surface to the sander. 3. Service or maintenance performed by insulated gripping surfaces when sanding where tool may include the following symbols. V Volts A Hz W rain Amps Hertz Watts Minutes no RPM SPM OPM Z Alternating current Direct current No-load speed...
Operation Manual
Page 9
... such a manner as the specific potentialhazards related to read and understand all instructions listed below may contribute to prevent ingesting contaminated paint particles. Failure to follow all instructions. they are NOT safety glasses. 3. Ordinary painting masks do not offer this tool. Vacuum filter bags should be:pllaced in the work area. Read operator's manual carefully. Followingthis rule will reduce...
... such a manner as the specific potentialhazards related to read and understand all instructions listed below may contribute to prevent ingesting contaminated paint particles. Failure to follow all instructions. they are NOT safety glasses. 3. Ordinary painting masks do not offer this tool. Vacuum filter bags should be:pllaced in the work area. Read operator's manual carefully. Followingthis rule will reduce...
Operation Manual
Page 10
... and use them repaired at a Sears Service center. 8. Refer to determine if it is not in possible serious personal injury. 10 ADDITIONAL RULES FOR SAFE OPERATION cont. 6. Do not discard any other part that is included. 6. Before further use . Check for damaged parts. If someone borrows this tool, make sure that may use this power tool until all parLs are assembling parts, making adjustments, installing or removing...
... and use them repaired at a Sears Service center. 8. Refer to determine if it is not in possible serious personal injury. 10 ADDITIONAL RULES FOR SAFE OPERATION cont. 6. Do not discard any other part that is included. 6. Before further use . Check for damaged parts. If someone borrows this tool, make sure that may use this power tool until all parLs are assembling parts, making adjustments, installing or removing...

Operation Manual
Page 11
... and Loop Sanding Discs with Dual Dust _I/T _)) _L_LJ// Ports _k,._ 4. This sander has a 10-ft., 2-wire power cord (no -load speed) is controlled by variable speed dial. Sander 2. Two 5-in . Match with Molded-in Comfort Grip for smooth operation and less operator fatigue. 11 PARTS LIST (Fig. 1) 1. r, familiarize yourself with 1/16-in . Random orbital action with all of the Your Professional 5" Random Orbit Sander has a precision-built electric motor and it should...
... and Loop Sanding Discs with Dual Dust _I/T _)) _L_LJ// Ports _k,._ 4. This sander has a 10-ft., 2-wire power cord (no -load speed) is controlled by variable speed dial. Sander 2. Two 5-in . Match with Molded-in Comfort Grip for smooth operation and less operator fatigue. 11 PARTS LIST (Fig. 1) 1. r, familiarize yourself with 1/16-in . Random orbital action with all of the Your Professional 5" Random Orbit Sander has a precision-built electric motor and it should...

Operation Manual
Page 12
... Loop Backing Pad Vac Adapter with Dual Dust Ports for Vac Hoses No-load Speed Rating Input Orbit Diameter Sanding Disc Size Paper Type 5000-12000 OPM orbits per minute variable speed 120 Volts, 60 Hz AC 3.0 Amps 1/16-inch 5-in . Sealed to keep out dust for easy control. On/Off Rocker Switch Comfort Grip Handle Speed Dial Fig 2 Cyclonic Dust Box 5-in . Cyclonic Dust/Air Separator (CDS) Collection System Dust Box features...
... Loop Backing Pad Vac Adapter with Dual Dust Ports for Vac Hoses No-load Speed Rating Input Orbit Diameter Sanding Disc Size Paper Type 5000-12000 OPM orbits per minute variable speed 120 Volts, 60 Hz AC 3.0 Amps 1/16-inch 5-in . Sealed to keep out dust for easy control. On/Off Rocker Switch Comfort Grip Handle Speed Dial Fig 2 Cyclonic Dust Box 5-in . Cyclonic Dust/Air Separator (CDS) Collection System Dust Box features...

Operation Manual
Page 13
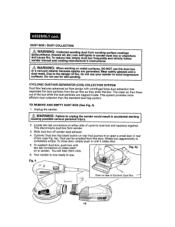
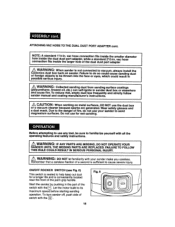
... Pre-Punched holes 13 acking pad in the hook and loop backing pad. the I NOTE: Remove cyclonic dust box assembly when installingsandpaper. INSTALLING THE SANDPAPER (See Fig. 3) ALWAYS inspect the sandpaper before beginning sanding operation (see page 14, Fig. 4). 2. Hook and Loop Backing Pad 5-in . ALWAYS remember to the power source when you are assembling parts, making adjustments, installingor removing sandpaper, cleaning or when...
... Pre-Punched holes 13 acking pad in the hook and loop backing pad. the I NOTE: Remove cyclonic dust box assembly when installingsandpaper. INSTALLING THE SANDPAPER (See Fig. 3) ALWAYS inspect the sandpaper before beginning sanding operation (see page 14, Fig. 4). 2. Hook and Loop Backing Pad 5-in . ALWAYS remember to the power source when you are assembling parts, making adjustments, installingor removing sandpaper, cleaning or when...
Operation Manual
Page 14
... NOT use for wet sanding. TO REMOVE AND EMPTY DUST BOX (See Fig. 4) 1. Locate two tab connectors on sides catch F'_. Dust can self-ignite in sander dust box or elsewhere and cause fire. two tab connectors on either side of fire, do not use . 5. To reduce risk, empty dust box frequently and strictly follow sander manual and coating manufacturer's instructions. /_ WARNING: When working...
... NOT use for wet sanding. TO REMOVE AND EMPTY DUST BOX (See Fig. 4) 1. Locate two tab connectors on sides catch F'_. Dust can self-ignite in sander dust box or elsewhere and cause fire. two tab connectors on either side of fire, do not use . 5. To reduce risk, empty dust box frequently and strictly follow sander manual and coating manufacturer's instructions. /_ WARNING: When working...
Operation Manual
Page 16
... danger of fire, do so could result in the part of the switch with the [----].Let the motor build to help keep out dust for wet sanding. To turn sander off, push side of the dual dust port adapter IJ /_ WARNING: When sander is sealed to its maximum speed before starting sanding operation. Do not use the dust box or a vacuum cleaner because sparks are generated...
... danger of fire, do so could result in the part of the switch with the [----].Let the motor build to help keep out dust for wet sanding. To turn sander off, push side of the dual dust port adapter IJ /_ WARNING: When sander is sealed to its maximum speed before starting sanding operation. Do not use the dust box or a vacuum cleaner because sparks are generated...
Operation Manual
Page 17
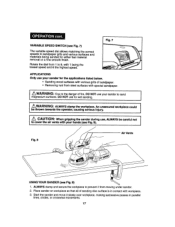
.... I I be careful not to sand II /_kWARNING: ALWAYS clamp the workpiece. T use your sander for either fast material removal or a fine smooth finish. Fig. 7 APPLICATIONS Only use , ALWAYS be thrown towards the operator, causing serious injury. Start the sander and move it from 1 to 6, with your hands (see Fig. 8) 1. VARIABLESPEEDSWITCH(seeFig.7) Thevariablespeeddial allows matching the correct speeds to sandpaper grits and...
.... I I be careful not to sand II /_kWARNING: ALWAYS clamp the workpiece. T use your sander for either fast material removal or a fine smooth finish. Fig. 7 APPLICATIONS Only use , ALWAYS be thrown towards the operator, causing serious injury. Start the sander and move it from 1 to 6, with your hands (see Fig. 8) 1. VARIABLESPEEDSWITCH(seeFig.7) Thevariablespeeddial allows matching the correct speeds to sandpaper grits and...

Operation Manual
Page 18
.... 5. NOTE: DO NOT use medium to a complete stop before removing from the heat of the surface to a complete stop , then remove it free without sandpaper. Inspect sandpaper frequently and change paper when grit is uniform. • Then use the sander without a load (off the workpiece) SANDING TIPS 1. Upon completion of the sander" supplies adequate pressure on page17) 4. The weight of sanding operation, turn sander off and wait...
.... 5. NOTE: DO NOT use medium to a complete stop before removing from the heat of the surface to a complete stop , then remove it free without sandpaper. Inspect sandpaper frequently and change paper when grit is uniform. • Then use the sander without a load (off the workpiece) SANDING TIPS 1. Upon completion of the sander" supplies adequate pressure on page17) 4. The weight of sanding operation, turn sander off and wait...
Operation Manual
Page 20
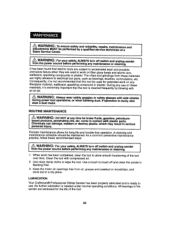
... life and trouble-free operation. Use clean damp cloths to brush off and clean the sander's Backing Pad. 3. LUBRICATION Your Craftsman® Professional Orbital Sander has been properly lubricated and is ready to work on fiber g_ass boats and sports cars, wallboard, spackling compounds or plaster. All bearings in contact with compressed air. . During any use . Clean the tool with plastic parts. Keep the motor air openings free from these...
... life and trouble-free operation. Use clean damp cloths to brush off and clean the sander's Backing Pad. 3. LUBRICATION Your Craftsman® Professional Orbital Sander has been properly lubricated and is ready to work on fiber g_ass boats and sports cars, wallboard, spackling compounds or plaster. All bearings in contact with compressed air. . During any use . Clean the tool with plastic parts. Keep the motor air openings free from these...

Operation Manual
Page 22
Visit your local Sears store or other Craftsman ®outlets offer a selection of the accessories for all your random orbital sander. 22 J Sears and other Craftsman outlets or s_hopsears.com/craftsman for all of Craftsman Professional Random Orbit Sander accessories designed for your sanding applications. 5-inch, 8 Hole, Hook and Loop Sanding Discs come in very fine, fine, medium and coarse grit. I /_re,coWmAmReNndINedG:for Tthhies utosoel omf iagthtatcbhemdeanntsgeororuasccaensdsocoriuelsd trheastualtreinnsoetrious injury.
Visit your local Sears store or other Craftsman ®outlets offer a selection of the accessories for all your random orbital sander. 22 J Sears and other Craftsman outlets or s_hopsears.com/craftsman for all of Craftsman Professional Random Orbit Sander accessories designed for your sanding applications. 5-inch, 8 Hole, Hook and Loop Sanding Discs come in very fine, fine, medium and coarse grit. I /_re,coWmAmReNndINedG:for Tthhies utosoel omf iagthtatcbhemdeanntsgeororuasccaensdsocoriuelsd trheastualtreinnsoetrious injury.

Operation Manual
Page 23
Always mention the model number when requesting parts and service for your tool. ,.,,,., _ _. SR 2 J -1011 4 15--_02 16--_ _, $$----17(3) _3_ 18 9_ _9 28 '29 --30(2) "31 32 to 8 Dia. Random Orbital Sander with Cyclonics MODEL NUMBER 172.27673 The model number will be found on the nameplate of the Random Orbital Sander. 5-in.
Always mention the model number when requesting parts and service for your tool. ,.,,,., _ _. SR 2 J -1011 4 15--_02 16--_ _, $$----17(3) _3_ 18 9_ _9 28 '29 --30(2) "31 32 to 8 Dia. Random Orbital Sander with Cyclonics MODEL NUMBER 172.27673 The model number will be found on the nameplate of the Random Orbital Sander. 5-in.

Operation Manual
Page 24
... the model number when requesting parts and service for your tool. 5-in. Stator 1 ScrewST4.2x55 2 Switchcover 1 Switch 1 ScrewST3.Sx8 2 Pressplate 1 Ballbearing6000 1 Housing 1 Cordclamp 1 Dustport 1 Ratedlabel 1 Rightwindbaffle 1 0 ring3x34 1 dustcollectobroxassembly 1 ScrewST3.5×!6 2 Dustport 1 Airproofstrip 1 Dustproobf oard 1 ScrewST3.5x10 3 CycloneDuct 1 Dustcollector 1 Compressisopnring 1 Airproopfatch 1 Button 1 Rearcover 1 Torsionsapl ring 1 Pin 2 Random Orbital Sander with Cyclonics MODEL NUMBER 172.27673 The model...
... the model number when requesting parts and service for your tool. 5-in. Stator 1 ScrewST4.2x55 2 Switchcover 1 Switch 1 ScrewST3.Sx8 2 Pressplate 1 Ballbearing6000 1 Housing 1 Cordclamp 1 Dustport 1 Ratedlabel 1 Rightwindbaffle 1 0 ring3x34 1 dustcollectobroxassembly 1 ScrewST3.5×!6 2 Dustport 1 Airproofstrip 1 Dustproobf oard 1 ScrewST3.5x10 3 CycloneDuct 1 Dustcollector 1 Compressisopnring 1 Airproopfatch 1 Button 1 Rearcover 1 Torsionsapl ring 1 Pin 2 Random Orbital Sander with Cyclonics MODEL NUMBER 172.27673 The model...


