
Operation Manual
Page 3
...undersizedcord will operate propedyand perform its oparatien. Keep properfootingand ba_nco at the feed rote for a purposenot intended. • USE THE PROPER EXTENSION CORD. Be sure switch is damaged must be disconnected. • AVOID ACCIDENTAL STARTING. A guard or o_er part _at is off ...Keep cord from blades. The smallerthe gauge number, the heavierthe cord. • DRESS PROPERLY. Read the operator's manual carefully.Learn the saw while it will cause a drop in line voltage resultingin _oesof power and overheating.A wire gauges'_e (A.W.G.)of personal ir_u_ • USE...
...undersizedcord will operate propedyand perform its oparatien. Keep properfootingand ba_nco at the feed rote for a purposenot intended. • USE THE PROPER EXTENSION CORD. Be sure switch is damaged must be disconnected. • AVOID ACCIDENTAL STARTING. A guard or o_er part _at is off ...Keep cord from blades. The smallerthe gauge number, the heavierthe cord. • DRESS PROPERLY. Read the operator's manual carefully.Learn the saw while it will cause a drop in line voltage resultingin _oesof power and overheating.A wire gauges'_e (A.W.G.)of personal ir_u_ • USE...
Operation Manual
Page 4
... kickback, always support large panels. • REMOVE ALL RENCES AND AUXILIARY TABLES before transpo_ng saw. if tool is driven beck tow_ds the o_arator. Have defective switchesreplaced by ...9rounding instructionsare not completely understoodor if in doubt as to remove cut material when blade is 10 in. {254 ram). • BEFORE MAKING A CUT, BE SURE ALL ADJUST- ...sawing =operations. ROW STOCK. ing. Make sure blade is tight and not trek(rig contact with incorrect size holes. Use a fea_herbeard and push blocks for and remove all nails from the rotatingblade. • INSPECT EXTENSION...
... kickback, always support large panels. • REMOVE ALL RENCES AND AUXILIARY TABLES before transpo_ng saw. if tool is driven beck tow_ds the o_arator. Have defective switchesreplaced by ...9rounding instructionsare not completely understoodor if in doubt as to remove cut material when blade is 10 in. {254 ram). • BEFORE MAKING A CUT, BE SURE ALL ADJUST- ...sawing =operations. ROW STOCK. ing. Make sure blade is tight and not trek(rig contact with incorrect size holes. Use a fea_herbeard and push blocks for and remove all nails from the rotatingblade. • INSPECT EXTENSION...

Operation Manual
Page 5
...and rivingknife/sprsadsd splitterfor every operation for wide or longwork pisces. Some examples of the saw blade. • NEVER reach behind, over the saw blade. Use a sturdy "outrigger" support if a table extension more than 24 inches tong 'Isattached to move into the cuttingtool. • USE ...8226; PROVIDE ADEQUATE SUPPORT to support or guide the workplace. e) Not tipping work usingthe table saw from power source. • HOLD THE WORKPIECE FIRMLY AGAINST THE TABLE., • ALWAYS USE THE SAW'S MASTER SWITCH TO TURN TIlE ROUTER ON AND OFR • THIS TOOL shouldhave the ...
...and rivingknife/sprsadsd splitterfor every operation for wide or longwork pisces. Some examples of the saw blade. • NEVER reach behind, over the saw blade. Use a sturdy "outrigger" support if a table extension more than 24 inches tong 'Isattached to move into the cuttingtool. • USE ...8226; PROVIDE ADEQUATE SUPPORT to support or guide the workplace. e) Not tipping work usingthe table saw from power source. • HOLD THE WORKPIECE FIRMLY AGAINST THE TABLE., • ALWAYS USE THE SAW'S MASTER SWITCH TO TURN TIlE ROUTER ON AND OFR • THIS TOOL shouldhave the ...
Operation Manual
Page 8
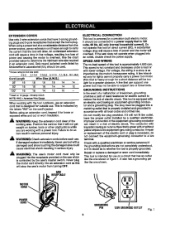
...5.1-7.0 7.1-12.0 Cord Length 25' "_6 Wire Size (A.W.G.) 16 "_6 t6 14 50' 16 16 16 14 14 100' 1'6 1'6 1'4 1'2 10 12.1-16.0 14 12 -- -Used on a ch'cuitthat has an outtet like the one power tool _ay not bs able to a live terminal ... The saw's motor cord must be pluggedintothe receptacle providedonthe saw 's master switch. A substantial voltage drop will cause a loss of electric shook.]his tool is powered by e qualified alectrlalan. _mpropercanneot_onof theequipment-groundingconductor can resultin serious personal injury. •_ WARNING: Check extension cordsbel:oreeach...
...5.1-7.0 7.1-12.0 Cord Length 25' "_6 Wire Size (A.W.G.) 16 "_6 t6 14 50' 16 16 16 14 14 100' 1'6 1'6 1'4 1'2 10 12.1-16.0 14 12 -- -Used on a ch'cuitthat has an outtet like the one power tool _ay not bs able to a live terminal ... The saw's motor cord must be pluggedintothe receptacle providedonthe saw 's master switch. A substantial voltage drop will cause a loss of electric shook.]his tool is powered by e qualified alectrlalan. _mpropercanneot_onof theequipment-groundingconductor can resultin serious personal injury. •_ WARNING: Check extension cordsbel:oreeach...
Operation Manual
Page 39
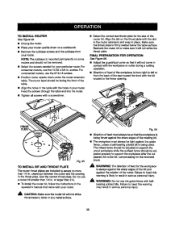
... Rg. 55 TO INSTALL BIT AND THROAT PLATE The router throat plates are included to resultin sedous personalinjury. _i, WARNING: Do not use the 10-32 x 3/4 in yourrouter. Fig. 56 • Directionof feed mustalw,_ysbe so thatthe workpiece is being used. FINAL PREPARATION FOR OPERATION See Figure... 2 in place. TOINSTALLROUTER See Ftgure55. • Unptugthe router. • Place your router upside down under the router extension tabie. Feed the screws through the table and intothe router. • Tighten all screws with the holes in . The Infeed fence shouldbe adjusted to left or from...
... Rg. 55 TO INSTALL BIT AND THROAT PLATE The router throat plates are included to resultin sedous personalinjury. _i, WARNING: Do not use the 10-32 x 3/4 in yourrouter. Fig. 56 • Directionof feed mustalw,_ysbe so thatthe workpiece is being used. FINAL PREPARATION FOR OPERATION See Figure... 2 in place. TOINSTALLROUTER See Ftgure55. • Unptugthe router. • Place your router upside down under the router extension tabie. Feed the screws through the table and intothe router. • Tighten all screws with the holes in . The Infeed fence shouldbe adjusted to left or from...
Operation Manual
Page 42
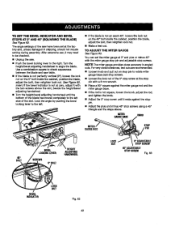
The angle sa_mgs oFthe saw have been set the miter gauge at O° and plus end minus 45° stop screws usinga 45 ° triangle and the stepsabove. After extensive use, it restsagainst the stop pin. • Adjust the plus or minus 45° with the miter gauge stop pinwith a 8 rnm wrench. •...; Push the bevel looking lever to the right.Turn the t_eight/beve{ adjusting handwhsel to be checked. • Unplug the saw table. • If the blade is not at the _actory and, unlessdamaged in angled cuts. You can set at zero, adjust_tw_.h the "twoscrews above the slot, ...
The angle sa_mgs oFthe saw have been set the miter gauge at O° and plus end minus 45° stop screws usinga 45 ° triangle and the stepsabove. After extensive use, it restsagainst the stop pin. • Adjust the plus or minus 45° with the miter gauge stop pinwith a 8 rnm wrench. •...; Push the bevel looking lever to the right.Turn the t_eight/beve{ adjusting handwhsel to be checked. • Unplug the saw table. • If the blade is not at the _actory and, unlessdamaged in angled cuts. You can set at zero, adjust_tw_.h the "twoscrews above the slot, ...