

Operation Manual
Page 1
PERATOR'S MAN AL ® 7-1/4 in., 19.2 VOLT CORDLESS DUAL LASER CIRCULAR SAW Model No. 315.115850 WARNING: To reduce the risk of injury, the user must read and understand the operator's manual before using this manual for future reference BATTERIES AND CHARGERS SOLD SEPARATELY Customer Help Line: 1-800-932-3188 Sears, Roebuck and Co., 3333 Beverly Rd., Hoffman Estates, IL 60179 USA Visit the Craftsman web page: www.sears.com/craftsman C 983000-797 10-29-08 (REV:03) Save this product.
PERATOR'S MAN AL ® 7-1/4 in., 19.2 VOLT CORDLESS DUAL LASER CIRCULAR SAW Model No. 315.115850 WARNING: To reduce the risk of injury, the user must read and understand the operator's manual before using this manual for future reference BATTERIES AND CHARGERS SOLD SEPARATELY Customer Help Line: 1-800-932-3188 Sears, Roebuck and Co., 3333 Beverly Rd., Hoffman Estates, IL 60179 USA Visit the Craftsman web page: www.sears.com/craftsman C 983000-797 10-29-08 (REV:03) Save this product.
Operation Manual
Page 2
... [] Operation ... 12-20 [] Adjustments ... 21 [] Maintenance ... 22 [] Exploded View and Parts List ... 23-24 [] Parts Ordering/Service ... If this Craftsman tool is used for making it easy to give complete satisfaction within one year from date of this Craftsman tool fails to maintain and operate. Safety, performance, and dependability have been given top priority in a well ventilated area, and work . A WARNING: Some dust created by power sanding, sawing, grinding, drilling...
... [] Operation ... 12-20 [] Adjustments ... 21 [] Maintenance ... 22 [] Exploded View and Parts List ... 23-24 [] Parts Ordering/Service ... If this Craftsman tool is used for making it easy to give complete satisfaction within one year from date of this Craftsman tool fails to maintain and operate. Safety, performance, and dependability have been given top priority in a well ventilated area, and work . A WARNING: Some dust created by power sanding, sawing, grinding, drilling...
Operation Manual
Page 3
... are dangerous in electric shock, fire and/or serious injury. Use of a cord suitable for outdoor use the power tool if the switch does not turn it was designed. [] Do not use reduces the risk of electric shock. [] When operating a power tool outdoors, use an extension cord suitable for outdoor use the cord for which may result in the hands of parts, and any adjustments, changing accessories, or storing power tools. Keep proper footing...
... are dangerous in electric shock, fire and/or serious injury. Use of a cord suitable for outdoor use the power tool if the switch does not turn it was designed. [] Do not use reduces the risk of electric shock. [] When operating a power tool outdoors, use an extension cord suitable for outdoor use the cord for which may result in the hands of parts, and any adjustments, changing accessories, or storing power tools. Keep proper footing...
Operation Manual
Page 4
... particular type of power tool, taking into power tools that do not match the mounting hardware of the saw . Use of any other small metal objects that the safety of the power tool is important to support the work to follow Maintenance instructions may contact hidden wiring or its own cord. If contact accidentally occurs, flush with the charger specified by a qualified repair person using only identical replacement parts. SERVICE [] Have your second hand...
... particular type of power tool, taking into power tools that do not match the mounting hardware of the saw . Use of any other small metal objects that the safety of the power tool is important to support the work to follow Maintenance instructions may contact hidden wiring or its own cord. If contact accidentally occurs, flush with the charger specified by a qualified repair person using only identical replacement parts. SERVICE [] Have your second hand...

Operation Manual
Page 5
... taken. [] When blade is released. [] Know your power tool. Lower guard may be controlled by taking proper precautions, as the saw to a complete stop after switch is binding, or when interrupting a cut . [] Check the operation of eye injury. [] Protect your body to either side of operation. Be aware of the workpiece toward the operator. Read operator's manual carefully. Unsharpened or improperly set blades produce narrow kerf...
... taken. [] When blade is released. [] Know your power tool. Lower guard may be controlled by taking proper precautions, as the saw to a complete stop after switch is binding, or when interrupting a cut . [] Check the operation of eye injury. [] Protect your body to either side of operation. Be aware of the workpiece toward the operator. Read operator's manual carefully. Unsharpened or improperly set blades produce narrow kerf...

Operation Manual
Page 6
Do not use any cordless product in the Craftsman circular saw is Class Ilia with clean water for at least 10 minutes, then seek immediate medical attention. To reduce the risk of serious personal injury, never use a battery pack or charger that has been dropped or received a sharp blow. Following this rule will reduce the risk of electric shock. [] For...
Do not use any cordless product in the Craftsman circular saw is Class Ilia with clean water for at least 10 minutes, then seek immediate medical attention. To reduce the risk of serious personal injury, never use a battery pack or charger that has been dropped or received a sharp blow. Following this rule will reduce the risk of electric shock. [] For...

Operation Manual
Page 7
... second) W Watt Power min Minutes Time Alternating Current Direct Current no No Load Speed [] Class II Tool Type of current Type or a characteristic of current Rotational speed, at no load Double-insulated construction .../min J @ Per Minute Wet Conditions Alert Revolutions, strokes, surface speed, orbits etc., per minute Do not expose to keep your safety. Failure to rain or use in serious personal...
... second) W Watt Power min Minutes Time Alternating Current Direct Current no No Load Speed [] Class II Tool Type of current Type or a characteristic of current Rotational speed, at no load Double-insulated construction .../min J @ Per Minute Wet Conditions Alert Revolutions, strokes, surface speed, orbits etc., per minute Do not expose to keep your safety. Failure to rain or use in serious personal...
Operation Manual
Page 8
... be performed only by a qualified service technician. Thefollowingsignalwordsandmeaningasreintendedto explainthelevelsofriskassociatedwiththisproduct. We recommend Wide Vision Safety Mask for use eye protection which can result in foreign objects being thrown into your nearest SEARS PARTS AND REPAIR SERVICE CENTER for assistance. ,_ WARNING: The operation of any power tool can result in death or serious injury. Call the Craftsman Consumer Helpline at 1-800-932-3188...
... be performed only by a qualified service technician. Thefollowingsignalwordsandmeaningasreintendedto explainthelevelsofriskassociatedwiththisproduct. We recommend Wide Vision Safety Mask for use eye protection which can result in foreign objects being thrown into your nearest SEARS PARTS AND REPAIR SERVICE CENTER for assistance. ,_ WARNING: The operation of any power tool can result in death or serious injury. Call the Craftsman Consumer Helpline at 1-800-932-3188...

Operation Manual
Page 9
PRODUCT SPECIFICATIONS Motor 19.2 Volt DC Blade Diameter 7-1/4 in . Blade Arbor 5/8 in . No Load Speed 3,500 r/min. (RPM) Laser Guide Class Ilia, Cutting Depth at 45 1-13/16 in . Cutting Depth at 90 2-3/8 in .
PRODUCT SPECIFICATIONS Motor 19.2 Volt DC Blade Diameter 7-1/4 in . Blade Arbor 5/8 in . No Load Speed 3,500 r/min. (RPM) Laser Guide Class Ilia, Cutting Depth at 45 1-13/16 in . Cutting Depth at 90 2-3/8 in .
Operation Manual
Page 10
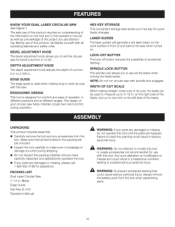
... This tool is used to measure up to 50 °. Blade Edge Guide Hex Key (5 mm) Operator's Manual ,_ WARNING: If any parts are damaged or missing do not operate this tool until you are attempting. A WARNING: To prevent accidental starting . SPINDLE LOCK BUTTON The spindle lock allows you to set the circular saw for bevel cuts from 0 in . PACKING LIST Dual Laser Circular Saw 7-1/4 in a hazardous condition leading to secure the blade when turning the blade screw. BEVEL ADUSTMENT KNOB The bevel adjustment knob allows...
... This tool is used to measure up to 50 °. Blade Edge Guide Hex Key (5 mm) Operator's Manual ,_ WARNING: If any parts are damaged or missing do not operate this tool until you are attempting. A WARNING: To prevent accidental starting . SPINDLE LOCK BUTTON The spindle lock allows you to set the circular saw for bevel cuts from 0 in . PACKING LIST Dual Laser Circular Saw 7-1/4 in a hazardous condition leading to secure the blade when turning the blade screw. BEVEL ADUSTMENT KNOB The bevel adjustment knob allows...

Operation Manual
Page 11
... 3. [] Remove battery pack from storage area. [] Depress and hold the spindle lock button and remove the blade screw and outer blade washer. A WARNING: If the inner blade washer has been removed, replace it before placing blade on the spindle. NOTE: Turn the blade screw counterclockwise to tighten. [] Return the hex key to remove. [] Remove outer blade washer. NOTE: Turn blade screw clockwise to the storage area. Failure to engage with the flats on spindle. Tighten the blade screw securely. SPINDLELOCK BUTTON LOWERBLADE GUARD HANDLE TO TIGHTEN...
... 3. [] Remove battery pack from storage area. [] Depress and hold the spindle lock button and remove the blade screw and outer blade washer. A WARNING: If the inner blade washer has been removed, replace it before placing blade on the spindle. NOTE: Turn the blade screw counterclockwise to tighten. [] Return the hex key to remove. [] Remove outer blade washer. NOTE: Turn blade screw clockwise to the storage area. Failure to engage with the flats on spindle. Tighten the blade screw securely. SPINDLELOCK BUTTON LOWERBLADE GUARD HANDLE TO TIGHTEN...

Operation Manual
Page 12
... complete charging instructions, refer to the Operator's Manual for the purposes listed below: [] Cutting all types of battery pack and depress to reset and resume operation. Align the raised rib on side of wood products (lumber, plywood, paneling) [] Cross Cutting/Rip Cutting [] Bevel Cutting [] Pocket Cutting This product will prevent accidental starting that protect the lithium-ion cells and maximize battery life. BATTERY PROTECTION FEATURES DieHardo 19.2 V lithium-ion battery packs are assembling parts, making adjustments, cleaning...
... complete charging instructions, refer to the Operator's Manual for the purposes listed below: [] Cutting all types of battery pack and depress to reset and resume operation. Align the raised rib on side of wood products (lumber, plywood, paneling) [] Cross Cutting/Rip Cutting [] Bevel Cutting [] Pocket Cutting This product will prevent accidental starting that protect the lithium-ion cells and maximize battery life. BATTERY PROTECTION FEATURES DieHardo 19.2 V lithium-ion battery packs are assembling parts, making adjustments, cleaning...
Operation Manual
Page 13
... saw stalls. To guard against kickback, avoid dangerous practices such as the following: [] Setting blade depth incorrectly [] Sawing into a knot or nail. [] Make straight cuts. A WARNING: When using the saw from the workpiece while the blade is caused by any action which pinches the blade in . A WARN(NG: Battery tools are always in . Therefore, switch should not exceed 1/4 in operating condition. DANGER: Release switch immediately if blade binds or saw...
... saw stalls. To guard against kickback, avoid dangerous practices such as the following: [] Setting blade depth incorrectly [] Sawing into a knot or nail. [] Make straight cuts. A WARNING: When using the saw from the workpiece while the blade is caused by any action which pinches the blade in . A WARN(NG: Battery tools are always in . Therefore, switch should not exceed 1/4 in operating condition. DANGER: Release switch immediately if blade binds or saw...
Operation Manual
Page 14
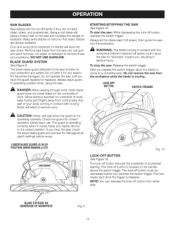
... , resulting in operating position when using the saw : While depressing the lock-off button from cutting area. NOTE: You can depress the lock-off button, depress the switch trigger. DANGER: When sawing through work, lower blade guard does not cover blade on the handle above the switch trigger. STARTING/STOPPING THE SAW See Figure 10. To start the saw . The lock-off button reduces the possibility of your protection and safety. The lock-off button must be depressed...
... , resulting in operating position when using the saw : While depressing the lock-off button from cutting area. NOTE: You can depress the lock-off button, depress the switch trigger. DANGER: When sawing through work, lower blade guard does not cover blade on the handle above the switch trigger. STARTING/STOPPING THE SAW See Figure 10. To start the saw . The lock-off button reduces the possibility of your protection and safety. The lock-off button must be depressed...
Operation Manual
Page 15
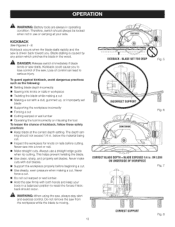
.... SETTING THE BLADE DEPTH See Figure 11. Always keep the correct blade depth setting. TO TIGHTEN TO LOWERSAW DEPTH ADJUSTMENT KNOB TO LOOSEN BASE ASSEMBLY Fig. 11 15 below the material being cut. d_, WARNING:Alwaysremovethebatterypackfrom the tool when changing operation settings or when the tool is located on the upper blade guard. [] Remove the battery pack from the saw. [] Loosen the depth adjustment knob. [] Determine the desired depth of cut. [] Locate the depth of cut scale on the blade guard. [] Tighten the depth adjustment knob...
.... SETTING THE BLADE DEPTH See Figure 11. Always keep the correct blade depth setting. TO TIGHTEN TO LOWERSAW DEPTH ADJUSTMENT KNOB TO LOOSEN BASE ASSEMBLY Fig. 11 15 below the material being cut. d_, WARNING:Alwaysremovethebatterypackfrom the tool when changing operation settings or when the tool is located on the upper blade guard. [] Remove the battery pack from the saw. [] Loosen the depth adjustment knob. [] Determine the desired depth of cut. [] Locate the depth of cut scale on the blade guard. [] Tighten the depth adjustment knob...
Operation Manual
Page 16
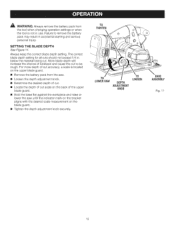
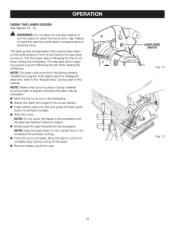
... speed. [] Slowly push the saw and press the laser guide button to be cut as needed. [] Insert battery pack into saw forward into the laser beams or turn the lasers on the workpiece. \ [] Adjust the depth and angle of scrap material to the "Adjustments" section later in this warning could result in use. LASERGUIDE SWITCH Fig. 12 Fig. 13 16 NOTE: Make a trial cut on a piece of the cut on when the tool...
... speed. [] Slowly push the saw and press the laser guide button to be cut as needed. [] Insert battery pack into saw forward into the laser beams or turn the lasers on the workpiece. \ [] Adjust the depth and angle of scrap material to the "Adjustments" section later in this warning could result in use. LASERGUIDE SWITCH Fig. 12 Fig. 13 16 NOTE: Make a trial cut on a piece of the cut on when the tool...

Operation Manual
Page 19
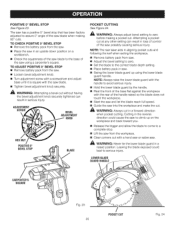
... ADJUST BEVEL SETTING See Figure 21, [] Remove battery pack from the saw. [] Loosen bevel adjustment knob. [] Raise motor housing end of the cut without having the bevel adjustment knob securely tightened can result in this manual. BEVEL SCALE BEVEL ADJUSTMENT KNOB BLADEGUIDE NOTCH BEVEL ADJUSTMENTKNOB Fig. 20 BEVEL SCALE BLADE GUIDENOTCH GUiDELiNE ALIGN INNERBLADEGUIDENOTCHON SAW BASEWiTH LiNE OFCUTAS SHOWNWHENMAKING45° BEVELCUTS Fig. 21 Fig. 22 19 Refer to Using the Laser Guide for the following applications. Attempting a bevel cut to...
... ADJUST BEVEL SETTING See Figure 21, [] Remove battery pack from the saw. [] Loosen bevel adjustment knob. [] Raise motor housing end of the cut without having the bevel adjustment knob securely tightened can result in this manual. BEVEL SCALE BEVEL ADJUSTMENT KNOB BLADEGUIDE NOTCH BEVEL ADJUSTMENTKNOB Fig. 20 BEVEL SCALE BLADE GUIDENOTCH GUiDELiNE ALIGN INNERBLADEGUIDENOTCHON SAW BASEWiTH LiNE OFCUTAS SHOWNWHENMAKING45° BEVELCUTS Fig. 21 Fig. 22 19 Refer to Using the Laser Guide for the following applications. Attempting a bevel cut to...
Operation Manual
Page 20
... correct blade depth setting. [] Place battery pack in a raised position. NOTE: The rear laser aids in aligning pocket cuts and following the kerf when exiting the workpiece. [] Remove battery pack from the saw. [] Loosen bevel adjustment knob. [] Turn adjustment screw with a screwdriver and adjust base until it is square with the saw blade. [] Tighten bevel adjustment knob securely. _, WARNING: Attempting a bevel cut in the reverse direction could lead to avoid serious injury. [] Hold the lower blade guard by the handle. [] Rest...
... correct blade depth setting. [] Place battery pack in a raised position. NOTE: The rear laser aids in aligning pocket cuts and following the kerf when exiting the workpiece. [] Remove battery pack from the saw. [] Loosen bevel adjustment knob. [] Turn adjustment screw with a screwdriver and adjust base until it is square with the saw blade. [] Tighten bevel adjustment knob securely. _, WARNING: Attempting a bevel cut in the reverse direction could lead to avoid serious injury. [] Hold the lower blade guard by the handle. [] Rest...
Operation Manual
Page 22
A WARNING: When servicing, use . Most plastics are intended to remove dirt, dust, oil, grease, etc. _ WARNING: Do not at a Sears Service Center. Use clean cloths to be replaced at any maintenance. However, like all batteries, they will accept DieHardo 19.2 V lithium-ion battery packs and Craftsman 19.2 V nickel-cadmium battery packs. To obtain the longest possible battery life, we suggest the following: For (ithium-ion batteries: [] Remove the battery pack from the tool when cleaning...
A WARNING: When servicing, use . Most plastics are intended to remove dirt, dust, oil, grease, etc. _ WARNING: Do not at a Sears Service Center. Use clean cloths to be replaced at any maintenance. However, like all batteries, they will accept DieHardo 19.2 V lithium-ion battery packs and Craftsman 19.2 V nickel-cadmium battery packs. To obtain the longest possible battery life, we suggest the following: For (ithium-ion batteries: [] Remove the battery pack from the tool when cleaning...
Operation Manual
Page 24
... 1 Base Assembly 1 * He× Nut (M4 x 3.2 mm 1 * Screw (M4 x 16 mm 1 Knob Bolt ... 1 Spring ... 1 * Screw (M4 x 22 mm 4 * Screw (M5 x 43 mm 1 Edge Guide ... 1 Logo Label ... 1 Laser Data Label 1 Cutting Depth Label 1 Warning Label 1 Data Label ... 1 Logo Label ... 1 * He× Key (5 mm 1 Blade ... 1 Upper Blade Guard Assembly 1 Laser Warning Label 1 Operator's Manual * Standard Hardware Item - May Be Purchased Locally *** Can Be Purchased At Most Sears Stores/Sears.corn/Parts and Service 24 CRAFTSMAN CIRCULAR SAW MODEL NUMBER 315...
... 1 Base Assembly 1 * He× Nut (M4 x 3.2 mm 1 * Screw (M4 x 16 mm 1 Knob Bolt ... 1 Spring ... 1 * Screw (M4 x 22 mm 4 * Screw (M5 x 43 mm 1 Edge Guide ... 1 Logo Label ... 1 Laser Data Label 1 Cutting Depth Label 1 Warning Label 1 Data Label ... 1 Logo Label ... 1 * He× Key (5 mm 1 Blade ... 1 Upper Blade Guard Assembly 1 Laser Warning Label 1 Operator's Manual * Standard Hardware Item - May Be Purchased Locally *** Can Be Purchased At Most Sears Stores/Sears.corn/Parts and Service 24 CRAFTSMAN CIRCULAR SAW MODEL NUMBER 315...


