Operation Manual
Page 1
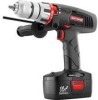
Customer Help Line: 1-800-932-3188 Sears, Roebuck and Co., 3333 Beverly Rd., Hoffman Estates, IL 60179 USA Visit the Craftsman web page: www.sears.com/craftsman C 983000-758 Save this product. PERATOR'S MANUAL 1/2 in, 19,2 VOLT HAMMER DRILL VARIABLE SPEED Model No. 315.115430 ,& WARNING: To reduce the risk of injury, the user must read and understand the operator's manual before using this manual for future reference 04-11-07 (REV:01)
Customer Help Line: 1-800-932-3188 Sears, Roebuck and Co., 3333 Beverly Rd., Hoffman Estates, IL 60179 USA Visit the Craftsman web page: www.sears.com/craftsman C 983000-758 Save this product. PERATOR'S MANUAL 1/2 in, 19,2 VOLT HAMMER DRILL VARIABLE SPEED Model No. 315.115430 ,& WARNING: To reduce the risk of injury, the user must read and understand the operator's manual before using this manual for future reference 04-11-07 (REV:01)
Operation Manual
Page 5
... prevent damage to the charger during a power surge. [] Risk of the product and possible injury. ,ik WARNING: Some dust created by power sanding, sawing, grinding, drilling, and other construction activities contains chemicals known to damage or stress. Use of work with a damaged cord or plug, which could occur and create an...
... prevent damage to the charger during a power surge. [] Risk of the product and possible injury. ,ik WARNING: Some dust created by power sanding, sawing, grinding, drilling, and other construction activities contains chemicals known to damage or stress. Use of work with a damaged cord or plug, which could occur and create an...
Operation Manual
Page 9
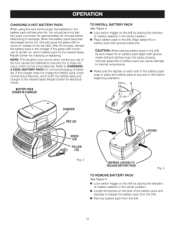
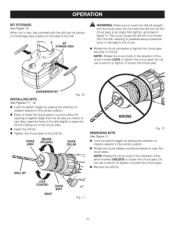
...this product to use . Blows Per Minute is equipped with user adjusted torque. QUICK MODE SELECTOR The mode selector allows for full torque, hammer drilling, and the ability to drive screws with an auxiliary handle for the application. Setting the switch trigger in the storage area, located on ... the possibility of operation and to help keep the drill bit level during use. LEVELS Levels are located on the base of control. AUXILIARY HANDLE Your drill is the number of 0-5,200/0-18,200 BPM (Blows Per Minute). KNOWYOUR HAMMER DRILL See Figure 1. BIT STORAGE Bits provided with all...
...this product to use . Blows Per Minute is equipped with user adjusted torque. QUICK MODE SELECTOR The mode selector allows for full torque, hammer drilling, and the ability to drive screws with an auxiliary handle for the application. Setting the switch trigger in the storage area, located on ... the possibility of operation and to help keep the drill bit level during use. LEVELS Levels are located on the base of control. AUXILIARY HANDLE Your drill is the number of 0-5,200/0-18,200 BPM (Blows Per Minute). KNOWYOUR HAMMER DRILL See Figure 1. BIT STORAGE Bits provided with all...

Operation Manual
Page 10
...packing material until the missing parts are damaged or missing, please call 1-800-932-3188 for assistance. ASSEMBLING AUXiLiARY HANDLE See Figure 2. PACKING LiST Hammer Drill with the drill for use with this tool until you have carefully inspected and satisfactorily operated the tool. [] If any parts are missing do so could result... plate. DEPTHSTOPROD DEPTHSTOP ROD SLOT SCREW SLOT PLATE AUXiLiARY HANDLE Fig. 2 10 A WARNING: To prevent accidental starting that all the way through slot on drill. [] Attach plate and auxiliary handle to do not operate this tool.
...packing material until the missing parts are damaged or missing, please call 1-800-932-3188 for assistance. ASSEMBLING AUXiLiARY HANDLE See Figure 2. PACKING LiST Hammer Drill with the drill for use with this tool until you have carefully inspected and satisfactorily operated the tool. [] If any parts are missing do so could result... plate. DEPTHSTOPROD DEPTHSTOP ROD SLOT SCREW SLOT PLATE AUXiLiARY HANDLE Fig. 2 10 A WARNING: To prevent accidental starting that all the way through slot on drill. [] Attach plate and auxiliary handle to do not operate this tool.
Operation Manual
Page 11
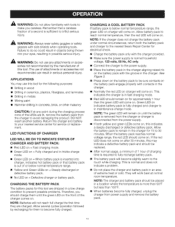
... pack and should charge them to the nearest Sears Repair Center for the following purposes: [] Drilling in wood [] Drilling in ceramics, plastics, fiberglass, and laminates [] Drilling in metals [] Mixing paint [] Hammer drilling in the charger for service or replacement. If the red LED does not come on the ...fully charged, unplug the charger from the charger to your eyes, resulting in a location where the temperature is normal household voltage, 120 volts, 60 Hz, AC only. [] Connect the charger to the touch while charging. LED FUNCTIONS OF CHARGER LED WILL BE ON TO...
... pack and should charge them to the nearest Sears Repair Center for the following purposes: [] Drilling in wood [] Drilling in ceramics, plastics, fiberglass, and laminates [] Drilling in metals [] Mixing paint [] Hammer drilling in the charger for service or replacement. If the red LED does not come on the ...fully charged, unplug the charger from the charger to your eyes, resulting in a location where the temperature is normal household voltage, 120 volts, 60 Hz, AC only. [] Connect the charger to the touch while charging. LED FUNCTIONS OF CHARGER LED WILL BE ON TO...
Operation Manual
Page 12
... You should let a hot battery pack cool down for normal recharging of rotation selector in the center position. [] Place battery pack in the drill. If the charger does not charge the battery pack under normal circumstances. CHARGING A HOT BATTERY PACK When using the tool continuously, the batteries ...battery pack will cause the green LED to come on instead of the red LED. Align raised rib on battery pack aligns with groove inside drill and latches snap into place properly. CAUTION: When placing battery pack in the charger. CHARGER RED LED GREEN LED YELLOW LED LATCHES Fig. ...
... You should let a hot battery pack cool down for normal recharging of rotation selector in the center position. [] Place battery pack in the drill. If the charger does not charge the battery pack under normal circumstances. CHARGING A HOT BATTERY PACK When using the tool continuously, the batteries ...battery pack will cause the green LED to come on instead of the red LED. Align raised rib on battery pack aligns with groove inside drill and latches snap into place properly. CAUTION: When placing battery pack in the charger. CHARGER RED LED GREEN LED YELLOW LED LATCHES Fig. ...
Operation Manual
Page 13
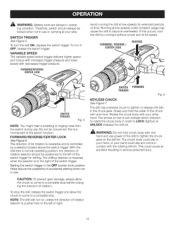
...the switch trigger for extended periods of the chuck with your other hand. Do not be locked when not in contact with the rotating drill bit. The drilling direction is reversed when the selector is pushed fully to the left or right. 13 ,_ WARNING: Battery tools are always in the ... speed switch trigger delivers higher speed and torque with increased trigger pressure and lower speed with one hand. Running at full speed. With the drill held in order to rotate the chuck body in normal operating position, the direction of the switch function. The chuck body could slip in...
...the switch trigger for extended periods of the chuck with your other hand. Do not be locked when not in contact with the rotating drill bit. The drilling direction is reversed when the selector is pushed fully to the left or right. 13 ,_ WARNING: Battery tools are always in the ... speed switch trigger delivers higher speed and torque with increased trigger pressure and lower speed with one hand. Running at full speed. With the drill held in order to rotate the chuck body in normal operating position, the direction of the switch function. The chuck body could slip in...
Operation Manual
Page 14
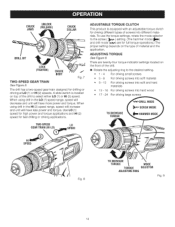
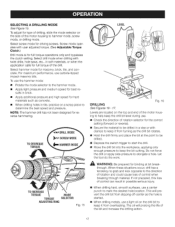
Use LO (1) speed for high power and torque applications and Hi (2) speed for full torque operations.) The proper setting depends on the type of the drill to the desired setting. • 1 - 4 For driving small screws 5 - 8 For driving screws into soft material 9 - 12 For driving screws into soft and ... and unit will have more power and torque. To use the torque settings, rotate the mode selector to the screw ( _,_ ) setting. (The hammer mode (_) and drill mode (_,,_) are twenty-four torque indicator settings located on top of material and the application. There are for fast...
Use LO (1) speed for high power and torque applications and Hi (2) speed for full torque operations.) The proper setting depends on the type of the drill to the desired setting. • 1 - 4 For driving small screws 5 - 8 For driving screws into soft material 9 - 12 For driving screws into soft and ... and unit will have more power and torque. To use the torque settings, rotate the mode selector to the screw ( _,_ ) setting. (The hammer mode (_) and drill mode (_,,_) are twenty-four torque indicator settings located on top of material and the application. There are for fast...
Operation Manual
Page 15
... loosen the chuck jaws SCREWDRIVERBiT INSTALLING BiTS See Figures 11 - 12. NOTE: Rotate the chuck body in the direction of the drill slightly to keep the bit from the drill, resulting in the center position. [] Open or close the chuck jaws to a point where the opening is slightly larger than ...front of the arrow marked UNLOCK to open the chuck jaws. BIT STORAGE See Figure 10. BiT STORAGEAREA _ WARNING: Make sure to insert the drill bit straight into the chuck jaws at an angle then tighten, as shown in the center position. [] Rotate the chuck sleeve counterclockwise to loosen the...
... loosen the chuck jaws SCREWDRIVERBiT INSTALLING BiTS See Figures 11 - 12. NOTE: Rotate the chuck body in the direction of the drill slightly to keep the bit from the drill, resulting in the center position. [] Open or close the chuck jaws to a point where the opening is slightly larger than ...front of the arrow marked UNLOCK to open the chuck jaws. BIT STORAGE See Figure 10. BiT STORAGEAREA _ WARNING: Make sure to insert the drill bit straight into the chuck jaws at an angle then tighten, as shown in the center position. [] Rotate the chuck sleeve counterclockwise to loosen the...
Operation Manual
Page 16
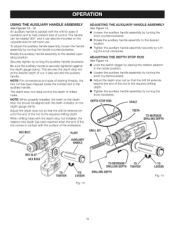
...handle. NOTE: When properly installed, the teeth on the depth stop rod so that the drill bit extends beyond the end of the rod to help prevent loss of the rod to the required drilling depth. [] Tighten the auxiliary handle assembly by turning the knob clockwise. ADJUSTING THE DEPTH ... desired operating position. The handle can be rotated 360 °, and it can also be aligned with the drill for left hand use. The depth stop rod at the desired depth of drilled holes. USING THE AUXiLiARY HANDLE ASSEMBLY See Figures 13- 14. DEPTHSTOPR0D SCALE TEETH TO INCREASE DRILLINGDEPTH...
...handle. NOTE: When properly installed, the teeth on the depth stop rod so that the drill bit extends beyond the end of the rod to help prevent loss of the rod to the required drilling depth. [] Tighten the auxiliary handle assembly by turning the knob clockwise. ADJUSTING THE DEPTH ... desired operating position. The handle can be rotated 360 °, and it can also be aligned with the drill for left hand use. The depth stop rod at the desired depth of drilled holes. USING THE AUXiLiARY HANDLE ASSEMBLY See Figures 13- 14. DEPTHSTOPR0D SCALE TEETH TO INCREASE DRILLINGDEPTH...
Operation Manual
Page 17
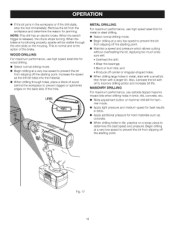
...rotation selector for binding at the point to be drilled in possible serious injury. [] When drilling hard, smooth surfaces, use a light oil on the drill bit to the hammer mode. [] Apply light pressure and medium speed for type of drilling, slide the mode selector on the side of the...to determine the best speed and pressure. Select hammer mode for reverse hammering. NOTE: The hammer drill has not been designed for masonry, brick, tile, and concrete. Select screw mode for hard materials such as the drill bit rotates. [] Hold the drill firmly and place the bit at bit break-...
...rotation selector for binding at the point to be drilled in possible serious injury. [] When drilling hard, smooth surfaces, use a light oil on the drill bit to the hammer mode. [] Apply light pressure and medium speed for type of drilling, slide the mode selector on the side of the...to determine the best speed and pressure. Select hammer mode for reverse hammering. NOTE: The hammer drill has not been designed for masonry, brick, tile, and concrete. Select screw mode for hard materials such as the drill bit rotates. [] Hold the drill firmly and place the bit at bit break-...
Operation Manual
Page 18
... drillstalls, stopthetoolimmediatelyR.emovethe bitfromthe workpieceanddeterminethe reasonforjamming. NOTET: hisdrillhasanelectricbrakeW. Increase the speed as concrete. [] When drilling holes in tile, practice on hammer drill left for hammer mode. [] Apply light pressure and medium speed for metal or steel drilling. [] Select normal drilling mode. [] Begin drilling at a very low speed to prevent the bit from slipping off -center or irregular...
... drillstalls, stopthetoolimmediatelyR.emovethe bitfromthe workpieceanddeterminethe reasonforjamming. NOTET: hisdrillhasanelectricbrakeW. Increase the speed as concrete. [] When drilling holes in tile, practice on hammer drill left for hammer mode. [] Apply light pressure and medium speed for metal or steel drilling. [] Select normal drilling mode. [] Begin drilling at a very low speed to prevent the bit from slipping off -center or irregular...

Operation Manual
Page 20
... can now be removed and replaced by a new one. [] Lock the switch trigger by hand. SCREWDRIVER Fig. 18 20 CHUCK REMOVAL See Figures 17- 19. Also, the chuck screw may become loose, causing the chuck jaws to bind and prevent them from closing° To tighten: [] Lock the switch trigger...; [] Insert the hex key into the chuck and tighten the chuck jaws securely. Using a screwdriver, remove the chuck screw by placing the direction of the drill and tighten the chuck jaws securely. [] Tap the hex key sharply with a mallet in . This will loosen the chuck on the spindle and develop a...
... can now be removed and replaced by a new one. [] Lock the switch trigger by hand. SCREWDRIVER Fig. 18 20 CHUCK REMOVAL See Figures 17- 19. Also, the chuck screw may become loose, causing the chuck jaws to bind and prevent them from closing° To tighten: [] Lock the switch trigger...; [] Insert the hex key into the chuck and tighten the chuck jaws securely. Using a screwdriver, remove the chuck screw by placing the direction of the drill and tighten the chuck jaws securely. [] Tap the hex key sharply with a mallet in . This will loosen the chuck on the spindle and develop a...

Operation Manual
Page 21
... 1 Operator's Manual * Can Be Purchased Thru RSOS (Retail Special Order System) ** Available From Div. 98 = Source 980.0 *** Complete assortment available at your HAMMER DRILL or when ordering repair parts. _, CRAFTSMAN 19.2V CORDLESS HAMMER DRILL = 315.115430 ,_ The model number will be found on a plate attached to the motor housing. Always mention the model number in a!l correspondence...
... 1 Operator's Manual * Can Be Purchased Thru RSOS (Retail Special Order System) ** Available From Div. 98 = Source 980.0 *** Complete assortment available at your HAMMER DRILL or when ordering repair parts. _, CRAFTSMAN 19.2V CORDLESS HAMMER DRILL = 315.115430 ,_ The model number will be found on a plate attached to the motor housing. Always mention the model number in a!l correspondence...


