
Operation Manual
Page 9
...exposure, blade binding, or loss of the time It takes for the blade to stopsplnnlng and the guard, base and release lever to desired depth) BEFORE USING THIS SAW (See Page 18, Figs. 4 and 4e). 3_CHECK the Blade Guard Release Leverand the LowerBlade Guardand Base BEFORE each use . 7. Make ...the upper and lower blade guard. ONLY USE the manual Blade Guard Release Lever to false the base, lowering the blade to the desired depth-of seriouspersonal Injury. CIRCULAR SAW cont. /_ CAUTION: When the blade Is plunged below the base, Increasingthe risk of -cut In your hands or across your legs,...
...exposure, blade binding, or loss of the time It takes for the blade to stopsplnnlng and the guard, base and release lever to desired depth) BEFORE USING THIS SAW (See Page 18, Figs. 4 and 4e). 3_CHECK the Blade Guard Release Leverand the LowerBlade Guardand Base BEFORE each use . 7. Make ...the upper and lower blade guard. ONLY USE the manual Blade Guard Release Lever to false the base, lowering the blade to the desired depth-of seriouspersonal Injury. CIRCULAR SAW cont. /_ CAUTION: When the blade Is plunged below the base, Increasingthe risk of -cut In your hands or across your legs,...
Operation Manual
Page 14
..., Non-scratch base cover for fast, smoothcutsin plywoodup to removedust and chipsaway from the cuttingarea, 17. Includes One Craftsman®3-In. 20 tooth carbide-tipped steel general purpose blade for use when Installingblades_ 15. Bullt-ln sawdust extraction port...feature for efficient powertransmission. Quick depth-of-cut adjustments witha maximum depth-of-cut scale, located on paddle for better vistbitityo 4. diamond grlt steel blade, for use when cutting delicate surfaces such as plastics and composite flooring. 11. CIRCULAR SAW (Fig. 2) l NopOeTrEat:...
..., Non-scratch base cover for fast, smoothcutsin plywoodup to removedust and chipsaway from the cuttingarea, 17. Includes One Craftsman®3-In. 20 tooth carbide-tipped steel general purpose blade for use when Installingblades_ 15. Bullt-ln sawdust extraction port...feature for efficient powertransmission. Quick depth-of-cut adjustments witha maximum depth-of-cut scale, located on paddle for better vistbitityo 4. diamond grlt steel blade, for use when cutting delicate surfaces such as plastics and composite flooring. 11. CIRCULAR SAW (Fig. 2) l NopOeTrEat:...

Operation Manual
Page 15
This Saw has the following features: cont. (Fig.2) Laser Tta¢TM and LED Workllght On / Off Switch uetsble Handle Soft-Grip Laser Light Aperture and LED Workllgh Depth-of-Cut and Length-of-Cut Indicator and Adjustment / Lock Lever for Edg_ iplng Screw Clamping Washer Length-of-Cut Indicator Scale Upper Blade... I / Retaining Mounting Slots for Edge Gulde Length_of*Cut Indicator Scale Lower Blade Guard and Base Rating No-Load Speed Biade Diameter Blade Arbor Maximum Cutting Depth Input 2.8 Amps 2800 RPM 3-in, (76,2mm) .3g4-1n. (1o ram) 7/8-1n. (22.2mm) 120-v., 60Hz AC '15
This Saw has the following features: cont. (Fig.2) Laser Tta¢TM and LED Workllght On / Off Switch uetsble Handle Soft-Grip Laser Light Aperture and LED Workllgh Depth-of-Cut and Length-of-Cut Indicator and Adjustment / Lock Lever for Edg_ iplng Screw Clamping Washer Length-of-Cut Indicator Scale Upper Blade... I / Retaining Mounting Slots for Edge Gulde Length_of*Cut Indicator Scale Lower Blade Guard and Base Rating No-Load Speed Biade Diameter Blade Arbor Maximum Cutting Depth Input 2.8 Amps 2800 RPM 3-in, (76,2mm) .3g4-1n. (1o ram) 7/8-1n. (22.2mm) 120-v., 60Hz AC '15
Operation Manual
Page 17
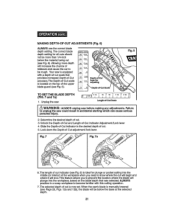
... the screw and the outer "D" washer. 6. Use the two hex wrenches to engage Fig. 3b Included: 9-61272 Craftsman 3-In. 20 tooth carbide tipped general purpose blade Sold separately 9-61273 Craftsman 3-1n. NOTE:The warning copy and the Blade Rotation Arrow shown on s fiat surfaceand continue to expose the blade below...screw ts loose, place the saw on the blade should point upward at the front of the blade should face outward towards the operator so It can be viewed (Fig. 3b). 10.Replace the "D" washer. 11. Set the depth-of-cut scale to the maximum depth of oil onto the Inner ...
... the screw and the outer "D" washer. 6. Use the two hex wrenches to engage Fig. 3b Included: 9-61272 Craftsman 3-In. 20 tooth carbide tipped general purpose blade Sold separately 9-61273 Craftsman 3-1n. NOTE:The warning copy and the Blade Rotation Arrow shown on s fiat surfaceand continue to expose the blade below...screw ts loose, place the saw on the blade should point upward at the front of the blade should face outward towards the operator so It can be viewed (Fig. 3b). 10.Replace the "D" washer. 11. Set the depth-of-cut scale to the maximum depth of oil onto the Inner ...

Operation Manual
Page 18
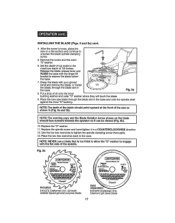
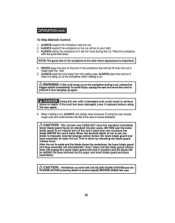
... GUARD SYSTEM (Figs. 4 and 4a) Fig. 4 The iower blade guard is an integral part of the saw's base and ONLY encloses the blade when it is ABOVE the saw's base (see Fig_4)_ When the desired depth-of-cut is set, the blade is manually lowered berow the base, (in a plunge action) by releasing... the blade guard release lever wh]ie holding the finger lift bracket on the base, as you lower the saw's handle and blade to the selected depth, Upper Blade Guard When starling and while making a cut, the blade is designed for your protection and safety and should NEVER be...
... GUARD SYSTEM (Figs. 4 and 4a) Fig. 4 The iower blade guard is an integral part of the saw's base and ONLY encloses the blade when it is ABOVE the saw's base (see Fig_4)_ When the desired depth-of-cut is set, the blade is manually lowered berow the base, (in a plunge action) by releasing... the blade guard release lever wh]ie holding the finger lift bracket on the base, as you lower the saw's handle and blade to the selected depth, Upper Blade Guard When starling and while making a cut, the blade is designed for your protection and safety and should NEVER be...

Operation Manual
Page 20
... 5a and 5b) cont. The depth setting should not exceed 1/4-Inch below the material being cut objects that can cause Kickback. _lIomsme ecdoinattreollyoifftthheebsAlaaLwdWe. Ways to Help Prevent Kickback cont. 6. BE SURE that the saw teeth are not engaged Into the material. If the saw blade is binding, it may walk... up or Kickback from the workplece when the saw in the workplece, CENTER the blade In the keff and checkto be sure that the blade depth and adjusting locking lever is restarted_ 7oDO NOT use a dull or damaged bladeoUnsharpened, Improperly set, or...
... 5a and 5b) cont. The depth setting should not exceed 1/4-Inch below the material being cut objects that can cause Kickback. _lIomsme ecdoinattreollyoifftthheebsAlaaLwdWe. Ways to Help Prevent Kickback cont. 6. BE SURE that the saw teeth are not engaged Into the material. If the saw blade is binding, it may walk... up or Kickback from the workplece when the saw in the workplece, CENTER the blade In the keff and checkto be sure that the blade depth and adjusting locking lever is restarted_ 7oDO NOT use a dull or damaged bladeoUnsharpened, Improperly set, or...
Operation Manual
Page 21
...the material being cut is now set.When the saw is manually lowered dSeePage 25, Figs. Determine the desired depth of *Cutscale Is located on the blade depththat wasselected.ALWAYS practicein a scrap workplaceto becomefamiliar with a depth-of cut , 3. Allowing more than 1/4-Inch below... the base at the selected epth. 21 Your saw 'sblade is equipped with this cuttingoperation. 7_The selecteddepth of -Cut adjustment/lock lever....
...the material being cut is now set.When the saw is manually lowered dSeePage 25, Figs. Determine the desired depth of *Cutscale Is located on the blade depththat wasselected.ALWAYS practicein a scrap workplaceto becomefamiliar with a depth-of cut , 3. Allowing more than 1/4-Inch below... the base at the selected epth. 21 Your saw 'sblade is equipped with this cuttingoperation. 7_The selecteddepth of -Cut adjustment/lock lever....
Operation Manual
Page 23
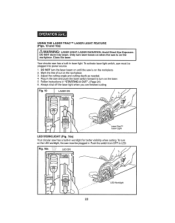
...cutting Fig. 10 1 LASER ON Laser TracTM Laser Light LED WORKLIGHT (Fig, 10a) Your circular saw has a built-in worklight for better vtsibi/lty when cutting To turn on the LED work]ight, the saw and push the iaser switch forward to LED° Fig. 10a LED ON 23 USING ...3. Avoid Direct Eye Exposure. i ll,l,,,ll i,,Hllll L Yourcircular saw has a built-in the saw must be plugged in "STARTING A CUT", (Page 24) 6. Adjust the cutting angle and cutting depth as needed., 4 Plug in laser light To activate laser light switch, saw must be plugged into beam, Only turn laser beam on when...
...cutting Fig. 10 1 LASER ON Laser TracTM Laser Light LED WORKLIGHT (Fig, 10a) Your circular saw has a built-in worklight for better vtsibi/lty when cutting To turn on the LED work]ight, the saw and push the iaser switch forward to LED° Fig. 10a LED ON 23 USING ...3. Avoid Direct Eye Exposure. i ll,l,,,ll i,,Hllll L Yourcircular saw has a built-in the saw must be plugged in "STARTING A CUT", (Page 24) 6. Adjust the cutting angle and cutting depth as needed., 4 Plug in laser light To activate laser light switch, saw must be plugged into beam, Only turn laser beam on when...

Operation Manual
Page 24
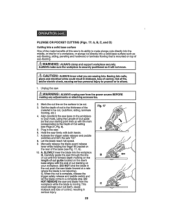
... as shown In Fig, 13a, 24 When the blade and saw are clear of and removed from the workplace while the blade is solidlysupported (see Rgo12, A and 13)as you lowerthe saw's handle and blade to the selected depth, MAKE SURETHE BLADE IS NOT MAKINGCONTACT WITH THE WORKPIECE. 9_ ...With both hands. 7_ Positionthe front of the saw , keepingthe front of the workplace that is moving.This could damage your...
... as shown In Fig, 13a, 24 When the blade and saw are clear of and removed from the workplace while the blade is solidlysupported (see Rgo12, A and 13)as you lowerthe saw's handle and blade to the selected depth, MAKE SURETHE BLADE IS NOT MAKINGCONTACT WITH THE WORKPIECE. 9_ ...With both hands. 7_ Positionthe front of the saw , keepingthe front of the workplace that is moving.This could damage your...
Operation Manual
Page 26
...depth of the saw's base and only encloses the blade ABOVE the saw again. 6. IfUtshiengcothrde shaaws bwelethn adadmamagaegde,dhcaovredItcroeupldlacreesdublteIfnorseeruiosiunsg | the saw 's base. When makinga cut Is made (see Fig 13s). 5, ALWAYS keep the cord away from the cutting area. To HelpMaintainControl: 1. L_ CAUTION: This circular saw...the slde where appearance Is Important. ] ! 4, NEVER place the saw and move the cordto I_WAR prevent It NfroINmGh:antfgtihnegcuopradghaainn.gsup on standard circular saws. ALWAYSplace the cord so it wtlinot move during the CUtrP, lace the...
...depth of the saw's base and only encloses the blade ABOVE the saw again. 6. IfUtshiengcothrde shaaws bwelethn adadmamagaegde,dhcaovredItcroeupldlacreesdublteIfnorseeruiosiunsg | the saw 's base. When makinga cut Is made (see Fig 13s). 5, ALWAYS keep the cord away from the cutting area. To HelpMaintainControl: 1. L_ CAUTION: This circular saw...the slde where appearance Is Important. ] ! 4, NEVER place the saw and move the cordto I_WAR prevent It NfroINmGh:antfgtihnegcuopradghaainn.gsup on standard circular saws. ALWAYSplace the cord so it wtlinot move during the CUtrP, lace the...
Operation Manual
Page 29
..., I I pipes and electrical wires could damage your workplace. (DO NOT bind the blade in the cut;push the saw 's base aligns with both hands. 7. Carefully guide the sawthroughthe line of cut untl!the forward depth marking or} the length of cut directly Into a solid base surfacesuch as sub-flooring, siding, panelingand hardwoodor...
..., I I pipes and electrical wires could damage your workplace. (DO NOT bind the blade in the cut;push the saw 's base aligns with both hands. 7. Carefully guide the sawthroughthe line of cut untl!the forward depth marking or} the length of cut directly Into a solid base surfacesuch as sub-flooring, siding, panelingand hardwoodor...
