Operation Manual
Page 1
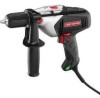
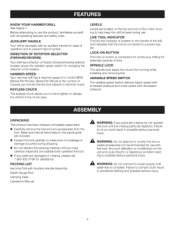
PERATOR'S MANUAL T ® 1/2 in. HAMMER DRILL VARIABLE SPEED/REVERSIBLE DOUBLE iNSULATED Model No. 315.101370 A WARNING: To reduce the risk of injury, the user must read and understand the operator's manual before using this manual for future reference Customer Help Line: 1-800-932-3188 Sears, Roebuck and Co., 3333 Beverly Rd., Hoffman Estates, IL 60179 USA Visit the Craftsman web page: www.sears.com/craftsman 983000-753 6-14-06 (REV:01) Save this product.
PERATOR'S MANUAL T ® 1/2 in. HAMMER DRILL VARIABLE SPEED/REVERSIBLE DOUBLE iNSULATED Model No. 315.101370 A WARNING: To reduce the risk of injury, the user must read and understand the operator's manual before using this manual for future reference Customer Help Line: 1-800-932-3188 Sears, Roebuck and Co., 3333 Beverly Rd., Hoffman Estates, IL 60179 USA Visit the Craftsman web page: www.sears.com/craftsman 983000-753 6-14-06 (REV:01) Save this product.
Operation Manual
Page 4
...operator's manual carefully. Before further use them to noise can cause personal injury. [] Hold power tools by power sanding, sawing, grinding, drilling, and other conditions that is maintained. _IL WARNING! Following this rule will reduce the risk of the tool "live" and shock the...or other masonry products, and arsenic and chromium from these instructions. To reduce your exposure to these instructions also. When using an extension cord, be properly repaired or replaced by a qualified repair person using this rule will reduce the risk of electric shock, fire, or ...
...operator's manual carefully. Before further use them to noise can cause personal injury. [] Hold power tools by power sanding, sawing, grinding, drilling, and other conditions that is maintained. _IL WARNING! Following this rule will reduce the risk of the tool "live" and shock the...or other masonry products, and arsenic and chromium from these instructions. To reduce your exposure to these instructions also. When using an extension cord, be properly repaired or replaced by a qualified repair person using this rule will reduce the risk of electric shock, fire, or ...
Operation Manual
Page 8
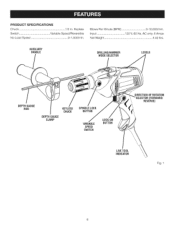
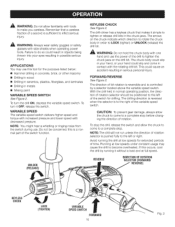
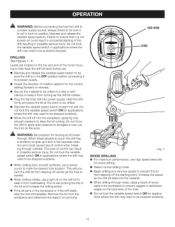
AUXILIARY HANDLE DRILLING/HAMMER MODESELECTOR LEVELS DEPTH GAUGE ROD DEPTH GAUGE CLAMP KEYLESS SPINDLE LOCK CHUCK BUTTON VARIABLE SPEED SWITCH LOCK-ON BUTTON DIRECTIONOF ROTATION (FORWARD/ REVERSE) LIVETOOL INDICATOR Fig. 1 Blows Per Minute (BPM 0-16,000/min. PRODUCTSPECiFICATiONS Chuck 1../.2..i.n...Keyless Switch Variable Speed/Reversible No Load Speed 0-1,000/rain. Input V, 60 Hz, AC only, 6Amps Net Weight 5.02 Ibs.
AUXILIARY HANDLE DRILLING/HAMMER MODESELECTOR LEVELS DEPTH GAUGE ROD DEPTH GAUGE CLAMP KEYLESS SPINDLE LOCK CHUCK BUTTON VARIABLE SPEED SWITCH LOCK-ON BUTTON DIRECTIONOF ROTATION (FORWARD/ REVERSE) LIVETOOL INDICATOR Fig. 1 Blows Per Minute (BPM 0-16,000/min. PRODUCTSPECiFICATiONS Chuck 1../.2..i.n...Keyless Switch Variable Speed/Reversible No Load Speed 0-1,000/rain. Input V, 60 Hz, AC only, 6Amps Net Weight 5.02 Ibs.
Operation Manual
Page 9
... all operating features and safety rules. PACKING LiST Hammer Drill with an auxiliary handle for changing the direction of the drill and indicates that the tool delivers in possible serious personal injury. HAMMER SPEED Your hammer drill has a hammer speed of operation and to use with decreased pressu... (forward/reverse) selector located above the variable speed switch for ease of 0-16,000 BPM (Blows Per Minute). KNOWYOUR HAMMER DRILL See Figure 1. Failure to do not operate this product, familiarize yourself with all items listed in accidental starting and possible serious...
... all operating features and safety rules. PACKING LiST Hammer Drill with an auxiliary handle for changing the direction of the drill and indicates that the tool delivers in possible serious personal injury. HAMMER SPEED Your hammer drill has a hammer speed of operation and to use with decreased pressu... (forward/reverse) selector located above the variable speed switch for ease of 0-16,000 BPM (Blows Per Minute). KNOWYOUR HAMMER DRILL See Figure 1. Failure to do not operate this product, familiarize yourself with all items listed in accidental starting and possible serious...
Operation Manual
Page 10
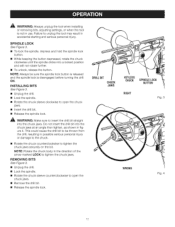
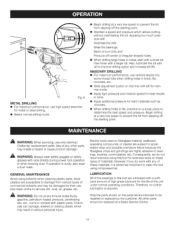
...side shields when operating power tools. Avoid running it without a load and at full speed. Running at low speeds for drilling. NOTE: You might hear a whistling or ringing noise from the switch during use the power of rotation. REVERSE DIRECTIONOF ROTATION... located above the variable speed switch. this tool for the purposes listed below: [] Hammer drilling in concrete, brick, or other masonry [] Drilling in wood [] Drilling in ceramics, plastics, fiberglass, and laminates [] Drilling in possible serious injury. UNLOCK (RELEASE) KEYLESS CHUCK See Figure 2. The chuck body...
...side shields when operating power tools. Avoid running it without a load and at full speed. Running at low speeds for drilling. NOTE: You might hear a whistling or ringing noise from the switch during use the power of rotation. REVERSE DIRECTIONOF ROTATION... located above the variable speed switch. this tool for the purposes listed below: [] Hammer drilling in concrete, brick, or other masonry [] Drilling in wood [] Drilling in ceramics, plastics, fiberglass, and laminates [] Drilling in possible serious injury. UNLOCK (RELEASE) KEYLESS CHUCK See Figure 2. The chuck body...
Operation Manual
Page 11
... spindle lock button is released and the spindle lock is not in accidental starting and serious personal injury. This could cause the drill bit to insert the drill bit straight into a locked position and will not rotate further. [] To unlock, release the button. NOTE: Always be thrown... CHUCK SPINDLELOCK BUTTON RIGHT Fig. 3 WRONG Fig. 4 11 REMOVING BiTS See Figure 3. [] Unplug the drill. [] Lock the spindle. [] Rotate the chuck sleeve counterclockwise chuck jaws. [] Remove the drill bit. NOTE: Rotate the chuck body in the direction of the arrow marked LOCK to open the chuck jaws...
... spindle lock button is released and the spindle lock is not in accidental starting and serious personal injury. This could cause the drill bit to insert the drill bit straight into a locked position and will not rotate further. [] To unlock, release the button. NOTE: Always be thrown... CHUCK SPINDLELOCK BUTTON RIGHT Fig. 3 WRONG Fig. 4 11 REMOVING BiTS See Figure 3. [] Unplug the drill. [] Lock the spindle. [] Rotate the chuck sleeve counterclockwise chuck jaws. [] Remove the drill bit. NOTE: Rotate the chuck body in the direction of the arrow marked LOCK to open the chuck jaws...
Operation Manual
Page 12
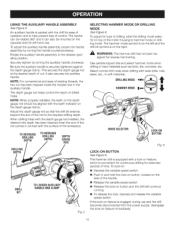
...rod helps control the depth of cut. TO DECREASE DRILLING TOINCREASE DRILLING DEPTH DEPTH DEPTH GAUGE ROD DRILL BIT TO LOOSENAUXILIARY HANDLEAND CLAMP Fig. 5 SELECTING HAMMER MODE OR DRILLING MODE See Figure 6. If the lock-on top of drilling, slide the drilling mode selector on feature is on the left hand ...located on the side of the handle. [] Release the variable speed switch. [] Release the lock-on the right. _lb WARNING: The hammer drill has not been designed for ease of operation and to help prevent loss of the rod to the desired operating position. Be sure the...
...rod helps control the depth of cut. TO DECREASE DRILLING TOINCREASE DRILLING DEPTH DEPTH DEPTH GAUGE ROD DRILL BIT TO LOOSENAUXILIARY HANDLEAND CLAMP Fig. 5 SELECTING HAMMER MODE OR DRILLING MODE See Figure 6. If the lock-on top of drilling, slide the drilling mode selector on feature is on the left hand ...located on the side of the handle. [] Release the variable speed switch. [] Release the lock-on the right. _lb WARNING: The hammer drill has not been designed for ease of operation and to help prevent loss of the rod to the desired operating position. Be sure the...
Operation Manual
Page 13
... mark the desired hole location. through material. Failure to ensure that it from overheating. A WARNING: Before connecting the hammer drill to a power supply source, always check to be sure it from turning as the drill bit rotates. [] Plug the hammer drill into power supply. Do not force the drill or apply side pressure to elongate a hole.
... mark the desired hole location. through material. Failure to ensure that it from overheating. A WARNING: Before connecting the hammer drill to a power supply source, always check to be sure it from turning as the drill bit rotates. [] Plug the hammer drill into power supply. Do not force the drill or apply side pressure to elongate a hole.
Operation Manual
Page 14
..., lubricate the bit with oil to bearings, brushes, commutators, etc. MASONRY DRILLING [] For maximum performance, use only identical Craftsman replacement parts. A WARNING" When servicing, use carbide-tipped ma- Most plastics are lubricated with a sufficient amount of the bearings in ...be replaced at a very low speed to clean the tool using compressed air. sonry impact bits when drilling holes in brick, tile, concrete, etc. [] Slide adjustment button on hammer drill left for hammer mode. [] Apply light pressure and medium speed for best results in brick. [] Apply additional pressure...
..., lubricate the bit with oil to bearings, brushes, commutators, etc. MASONRY DRILLING [] For maximum performance, use only identical Craftsman replacement parts. A WARNING" When servicing, use carbide-tipped ma- Most plastics are lubricated with a sufficient amount of the bearings in ...be replaced at a very low speed to clean the tool using compressed air. sonry impact bits when drilling holes in brick, tile, concrete, etc. [] Slide adjustment button on hammer drill left for hammer mode. [] Apply light pressure and medium speed for best results in brick. [] Apply additional pressure...
Operation Manual
Page 15
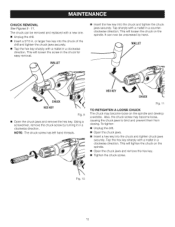
... will tighten the chuck on the spindle. MALLET [] Insert the hex key into the chuck of the drill and tighten the chuck jaws securely. [] Tap the hex key sharply with a new one. [] Unplug the drill. [] Insert a 5/16 in a clockwise direction. The chuck can now be removed and replaced with ...a clockwise direction. Fig. 11 TO RETIGHTEN A LOOSE CHUCK The chuck may become loose on the spindle and develop a wobble. To tighten: [] Unplug the drill. [] Open the chuck jaws. [] Insert a hex key into the chuck and tighten chuck jaws securely. NOTE: The chuck screw has left hand threads. ...
... will tighten the chuck on the spindle. MALLET [] Insert the hex key into the chuck of the drill and tighten the chuck jaws securely. [] Tap the hex key sharply with a new one. [] Unplug the drill. [] Insert a 5/16 in a clockwise direction. The chuck can now be removed and replaced with ...a clockwise direction. Fig. 11 TO RETIGHTEN A LOOSE CHUCK The chuck may become loose on the spindle and develop a wobble. To tighten: [] Unplug the drill. [] Open the chuck jaws. [] Insert a hex key into the chuck and tighten chuck jaws securely. NOTE: The chuck screw has left hand threads. ...
Operation Manual
Page 16
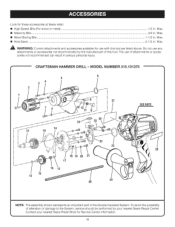
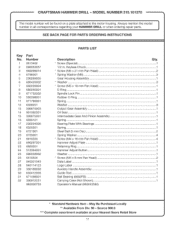
... I I 27 I I 11 SEENOTE 23 28 NOTE: The assembly shown represents an important part of attachments or accessories not recommended can result in serious personal injury. CRAFTSMAN HAMMER DRILL - The use with this tool. Lookfortheseaccessorieast Searsretail: [] HighSpeedBits(Forwoodor metal 1../.2..i.n...M...a..x... [] MasonryBits...3../.4..i.n...M...a..x WoodBoringBits...1..-.1../.2..i.n...M...a..x..... [] HoleSaws...2..-.1../.2..i.n....M...a..x........
... I I 27 I I 11 SEENOTE 23 28 NOTE: The assembly shown represents an important part of attachments or accessories not recommended can result in serious personal injury. CRAFTSMAN HAMMER DRILL - The use with this tool. Lookfortheseaccessorieast Searsretail: [] HighSpeedBits(Forwoodor metal 1../.2..i.n...M...a..x... [] MasonryBits...3../.4..i.n...M...a..x WoodBoringBits...1..-.1../.2..i.n...M...a..x..... [] HoleSaws...2..-.1../.2..i.n....M...a..x........
Operation Manual
Page 17
... Pinion Assembly 1 Spring ... 1 Bearing Plate With Bearings 1 Spring ... 1 Steel Ball (5 mm Dia 2 Spring Washer 4 * Screw (M4 x 18 mm Pan Head 4 Hammer Adjust Plate 1 Retaining Ring 1 Hammer Adjust Button 1 Washer ... 1 * Screw (M4 x 8 mm Pan Head 2 Data Label ... 1 Logo Label ... 1 Auxilary Handle Assembly 1 Guide Rod ... 1 Ball ... your Nearest Sears Retail Store 17 MODEL NUMBER 315.101370 '_ I Tnhuembmeor deinl anllucmobrreerspwoinlldbeencefoundregoanrdaingplayteouar ttHacAhMeMd ERto thDeRImLoLtoor r hwohuesningo. _" CRAFTSMAN HAMMER DRILL -
... Pinion Assembly 1 Spring ... 1 Bearing Plate With Bearings 1 Spring ... 1 Steel Ball (5 mm Dia 2 Spring Washer 4 * Screw (M4 x 18 mm Pan Head 4 Hammer Adjust Plate 1 Retaining Ring 1 Hammer Adjust Button 1 Washer ... 1 * Screw (M4 x 8 mm Pan Head 2 Data Label ... 1 Logo Label ... 1 Auxilary Handle Assembly 1 Guide Rod ... 1 Ball ... your Nearest Sears Retail Store 17 MODEL NUMBER 315.101370 '_ I Tnhuembmeor deinl anllucmobrreerspwoinlldbeencefoundregoanrdaingplayteouar ttHacAhMeMd ERto thDeRImLoLtoor r hwohuesningo. _" CRAFTSMAN HAMMER DRILL -


