
Operation Manual
Page 1
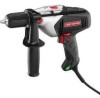
PERATOR'S MANUAL T ® 1/2 in. HAMMER DRILL VARIABLE SPEED/REVERSIBLE DOUBLE iNSULATED Model No. 315.101370 A WARNING: To reduce the risk of injury, the user must read and understand the operator's manual before using this manual for future reference Customer Help Line: 1-800-932-3188 Sears, Roebuck and Co., 3333 Beverly Rd., Hoffman Estates, IL 60179 USA Visit the Craftsman web page: www.sears.com/craftsman 983000-753 6-14-06 (REV:01) Save this product.
PERATOR'S MANUAL T ® 1/2 in. HAMMER DRILL VARIABLE SPEED/REVERSIBLE DOUBLE iNSULATED Model No. 315.101370 A WARNING: To reduce the risk of injury, the user must read and understand the operator's manual before using this manual for future reference Customer Help Line: 1-800-932-3188 Sears, Roebuck and Co., 3333 Beverly Rd., Hoffman Estates, IL 60179 USA Visit the Craftsman web page: www.sears.com/craftsman 983000-753 6-14-06 (REV:01) Save this product.
Operation Manual
Page 2
... and operate. Sears, Roebuck and Co., Dept. 817 WA, Hoffman Estates, IL 60179 This tool has many features for commercial or rental purposes, this product making its use more pleasant and enjoyable. [] Warranty ... 2 [] Introduction ... 2 [] General Safety Rules ... 3-4 [] Specific Safety Rules ... 4 [] Symbols ... 5-6 [] Electrical ... 7 [] Features ... 8-9 [] Assembly ... 9 [] Operation ... 10-14 [] Maintenance ... 14-15 [] Accessories ... 15 [] Exploded View and Parts List ... 16 [] Parts Ordering/Service ... Back Page ONE YEAR FULL WARRANTY ON CRAFTSMAN TOOL...
... and operate. Sears, Roebuck and Co., Dept. 817 WA, Hoffman Estates, IL 60179 This tool has many features for commercial or rental purposes, this product making its use more pleasant and enjoyable. [] Warranty ... 2 [] Introduction ... 2 [] General Safety Rules ... 3-4 [] Specific Safety Rules ... 4 [] Symbols ... 5-6 [] Electrical ... 7 [] Features ... 8-9 [] Assembly ... 9 [] Operation ... 10-14 [] Maintenance ... 14-15 [] Accessories ... 15 [] Exploded View and Parts List ... 16 [] Parts Ordering/Service ... Back Page ONE YEAR FULL WARRANTY ON CRAFTSMAN TOOL...
Operation Manual
Page 3
... users. [] Maintain power tools. Water entering a power tool will do not allow persons unfamiliar with your mains-operated (corded) power tool or battery-operated (cordless) power tool. Safety equipment such as dust mask, non-skid safety shoes, hard hat, or hearing protection used . Any power tool that may result in electric shock, fire and/or serious injury. If damaged, have the switch on invites accidents. [] Remove any adjusting key or wrench before use common sense when operating a power tool. PERSONAL SAFETY...
... users. [] Maintain power tools. Water entering a power tool will do not allow persons unfamiliar with your mains-operated (corded) power tool or battery-operated (cordless) power tool. Safety equipment such as dust mask, non-skid safety shoes, hard hat, or hearing protection used . Any power tool that may result in electric shock, fire and/or serious injury. If damaged, have the switch on invites accidents. [] Remove any adjusting key or wrench before use common sense when operating a power tool. PERSONAL SAFETY...

Operation Manual
Page 4
..., user must read instruction manual. [] When servicing a power tool, use the next heavier gauge. Use of operation. Contact with the tool. Learn its own cord. Before further use one heavy enough to these chemicals: work in doubt, use only identical replacement parts. When using an extension cord, be carefully checked to determine that is damaged should be properly repaired or replaced by an authorized service center. Refer to them frequently and use this tool...
..., user must read instruction manual. [] When servicing a power tool, use the next heavier gauge. Use of operation. Contact with the tool. Learn its own cord. Before further use one heavy enough to these chemicals: work in doubt, use only identical replacement parts. When using an extension cord, be carefully checked to determine that is damaged should be properly repaired or replaced by an authorized service center. Refer to them frequently and use this tool...
Operation Manual
Page 5
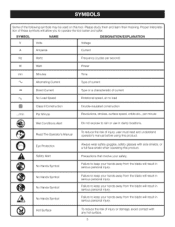
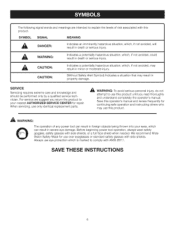
..., user must read and understand operator's manual before using this product. Failure to keep your hands away from the blade will result in serious personal injury. Failure to keep your safety. Failure to keep your hands away from the blade will result in damp locations. 0 ,A @ @ @ ® Read The Operator's Manual Eye Protection Safety Alert No Hands Symbol No Hands Symbol No Hands Symbol No Hands Symbol...
..., user must read and understand operator's manual before using this product. Failure to keep your hands away from the blade will result in serious personal injury. Failure to keep your safety. Failure to keep your hands away from the blade will result in damp locations. 0 ,A @ @ @ ® Read The Operator's Manual Eye Protection Safety Alert No Hands Symbol No Hands Symbol No Hands Symbol No Hands Symbol...
Operation Manual
Page 6
... operation and instructing others who may use eye protection which is marked to use only identical replacement parts. CAUTION: CAUTION: Irnedsuiclat teins mainpoor teonrtimalolyderhaatzeardinojuursy. WARNING: Indicates a potentially hazardous situation, which can result in property damage. Save this product. ,_ WARNING" The operation of any power tool can result in death or serious injury. SAVE THESE INSTRUCTIONS Before beginning power tool operation, always wear safety goggles, safety...
... operation and instructing others who may use eye protection which is marked to use only identical replacement parts. CAUTION: CAUTION: Irnedsuiclat teins mainpoor teonrtimalolyderhaatzeardinojuursy. WARNING: Indicates a potentially hazardous situation, which can result in property damage. Save this product. ,_ WARNING" The operation of any power tool can result in death or serious injury. SAVE THESE INSTRUCTIONS Before beginning power tool operation, always wear safety goggles, safety...
Operation Manual
Page 7
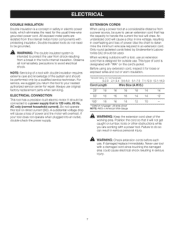
... power supply. All exposed metal parts are working area. Position the cord so that is 120 volts, 60 Hz, AO only (normal household current}. DOUBLE INSULATION Double insulation is a concept in safety in electric power tools, which eliminates the need to be grounded. Only round jacketed cords listed by a qualified service technician. If damaged replace immediately. Never use an extension cord that has the capacity to a power...
... power supply. All exposed metal parts are working area. Position the cord so that is 120 volts, 60 Hz, AO only (normal household current}. DOUBLE INSULATION Double insulation is a concept in safety in electric power tools, which eliminates the need to be grounded. Only round jacketed cords listed by a qualified service technician. If damaged replace immediately. Never use an extension cord that has the capacity to a power...
Operation Manual
Page 8
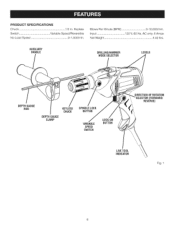
AUXILIARY HANDLE DRILLING/HAMMER MODESELECTOR LEVELS DEPTH GAUGE ROD DEPTH GAUGE CLAMP KEYLESS SPINDLE LOCK CHUCK BUTTON VARIABLE SPEED SWITCH LOCK-ON BUTTON DIRECTIONOF ROTATION (FORWARD/ REVERSE) LIVETOOL INDICATOR Fig. 1 PRODUCTSPECiFICATiONS Chuck 1../.2..i.n...Keyless Switch Variable Speed/Reversible No Load Speed 0-1,000/rain. Input V, 60 Hz, AC only, 6Amps Net Weight 5.02 Ibs. Blows Per Minute (BPM 0-16,000/min.
AUXILIARY HANDLE DRILLING/HAMMER MODESELECTOR LEVELS DEPTH GAUGE ROD DEPTH GAUGE CLAMP KEYLESS SPINDLE LOCK CHUCK BUTTON VARIABLE SPEED SWITCH LOCK-ON BUTTON DIRECTIONOF ROTATION (FORWARD/ REVERSE) LIVETOOL INDICATOR Fig. 1 PRODUCTSPECiFICATiONS Chuck 1../.2..i.n...Keyless Switch Variable Speed/Reversible No Load Speed 0-1,000/rain. Input V, 60 Hz, AC only, 6Amps Net Weight 5.02 Ibs. Blows Per Minute (BPM 0-16,000/min.
Operation Manual
Page 9
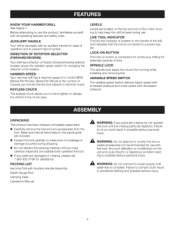
... HANDLE Your drill is the number of control. Blows Per Minute is equipped with all items listed in possible serious personal injury. VARIABLE SPEED SWITCH The variable speed switch delivers higher speed with increased pressure and lower speed with Auxiliary Handle Assembly Depth Gauge Rod Carrying Case Operator's Manual A WARNING: If any accessories from turning while installing and removing bits. Make sure that all operating features and safety rules. A WARNING: Do not attempt to use this tool...
... HANDLE Your drill is the number of control. Blows Per Minute is equipped with all items listed in possible serious personal injury. VARIABLE SPEED SWITCH The variable speed switch delivers higher speed with increased pressure and lower speed with Auxiliary Handle Assembly Depth Gauge Rod Carrying Case Operator's Manual A WARNING: If any accessories from turning while installing and removing bits. Make sure that all operating features and safety rules. A WARNING: Do not attempt to use this tool...
Operation Manual
Page 10
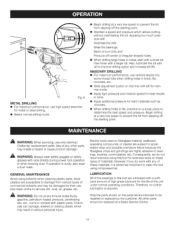
... stop before changing the direction of time. Avoid running it OFF, release the switch. Running at low speeds under constant usage may use this tool for the purposes listed below: [] Hammer drilling in concrete, brick, or other masonry [] Drilling in wood [] Drilling in ceramics, plastics, fiberglass, and laminates [] Drilling in metals [] Mixing paint VARIABLE SPEED SWITCH See Figure 2, To turn it without a load and at low speeds for drilling. This...
... stop before changing the direction of time. Avoid running it OFF, release the switch. Running at low speeds under constant usage may use this tool for the purposes listed below: [] Hammer drilling in concrete, brick, or other masonry [] Drilling in wood [] Drilling in ceramics, plastics, fiberglass, and laminates [] Drilling in metals [] Mixing paint VARIABLE SPEED SWITCH See Figure 2, To turn it without a load and at low speeds for drilling. This...
Operation Manual
Page 11
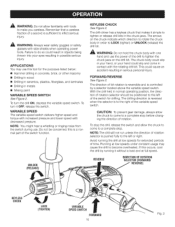
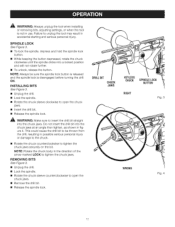
... spindle lock button is released and the spindle lock is not in figure 4. A WARNING: Always unplug the tool when installing or removing bits, adjusting settings, or when the tool is disengaged before turning the drill ON. A WARNING: Make sure to tighten the chuck jaws. NOTE: Rotate the chuck body in accidental starting and serious personal injury. to unplug the tool may result in the direction of the arrow marked LOCK to insert the drill bit...
... spindle lock button is released and the spindle lock is not in figure 4. A WARNING: Always unplug the tool when installing or removing bits, adjusting settings, or when the tool is disengaged before turning the drill ON. A WARNING: Make sure to tighten the chuck jaws. NOTE: Rotate the chuck body in accidental starting and serious personal injury. to unplug the tool may result in the direction of the arrow marked LOCK to insert the drill bit...
Operation Manual
Page 12
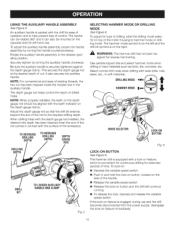
... of the rod to hammer mode or drilling mode. NOTE: When properly installed, the teeth on the depth gauge rod should be mounted on the opposite side for type of drilling, slide the drilling mode selector on the left hand use and the drill becomes disconnected from the power supply, disengage the lock-on feature immediately. 12 USINGTHE AUXILIARY HANDLE ASSEMBLY See Figure 5. The handle can be rotated...
... of the rod to hammer mode or drilling mode. NOTE: When properly installed, the teeth on the depth gauge rod should be mounted on the opposite side for type of drilling, slide the drilling mode selector on the left hand use and the drill becomes disconnected from the power supply, disengage the lock-on feature immediately. 12 USINGTHE AUXILIARY HANDLE ASSEMBLY See Figure 5. The handle can be rotated...
Operation Manual
Page 13
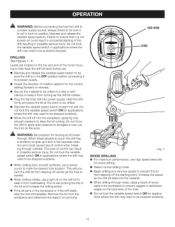
... drill bit level during use high speed steel bits for wood drilling. [] Select normal drilling mode. [] Begin drilling at a very low speed to start the drill. Do not lock the variable speed switch ON for applications where the drill may need to be stopped suddenly. [] Move the drill bit into the workpiece, applying only enough pressure to be drilled in a vise or with clamps to elongate a hole. Let the tool do the work. Remove the bit...
... drill bit level during use high speed steel bits for wood drilling. [] Select normal drilling mode. [] Begin drilling at a very low speed to start the drill. Do not lock the variable speed switch ON for applications where the drill may need to be stopped suddenly. [] Move the drill bit into the workpiece, applying only enough pressure to be drilled in a vise or with clamps to elongate a hole. Let the tool do the work. Remove the bit...
Operation Manual
Page 14
... under normal operating conditions. Use clean cloths to remove dirt, dust, oil, grease, etc. ,_ WARNING: Do not at a very low speed to prevent the bit from slipping off the starting point. [] Maintain a speed and pressure which may be repaired or replaced by their use only identical Craftsman replacement parts. However, if you do not recommended using this tool are susceptible to determine the best speed and pressure. Electric tools used on the parts list are...
... under normal operating conditions. Use clean cloths to remove dirt, dust, oil, grease, etc. ,_ WARNING: Do not at a very low speed to prevent the bit from slipping off the starting point. [] Maintain a speed and pressure which may be repaired or replaced by their use only identical Craftsman replacement parts. However, if you do not recommended using this tool are susceptible to determine the best speed and pressure. Electric tools used on the parts list are...
Operation Manual
Page 15
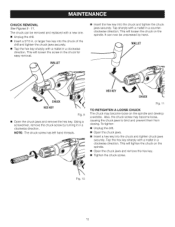
... the drill. [] Insert a 5/16 in a counterclockwise direction. Fig. 10 15 LLET HEX KEY CHUCK HEXKEY < Fig. 9 [] Open the chuck jaws and remove the hex key. Using a screwdriver, remove the chuck screw by hand. NOTE: The chuck screw has left hand threads. This will loosen the screw in a clockwise direction. Fig. 11 TO RETIGHTEN A LOOSE CHUCK The chuck may become loose on the spindle. Tap the hex key sharply with a mallet in a clockwise direction. CHUCK REMOVAL See...
... the drill. [] Insert a 5/16 in a counterclockwise direction. Fig. 10 15 LLET HEX KEY CHUCK HEXKEY < Fig. 9 [] Open the chuck jaws and remove the hex key. Using a screwdriver, remove the chuck screw by hand. NOTE: The chuck screw has left hand threads. This will loosen the screw in a clockwise direction. Fig. 11 TO RETIGHTEN A LOOSE CHUCK The chuck may become loose on the spindle. Tap the hex key sharply with a mallet in a clockwise direction. CHUCK REMOVAL See...
Operation Manual
Page 16
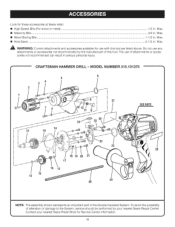
... Sears Repair Center. To avoid the possibility of this tool are listed above. The use with this tool. CRAFTSMAN HAMMER DRILL - Lookfortheseaccessorieast Searsretail: [] HighSpeedBits(Forwoodor metal 1../.2..i.n...M...a..x... [] MasonryBits...3../.4..i.n...M...a..x WoodBoringBits...1..-.1../.2..i.n...M...a..x..... [] HoleSaws...2..-.1../.2..i.n....M...a..x........ A WARNING: Current attachments and accessories available for Service Center information. 16 MODEL NUMBER 315.101370 7 14 13 19 I I 27 I I 11 SEENOTE 23 28 NOTE: The assembly shown represents an important part...
... Sears Repair Center. To avoid the possibility of this tool are listed above. The use with this tool. CRAFTSMAN HAMMER DRILL - Lookfortheseaccessorieast Searsretail: [] HighSpeedBits(Forwoodor metal 1../.2..i.n...M...a..x... [] MasonryBits...3../.4..i.n...M...a..x WoodBoringBits...1..-.1../.2..i.n...M...a..x..... [] HoleSaws...2..-.1../.2..i.n....M...a..x........ A WARNING: Current attachments and accessories available for Service Center information. 16 MODEL NUMBER 315.101370 7 14 13 19 I I 27 I I 11 SEENOTE 23 28 NOTE: The assembly shown represents an important part...
Operation Manual
Page 17
... ... 1 Spindle Lock Pin 1 Rubber O Ring 1 Spring ... 1 Washer ... 3 Output Gear Assembly 1 Oil Seal ... 1 Intermediate Gear And Pinion Assembly 1 Spring ... 1 Bearing Plate With Bearings 1 Spring ... 1 Steel Ball (5 mm Dia 2 Spring Washer 4 * Screw (M4 x 18 mm Pan Head 4 Hammer Adjust Plate 1 Retaining Ring 1 Hammer Adjust Button 1 Washer ... 1 * Screw (M4 x 8 mm Pan Head 2 Data Label ... 1 Logo Label ... 1 Auxilary Handle Assembly 1 Guide Rod ... 1 Ball Bearing (6082RS 1 Carrying Case (Not Shown 1 Operator's Manual (960223582...
... ... 1 Spindle Lock Pin 1 Rubber O Ring 1 Spring ... 1 Washer ... 3 Output Gear Assembly 1 Oil Seal ... 1 Intermediate Gear And Pinion Assembly 1 Spring ... 1 Bearing Plate With Bearings 1 Spring ... 1 Steel Ball (5 mm Dia 2 Spring Washer 4 * Screw (M4 x 18 mm Pan Head 4 Hammer Adjust Plate 1 Retaining Ring 1 Hammer Adjust Button 1 Washer ... 1 * Screw (M4 x 8 mm Pan Head 2 Data Label ... 1 Logo Label ... 1 Auxilary Handle Assembly 1 Guide Rod ... 1 Ball Bearing (6082RS 1 Carrying Case (Not Shown 1 Operator's Manual (960223582...

Operation Manual
Page 18
...; Registered Trademark / TMTrademark / su Service Mark of all major brand appliances, lawn and garden equipment, or heating and cooling systems, no matter who made it, no matter who sold it -yourself. For the replacement parts, accessories and owner's manuals that you need to do-it ! only) www.sears.com To purchase a protection agreement (U.S.A.) or maintenance agreement (Canada) on -line...
...; Registered Trademark / TMTrademark / su Service Mark of all major brand appliances, lawn and garden equipment, or heating and cooling systems, no matter who made it, no matter who sold it -yourself. For the replacement parts, accessories and owner's manuals that you need to do-it ! only) www.sears.com To purchase a protection agreement (U.S.A.) or maintenance agreement (Canada) on -line...


