
Operation Manual
Page 1
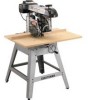
CAUTION: Read and follow all Safety Rules and Operating Instructions before first use of this manual for future reference. Stationary RADIAL ARM SAW Model No. 315.220100 Save this product. Customer Help Line: 1-800-932-3188 • Safety • Features • Assembly • Operation • Maintenance • Parts List Sears, Roebuck and Co., 3333 Beverly Rd., Hoffman Estates, IL 60179 USA Visit the Craftsman web page: www.sears.com/craftsman 983000-041 5-02 Operator's Manual CRAFTSMAN + PRO I 0 HAL 10 in.
CAUTION: Read and follow all Safety Rules and Operating Instructions before first use of this manual for future reference. Stationary RADIAL ARM SAW Model No. 315.220100 Save this product. Customer Help Line: 1-800-932-3188 • Safety • Features • Assembly • Operation • Maintenance • Parts List Sears, Roebuck and Co., 3333 Beverly Rd., Hoffman Estates, IL 60179 USA Visit the Craftsman web page: www.sears.com/craftsman 983000-041 5-02 Operator's Manual CRAFTSMAN + PRO I 0 HAL 10 in.

Operation Manual
Page 2
...Safety, performance and dependability have other rights which vary from state to state. It means attention!!! FULL ONE YEAR WARRANTY ON CRAFTSMAN RADIAL ARM SAW If this product fails due to a defect in material or workmanship within one year from the date of purchase, Sears ... ...• Product Specifications and Glossary ...• Unpacking and Accessories ...• Loose Parts List ...• Tools Needed ...• Labels ...• Features ...• Assembly ...Assembling Leg Stand ...Mounting Saw to Leg Stand ... 2 2-3 4-7 8-9 10-11 11 12-14 15 16-17 18-21 22-36 22 23 [RRFT...
...Safety, performance and dependability have other rights which vary from state to state. It means attention!!! FULL ONE YEAR WARRANTY ON CRAFTSMAN RADIAL ARM SAW If this product fails due to a defect in material or workmanship within one year from the date of purchase, Sears ... ...• Product Specifications and Glossary ...• Unpacking and Accessories ...• Loose Parts List ...• Tools Needed ...• Labels ...• Features ...• Assembly ...Assembling Leg Stand ...Mounting Saw to Leg Stand ... 2 2-3 4-7 8-9 10-11 11 12-14 15 16-17 18-21 22-36 22 23 [RRFT...

Operation Manual
Page 3
...Squaring Blade to Fence ...Paralleling Blade to Table ...Aligning the Rip Scale Indicators ...Installing Control Cut Device ...Check Alignment of Arm and Blade using Laser • Operation ...Basic Operation of the Radial Arm Saw ...Types of Cuts ...Switch and Switch Key ...Causes of Kickback ...Avoiding Kickback ...Cutting Aids ...Making a Cross Cut ...Making...50 51 51-52 52 53 53 54 55-56 • Maintenance ... 57 • Troubleshooting ...• Exploded View and Repair Parts List ...• Parts Ordering / Service ... 58-62 64-85 back page 3 rRI:IFI"$1_tI_:INRADIAL SAW315.220100
...Squaring Blade to Fence ...Paralleling Blade to Table ...Aligning the Rip Scale Indicators ...Installing Control Cut Device ...Check Alignment of Arm and Blade using Laser • Operation ...Basic Operation of the Radial Arm Saw ...Types of Cuts ...Switch and Switch Key ...Causes of Kickback ...Avoiding Kickback ...Cutting Aids ...Making a Cross Cut ...Making...50 51 51-52 52 53 53 54 55-56 • Maintenance ... 57 • Troubleshooting ...• Exploded View and Repair Parts List ...• Parts Ordering / Service ... 58-62 64-85 back page 3 rRI:IFI"$1_tI_:INRADIAL SAW315.220100

Operation Manual
Page 4
... should wear safety glasses and be performed only by a qualified service technician, For service we suggest you into moving parts. Do not use original factory replacement parts when servicing. contained in this tool. • MAKE WORKSHOP CHILDPROOF with other flammable liquids, in damp or wet locations...it only the way it was intended, • DRESS PROPERLY. Always follow the safety precautions to reduce the risk of wood on the saw 's applications and limitations as well as the specific potential hazards related to operate this tool. • DO NOT USE IN DANGEROUS ENVIRONMENT....
... should wear safety glasses and be performed only by a qualified service technician, For service we suggest you into moving parts. Do not use original factory replacement parts when servicing. contained in this tool. • MAKE WORKSHOP CHILDPROOF with other flammable liquids, in damp or wet locations...it only the way it was intended, • DRESS PROPERLY. Always follow the safety precautions to reduce the risk of wood on the saw 's applications and limitations as well as the specific potential hazards related to operate this tool. • DO NOT USE IN DANGEROUS ENVIRONMENT....
Operation Manual
Page 5
...TOOL. Use only a cord heavy enough to carry the current your hand to move into a blade or cutter against the direction of rotation of parts, saw , rRFIFTSMR_NRADIAL SAW315.220100 Get in the tool, • REMOVE WRENCHES AND ADJUSTING KEYS. It will do the job better and more than 24 ... SHOCK by preventing body contact with safe operation BEFORE performing any work and that may affect its operation, A damaged part must be made by a qualified service technician at least 5,000 rpm and 10 in, or smaller, with a 5/8 in doubt, use , before turning on the tool - Use wood dust collection...
...TOOL. Use only a cord heavy enough to carry the current your hand to move into a blade or cutter against the direction of rotation of parts, saw , rRFIFTSMR_NRADIAL SAW315.220100 Get in the tool, • REMOVE WRENCHES AND ADJUSTING KEYS. It will do the job better and more than 24 ... SHOCK by preventing body contact with safe operation BEFORE performing any work and that may affect its operation, A damaged part must be made by a qualified service technician at least 5,000 rpm and 10 in, or smaller, with a 5/8 in doubt, use , before turning on the tool - Use wood dust collection...

Operation Manual
Page 6
... reconnecting to a power source. • BEFORE CHANGING THE SETUP, REMOVING COVERS, GUARDS, OR BLADE unplug the saw and remove the switch key, • AVOID direct eye exposure when using the laser guide. store indoors while not in use , for workpieces so small that are secure. • NEVER cut ...NOT STACK more than the saw , • DO NOT FEED THE MATERIAL TOO QUICKLY. • CUT ONLY WOOD, PLASTIC OR WOOD-LIKE MATERIALS. Do not cut metal, • BEFORE MAKING A CUT, be cut to disconnect it from receptacle, Keep the cord from the moving parts during use ," Use extension ...
... reconnecting to a power source. • BEFORE CHANGING THE SETUP, REMOVING COVERS, GUARDS, OR BLADE unplug the saw and remove the switch key, • AVOID direct eye exposure when using the laser guide. store indoors while not in use , for workpieces so small that are secure. • NEVER cut ...NOT STACK more than the saw , • DO NOT FEED THE MATERIAL TOO QUICKLY. • CUT ONLY WOOD, PLASTIC OR WOOD-LIKE MATERIALS. Do not cut metal, • BEFORE MAKING A CUT, be cut to disconnect it from receptacle, Keep the cord from the moving parts during use ," Use extension ...

Operation Manual
Page 7
..., Verify the blade, all the way past the blade, 7 rRFIFTSMR_NRADIAL SAW315.220100 Secure the radial arm with the arm lock knob, Secure the carriage with the sawblade, • AVOID HEELING by adjusting the saw blade correctly adjusted and by feeding the work positioned firmly against the fence, • USE ... WITH THE BLADE. Never use it started, Keep the points sharp, • KEEP THE SAW BLADE PATH CLEAR. The feed will be seriously injured, • POSITION THE CUT SO THE WASTE PART FALLS OFF. Press the switch off rapidly, This can ricochet from the infeed side (opposite ...
..., Verify the blade, all the way past the blade, 7 rRFIFTSMR_NRADIAL SAW315.220100 Secure the radial arm with the arm lock knob, Secure the carriage with the sawblade, • AVOID HEELING by adjusting the saw blade correctly adjusted and by feeding the work positioned firmly against the fence, • USE ... WITH THE BLADE. Never use it started, Keep the points sharp, • KEEP THE SAW BLADE PATH CLEAR. The feed will be seriously injured, • POSITION THE CUT SO THE WASTE PART FALLS OFF. Press the switch off rapidly, This can ricochet from the infeed side (opposite ...

Operation Manual
Page 10
... a edge guide for the workpiece, Located perpendicular to the carriage arm and the blade teeth pointing down, It can occur when blade ...clamps. Cross Cut A cutting operation with the blade parallel to the carriage arm, Can be across or with the blade at 90 ° 16in. ...thinner pieces. [RAFTSMA_NRADIALSAW315.220100 10 Leading End The end of a workpiece. Cutting Capacity - Blade Bevel Angle 0 o _ 90 ° Radial Arm Swing Range 45 °...120V/240V 60 Hz - Climb A hazard in a non-through the saw blade during rip cuts. Freehand Dangerous practice of making a cut without using ...
... a edge guide for the workpiece, Located perpendicular to the carriage arm and the blade teeth pointing down, It can occur when blade ...clamps. Cross Cut A cutting operation with the blade parallel to the carriage arm, Can be across or with the blade at 90 ° 16in. ...thinner pieces. [RAFTSMA_NRADIALSAW315.220100 10 Leading End The end of a workpiece. Cutting Capacity - Blade Bevel Angle 0 o _ 90 ° Radial Arm Swing Range 45 °...120V/240V 60 Hz - Climb A hazard in a non-through the saw blade during rip cuts. Freehand Dangerous practice of making a cut without using ...

Operation Manual
Page 11
... possible attemptoplugin thepowercordandturnthe switchon untilthedamagedor missingpartsare obtainedandareinstalledcorrectly, seriouspersonailnjury. TrailingEnd Theworkpieceendlastcutbythe bladeina ripcut. itto powersupply.Thesawshouldneverbe connectedto thepowersupplywhenyouare • Donotdiscardthepackingmaterialsuntilyouhave carefullyinspectedthesaw,identifiedall parts,and assemblingparts,makingadjustmentsin, stalling satisfactoriloyperatedyournewsaw, or removingbladeso, r whennotin use of attachments or accessories not listed might be hazardous, 11 rRI:IR...
... possible attemptoplugin thepowercordandturnthe switchon untilthedamagedor missingpartsare obtainedandareinstalledcorrectly, seriouspersonailnjury. TrailingEnd Theworkpieceendlastcutbythe bladeina ripcut. itto powersupply.Thesawshouldneverbe connectedto thepowersupplywhenyouare • Donotdiscardthepackingmaterialsuntilyouhave carefullyinspectedthesaw,identifiedall parts,and assemblingparts,makingadjustmentsin, stalling satisfactoriloyperatedyournewsaw, or removingbladeso, r whennotin use of attachments or accessories not listed might be hazardous, 11 rRI:IR...

Operation Manual
Page 12
Star Washer 1 Fig, 5 3, Blade Wrench 2 Hex Key A, 3/16 in, Hex Key 1 B. 1/4 in . Soc, Hd 1 C. Check all loose parts from the box with the list below, Use the instructions on the following pages to assemble. All fasteners are shown actual size, 1, Saw Assembly 1 SAW ASSEMBLYSHOWNAS PACKED 2, Elevating Handwheel A, Handwheel 1 B. Screw (10-24 x 5/8 in , Hex Key 1 rRnFT._MnN RADIALSAW315.220100 12 Fig, 6A
Star Washer 1 Fig, 5 3, Blade Wrench 2 Hex Key A, 3/16 in, Hex Key 1 B. 1/4 in . Soc, Hd 1 C. Check all loose parts from the box with the list below, Use the instructions on the following pages to assemble. All fasteners are shown actual size, 1, Saw Assembly 1 SAW ASSEMBLYSHOWNAS PACKED 2, Elevating Handwheel A, Handwheel 1 B. Screw (10-24 x 5/8 in , Hex Key 1 rRnFT._MnN RADIALSAW315.220100 12 Fig, 6A

Operation Manual
Page 13
...11. Use the instructions on the following pages to Leg Stand AssemMy A. Speed Nut 2 C. Saw Base to assembb. Switch Key 2 A C b D Fig. 6B 13 CRnFT$MRN' RADIAL SAW315.220100 Hardware for Front TaMe A. Check aH bose parts from the box with the Hst bebw. AH fasteners are shown actual size.... . Saw AssemMy (not shown 1 B, Leg Stand AssemMy (not shown 1 C, Hex BoUt (5/16-18 x 5/8 in, ...
...11. Use the instructions on the following pages to Leg Stand AssemMy A. Speed Nut 2 C. Saw Base to assembb. Switch Key 2 A C b D Fig. 6B 13 CRnFT$MRN' RADIAL SAW315.220100 Hardware for Front TaMe A. Check aH bose parts from the box with the Hst bebw. AH fasteners are shown actual size.... . Saw AssemMy (not shown 1 B, Leg Stand AssemMy (not shown 1 C, Hex BoUt (5/16-18 x 5/8 in, ...

Operation Manual
Page 14
... 2 E. Hex Nut (3/8-16 8 © o o A o B C D E i B o o o °1 0 D C 14. Operator's ManuaU (not shown 1 CRnFTSMRN_RADIAL SAW315.220100 14 E G Fig. 6C Long Top Brace 2 D. Star Washer 40 [. Check aH Uoose parts from the box with the Hst beUow. Use the instructions on the following pages to assemMe. AH fasteners are shown actuaUsize, 12. TaMe Support A. Lock...
... 2 E. Hex Nut (3/8-16 8 © o o A o B C D E i B o o o °1 0 D C 14. Operator's ManuaU (not shown 1 CRnFTSMRN_RADIAL SAW315.220100 14 E G Fig. 6C Long Top Brace 2 D. Star Washer 40 [. Check aH Uoose parts from the box with the Hst beUow. Use the instructions on the following pages to assemMe. AH fasteners are shown actuaUsize, 12. TaMe Support A. Lock...
Operation Manual
Page 16
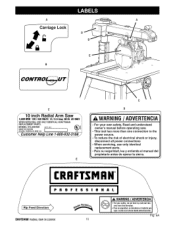
.... • To reduce the risk of electrical shock or injury, disconnect all power connections • When servicing, use only identical replacement parts. • Para su seguridad, lea y entienda el manual del propietario antes de operar la sierra. CRRFTSHRH i PR O I MADIENTAIWAN BER...seg,ridadn, ointrodnzcenl materiaql ,e vayaa cortnrenla sierradesdeestesdirecci6n. NO. / _ _1 _ _I SEARS, ROEBUCKAND CO. ] Carriage Lock CONTRO_UT C _R3W10_Einch Radial Arm Saw "_ 00 RPM 120/ 240 VOLTS13 / 6.5 Amp 60 Hz AC0NLY I N SERVICING,USE ONLYIDENTICALCRAFTSMAN | LACEMENT PARTS. !
.... • To reduce the risk of electrical shock or injury, disconnect all power connections • When servicing, use only identical replacement parts. • Para su seguridad, lea y entienda el manual del propietario antes de operar la sierra. CRRFTSHRH i PR O I MADIENTAIWAN BER...seg,ridadn, ointrodnzcenl materiaql ,e vayaa cortnrenla sierradesdeestesdirecci6n. NO. / _ _1 _ _I SEARS, ROEBUCKAND CO. ] Carriage Lock CONTRO_UT C _R3W10_Einch Radial Arm Saw "_ 00 RPM 120/ 240 VOLTS13 / 6.5 Amp 60 Hz AC0NLY I N SERVICING,USE ONLYIDENTICALCRAFTSMAN | LACEMENT PARTS. !

Operation Manual
Page 17
... of pathof blade, Io Donotreacharoundsawblade. Parasuseguridadle, ayentiendeal manuadl elpropietariaontesdeoperalrasierra., A WARNING ADVERTENCIA • Read and understand owners manual before operating saw. • For your safety, do not use accessories without proper guarding. • Provide proper workpiece support • Position cutting... and switch key removed, turn cutting tool by hand to make sure it does not strike guard, fence or any other saw parts. • Para su seguridad, lea y entienda el manual del propietario antes de operar la sierra. 17 I 'Unplug ...
... of pathof blade, Io Donotreacharoundsawblade. Parasuseguridadle, ayentiendeal manuadl elpropietariaontesdeoperalrasierra., A WARNING ADVERTENCIA • Read and understand owners manual before operating saw. • For your safety, do not use accessories without proper guarding. • Provide proper workpiece support • Position cutting... and switch key removed, turn cutting tool by hand to make sure it does not strike guard, fence or any other saw parts. • Para su seguridad, lea y entienda el manual del propietario antes de operar la sierra. 17 I 'Unplug ...

Operation Manual
Page 22
...have obtained the missing part(s). wrench. [] When the leg stand is capable of a wide variety of operations, and thus requires a number of the legs. When you remove the saw in about the description of legs up) and align the three holes in . Your radial arm saw frequently, referring to ...their illustrations. See the Loose Parts section. Add the star washers and 1/4-20 hex nuts. Using a level...
...have obtained the missing part(s). wrench. [] When the leg stand is capable of a wide variety of operations, and thus requires a number of the legs. When you remove the saw in about the description of legs up) and align the three holes in . Your radial arm saw frequently, referring to ...their illustrations. See the Loose Parts section. Add the star washers and 1/4-20 hex nuts. Using a level...

Operation Manual
Page 24
...all screws securely. _ WARMNG: Once the yoke assembly is on the carriage track, reinstall the arm cap, the arm cap screws, the carriage stop screw, the Iockwasher, arm cap, and arm cap screws. CRRF[_MRN RADIAL SAW 315.220100 24 hex key. CARRIAGECOVER Fig. 13C Reinstall the carriage stop screw, and the ... the two motor setscrews in the bottom of the arm, to replace these parts. [] Tighten the carriage lock knob, on the carriage cover on top of the front of the arm with the arm so bearings slide in the carriage below the arm. See Figure 13B. See F_gure !3C. INSTALUNG...
...all screws securely. _ WARMNG: Once the yoke assembly is on the carriage track, reinstall the arm cap, the arm cap screws, the carriage stop screw, the Iockwasher, arm cap, and arm cap screws. CRRF[_MRN RADIAL SAW 315.220100 24 hex key. CARRIAGECOVER Fig. 13C Reinstall the carriage stop screw, and the ... the two motor setscrews in the bottom of the arm, to replace these parts. [] Tighten the carriage lock knob, on the carriage cover on top of the front of the arm with the arm so bearings slide in the carriage below the arm. See Figure 13B. See F_gure !3C. INSTALUNG...

Operation Manual
Page 51
... not your hands, when the trailing edge of the workpiece is too low, and turn the saw .) For large panel rip cuts, use the laser guide during any of these precautions can snag clothing, jewelry, the workpiece, or even skin, causing...set the bevel indicator to zero, (For a bevel rip cut, set only 1/2 in . See the section on the arm, remove the yellow key, and wait for a bevel rip cut or an out-rip process and will be enclosed in ...properly. • Always set up, Before setting up the workpiece so the wider part of the pawls should be positioned to rest lightly on the workpiece.
... not your hands, when the trailing edge of the workpiece is too low, and turn the saw .) For large panel rip cuts, use the laser guide during any of these precautions can snag clothing, jewelry, the workpiece, or even skin, causing...set the bevel indicator to zero, (For a bevel rip cut, set only 1/2 in . See the section on the arm, remove the yellow key, and wait for a bevel rip cut or an out-rip process and will be enclosed in ...properly. • Always set up, Before setting up the workpiece so the wider part of the pawls should be positioned to rest lightly on the workpiece.

Operation Manual
Page 57
... of anti-kickback pawls; Do not use only identical Craftsman replacement parts. WARNmNG: Do not at a Sears store or repair center. They contain chemicals that can damage, weaken or destroy plastic. [] Check teeth of any other part may create a hazard or cause product damage. ,_ .... GENERAL MAINTENANCE ,_ WARNING: When servicing, use any strong solvents. WARNING: To avoid fire or electrocution, reassemble electric parts only with the switch on the arm, remove the switch key, and unplug the saw before working on the radial saw with identical Craftsman replacement parts. contact plastic...
... of anti-kickback pawls; Do not use only identical Craftsman replacement parts. WARNmNG: Do not at a Sears store or repair center. They contain chemicals that can damage, weaken or destroy plastic. [] Check teeth of any other part may create a hazard or cause product damage. ,_ .... GENERAL MAINTENANCE ,_ WARNING: When servicing, use any strong solvents. WARNING: To avoid fire or electrocution, reassemble electric parts only with the switch on the arm, remove the switch key, and unplug the saw before working on the radial saw with identical Craftsman replacement parts. contact plastic...

Operation Manual
Page 65
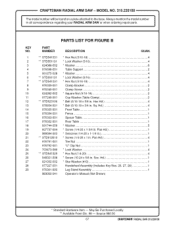
...A DESCRIPTION QUAN. Source 980.00 MODEL NO. 315.220100 I TAhReMmSoAdWel nour mwbheern woirlldbeerinfgounredpaoinr apaprltast.e attached to the base. PART NUMBER Lower Arm Cover 1 * Screw (10-16 x 5/8 in, Pan Hd 4 Cord Label (Control Cut Power Cord) ........ 1 Control Cut Power Cord 1 ...Cord Clamp 1 * Screw (1/4-20 x 1/2 in, Pan Hd 1 * Screw (10-16 x 41/64 in all correspondence regarding your RADIAL !J KEY NO. May Be Purchased Locally ** Available From Div, 98 -- Pan Hd. CRAFTSMAN RADIAL ARM SAW- Pan Hd 4 Cable Bracket 1 Control Cut Label 1 * Standard Hardware Item -- ...
...A DESCRIPTION QUAN. Source 980.00 MODEL NO. 315.220100 I TAhReMmSoAdWel nour mwbheern woirlldbeerinfgounredpaoinr apaprltast.e attached to the base. PART NUMBER Lower Arm Cover 1 * Screw (10-16 x 5/8 in, Pan Hd 4 Cord Label (Control Cut Power Cord) ........ 1 Control Cut Power Cord 1 ...Cord Clamp 1 * Screw (1/4-20 x 1/2 in, Pan Hd 1 * Screw (10-16 x 41/64 in all correspondence regarding your RADIAL !J KEY NO. May Be Purchased Locally ** Available From Div, 98 -- Pan Hd. CRAFTSMAN RADIAL ARM SAW- Pan Hd 4 Cable Bracket 1 Control Cut Label 1 * Standard Hardware Item -- ...
Operation Manual
Page 67
CRAFTSMAN RADIAL ARM SAW- MODEL NO. 315.220100 • I Tinheallmcoodrreelsnpuomndbeenrcewill rbeegaforduindg oynouar pRlaAteDIaAttLachAeRdMtoStAheWboarsew, hAelnwaoyrsdemrinegntiorenptahire pmaortdse, l number I :RRFT._MI:i°NRADIALSAW315.220100 Hd 1 * Star Washer (#10 1 Handwheel Assembly (Includes Key Nos. 26, 27, 28 1 Leg Stand Assembly 1 Operator's Manual (Not Shown) * Standard Hardware Item -- Pan Hd 4 Tee Nut 1 "U" Clip Nut 1 * Lock Washer 4 * Hex Nut (1/4-20 4 * Screw (10-24...
CRAFTSMAN RADIAL ARM SAW- MODEL NO. 315.220100 • I Tinheallmcoodrreelsnpuomndbeenrcewill rbeegaforduindg oynouar pRlaAteDIaAttLachAeRdMtoStAheWboarsew, hAelnwaoyrsdemrinegntiorenptahire pmaortdse, l number I :RRFT._MI:i°NRADIALSAW315.220100 Hd 1 * Star Washer (#10 1 Handwheel Assembly (Includes Key Nos. 26, 27, 28 1 Leg Stand Assembly 1 Operator's Manual (Not Shown) * Standard Hardware Item -- Pan Hd 4 Tee Nut 1 "U" Clip Nut 1 * Lock Washer 4 * Hex Nut (1/4-20 4 * Screw (10-24...

