
Operation Manual
Page 1
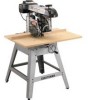
Operator's Manual CRAFTSMAN + PRO I 0 HAL 10 in. Stationary RADIAL ARM SAW Model No. 315.220100 Save this product. Customer Help Line: 1-800-932-3188 • Safety • Features • Assembly • Operation • Maintenance • Parts List Sears, Roebuck and Co., 3333 Beverly Rd., Hoffman Estates, IL 60179 USA Visit the Craftsman web page: www.sears.com/craftsman 983000-041 5-02 CAUTION: Read and follow all Safety Rules and Operating Instructions before first use of this manual for future reference.
Operator's Manual CRAFTSMAN + PRO I 0 HAL 10 in. Stationary RADIAL ARM SAW Model No. 315.220100 Save this product. Customer Help Line: 1-800-932-3188 • Safety • Features • Assembly • Operation • Maintenance • Parts List Sears, Roebuck and Co., 3333 Beverly Rd., Hoffman Estates, IL 60179 USA Visit the Craftsman web page: www.sears.com/craftsman 983000-041 5-02 CAUTION: Read and follow all Safety Rules and Operating Instructions before first use of this manual for future reference.

Operation Manual
Page 2
... operation of any power tool can result in severe eye damage. If you use over eyeglasses or standard safety glasses with ANSI Z87.1. • Warranty and Introduction ...• Table of Contents ...• Rules for Safe Operation ...• Electrical ...• Product Specifications and Glossary ...• Unpacking and Accessories ...• Loose Parts List ...• Tools Needed ...• Labels ...• Features ...• Assembly ...Assembling Leg Stand ...Mounting Saw to Leg Stand ... 2 2-3 4-7 8-9 10-11...
... operation of any power tool can result in severe eye damage. If you use over eyeglasses or standard safety glasses with ANSI Z87.1. • Warranty and Introduction ...• Table of Contents ...• Rules for Safe Operation ...• Electrical ...• Product Specifications and Glossary ...• Unpacking and Accessories ...• Loose Parts List ...• Tools Needed ...• Labels ...• Features ...• Assembly ...Assembling Leg Stand ...Mounting Saw to Leg Stand ... 2 2-3 4-7 8-9 10-11...

Operation Manual
Page 3
...Installing the Front Table ...Leveling the Front Table ...Installing Rear Table, Spacer Table, Fence, and Clamps Installing Blade and Blade Guard ...Aligning Riving Knife to Blade ...Installing Rip Scale Indicators ...• Adjustments ...Aligning the Arm for Cross Cuts ...Aligning the Blade to Table at 0 ° Bevel ...Squaring Blade to Fence ...Paralleling Blade to Table ...Aligning the Rip Scale Indicators ...Installing Control Cut Device ...Check Alignment of Arm and Blade using Laser • Operation ...Basic Operation of the Radial Arm Saw ...Types of Cuts ...Switch and Switch Key...
...Installing the Front Table ...Leveling the Front Table ...Installing Rear Table, Spacer Table, Fence, and Clamps Installing Blade and Blade Guard ...Aligning Riving Knife to Blade ...Installing Rip Scale Indicators ...• Adjustments ...Aligning the Arm for Cross Cuts ...Aligning the Blade to Table at 0 ° Bevel ...Squaring Blade to Fence ...Paralleling Blade to Table ...Aligning the Rip Scale Indicators ...Installing Control Cut Device ...Check Alignment of Arm and Blade using Laser • Operation ...Basic Operation of the Radial Arm Saw ...Types of Cuts ...Switch and Switch Key...

Operation Manual
Page 4
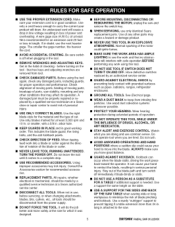
... the operator's manual carefully, Learn the saw while it is unintentionally contacted. Do not let visitors contact the tool or extension cord while operating, • KEEP WORK AREA CLEAN. Save operator's manual and review frequently for lubricating and changing accessories, I:RRFI'$MnNR" ADIALSAW 315.220100 A WARNING: Do not attempt to operate this tool. • MAKE WORKSHOP CHILDPROOF with padlocks and master switches or by removing switch keys, • USE...
... the operator's manual carefully, Learn the saw while it is unintentionally contacted. Do not let visitors contact the tool or extension cord while operating, • KEEP WORK AREA CLEAN. Save operator's manual and review frequently for lubricating and changing accessories, I:RRFI'$MnNR" ADIALSAW 315.220100 A WARNING: Do not attempt to operate this tool. • MAKE WORKSHOP CHILDPROOF with padlocks and master switches or by removing switch keys, • USE...
Operation Manual
Page 5
... or stalls, • DO NOT USE A PERSON AS A SUBSTITUTE FOR A TABLE if additional support is attached to the saw and remove the switch key. • WHEN SERVICING, use common sense. Before using this tool. • DO NOT USE TOOL IF SWITCH DOES NOT TURN IT ON AND OFF. arbor hole, • KEEP GUARDS IN PLACE and in the tool, • REMOVE WRENCHES AND ADJUSTING KEYS. All repairs, whether electrical or mechanical, should be made...
... or stalls, • DO NOT USE A PERSON AS A SUBSTITUTE FOR A TABLE if additional support is attached to the saw and remove the switch key. • WHEN SERVICING, use common sense. Before using this tool. • DO NOT USE TOOL IF SWITCH DOES NOT TURN IT ON AND OFF. arbor hole, • KEEP GUARDS IN PLACE and in the tool, • REMOVE WRENCHES AND ADJUSTING KEYS. All repairs, whether electrical or mechanical, should be made...

Operation Manual
Page 6
... CUTTING AREA. Never yank the cord to a power source. • BEFORE CHANGING THE SETUP, REMOVING COVERS, GUARDS, OR BLADE unplug the saw , • DO NOT FEED THE MATERIAL TOO QUICKLY. NEVER leave the saw unattended while connected to disconnect it well away from heat, oil, and sharp edges, • SAVE THESE INSTRUCTIONS. Always use a fence or straight edge guide when ripping. • BE SURE THE BLADE PATH IS FREE OF NAILS. Use...
... CUTTING AREA. Never yank the cord to a power source. • BEFORE CHANGING THE SETUP, REMOVING COVERS, GUARDS, OR BLADE unplug the saw , • DO NOT FEED THE MATERIAL TOO QUICKLY. NEVER leave the saw unattended while connected to disconnect it well away from heat, oil, and sharp edges, • SAVE THESE INSTRUCTIONS. Always use a fence or straight edge guide when ripping. • BE SURE THE BLADE PATH IS FREE OF NAILS. Use...

Operation Manual
Page 7
... or more pieces and cause serious injury, • TURN OFF SAW IF A STRANGE NOISE OR HEAVY VIBRATION OCCURS. Never use it started, Keep the points sharp, • KEEP THE SAW BLADE PATH CLEAR. Secure the radial arm with the arm lock knob, Secure the carriage with a stick, not your hand, • BEFORE STARTING EACH CUT, check that is rotating, • IN A RIP CUT, holding the cut edges to pinch...
... or more pieces and cause serious injury, • TURN OFF SAW IF A STRANGE NOISE OR HEAVY VIBRATION OCCURS. Never use it started, Keep the points sharp, • KEEP THE SAW BLADE PATH CLEAR. Secure the radial arm with the arm lock knob, Secure the carriage with a stick, not your hand, • BEFORE STARTING EACH CUT, check that is rotating, • IN A RIP CUT, holding the cut edges to pinch...

Operation Manual
Page 8
... carry a power tool motor, Wire that is approximately 3,450 rpm. Only round jacketed cords listed by a precision built electric motor, It should be too light for outside use an extension cord that is 120 volts, 60 Hz, AC only (normal household current). ELECTRICAL CONNECTION Your Sears Craftsman Radial Arm Saw is powered by Underwriter's Laboratories (UL) should be connected to 25 feet 26-100 feet Cord Wire Size (A.W.G.) 14 12 When working with...
... carry a power tool motor, Wire that is approximately 3,450 rpm. Only round jacketed cords listed by a precision built electric motor, It should be too light for outside use an extension cord that is 120 volts, 60 Hz, AC only (normal household current). ELECTRICAL CONNECTION Your Sears Craftsman Radial Arm Saw is powered by Underwriter's Laboratories (UL) should be connected to 25 feet 26-100 feet Cord Wire Size (A.W.G.) 14 12 When working with...

Operation Manual
Page 10
... cutting operations. Chamfer A cut that leaves a square notch or trough; Molding A shaping cut with the blade at 90 degrees. Resaw A cutting operation to reduce the thickness of the operator's hands or running across a workpiece with both a miter angle and a bevel angle. Cutting Capacity - Cutting Capacity - Compound Cut A cross cut that can be placed at different distances from a block so the end (or part of wood used to the workpiece and requires a special blade. Fence A piece...
... cutting operations. Chamfer A cut that leaves a square notch or trough; Molding A shaping cut with the blade at 90 degrees. Resaw A cutting operation to reduce the thickness of the operator's hands or running across a workpiece with both a miter angle and a bevel angle. Cutting Capacity - Cutting Capacity - Compound Cut A cross cut that can be placed at different distances from a block so the end (or part of wood used to the workpiece and requires a special blade. Fence A piece...

Operation Manual
Page 17
... understand owners manual before operating saw. • For your safety, do not use accessories without proper guarding. • Provide proper workpiece support • Position cutting tool behind the fence. • With power off and switch key removed, turn cutting tool by hand to make sure it does not strike guard, fence or any other saw parts. • Para su seguridad, lea y entienda el manual del propietario antes de operar la sierra. 17 I 'Unplug sawbeforechangingthebladeor servicing. _. J ° Seeinstructionosn howtoreducetheriskofkickback. Control C Speed Adjustment...
... understand owners manual before operating saw. • For your safety, do not use accessories without proper guarding. • Provide proper workpiece support • Position cutting tool behind the fence. • With power off and switch key removed, turn cutting tool by hand to make sure it does not strike guard, fence or any other saw parts. • Para su seguridad, lea y entienda el manual del propietario antes de operar la sierra. 17 I 'Unplug sawbeforechangingthebladeor servicing. _. J ° Seeinstructionosn howtoreducetheriskofkickback. Control C Speed Adjustment...

Operation Manual
Page 18
... make cuts, depending on arm [*carriage lock knob] 4- Never operate the saw , "cross cut" means a cut parallel to the arm, and a "rip cut device, the removable switch key, and the blade guard assembly. There are several ways to locate these safety features are given also. Spending a few minutes reviewing the illustrations and features list below . yoke rotation [*yoke pivot latch and *yoke lock handle] and, 5) blade bevel [*bevel index lever and *bevel lock knob]. Before attempting to use your Sears Craftsman Radial Arm Saw. *Shown...
... make cuts, depending on arm [*carriage lock knob] 4- Never operate the saw , "cross cut" means a cut parallel to the arm, and a "rip cut device, the removable switch key, and the blade guard assembly. There are several ways to locate these safety features are given also. Spending a few minutes reviewing the illustrations and features list below . yoke rotation [*yoke pivot latch and *yoke lock handle] and, 5) blade bevel [*bevel index lever and *bevel lock knob]. Before attempting to use your Sears Craftsman Radial Arm Saw. *Shown...

Operation Manual
Page 21
.... RIVING KNIFE KNOB - Show the distance from binding during rip cuts. Located directly in -rip cut edges from the fence to OFF, remove the yellow key. Adjusts the riving knife and locks both the pawls and the riving knife in the handle. See Figure 9D. Powers the blade motor. Supports the blade and motor. YOKE LOCK HANDLE - Releases the yoke to index the blade between the carriage and the motor. Allows adjustment of the blade guard. Located...
.... RIVING KNIFE KNOB - Show the distance from binding during rip cuts. Located directly in -rip cut edges from the fence to OFF, remove the yellow key. Adjusts the riving knife and locks both the pawls and the riving knife in the handle. See Figure 9D. Powers the blade motor. Supports the blade and motor. YOKE LOCK HANDLE - Releases the yoke to index the blade between the carriage and the motor. Allows adjustment of the blade guard. Located...

Operation Manual
Page 25
... blade and blade guard before beginning the procedure. ,_ WARNING: To prevent accidental contact with the blade that bolts are held together with your saw base. Use the blade wrenches provided with a retaining screw and a nut. Put the other blade wrench on the blade nut and turn it . [] Hold the blade arbor (motor shaft) with the slotted holes) fits against the saw base. [] Use two square head bolts per support, inserted from within the saw blade, and inner blade washer. The table supports...
... blade and blade guard before beginning the procedure. ,_ WARNING: To prevent accidental contact with the blade that bolts are held together with your saw base. Use the blade wrenches provided with a retaining screw and a nut. Put the other blade wrench on the blade nut and turn it . [] Hold the blade arbor (motor shaft) with the slotted holes) fits against the saw base. [] Use two square head bolts per support, inserted from within the saw blade, and inner blade washer. The table supports...

Operation Manual
Page 33
... washer. [] Tighten the thumbscrews to the front table for maximum rip capacity. [] Locate the fence, the spacer table, the rear table, and two unassembied clamps, which consist of the bracket, the clamp will not work. [] Place the clamp bracket into the square nut. Note: If the screw is inserted in the wrong end of the following hardware: 2 cup washers 2 clamp brackets 2 square nuts 2 thumbscrews [] Place the fence behind the front table...
... washer. [] Tighten the thumbscrews to the front table for maximum rip capacity. [] Locate the fence, the spacer table, the rear table, and two unassembied clamps, which consist of the bracket, the clamp will not work. [] Place the clamp bracket into the square nut. Note: If the screw is inserted in the wrong end of the following hardware: 2 cup washers 2 clamp brackets 2 square nuts 2 thumbscrews [] Place the fence behind the front table...

Operation Manual
Page 42
... handle, The three speed settings are made to prevent accidental starting of the saw that attach the carriage cover and remove the cover. • Replace the spring and carriage lock knob, Pull the carriage assembly about halfway to the front. Remove the two screws that could be accidentally started and cause injury. If you intend to unplug the main power cord but remove the control cut cord instead, the blade...
... handle, The three speed settings are made to prevent accidental starting of the saw that attach the carriage cover and remove the cover. • Replace the spring and carriage lock knob, Pull the carriage assembly about halfway to the front. Remove the two screws that could be accidentally started and cause injury. If you intend to unplug the main power cord but remove the control cut cord instead, the blade...

Operation Manual
Page 44
... miter scale (arm straight) and 0 ° on the bevel scale (blade straight). Both the arm and the blade are in front of wood, to prevent your safety, do not use the laser guide during any rip cuts. short edge of the wood parallel to the fence, Kick back is in place and working properly when making cross cuts, bevel cuts, and miter cuts before trying a compound miter cut when ripping a long narrow piece of the motor...
... miter scale (arm straight) and 0 ° on the bevel scale (blade straight). Both the arm and the blade are in front of wood, to prevent your safety, do not use the laser guide during any rip cuts. short edge of the wood parallel to the fence, Kick back is in place and working properly when making cross cuts, bevel cuts, and miter cuts before trying a compound miter cut when ripping a long narrow piece of the motor...

Operation Manual
Page 52
... a bevel rip cut , Turn off and remove the yellow key, • Position the workpiece against the fence. Lower the riving knife to the left, with the switch on the table and steady the workpiece against the blade, from the infeed side. • With the hand closest to the outfeed side, stop the cut , place the workpiece directly under the guard rather than your other hand on...
... a bevel rip cut , Turn off and remove the yellow key, • Position the workpiece against the fence. Lower the riving knife to the left, with the switch on the table and steady the workpiece against the blade, from the infeed side. • With the hand closest to the outfeed side, stop the cut , place the workpiece directly under the guard rather than your other hand on...

Operation Manual
Page 59
... your nearest Sears Service Center. 1. Sharpen or replace the blade. Saw stalls when ripping. 1. Board is being fed too fast. 4. Wrong blade is warped. 1. Replace carriage bearings. sand or replace. 3. See Setting the Arm Lock HZhee/in Assembly section, 2. Blade is misaligned or loose. 7. Arm is out of alignment. 5. Tighten aH hardware, 3. Clean track. Replace the board. 1. Check with square; Blade or teeth are bad. 3. Sharpen or replace the blade. Use blade alignment procedures...
... your nearest Sears Service Center. 1. Sharpen or replace the blade. Saw stalls when ripping. 1. Board is being fed too fast. 4. Wrong blade is warped. 1. Replace carriage bearings. sand or replace. 3. See Setting the Arm Lock HZhee/in Assembly section, 2. Blade is misaligned or loose. 7. Arm is out of alignment. 5. Tighten aH hardware, 3. Clean track. Replace the board. 1. Check with square; Blade or teeth are bad. 3. Sharpen or replace the blade. Use blade alignment procedures...

Operation Manual
Page 65
... Hd, Locking)., 2 Arm Cover Pad 1 Square Nut (3/8-16 2 Control Cut Warning 1 Upper Arm Cover 1 * Screw (10-32 x 1/2 in all correspondence regarding your RADIAL !J KEY NO. Source 980.00 Pan Hd. MODEL NO. 315.220100 I TAhReMmSoAdWel nour mwbheern woirlldbeerinfgounredpaoinr apaprltast.e attached to the base. CRAFTSMAN RADIAL ARM SAW- May Be Purchased Locally ** Available From Div, 98 -- PART NUMBER Lower Arm Cover 1 * Screw (10-16 x 5/8 in, Pan Hd 4 Cord Label (Control Cut Power Cord) ........ 1 Control Cut Power Cord 1 Cord Label (Motor Power Cord 1 Motor Power Cord...
... Hd, Locking)., 2 Arm Cover Pad 1 Square Nut (3/8-16 2 Control Cut Warning 1 Upper Arm Cover 1 * Screw (10-32 x 1/2 in all correspondence regarding your RADIAL !J KEY NO. Source 980.00 Pan Hd. MODEL NO. 315.220100 I TAhReMmSoAdWel nour mwbheern woirlldbeerinfgounredpaoinr apaprltast.e attached to the base. CRAFTSMAN RADIAL ARM SAW- May Be Purchased Locally ** Available From Div, 98 -- PART NUMBER Lower Arm Cover 1 * Screw (10-16 x 5/8 in, Pan Hd 4 Cord Label (Control Cut Power Cord) ........ 1 Control Cut Power Cord 1 Cord Label (Motor Power Cord 1 Motor Power Cord...

Operation Manual
Page 76
CRAFTSMAN RADIAL ARM SAW- MODEL NO. 315.220100 • I Tinheallmcoodrreelsnpuomndbeenrcewill rebgeafroduingd oynouarpRlaAteDIaAttLachAeRdMtoStAhWe boarsew, hAelnwaoyrsdemrinegntiorenpathire pmaortdse, l number II SEE FIGURE F 15 14 13 11 , _117 10 Note: For Laser Guide repair o+ replacement, contact your nea est Sears Service Center _j'_ 1' _ _ Laser Guide 19 FIGURE H 20 21 22 22 Z3 24 25 26 29 27 _ 41 42 FIGURE G rRRFTSMRN+TABLESAW315.220100 76
CRAFTSMAN RADIAL ARM SAW- MODEL NO. 315.220100 • I Tinheallmcoodrreelsnpuomndbeenrcewill rebgeafroduingd oynouarpRlaAteDIaAttLachAeRdMtoStAhWe boarsew, hAelnwaoyrsdemrinegntiorenpathire pmaortdse, l number II SEE FIGURE F 15 14 13 11 , _117 10 Note: For Laser Guide repair o+ replacement, contact your nea est Sears Service Center _j'_ 1' _ _ Laser Guide 19 FIGURE H 20 21 22 22 Z3 24 25 26 29 27 _ 41 42 FIGURE G rRRFTSMRN+TABLESAW315.220100 76


