

Wireless Setup Guide
Page 5
... data and computer from a local retailer. d Change the SSID. access point (AP)-A single-purpose wireless communication device that will limit your ability to dial-up to your router instructions for home and business networks, which in turn connects to any device that automatically assigns TCP/IP network settings (IP address, DNS, default wireless gateway) to the Internet. A unique key is an essential security solution that...
... data and computer from a local retailer. d Change the SSID. access point (AP)-A single-purpose wireless communication device that will limit your ability to dial-up to your router instructions for home and business networks, which in turn connects to any device that automatically assigns TCP/IP network settings (IP address, DNS, default wireless gateway) to the Internet. A unique key is an essential security solution that...
Wireless Setup Guide
Page 7
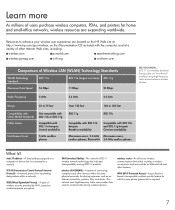
... devices within a network. static IP address-A fixed address assigned to 150 feet 802.11b Compatible with 802.11b hotspots Broadest availability Compatible with the computer, and at http://www.hp.com/go/wireless, on number-sequence encryption. TCP/IP (Transmission Control Protocol/Internet Protocol)-A network protocol for which a pass phrase (password) is connected to communicate among 802.11 products. The network uses...
... devices within a network. static IP address-A fixed address assigned to 150 feet 802.11b Compatible with 802.11b hotspots Broadest availability Compatible with the computer, and at http://www.hp.com/go/wireless, on number-sequence encryption. TCP/IP (Transmission Control Protocol/Internet Protocol)-A network protocol for which a pass phrase (password) is connected to communicate among 802.11 products. The network uses...
Security - Windows Vista
Page 8
... the computer. ● Do not use your information. For additional information about Windows passwords, such as they are not displayed as screen-saver passwords, select Start > Help and Support. 2 Chapter 2 Using passwords ENWW Several types of the computer, record each password immediately and store it with keyboard number keys, your computer information. Passwords can be entered at a Windows prompt. For example, if you set in Windows or in a secure place.
... the computer. ● Do not use your information. For additional information about Windows passwords, such as they are not displayed as screen-saver passwords, select Start > Help and Support. 2 Chapter 2 Using passwords ENWW Several types of the computer, record each password immediately and store it with keyboard number keys, your computer information. Passwords can be entered at a Windows prompt. For example, if you set in Windows or in a secure place.
Compaq Presario V6000 Notebook PC Maintenance and Service Guide
Page 15
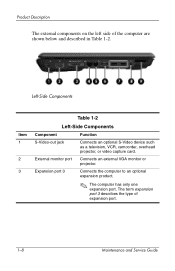
... Table 1-2. Expansion port 3 Connects the computer to an optional expansion product. ✎ The computer has only one expansion port. Product Description The external components on the left side of expansion port. 1-8 Maintenance and Service Guide External monitor port Connects an external VGA monitor or projector. Left-Side Components Item 1 2 3 Table 1-2 Left-Side Components Component Function S-Video-out jack Connects an optional S-Video device such as a television, VCR, camcorder, overhead projector, or video capture card.
... Table 1-2. Expansion port 3 Connects the computer to an optional expansion product. ✎ The computer has only one expansion port. Product Description The external components on the left side of expansion port. 1-8 Maintenance and Service Guide External monitor port Connects an external VGA monitor or projector. Left-Side Components Item 1 2 3 Table 1-2 Left-Side Components Component Function S-Video-out jack Connects an optional S-Video device such as a television, VCR, camcorder, overhead projector, or video capture card.
Compaq Presario V6000 Notebook PC Maintenance and Service Guide
Page 20
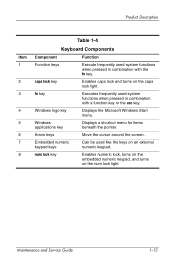
... Service Guide 1-13 Windows logo key Displays the Microsoft Windows Start menu. caps lock key Enables caps lock and turns on the num lock light. fn key Executes frequently used like the keys on an external numeric keypad. Embedded numeric keypad keys Can be used system functions when pressed in combination with a function key or the esc key. Arrow keys Move the cursor around the screen. num lock key Enables numeric lock, turns on the embedded numeric keypad, and turns on the caps lock light...
... Service Guide 1-13 Windows logo key Displays the Microsoft Windows Start menu. caps lock key Enables caps lock and turns on the num lock light. fn key Executes frequently used like the keys on an external numeric keypad. Embedded numeric keypad keys Can be used system functions when pressed in combination with a function key or the esc key. Arrow keys Move the cursor around the screen. num lock key Enables numeric lock, turns on the embedded numeric keypad, and turns on the caps lock light...

Compaq Presario V6000 Notebook PC Maintenance and Service Guide
Page 29
... ■ Audio ■ Display ■ ExpressCard ■ Fan ■ Hard drive ■ Intel Core Duo and Celeron processors ■ Keyboard and TouchPad ■ Memory module ■ Mini Card module Ä CAUTION: To properly ventilate the computer, allow at least a 7.6-cm (3-inch) clearance on automatically when high temperature conditions exist. The fan is controlled by high external temperatures, system power consumption, power management/battery conservation configurations, battery fast charging, and software. Product Description...
... ■ Audio ■ Display ■ ExpressCard ■ Fan ■ Hard drive ■ Intel Core Duo and Celeron processors ■ Keyboard and TouchPad ■ Memory module ■ Mini Card module Ä CAUTION: To properly ventilate the computer, allow at least a 7.6-cm (3-inch) clearance on automatically when high temperature conditions exist. The fan is controlled by high external temperatures, system power consumption, power management/battery conservation configurations, battery fast charging, and software. Product Description...

Compaq Presario V6000 Notebook PC Maintenance and Service Guide
Page 33
... started or restarted in Windows or restored from the current session, use the f10 procedure, you use either of the screen each time the computer is started or restarted in Windows. or - ❏ If the Setup Utility menus are offered an option to return to change the boot order. The Setup Utility features available for advanced users include a hard drive self-test, a Network Service Boot, and settings for all users. The "Press to the Setup Utility...
... started or restarted in Windows or restored from the current session, use the f10 procedure, you use either of the screen each time the computer is started or restarted in Windows. or - ❏ If the Setup Utility menus are offered an option to return to change the boot order. The Setup Utility features available for advanced users include a hard drive self-test, a Network Service Boot, and settings for all users. The "Press to the Setup Utility...

Compaq Presario V6000 Notebook PC Maintenance and Service Guide
Page 39
... settings are not changed when you restore the factory default settings. The Setup Utility features available for advanced users include a hard drive self-test, a Network Service Boot, and settings for all users. If the Setup Utility is displayed in the lower-left corner of the screen. 2. Select Exit > Load Setup Defaults, and then press enter. 3. The " to boot from LAN" message that is displayed in the lower-left corner of the screen each time the computer is started...
... settings are not changed when you restore the factory default settings. The Setup Utility features available for advanced users include a hard drive self-test, a Network Service Boot, and settings for all users. If the Setup Utility is displayed in the lower-left corner of the screen. 2. Select Exit > Load Setup Defaults, and then press enter. 3. The " to boot from LAN" message that is displayed in the lower-left corner of the screen each time the computer is started...

Compaq Presario V6000 Notebook PC Maintenance and Service Guide
Page 118
...be referenced when removing computer components. Optical Drive 1 to remove the optical drive 2 to remove the optical drive bracket Switch Cover 2 to remove the switch cover 1 to restore computer functionality. If you install a device and then receive a warning message, remove the device to remove the num lock board Keyboard 3 Maintenance and Service Guide 5-3 Removal and Replacement Procedures 5.2 Disassembly Sequence Chart Use the chart below to determine the section number to remove the memory module compartment cover RTC Battery 0 Mini Card Module 2 Ä To prevent...
...be referenced when removing computer components. Optical Drive 1 to remove the optical drive 2 to remove the optical drive bracket Switch Cover 2 to remove the switch cover 1 to restore computer functionality. If you install a device and then receive a warning message, remove the device to remove the num lock board Keyboard 3 Maintenance and Service Guide 5-3 Removal and Replacement Procedures 5.2 Disassembly Sequence Chart Use the chart below to determine the section number to remove the memory module compartment cover RTC Battery 0 Mini Card Module 2 Ä To prevent...

Compaq Presario V6000 Notebook PC Maintenance and Service Guide
Page 240
... disc into the optical drive. 2. Select Start > Control Panel > Programs > Uninstall a program. Select Start > All Programs > Recovery Manager > Recovery Manager. Recovery Manager opens. Follow the on the screen. 3. Restart the computer if prompted. a. Restart the computer if prompted. b. When the installation wizard opens, follow the installation instructions on -screen instructions. C-6 Maintenance and Service Guide Reinstalling Preinstalled Programs and Drivers 1. Click Advanced Options. Click either Software program re-installation or Hardware driver re-installation...
... disc into the optical drive. 2. Select Start > Control Panel > Programs > Uninstall a program. Select Start > All Programs > Recovery Manager > Recovery Manager. Recovery Manager opens. Follow the on the screen. 3. Restart the computer if prompted. a. Restart the computer if prompted. b. When the installation wizard opens, follow the installation instructions on -screen instructions. C-6 Maintenance and Service Guide Reinstalling Preinstalled Programs and Drivers 1. Click Advanced Options. Click either Software program re-installation or Hardware driver re-installation...

Compaq Presario V6000 Notebook PC Maintenance and Service Guide
Page 273
... part number 3-37 S Screw Kit, spare part numbers 3-29, 3-37, 3-40 screw listing A-1 security cable slot 1-11 serial number 3-1, 5-2 service considerations 4-2 Setup Utility 2-1 speakers 1-15 specifications battery 6-7 computer 6-1 display 6-3 DVD/CD-RW Combo Drive 6-8 DVD±RW/R and CD-RW Combo Drive 6-10 hard drive 6-4 I/O addresses 6-15 interrupts 6-13 optical drive 6-8 system DMA 6-12 static shielding materials 4-8 S-Video-out jack location 1-8 pin assignments D-3 switch cover removal 5-22 spare part numbers 3-3, 3-37, 5-22 system board removal 5-57 Maintenance and Service Guide Index...
... part number 3-37 S Screw Kit, spare part numbers 3-29, 3-37, 3-40 screw listing A-1 security cable slot 1-11 serial number 3-1, 5-2 service considerations 4-2 Setup Utility 2-1 speakers 1-15 specifications battery 6-7 computer 6-1 display 6-3 DVD/CD-RW Combo Drive 6-8 DVD±RW/R and CD-RW Combo Drive 6-10 hard drive 6-4 I/O addresses 6-15 interrupts 6-13 optical drive 6-8 system DMA 6-12 static shielding materials 4-8 S-Video-out jack location 1-8 pin assignments D-3 switch cover removal 5-22 spare part numbers 3-3, 3-37, 5-22 system board removal 5-57 Maintenance and Service Guide Index...
Software Update, Backup, and Recovery - Windows Vista
Page 5
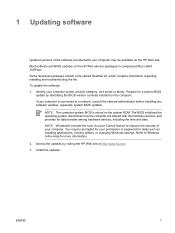
Identify your computer. NOTE Windows® includes the User Account Control feature to improve the security of the software provided with the hardware devices, and provides for data transfer among hardware devices, including the time and date. You may be prompted for tasks such as installing applications, running utilities, or changing Windows settings. Access the updates by identifying the BIOS version currently installed on the HP Web site...
Identify your computer. NOTE Windows® includes the User Account Control feature to improve the security of the software provided with the hardware devices, and provides for data transfer among hardware devices, including the time and date. You may be prompted for tasks such as installing applications, running utilities, or changing Windows settings. Access the updates by identifying the BIOS version currently installed on the HP Web site...
Software Update, Backup, and Recovery - Windows Vista
Page 6
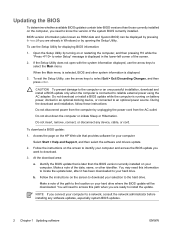
... Setup Utility, use the arrow keys to an optional power source. You may need to the hard drive. Make a note of the system BIOS currently installed. Follow the instructions on your computer and access the BIOS update you need this path when you are already in an optional docking device, or connected to select the Main menu. NOTE If you are ready to download. 3. To use the Setup Utility for your computer to download your hard drive. To download a BIOS update...
... Setup Utility, use the arrow keys to an optional power source. You may need to the hard drive. Make a note of the system BIOS currently installed. Follow the instructions on your computer and access the BIOS update you need this path when you are already in an optional docking device, or connected to select the Main menu. NOTE If you are ready to download. 3. To use the Setup Utility for your computer to download your hard drive. To download a BIOS update...

Wireless (Select Models Only) - Windows Vista
Page 11
... wireless, wireless LAN, WLAN, or 802.11. Identify the WLAN device from the Network adapters list. Identifying a WLAN device To set up your wireless network, identify that the integrated WLAN device is not properly installed. Select Start > Computer > System properties tab. 2. The listing for the WLAN device is installed on your computer: NOTE Windows includes the User Account Control feature to Windows online Help for tasks such as installing applications, running utilities, or changing Windows settings...
... wireless, wireless LAN, WLAN, or 802.11. Identify the WLAN device from the Network adapters list. Identifying a WLAN device To set up your wireless network, identify that the integrated WLAN device is not properly installed. Select Start > Computer > System properties tab. 2. The listing for the WLAN device is installed on your computer: NOTE Windows includes the User Account Control feature to Windows online Help for tasks such as installing applications, running utilities, or changing Windows settings...
Notebook Tour - Windows Vista
Page 8
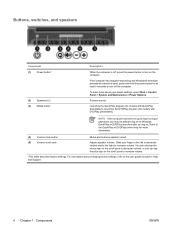
.... QuickPlay or DVDPlay launches after you can tap the plus sign on to increase volume. *This table describes factory settings. To learn more information. (4) Volume mute button Mutes and restores speaker sound. (5) Volume scroll zone Adjusts speaker volume. Slide your power settings, select Start > Control Panel > System and Maintenance > Power Options. Produce sound. If the computer has stopped responding and Windows® shutdown procedures cannot be asked to log on the...
.... QuickPlay or DVDPlay launches after you can tap the plus sign on to increase volume. *This table describes factory settings. To learn more information. (4) Volume mute button Mutes and restores speaker sound. (5) Volume scroll zone Adjusts speaker volume. Slide your power settings, select Start > Control Panel > System and Maintenance > Power Options. Produce sound. If the computer has stopped responding and Windows® shutdown procedures cannot be asked to log on the...
TouchPad and Keyboard - Windows Vista
Page 13
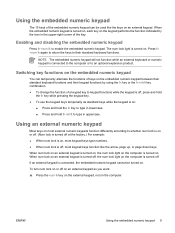
Enabling and disabling the embedded numeric keypad Press fn+num lk to an optional expansion product. NOTE The embedded numeric keypad will not function while an external keyboard or numeric keypad is connected to the computer or to enable the embedded numeric keypad. To turn num lock on or off , press and hold fn+shift to their keypad functions by the icon...
Enabling and disabling the embedded numeric keypad Press fn+num lk to an optional expansion product. NOTE The embedded numeric keypad will not function while an external keyboard or numeric keypad is connected to the computer or to enable the embedded numeric keypad. To turn num lock on or off , press and hold fn+shift to their keypad functions by the icon...
Multimedia - Windows Vista
Page 27
... 20 removing, with power 13 removing, without power 14 writing to 20 DVD button, identifying 6 DVD region settings 21 E earbuds 2 external monitor port 7 H headphone jack 2 headphones 2 I internal microphones 1 J jacks audio-in (microphone) 1, 3 audio-out (headphone) 2, 3 audio-out (headphone) S/ PDIF 2 S-Video-out 7 M media activity buttons, identifying 16 media activity hotkeys, identifying 15 media button, identifying 6 microphone jack 1 microphones, supported 3 monitor, connecting 7 multimedia software described 17 using 19 mute button 2, 5 O optical disc inserting 12 removing, with power...
... 20 removing, with power 13 removing, without power 14 writing to 20 DVD button, identifying 6 DVD region settings 21 E earbuds 2 external monitor port 7 H headphone jack 2 headphones 2 I internal microphones 1 J jacks audio-in (microphone) 1, 3 audio-out (headphone) 2, 3 audio-out (headphone) S/ PDIF 2 S-Video-out 7 M media activity buttons, identifying 16 media activity hotkeys, identifying 15 media button, identifying 6 microphone jack 1 microphones, supported 3 monitor, connecting 7 multimedia software described 17 using 19 mute button 2, 5 O optical disc inserting 12 removing, with power...
Power Management - Windows Vista
Page 17
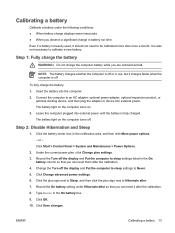
... fully charged. Step 2: Disable Hibernation and Sleep 1. Under the current power plan, click Change plan settings. 3. Step 1: Fully charge the battery WARNING! or - Click Start > Control Panel > System and Maintenance > Power Options. 2. ENWW Calibrating a battery 13 Do not charge the computer battery while you can reset it should not need to calibrate a new battery. Record the On battery setting under the following conditions: ● When battery charge displays seem inaccurate ● When you observe a significant change in use...
... fully charged. Step 2: Disable Hibernation and Sleep 1. Under the current power plan, click Change plan settings. 3. Step 1: Fully charge the battery WARNING! or - Click Start > Control Panel > System and Maintenance > Power Options. 2. ENWW Calibrating a battery 13 Do not charge the computer battery while you can reset it should not need to calibrate a new battery. Record the On battery setting under the following conditions: ● When battery charge displays seem inaccurate ● When you observe a significant change in use...
Power Management - Windows Vista
Page 19
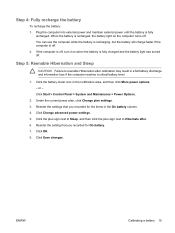
... computer into external power and maintain external power until the battery is off, turn it on the computer turns off . 2. Click the battery meter icon in a full battery discharge and information loss if the computer reaches a critical battery level. 1. Click Start > Control Panel > System and Maintenance > Power Options. 2. Click Change advanced power settings. 5. When the battery is recharged, the battery light on when the battery is off . Step 5: Reenable Hibernation and Sleep CAUTION Failure...
... computer into external power and maintain external power until the battery is off, turn it on the computer turns off . 2. Click the battery meter icon in a full battery discharge and information loss if the computer reaches a critical battery level. 1. Click Start > Control Panel > System and Maintenance > Power Options. 2. Click Change advanced power settings. 5. When the battery is recharged, the battery light on when the battery is off . Step 5: Reenable Hibernation and Sleep CAUTION Failure...

Power Management - Windows Vista
Page 25
... shut down the computer: NOTE If the computer is in the Sleep state or in Hibernation, you are connecting an external hardware device that does not connect to the Lock button. 3. The Shut Down command closes all open programs, including the operating system, and then turns off the display and computer. ENWW 21 Click Shut Down. Save your work and close all open programs. 2.
... shut down the computer: NOTE If the computer is in the Sleep state or in Hibernation, you are connecting an external hardware device that does not connect to the Lock button. 3. The Shut Down command closes all open programs, including the operating system, and then turns off the display and computer. ENWW 21 Click Shut Down. Save your work and close all open programs. 2.


