End User License Agreement
Page 1
Other software may load the Software ON THE CONDITION THAT YOU Product into the local memory or storage device of the HP Product. You may contain a EULA in the form of a discrete agreement, shrink wrap license or electronic license terms accepted ... a separate license agreement between you and HP or its suppliers. You do not have Software Product into Your Computer's AGREE TO ALL TERMS AND temporary memory (RAM) for back-up copies of the Software Product, provided the copy contains all of the Software Product for use on more than one computer...
Other software may load the Software ON THE CONDITION THAT YOU Product into the local memory or storage device of the HP Product. You may contain a EULA in the form of a discrete agreement, shrink wrap license or electronic license terms accepted ... a separate license agreement between you and HP or its suppliers. You do not have Software Product into Your Computer's AGREE TO ALL TERMS AND temporary memory (RAM) for back-up copies of the Software Product, provided the copy contains all of the Software Product for use on more than one computer...
Safety and Regulatory Information Desktops, Thin Clients, and Personal Workstations
Page 29
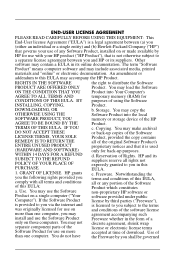
... such as temperature and humidity. Table 2-2 Toxic and Hazardous Substances and Elements (continued) Part Name Lead (Pb) Mercury (Hg) Cadmium (Cd) Hexavalent Chromium (Cr(VI)) Memory X O O O I/O PCAs X O O O Power supply X O O O Keyboard X O O O Mouse X O O O Chassis/Other X O O O Fans X O O O Internal/External Media Reading X O O O Devices External Control Devices X O O O Cable X O O O Hard Disk Drive X O O O Display X X O O Polybrominated biphenyls (PBB) Polybrominated...
... such as temperature and humidity. Table 2-2 Toxic and Hazardous Substances and Elements (continued) Part Name Lead (Pb) Mercury (Hg) Cadmium (Cd) Hexavalent Chromium (Cr(VI)) Memory X O O O I/O PCAs X O O O Power supply X O O O Keyboard X O O O Mouse X O O O Chassis/Other X O O O Fans X O O O Internal/External Media Reading X O O O Devices External Control Devices X O O O Cable X O O O Hard Disk Drive X O O O Display X X O O Polybrominated biphenyls (PBB) Polybrominated...

Upgrading and Servicing Guide
Page 3
Table of Contents Safety Information 1 Opening and Closing the PC 1 Preparing the PC 2 Before Opening the PC 2 After Closing the PC 3 Removing the Side Panel 3 Replacing the Side Panel 4 Removing the Front Panel 5 Replacing the Front Panel 6 Locating Components Inside the Computer 7 Removing and Replacing ... Reader 16 Removing the Hard Disk Drive 17 Adding or Replacing a Hard Disk Drive 19 Adding Memory 22 Removing a Memory Module 22 Installing a Memory Module 23 Removing or Installing an Add-in Card 24 Removing an Add-in Card 25 Installing an Add-in Card 26 Replacing the...
Table of Contents Safety Information 1 Opening and Closing the PC 1 Preparing the PC 2 Before Opening the PC 2 After Closing the PC 3 Removing the Side Panel 3 Replacing the Side Panel 4 Removing the Front Panel 5 Replacing the Front Panel 6 Locating Components Inside the Computer 7 Removing and Replacing ... Reader 16 Removing the Hard Disk Drive 17 Adding or Replacing a Hard Disk Drive 19 Adding Memory 22 Removing a Memory Module 22 Installing a Memory Module 23 Removing or Installing an Add-in Card 24 Removing an Add-in Card 25 Installing an Add-in Card 26 Replacing the...

Upgrading and Servicing Guide
Page 9
Upgrading and Servicing Guide 5 B 2 Swing the front panel away from the outside edge of the chassis. Removing the Front Panel This procedure is necessary only when removing or replacing an optical drive, memory card reader, an HP Pocket Media Drive, diskette drive, or the hard disk drive. 1 Pull the three tabs (B) away from the chassis toward the left to remove it.
Upgrading and Servicing Guide 5 B 2 Swing the front panel away from the outside edge of the chassis. Removing the Front Panel This procedure is necessary only when removing or replacing an optical drive, memory card reader, an HP Pocket Media Drive, diskette drive, or the hard disk drive. 1 Pull the three tabs (B) away from the chassis toward the left to remove it.

Upgrading and Servicing Guide
Page 11
...-ROM, DVD+RW/+R, combination drive, or HP Personal Media Drive bay C HP Pocket Media Drive bay, a hard disk drive, or a diskette (floppy) drive (select models) D Memory card reader (select models) E Front connector panel (no replacement instructions) F Hard disk drive and space for a second hard disk drive (located inside the chassis) (select...
...-ROM, DVD+RW/+R, combination drive, or HP Personal Media Drive bay C HP Pocket Media Drive bay, a hard disk drive, or a diskette (floppy) drive (select models) D Memory card reader (select models) E Front connector panel (no replacement instructions) F Hard disk drive and space for a second hard disk drive (located inside the chassis) (select...

Upgrading and Servicing Guide
Page 19
See "Opening and Closing the PC" on page 1. 2 Release the drive by removing the screw on the right side of the chassis. Removing the Memory Card Reader 1 Complete the procedures to prepare the PC to remove the side panel and to loosen it, and then pulling the memory card reader part way out of the front of the chassis. 3 Disconnect the cable from the back of the memory card reader. 4 Pull the memory card reader out of the front of the memory card reader, sliding the reader to the left to remove the front panel. Upgrading and Servicing Guide 15
See "Opening and Closing the PC" on page 1. 2 Release the drive by removing the screw on the right side of the chassis. Removing the Memory Card Reader 1 Complete the procedures to prepare the PC to remove the side panel and to loosen it, and then pulling the memory card reader part way out of the front of the chassis. 3 Disconnect the cable from the back of the memory card reader. 4 Pull the memory card reader out of the front of the memory card reader, sliding the reader to the left to remove the front panel. Upgrading and Servicing Guide 15

Upgrading and Servicing Guide
Page 20
Adding or Replacing the Memory Card Reader 1 Complete the procedures to replace the front panel, replace the side panel, and close the PC. See "Opening and Closing the PC" on the right side of the memory card reader. 4 Push the memory card reader into the front of the chassis. 3 Attach the cable to the... back of the memory card reader, and then insert the screw to secure...
Adding or Replacing the Memory Card Reader 1 Complete the procedures to replace the front panel, replace the side panel, and close the PC. See "Opening and Closing the PC" on the right side of the memory card reader. 4 Push the memory card reader into the front of the chassis. 3 Attach the cable to the... back of the memory card reader, and then insert the screw to secure...
Upgrading and Servicing Guide
Page 26
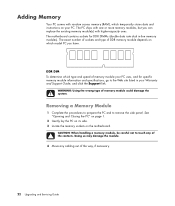
... to the Web site listed in -line memory modules). See "Opening and Closing the PC" on page 1. 2 Gently lay the PC on its side. 3 Locate the memory sockets on which model PC you can replace the existing memory module(s) with random access memory (RAM), which type and speed of DDR memory module depends on the motherboard. The motherboard...
... to the Web site listed in -line memory modules). See "Opening and Closing the PC" on page 1. 2 Gently lay the PC on its side. 3 Locate the memory sockets on which model PC you can replace the existing memory module(s) with random access memory (RAM), which type and speed of DDR memory module depends on the motherboard. The motherboard...

Upgrading and Servicing Guide
Page 27
... of the memory module socket: If you are replacing a memory module, put the new memory module in the same memory slot from the memory socket. Use the retaining clips to touch any of the socket. Upgrading and Servicing Guide 23 Installing a Memory Module Upgrade the memory in your PC with memory of the ...socket. 5 Push down the two retaining clips on the ends of the memory socket until the memory module pops out of the same type and speed as ...
... of the memory module socket: If you are replacing a memory module, put the new memory module in the same memory slot from the memory socket. Use the retaining clips to touch any of the socket. Upgrading and Servicing Guide 23 Installing a Memory Module Upgrade the memory in your PC with memory of the ...socket. 5 Push down the two retaining clips on the ends of the memory socket until the memory module pops out of the same type and speed as ...

Upgrading and Servicing Guide
Page 28
... 24 Upgrading and Servicing Guide The system is the wrong type of memory. 2 Set the chassis upright. 3 Complete the procedures to your PC. NOTE: If a blank screen is displayed after replacing or adding a memory module, the memory is installed incorrectly or it is designed to remove, replace, or add... not exceed the total number of +5 Vv power for certain graphics card upgrades. See "Opening and Closing the PC" on page 1. Remove and reinstall the memory module. Your PC contains several add-in card slots that draw excessive current. NOTE: A power supply upgrade may be used to add...
... 24 Upgrading and Servicing Guide The system is the wrong type of memory. 2 Set the chassis upright. 3 Complete the procedures to your PC. NOTE: If a blank screen is displayed after replacing or adding a memory module, the memory is installed incorrectly or it is designed to remove, replace, or add... not exceed the total number of +5 Vv power for certain graphics card upgrades. See "Opening and Closing the PC" on page 1. Remove and reinstall the memory module. Your PC contains several add-in card slots that draw excessive current. NOTE: A power supply upgrade may be used to add...
Upgrading and Servicing Guide
Page 31
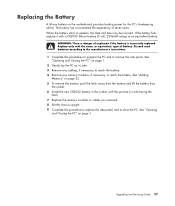
... the side panel, and to remove the side panel. See "Opening and Closing the PC" on the motherboard provides backup power for the PC's timekeeping ability. WARNING: There is incorrectly replaced. See "Adding Memory" on its side. 3 Remove any cabling, if necessary, to reach the battery. ...4 Remove any memory modules, if necessary, to weaken, the date and time may be incorrect. ...
... the side panel, and to remove the side panel. See "Opening and Closing the PC" on the motherboard provides backup power for the PC's timekeeping ability. WARNING: There is incorrectly replaced. See "Adding Memory" on its side. 3 Remove any cabling, if necessary, to reach the battery. ...4 Remove any memory modules, if necessary, to weaken, the date and time may be incorrect. ...
Warranty
Page 6
... otherwise subject to and first steps). Use. If the Software Product is provided to this EULA may load the Software Product into the local memory or storage device of the Software Product for use with : • Generating or diagnosing user-generated programs or source codes. • Installing... provided you can receive support by HP for online resources and telephone support. You may copy the Software Product into Your Computer's temporary memory (RAM) for purposes of purchase. RIGHTS IN THE SOFTWARE PRODUCT ARE OFFERED ONLY ON THE CONDITION THAT YOU AGREE TO ALL TERMS AND...
... otherwise subject to and first steps). Use. If the Software Product is provided to this EULA may load the Software Product into the local memory or storage device of the Software Product for use with : • Generating or diagnosing user-generated programs or source codes. • Installing... provided you can receive support by HP for online resources and telephone support. You may copy the Software Product into Your Computer's temporary memory (RAM) for purposes of purchase. RIGHTS IN THE SOFTWARE PRODUCT ARE OFFERED ONLY ON THE CONDITION THAT YOU AGREE TO ALL TERMS AND...
Warranty and Support Guide
Page 8
... Software Product provided by HP unless HP provides other terms will prevail. 4. Storage. You may load the Software Product into the local memory or storage device of the HP Product. e. Freeware. Any software recovery solution provided with/for your license is automatically terminated. The use... THIS EULA. The transfer may not be an indirect transfer, such as other form, may copy the Software Product into Your Computer's temporary memory (RAM) for the upgrade. f. You may not reverse engineer, decompile, or disassemble the Software Product, except and only to the extent...
... Software Product provided by HP unless HP provides other terms will prevail. 4. Storage. You may load the Software Product into the local memory or storage device of the HP Product. e. Freeware. Any software recovery solution provided with/for your license is automatically terminated. The use... THIS EULA. The transfer may not be an indirect transfer, such as other form, may copy the Software Product into Your Computer's temporary memory (RAM) for the upgrade. f. You may not reverse engineer, decompile, or disassemble the Software Product, except and only to the extent...

Warranty and Support Guide
Page 11
When you restart, the computer reloads the operating system and software into its memory. To turn off your problem: 1 Click the Windows Vista start button, All Programs, and then click Accessories. 3 Choose System Tools, System Restore, and then ... button, right-click Computer, and then select Properties. 2 Under Tasks, click Device Manager. 3 Click the plus sign (+) to reload the operating system into its memory, which you want to repair it records the computer settings at that of fixing your computer. Updating Drivers A driver is installed, the operating system automatically...
When you restart, the computer reloads the operating system and software into its memory. To turn off your problem: 1 Click the Windows Vista start button, All Programs, and then click Accessories. 3 Choose System Tools, System Restore, and then ... button, right-click Computer, and then select Properties. 2 Under Tasks, click Device Manager. 3 Click the plus sign (+) to reload the operating system into its memory, which you want to repair it records the computer settings at that of fixing your computer. Updating Drivers A driver is installed, the operating system automatically...
PC Troubleshooting
Page 16
... different electrical device to mouse movement. 4 Click OK. Reinstall the old memory to contact Support. Invalid system disk or Non-System disk or disk error message displays. PC does not respond or turn on the desktop to open the Help and Support Center, or refer to the Limited Warranty... activity stops, remove the disk and press the spacebar. The PC should start . PC shuts down . If you upgraded memory, it in an exceedingly hot environment. Note that your PC may not have an internal fan. Refer to the PC, plug it may not be incompatible. Let it on. Note...
... different electrical device to mouse movement. 4 Click OK. Reinstall the old memory to contact Support. Invalid system disk or Non-System disk or disk error message displays. PC does not respond or turn on the desktop to open the Help and Support Center, or refer to the Limited Warranty... activity stops, remove the disk and press the spacebar. The PC should start . PC shuts down . If you upgraded memory, it in an exceedingly hot environment. Note that your PC may not have an internal fan. Refer to the PC, plug it may not be incompatible. Let it on. Note...
PC Troubleshooting
Page 18
...leave the remote sensor plugged in, and then restart the PC. Memory card reader (select models only) cannot read my memory card. Clean the contacts with a lint-free cloth and small amounts of the supported types: CompactFlash (I, II, and Microdrive), Memory Stick, Memory Stick Pro, MultiMedia, Secure Digital, SmartMedia, or XD.... is not listed, go to it may cause data loss, or it . Replace the memory card if necessary. 14 PC Troubleshooting and Maintenance Guide Do not insert or remove memory cards when the in the Device Manager window. Make sure the amount of data you are storing ...
...leave the remote sensor plugged in, and then restart the PC. Memory card reader (select models only) cannot read my memory card. Clean the contacts with a lint-free cloth and small amounts of the supported types: CompactFlash (I, II, and Microdrive), Memory Stick, Memory Stick Pro, MultiMedia, Secure Digital, SmartMedia, or XD.... is not listed, go to it may cause data loss, or it . Replace the memory card if necessary. 14 PC Troubleshooting and Maintenance Guide Do not insert or remove memory cards when the in the Device Manager window. Make sure the amount of data you are storing ...

Getting Started
Page 7
... 116 Optical Drive Quick Reference Table 117 Using Blu-ray and HD Disc Drives 118 Using the Memory Card Reader 119 Media Insertion Guide 120 Understanding the Activity Light 123 Formatting a Memory Card 123 Troubleshooting the Memory Card Reader 124 Using the HP Personal Media Drive and HP Pocket Media Drive ...........125 Connecting...
... 116 Optical Drive Quick Reference Table 117 Using Blu-ray and HD Disc Drives 118 Using the Memory Card Reader 119 Media Insertion Guide 120 Understanding the Activity Light 123 Formatting a Memory Card 123 Troubleshooting the Memory Card Reader 124 Using the HP Personal Media Drive and HP Pocket Media Drive ...........125 Connecting...

Getting Started
Page 9
Windows Media Center Features 161 The right music for the moment 162 Playing Internet radio 162 Sharing your digital memories 162 Transforming your living space into a theater 163 Online media 163 Navigating Windows Media Center 163 Opening Windows Media Center with a mouse 163 Opening Windows ...
Windows Media Center Features 161 The right music for the moment 162 Playing Internet radio 162 Sharing your digital memories 162 Transforming your living space into a theater 163 Online media 163 Navigating Windows Media Center 163 Opening Windows Media Center with a mouse 163 Opening Windows ...

Getting Started
Page 20
... devices can be connected to the front or back of the computer by model) These peripheral devices include printers, scanners, video cameras, digital photo cameras, memory card readers, and PDAs (personal digital assistants) or handheld computers. NOTE: Some peripheral devices are not included with your device. Storing Documentation and Recovery Discs...
... devices can be connected to the front or back of the computer by model) These peripheral devices include printers, scanners, video cameras, digital photo cameras, memory card readers, and PDAs (personal digital assistants) or handheld computers. NOTE: Some peripheral devices are not included with your device. Storing Documentation and Recovery Discs...

Getting Started
Page 50
Or Click the Windows Start Button on your keyboard. Using the PC Help & Tools Folder The PC Help & Tools folder contains special utilities for computer owners, such as printers, monitors, speakers, and network adapters. Show information, and run diagnostic tests on computer ... tools The hardware diagnostic tools help you can find links to driver updates, access to do the following: View the computer system information, such as memory usage, drive capacity and CPU usage. Using the Onscreen Help and Support Center Information about your computer is in the...
Or Click the Windows Start Button on your keyboard. Using the PC Help & Tools Folder The PC Help & Tools folder contains special utilities for computer owners, such as printers, monitors, speakers, and network adapters. Show information, and run diagnostic tests on computer ... tools The hardware diagnostic tools help you can find links to driver updates, access to do the following: View the computer system information, such as memory usage, drive capacity and CPU usage. Using the Onscreen Help and Support Center Information about your computer is in the...


