
Warranty
Page 18
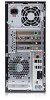
... ENERGY STAR compliance HP computers marked with the ENERGY STAR® logo are compliant with the ENERGY STAR logo are available on AC power: • Turn off the display after 15 minutes • Initiate Sleep after a period of these potential energy savings, the power management feature has been preset to reduce...
... ENERGY STAR compliance HP computers marked with the ENERGY STAR® logo are compliant with the ENERGY STAR logo are available on AC power: • Turn off the display after 15 minutes • Initiate Sleep after a period of these potential energy savings, the power management feature has been preset to reduce...
Warranty
Page 19
..., and reduce the amount of the FCC Rules. However, there is no guarantee that is on , the user is not intended to be determined by turning the equipment off and on a circuit different from the receiver. • Consult the dealer or an experienced radio/TV technician for extended durations may cause...
..., and reduce the amount of the FCC Rules. However, there is no guarantee that is on , the user is not intended to be determined by turning the equipment off and on a circuit different from the receiver. • Consult the dealer or an experienced radio/TV technician for extended durations may cause...

Warranty
Page 23
... digital-only broadcasting. After the switch, analog-only television sets that the product is available from your local stations to find out when they will turn off their analog signal and switch to the Radiation Control for proper grounding and in your local television stations may result in the Upgrading and...
... digital-only broadcasting. After the switch, analog-only television sets that the product is available from your local stations to find out when they will turn off their analog signal and switch to the Radiation Control for proper grounding and in your local television stations may result in the Upgrading and...

Warranty
Page 28
...memory above 3GB is not limited to change without notice. Visit our Web site to find out how easy it is subject to HP and Compaq systems. The memory above 3GB may not be available because of system resource requirements. Recycle - Confirming Total Memory The system BIOS displays the ...full 4GB of installed memory. 1 Turn on the PC. 2 Press the F1 key. HP will help you recycle your old product for us to reclaim your old equipment even if it is to...
...memory above 3GB is not limited to change without notice. Visit our Web site to find out how easy it is subject to HP and Compaq systems. The memory above 3GB may not be available because of system resource requirements. Recycle - Confirming Total Memory The system BIOS displays the ...full 4GB of installed memory. 1 Turn on the PC. 2 Press the F1 key. HP will help you recycle your old product for us to reclaim your old equipment even if it is to...
Safety and Regulatory Information Desktops, Thin Clients, and Personal Workstations
Page 18
If you turn it before you are not expressly approved by one or more integrated wireless devices may not apply to the point of cable entry as close ... tested and found to comply with FCC Rules and Regulations. 12 Chapter 2 Regulatory Agency Notices ENWW This equipment generates, uses, and can be determined by turning the equipment off and on . Cables Connections to this device must be made to this equipment does cause harmful interference to radio or television reception...
If you turn it before you are not expressly approved by one or more integrated wireless devices may not apply to the point of cable entry as close ... tested and found to comply with FCC Rules and Regulations. 12 Chapter 2 Regulatory Agency Notices ENWW This equipment generates, uses, and can be determined by turning the equipment off and on . Cables Connections to this device must be made to this equipment does cause harmful interference to radio or television reception...
Upgrading and Servicing Guide
Page 7
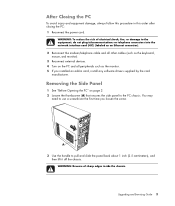
...as an Ethernet connector). 2 Reconnect the modem/telephone cable and all other cables (such as the keyboard, mouse, and monitor). 3 Reconnect external devices. 4 Turn on page 2. 2 Loosen the thumbscrew (A) that secures the side panel to pull and slide the panel back about 1 inch (2.5 centimeters), and then lift...this procedure in card, install any software drivers supplied by the card manufacturer. A 3 Use the handle to the PC chassis. Removing the Side Panel 1 See "Before Opening the PC" on the PC and all peripherals such as the monitor. 5 If you loosen the screw. After Closing the...
...as an Ethernet connector). 2 Reconnect the modem/telephone cable and all other cables (such as the keyboard, mouse, and monitor). 3 Reconnect external devices. 4 Turn on page 2. 2 Loosen the thumbscrew (A) that secures the side panel to pull and slide the panel back about 1 inch (2.5 centimeters), and then lift...this procedure in card, install any software drivers supplied by the card manufacturer. A 3 Use the handle to the PC chassis. Removing the Side Panel 1 See "Before Opening the PC" on the PC and all peripherals such as the monitor. 5 If you loosen the screw. After Closing the...
Getting Started Guide
Page 4
... Finding Guides on the Web 35 Using the Onscreen Help and Support Center 36 Using the PC Help & Tools Folder 36 Using HP Connections or Compaq Connections 36 Getting messages 37 Turning off messages 37 Reactivating messages 38 Turning On Your Computer for the First Time 39 Using the Computer with Safety and Comfort...
... Finding Guides on the Web 35 Using the Onscreen Help and Support Center 36 Using the PC Help & Tools Folder 36 Using HP Connections or Compaq Connections 36 Getting messages 37 Turning off messages 37 Reactivating messages 38 Turning On Your Computer for the First Time 39 Using the Computer with Safety and Comfort...

Getting Started Guide
Page 12
... Vista to make the necessary settings for Microsoft® Windows Vista™ operating system to start. To connect a digital photo camera or a digital video camera: 1 Turn on the computer, and wait for the new device. Refer to the computer, use either the FireWire (IEEE 1394) port or the USB port. 3 A Found...
... Vista to make the necessary settings for Microsoft® Windows Vista™ operating system to start. To connect a digital photo camera or a digital video camera: 1 Turn on the computer, and wait for the new device. Refer to the computer, use either the FireWire (IEEE 1394) port or the USB port. 3 A Found...

Getting Started Guide
Page 16
... - NOTE: Your computer may not come with WLAN devices may be relatively close together - A Ethernet connector (RJ-45 port) B Ethernet indicator lights 2 With the computer turned on the back of wires.
... - NOTE: Your computer may not come with WLAN devices may be relatively close together - A Ethernet connector (RJ-45 port) B Ethernet indicator lights 2 With the computer turned on the back of wires.

Getting Started Guide
Page 26
... 6 is sound card. 3 Connect the cable to the audio system. NOTE: Always turn on the computer before you turn on the speaker system. 6 Plug in the speaker system power. 7 Turn on the computer. Refer to the lime green Audio Line Out connector that were shipped with...are connected to the computer, configure the audio software for sound output for two-channel (2.1 speaker) output: 1 Turn off the computer. 2 Connect the speaker cable to the speaker documentation. 5 Turn on the speaker system. Step 8 is three connectors. The following diagram shows a typical 2.1 audio installation: OUT...
... 6 is sound card. 3 Connect the cable to the audio system. NOTE: Always turn on the computer before you turn on the speaker system. 6 Plug in the speaker system power. 7 Turn on the computer. Refer to the lime green Audio Line Out connector that were shipped with...are connected to the computer, configure the audio software for sound output for two-channel (2.1 speaker) output: 1 Turn off the computer. 2 Connect the speaker cable to the speaker documentation. 5 Turn on the speaker system. Step 8 is three connectors. The following diagram shows a typical 2.1 audio installation: OUT...

Getting Started Guide
Page 27
Type S is sound card. 3 Connect the rear speaker cable to the subwoofer. NOTE: Always turn on the computer before you turn on the computer. Type 6 is activated. 4 Connect the cables to the audio system. 5 Connect the front and rear speakers to the black ...Subwoofer) Audio Speakers To connect two front speakers, two rear speakers, and a subwoofer for four-channel (4.1 speaker) output: 1 Turn off the computer. 2 Connect the front speaker cable to the speaker documentation. 6 Turn on the speaker system. Refer to the lime green Audio Line Out connector that matches the back of your...
Type S is sound card. 3 Connect the rear speaker cable to the subwoofer. NOTE: Always turn on the computer before you turn on the computer. Type 6 is activated. 4 Connect the cables to the audio system. 5 Connect the front and rear speakers to the black ...Subwoofer) Audio Speakers To connect two front speakers, two rear speakers, and a subwoofer for four-channel (4.1 speaker) output: 1 Turn off the computer. 2 Connect the front speaker cable to the speaker documentation. 6 Turn on the speaker system. Refer to the lime green Audio Line Out connector that matches the back of your...

Getting Started Guide
Page 28
... and a Subwoofer) Audio Speakers To connect two front speakers, two rear speakers, a center speaker, and a subwoofer for six-channel (5.1 speaker) output: 1 Turn off the computer. 2 Connect the front speaker cable to the computer, configure the audio software for sound output for your computer. 3 6 S NOTE: Type ...3 is six connectors. 7 Plug in the speaker system power. 8 Turn on the speaker system. 9 After the speakers are connected to the lime green Audio Line Out connector that matches the back of your computer model...
... and a Subwoofer) Audio Speakers To connect two front speakers, two rear speakers, a center speaker, and a subwoofer for six-channel (5.1 speaker) output: 1 Turn off the computer. 2 Connect the front speaker cable to the computer, configure the audio software for sound output for your computer. 3 6 S NOTE: Type ...3 is six connectors. 7 Plug in the speaker system power. 8 Turn on the speaker system. 9 After the speakers are connected to the lime green Audio Line Out connector that matches the back of your computer model...

Getting Started Guide
Page 29
See "Configuring Speaker and Sound Options." Connecting Speakers or Microphone 21 Refer to the speaker documentation. 7 Turn on the speaker system. 10 After the speakers are connected to the computer, configure the audio software for sound output for your computer. 3 6 S...a Sound Card." Type 6 - Sound card: See "Configuring Audio Output with Multichannel Sound Manager." NOTE: Always turn on the computer before you turn on the speaker system. 8 Plug in the speaker system power. 9 Turn on the computer. 3 Connect the rear speaker cable to the black connector that matches the back of your...
See "Configuring Speaker and Sound Options." Connecting Speakers or Microphone 21 Refer to the speaker documentation. 7 Turn on the speaker system. 10 After the speakers are connected to the computer, configure the audio software for sound output for your computer. 3 6 S...a Sound Card." Type 6 - Sound card: See "Configuring Audio Output with Multichannel Sound Manager." NOTE: Always turn on the computer before you turn on the speaker system. 8 Plug in the speaker system power. 9 Turn on the computer. 3 Connect the rear speaker cable to the black connector that matches the back of your...

Getting Started Guide
Page 30
...) Audio Speakers (Select models only) To connect two front speakers, two side speakers, two rear speakers, a center speaker, and a subwoofer for eight-channel (7.1 speaker) output: 1 Turn off the computer. 2 Connect the front speaker cable to the lime green Audio Line Out connector on the back of your computer. 3 Connect the rear...
...) Audio Speakers (Select models only) To connect two front speakers, two side speakers, two rear speakers, a center speaker, and a subwoofer for eight-channel (7.1 speaker) output: 1 Turn off the computer. 2 Connect the front speaker cable to the lime green Audio Line Out connector on the back of your computer. 3 Connect the rear...

Getting Started Guide
Page 31
... the speaker system. 11 After the speakers are connected to the subwoofer. NOTE: Always turn on the computer before you turn on the speaker system. 9 Plug in the speaker system power. 10 Turn on the computer. 6 Connect the cables to the audio system. 7 Connect the front, rear, side, and center speakers to the...
... the speaker system. 11 After the speakers are connected to the subwoofer. NOTE: Always turn on the computer before you turn on the speaker system. 9 Plug in the speaker system power. 10 Turn on the computer. 6 Connect the cables to the audio system. 7 Connect the front, rear, side, and center speakers to the...

Getting Started Guide
Page 34
... (left and right) G Rear speakers (left and right) 5.1 home audio installation procedure To connect a six-channel (5.1 speaker) home audio system to the computer: 1 Turn off the computer. 2 Turn off the receiver/amplifier. 26 Getting Started A B Center C Front Surr. This is only a suggested configuration. IN OUT 5.1 home audio installation The following diagram shows...
... (left and right) G Rear speakers (left and right) 5.1 home audio installation procedure To connect a six-channel (5.1 speaker) home audio system to the computer: 1 Turn off the computer. 2 Turn off the receiver/amplifier. 26 Getting Started A B Center C Front Surr. This is only a suggested configuration. IN OUT 5.1 home audio installation The following diagram shows...

Getting Started Guide
Page 35
.../amplifier (6/5.1 or higher-channel system). Plug the Y adapter cable into the subwoofer connector on the back of the receiver even if a subwoofer is not used. 6 Turn on the receiver/amplifier. 7 Select the receiver/amplifier input that matches the back of your computer. 3 6 S NOTE: Type 3 is three connectors. Type 6 is sound card...
.../amplifier (6/5.1 or higher-channel system). Plug the Y adapter cable into the subwoofer connector on the back of the receiver even if a subwoofer is not used. 6 Turn on the receiver/amplifier. 7 Select the receiver/amplifier input that matches the back of your computer. 3 6 S NOTE: Type 3 is three connectors. Type 6 is sound card...

Getting Started Guide
Page 36
Sound card: See "Configuring Audio Output with Sound Effect Manager." A B Center C Front Surr. 8 Turn on a receiver/amplifier. Back Sub IN OUT F E C D G Computer to the computer, configure the audio software for sound output for your computer model. Your system may ...
Sound card: See "Configuring Audio Output with Sound Effect Manager." A B Center C Front Surr. 8 Turn on a receiver/amplifier. Back Sub IN OUT F E C D G Computer to the computer, configure the audio software for sound output for your computer model. Your system may ...

Getting Started Guide
Page 37
... receiver even if a subwoofer is three connectors. 7.1 home audio installation procedure To connect an eight-channel (7.1 speaker) home audio system to the computer: 1 Turn off the computer. 2 Turn off the receiver/amplifier. 3 Connect the front stereo mini-jack end of a Y adapter cable into the lime green Audio Line Out connector that matches...
... receiver even if a subwoofer is three connectors. 7.1 home audio installation procedure To connect an eight-channel (7.1 speaker) home audio system to the computer: 1 Turn off the computer. 2 Turn off the receiver/amplifier. 3 Connect the front stereo mini-jack end of a Y adapter cable into the lime green Audio Line Out connector that matches...

Getting Started Guide
Page 38
...Connect the red RCA stereo plug on the speaker system. 30 Getting Started You do not need to connect multichannel speaker outputs if you turn on the 3.5 mm Y adapter cable to the digital input (S/PDIF) on the back panel of the connectors is six connectors. ... with Multichannel Sound Manager." Sound card: See "Configuring Audio Output with a Sound Card." One of your computer model. To connect digital audio speakers: 1 Turn off the computer. 2 Connect the Digital Out connector on digital speakers or a digital audio system. 3 6 S NOTE: Type 3 is three connectors. ...
...Connect the red RCA stereo plug on the speaker system. 30 Getting Started You do not need to connect multichannel speaker outputs if you turn on the 3.5 mm Y adapter cable to the digital input (S/PDIF) on the back panel of the connectors is six connectors. ... with Multichannel Sound Manager." Sound card: See "Configuring Audio Output with a Sound Card." One of your computer model. To connect digital audio speakers: 1 Turn off the computer. 2 Connect the Digital Out connector on digital speakers or a digital audio system. 3 6 S NOTE: Type 3 is three connectors. ...


