
Limited Warranty and Technical Support
Page 3
... "2 YR," or "3YR" marked on the serial number label located on the back of the unit Included Compaq accessories and batteries Duration of Warranty Period 1 year, 2 years, or 3 years, according to manufacturer's warranty. COMPAQ EXPRESSLY DISCLAIMS ALL WARRANTIES AND CONDITIONS NOT STATED IN THIS LIMITED WARRANTY. General Terms THIS LIMITED WARRANTY APPLIES...LIMITED WARRANTY MAY NOT APPLY TO YOU. 1 LIMITED WARRANTY AND TECHNICAL SUPPORT United States and Canada This document includes Limited Warranty information for notebook products purchased in the United States and Canada.
... "2 YR," or "3YR" marked on the serial number label located on the back of the unit Included Compaq accessories and batteries Duration of Warranty Period 1 year, 2 years, or 3 years, according to manufacturer's warranty. COMPAQ EXPRESSLY DISCLAIMS ALL WARRANTIES AND CONDITIONS NOT STATED IN THIS LIMITED WARRANTY. General Terms THIS LIMITED WARRANTY APPLIES...LIMITED WARRANTY MAY NOT APPLY TO YOU. 1 LIMITED WARRANTY AND TECHNICAL SUPPORT United States and Canada This document includes Limited Warranty information for notebook products purchased in the United States and Canada.
Hardware-Software Guide
Page 4
Contents 2 Power Power Control and Light Locations 2-1 Power Sources 2-3 Selecting a Power Source 2-3 Using External or Battery Power 2-4 Standby and Hibernation 2-5 Standby 2-5 Hibernation 2-6 Initiating Standby, Hibernation or Shutdown 2-8 Default Power Settings 2-9 Turning the Notebook or Display On or Off 2-10 Initiating or Restoring from Hibernation 2-11 Initiating or Resuming from Standby 2-12 Using Emergency...
Contents 2 Power Power Control and Light Locations 2-1 Power Sources 2-3 Selecting a Power Source 2-3 Using External or Battery Power 2-4 Standby and Hibernation 2-5 Standby 2-5 Hibernation 2-6 Initiating Standby, Hibernation or Shutdown 2-8 Default Power Settings 2-9 Turning the Notebook or Display On or Off 2-10 Initiating or Restoring from Hibernation 2-11 Initiating or Resuming from Standby 2-12 Using Emergency...
Hardware-Software Guide
Page 16
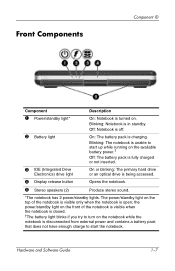
... that does not have enough charge to start the notebook. Front Components Component ID Component Description 1 Power/standby light* 2 Battery light On: Notebook is being accessed. 4 Display release button Opens the notebook. 5 Stereo speakers (2) Produce stereo sound. *The notebook has 2 power/standby lights. Blinking: The notebook is unable to start up while running on the available...
... that does not have enough charge to start the notebook. Front Components Component ID Component Description 1 Power/standby light* 2 Battery light On: Notebook is being accessed. 4 Display release button Opens the notebook. 5 Stereo speakers (2) Produce stereo sound. *The notebook has 2 power/standby lights. Blinking: The notebook is unable to start up while running on the available...
Hardware-Software Guide
Page 22
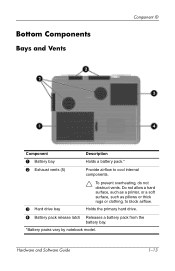
Bottom Components Bays and Vents Component ID Component Description 1 Battery bay Holds a battery pack.* 2 Exhaust vents (5) Provide airflow to block airflow. 3 Hard drive bay Holds the primary hard drive. 4 Battery pack release latch Releases a battery pack from the battery bay. *Battery packs vary by notebook model. Hardware and Software Guide 1-13 Do not allow a hard surface, such as a printer, or a soft surface, such as pillows or thick rugs or clothing, to cool internal components. Ä To prevent overheating, do not obstruct vents.
Bottom Components Bays and Vents Component ID Component Description 1 Battery bay Holds a battery pack.* 2 Exhaust vents (5) Provide airflow to block airflow. 3 Hard drive bay Holds the primary hard drive. 4 Battery pack release latch Releases a battery pack from the battery bay. *Battery packs vary by notebook model. Hardware and Software Guide 1-13 Do not allow a hard surface, such as a printer, or a soft surface, such as pillows or thick rugs or clothing, to cool internal components. Ä To prevent overheating, do not obstruct vents.

Hardware-Software Guide
Page 25
...described in this table vary in appearance by telephone jack. The following sections identify the standard external components included with your notebook vary by region, country, notebook model, and the optional hardware you purchased. Power and Modem Hardware Component 1 AC adapter* Description Converts AC power to ...DC power. 2 Power cord* Connects an AC adapter to an AC outlet. 3 Battery pack* Powers the notebook when the notebook is not connected to external power. 4 Modem cable* Connects the modem to an RJ-11 telephone jack or to a ...
...described in this table vary in appearance by telephone jack. The following sections identify the standard external components included with your notebook vary by region, country, notebook model, and the optional hardware you purchased. Power and Modem Hardware Component 1 AC adapter* Description Converts AC power to ...DC power. 2 Power cord* Connects an AC adapter to an AC outlet. 3 Battery pack* Powers the notebook when the notebook is not connected to external power. 4 Modem cable* Connects the modem to an RJ-11 telephone jack or to a ...
Hardware-Software Guide
Page 27
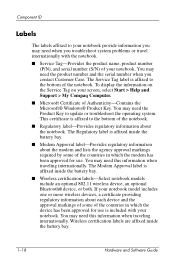
...Help and Support > My Compaq Computer. ■ Microsoft Certificate of the countries in which the device has been approved for use is affixed inside the battery bay. 1-18 Hardware and Software Guide The Modem Approval label is included with the notebook. ■ Service Tag-... Customer Care. You may need this information when traveling internationally. Wireless certification labels are affixed inside the battery bay. ■ Wireless certification labels-Select notebook models include an optional 802.11 wireless device, an optional Bluetooth® device, or both. You...
...Help and Support > My Compaq Computer. ■ Microsoft Certificate of the countries in which the device has been approved for use is affixed inside the battery bay. 1-18 Hardware and Software Guide The Modem Approval label is included with the notebook. ■ Service Tag-... Customer Care. You may need this information when traveling internationally. Wireless certification labels are affixed inside the battery bay. ■ Wireless certification labels-Select notebook models include an optional 802.11 wireless device, an optional Bluetooth® device, or both. You...
Hardware-Software Guide
Page 29
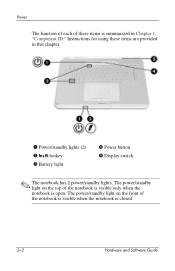
The power/standby light on the front of the notebook is visible when the notebook is closed. 2-2 Hardware and Software Guide The power/standby light on the top of the notebook is visible only when the notebook is open. Instructions for using these items is summarized in this chapter. 1 Power/standby lights (2) 2 fn+f5 hotkey 3 Battery light 4 Power button 5 Display switch ✎ The notebook has 2 power/standby lights. Power The function of each of these items are provided in Chapter 1, "Component ID."
The power/standby light on the front of the notebook is visible when the notebook is closed. 2-2 Hardware and Software Guide The power/standby light on the top of the notebook is visible only when the notebook is open. Instructions for using these items is summarized in this chapter. 1 Power/standby lights (2) 2 fn+f5 hotkey 3 Battery light 4 Power button 5 Display switch ✎ The notebook has 2 power/standby lights. Power The function of each of these items are provided in Chapter 1, "Component ID."

Hardware-Software Guide
Page 30
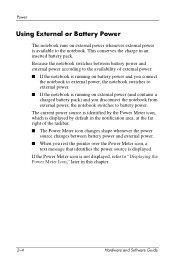
...equipment: ■ Plug the power cord into a grounded (earthed) 3-pin outlet. Hardware and Software Guide 2-3 An inserted battery pack can charge only while the notebook is connected to external power. Å WARNING: To reduce the risk of these sources while working in most software applications. ...for example, by unplugging the power cord from the notebook). ■ If provided with a 3-pin attachment plug on external power supplied through the AC adapter or an optional docking device. The ...
...equipment: ■ Plug the power cord into a grounded (earthed) 3-pin outlet. Hardware and Software Guide 2-3 An inserted battery pack can charge only while the notebook is connected to external power. Å WARNING: To reduce the risk of these sources while working in most software applications. ...for example, by unplugging the power cord from the notebook). ■ If provided with a 3-pin attachment plug on external power supplied through the AC adapter or an optional docking device. The ...
Hardware-Software Guide
Page 31
... on external power whenever external power is not displayed, refer to battery power. Because the notebook switches between battery power and external power. ■ When you disconnect the notebook from external power, the notebook switches to "Displaying the Power Meter Icon," later in an inserted battery pack. This conserves the charge in this chapter. 2-4 Hardware and...
... on external power whenever external power is not displayed, refer to battery power. Because the notebook switches between battery power and external power. ■ When you disconnect the notebook from external power, the notebook switches to "Displaying the Power Meter Icon," later in an inserted battery pack. This conserves the charge in this chapter. 2-4 Hardware and...

Hardware-Software Guide
Page 32
...is initiated, your work is saved in use. By default, the system initiates standby after 10 minutes of inactivity when the notebook is a recommended precaution. Hardware and Software Guide 2-5 Power Standby and Hibernation Standby Standby reduces power to system components that are .../standby lights blink. Saving your work before initiating standby is not usually necessary but is running on battery power and after 25 minutes of notebook inactivity when the notebook is running on external power. For information about changing these settings, refer to the screen. When you...
...is initiated, your work is saved in use. By default, the system initiates standby after 10 minutes of inactivity when the notebook is a recommended precaution. Hardware and Software Guide 2-5 Power Standby and Hibernation Standby Standby reduces power to system components that are .../standby lights blink. Saving your work before initiating standby is not usually necessary but is running on battery power and after 25 minutes of notebook inactivity when the notebook is running on external power. For information about changing these settings, refer to the screen. When you...

Hardware-Software Guide
Page 33
...notebook inactivity or whenever the notebook reaches a critical low-battery condition. Saving your work to a hibernation file on battery power, hibernation is initiated by default after restarting the notebook. When you left off. When the notebook is running on the hard drive and then shuts down the notebook... an external device. ■ Do not insert or remove a CD, DVD, PC Card, ExpressCard, or digital memory card. For instructions, refer to resume from hibernation. To determine whether the notebook is in hibernation or turned off, press the power button. ■ If the...
...notebook inactivity or whenever the notebook reaches a critical low-battery condition. Saving your work to a hibernation file on battery power, hibernation is initiated by default after restarting the notebook. When you left off. When the notebook is running on the hard drive and then shuts down the notebook... an external device. ■ Do not insert or remove a CD, DVD, PC Card, ExpressCard, or digital memory card. For instructions, refer to resume from hibernation. To determine whether the notebook is in hibernation or turned off, press the power button. ■ If the...

Hardware-Software Guide
Page 34
... > Files, folders, and programs > Use Windows classic folders. Power Hibernation is selected. ✎ All Windows instructions in the left panel of work during a critical low-battery condition, disable hibernation only during a battery pack calibration. To verify that hibernation is enabled: » Select Start > Control Panel > Performance and Maintenance > Power Options > Hibernate tab.
... > Files, folders, and programs > Use Windows classic folders. Power Hibernation is selected. ✎ All Windows instructions in the left panel of work during a critical low-battery condition, disable hibernation only during a battery pack calibration. To verify that hibernation is enabled: » Select Start > Control Panel > Performance and Maintenance > Power Options > Hibernate tab.
Hardware-Software Guide
Page 35
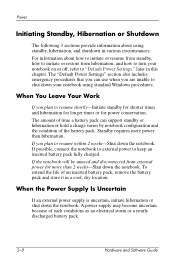
.... If you are unable to resume within 2 weeks-Shut down the notebook. To extend the life of time a battery pack can use when you plan to shut down the notebook. If possible, connect the notebook to external power to resume shortly-Initiate standby for shorter times and hibernation...Settings" section also includes emergency procedures that you plan to keep an inserted battery pack fully charged. When You Leave Your Work If you can support standby or hibernation or hold a charge varies by notebook configuration and the condition of such conditions as an electrical storm or a...
.... If you are unable to resume within 2 weeks-Shut down the notebook. To extend the life of time a battery pack can use when you plan to shut down the notebook. If possible, connect the notebook to external power to resume shortly-Initiate standby for shorter times and hibernation...Settings" section also includes emergency procedures that you plan to keep an inserted battery pack fully charged. When You Leave Your Work If you can support standby or hibernation or hold a charge varies by notebook configuration and the condition of such conditions as an electrical storm or a...

Hardware-Software Guide
Page 38
... is required. Task Procedure Result Initiate hibernation. No action is selected. If the notebook is running on battery power and hibernation is enabled, the system initiates hibernation ■ After 30 minutes of notebook inactivity. ■ Whenever the battery pack reaches a critical low-battery condition. ■ Power/standby lights are turned on your network connections, the...
... is required. Task Procedure Result Initiate hibernation. No action is selected. If the notebook is running on battery power and hibernation is enabled, the system initiates hibernation ■ After 30 minutes of notebook inactivity. ■ Whenever the battery pack reaches a critical low-battery condition. ■ Power/standby lights are turned on your network connections, the...
Hardware-Software Guide
Page 39
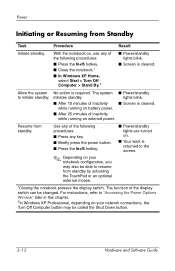
...9632; Press any of the following procedures: ■ Press the fn+f5 hotkey. ■ Close the notebook.* ■ In Windows XP Home, select Start > Turn Off Computer > Stand By.† ■...mouse. ■ Power/standby lights are turned on your notebook configuration, you may be able to the screen. *Closing the notebook presses the display switch. For instructions, refer to initiate... standby. Power Initiating or Resuming from Standby Task Procedure Result Initiate standby. With the notebook on, use any key. ■ Briefly press the power button. ■ Press the...
...9632; Press any of the following procedures: ■ Press the fn+f5 hotkey. ■ Close the notebook.* ■ In Windows XP Home, select Start > Turn Off Computer > Stand By.† ■...mouse. ■ Power/standby lights are turned on your notebook configuration, you may be able to the screen. *Closing the notebook presses the display switch. For instructions, refer to initiate... standby. Power Initiating or Resuming from Standby Task Procedure Result Initiate standby. With the notebook on, use any key. ■ Briefly press the power button. ■ Press the...
Hardware-Software Guide
Page 40
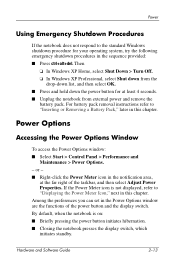
...: ■ Select Start > Control Panel > Performance and Maintenance > Power Options. - By default, when the notebook is not displayed, refer to "Inserting or Removing a Battery Pack," later in the Power Options window are the functions of the taskbar, and then select Adjust Power Properties. or...Turn Off. ❏ In Windows XP Professional, select Shut down from external power and remove the battery pack. Power Using Emergency Shutdown Procedures If the notebook does not respond to the standard Windows shutdown procedure for your operating system, try the following emergency shutdown...
...: ■ Select Start > Control Panel > Performance and Maintenance > Power Options. - By default, when the notebook is not displayed, refer to "Inserting or Removing a Battery Pack," later in the Power Options window are the functions of the taskbar, and then select Adjust Power Properties. or...Turn Off. ❏ In Windows XP Professional, select Shut down from external power and remove the battery pack. Power Using Emergency Shutdown Procedures If the notebook does not respond to the standard Windows shutdown procedure for your operating system, try the following emergency shutdown...
Hardware-Software Guide
Page 42
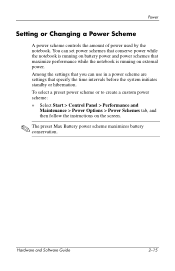
...187; Select Start > Control Panel > Performance and Maintenance > Power Options > Power Schemes tab, and then follow the instructions on battery power and power schemes that specify the time intervals before the system initiates standby or hibernation. Hardware and Software Guide 2-15 You ...settings that maximize performance while the notebook is running on external power. Among the settings that you can set power schemes that conserve power while the notebook is running on the screen. ✎ The preset Max Battery power scheme maximizes battery conservation. Power Setting or Changing a...
...187; Select Start > Control Panel > Performance and Maintenance > Power Options > Power Schemes tab, and then follow the instructions on battery power and power schemes that specify the time intervals before the system initiates standby or hibernation. Hardware and Software Guide 2-15 You ...settings that maximize performance while the notebook is running on external power. Among the settings that you can set power schemes that conserve power while the notebook is running on the screen. ✎ The preset Max Battery power scheme maximizes battery conservation. Power Setting or Changing a...

Hardware-Software Guide
Page 44
Hardware and Software Guide 2-17 Turn the notebook upside down the notebook or initiate hibernation before removing the battery pack. (If you initiate hibernation, do not begin battery pack removal until it is seated 2. Slide the battery pack into the battery bay 1. 3. Power Battery Packs Inserting or Removing a Battery Pack Ä CAUTION: To prevent loss of work when removing...
Hardware and Software Guide 2-17 Turn the notebook upside down the notebook or initiate hibernation before removing the battery pack. (If you initiate hibernation, do not begin battery pack removal until it is seated 2. Slide the battery pack into the battery bay 1. 3. Power Battery Packs Inserting or Removing a Battery Pack Ä CAUTION: To prevent loss of work when removing...
Hardware-Software Guide
Page 45
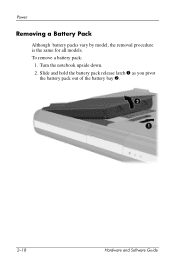
Turn the notebook upside down. 2. Slide and hold the battery pack release latch 1 as you pivot the battery pack out of the battery bay 2. 2-18 Hardware and Software Guide To remove a battery pack: 1. Power Removing a Battery Pack Although battery packs vary by model, the removal procedure is the same for all models.
Turn the notebook upside down. 2. Slide and hold the battery pack release latch 1 as you pivot the battery pack out of the battery bay 2. 2-18 Hardware and Software Guide To remove a battery pack: 1. Power Removing a Battery Pack Although battery packs vary by model, the removal procedure is the same for all models.
Hardware-Software Guide
Page 46
..., follow the instructions in "Charging a New Battery Pack" and "Charging an In-Use Battery Pack," next in the battery pack is too low to start the notebook. A battery pack inserted in the notebook charges whether the notebook is off or in the notebook charges whenever the notebook is connected to turn on the notebook while the only power source is...
..., follow the instructions in "Charging a New Battery Pack" and "Charging an In-Use Battery Pack," next in the battery pack is too low to start the notebook. A battery pack inserted in the notebook charges whether the notebook is off or in the notebook charges whenever the notebook is connected to turn on the notebook while the only power source is...

