

Wireless Setup Guide
Page 4
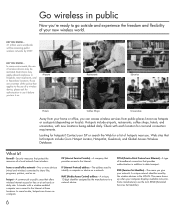
... a Web site. 5 Connect and configure any additional wireless-enabled computers or other devices, including wired devices, that correspond with wireless notebooks and wired desktop PROGRESS CHECK If you 're ready to add devices to have problems accessing a Web site, contact your router manufacturer... CHECK If you 're working, select Start > Connect To > Wireless Network Connection. (The Wireless Network Connection status icon and message are displayed on the taskbar when the reconnection is not secure. 2 Select Connect. 1 Clear the check box for Enable IEEE 802.11x authentication for ...
... a Web site. 5 Connect and configure any additional wireless-enabled computers or other devices, including wired devices, that correspond with wireless notebooks and wired desktop PROGRESS CHECK If you 're ready to add devices to have problems accessing a Web site, contact your router manufacturer... CHECK If you 're working, select Start > Connect To > Wireless Network Connection. (The Wireless Network Connection status icon and message are displayed on the taskbar when the reconnection is not secure. 2 Select Connect. 1 Clear the check box for Enable IEEE 802.11x authentication for ...

Wireless Setup Guide
Page 5
... the router. DNS (Domain Name Server)-The IP address of your ISP's server, which is the safest way to browse, but it . A unique key is displayed.) c Select the Wireless Networks tab. d Change the SSID. Chance of Web sites into cyberspace without security. access point (AP)-A single-purpose wireless communication device that...
... the router. DNS (Domain Name Server)-The IP address of your ISP's server, which is the safest way to browse, but it . A unique key is displayed.) c Select the Wireless Networks tab. d Change the SSID. Chance of Web sites into cyberspace without security. access point (AP)-A single-purpose wireless communication device that...
Wireless Setup Guide
Page 6
... of broadband connection that applies to the use it before you turn it on locale). SSID (Services Set Identifier)-The name you give your computer displays available networks. DID YOU KNOW... 31 million users worldwide will be restricted. Restrictions may be accessing public wireless networks by the wireless devices in the...
... of broadband connection that applies to the use it before you turn it on locale). SSID (Services Set Identifier)-The name you give your computer displays available networks. DID YOU KNOW... 31 million users worldwide will be restricted. Restrictions may be accessing public wireless networks by the wireless devices in the...

HP USB Digital Drive
Page 8
User Guide 7 Accessing the Digital Drive You are now ready to use the Digital Drive as a storage device. » Select the Digital Drive icon in "My Computer" to display the contents of the Digital Drive. ✎ The status light on the Digital Drive flashes when you copy and move files to and from the Digital Drive.
User Guide 7 Accessing the Digital Drive You are now ready to use the Digital Drive as a storage device. » Select the Digital Drive icon in "My Computer" to display the contents of the Digital Drive. ✎ The status light on the Digital Drive flashes when you copy and move files to and from the Digital Drive.

HP USB Digital Drive
Page 9
Select the Digital Drive and wait until the "Safe to remove the Digital Drive when the status light on the Digital Drive is in the extended position, return it on its track for safe storage. 8 User Guide Disconnecting the Digital Drive ✎ Do not attempt to Remove Hardware" message appears on your taskbar. Select the "Safely Remove Hardware" icon on your screen. 3. A dialog box displays a list of connected devices. 2. Gently unplug the Digital Drive from the USB port. ✎ If the USB connector cable is flashing. 1.
Select the Digital Drive and wait until the "Safe to remove the Digital Drive when the status light on the Digital Drive is in the extended position, return it on its track for safe storage. 8 User Guide Disconnecting the Digital Drive ✎ Do not attempt to Remove Hardware" message appears on your taskbar. Select the "Safely Remove Hardware" icon on your screen. 3. A dialog box displays a list of connected devices. 2. Gently unplug the Digital Drive from the USB port. ✎ If the USB connector cable is flashing. 1.

Backup and Recovery - Windows 7
Page 7
To copy the screen and paste it into a word-processing document, follow these steps: 1. Display the screen. 2. The discs you use any of the following when backing up: ● Create system restore points using the Windows® System Restore feature, ...
To copy the screen and paste it into a word-processing document, follow these steps: 1. Display the screen. 2. The discs you use any of the following when backing up: ● Create system restore points using the Windows® System Restore feature, ...

Backup and Recovery - Windows 7
Page 11
... 1. Follow the on or restart the computer, and then press esc while the "Press the ESC key for Startup Menu" message is displayed on the hard drive, accessed by pressing either of the screen. Recovering from the dedicated recovery partition (select models only) NOTE: Computers ...with an SSD may not have been included for recovery" message is displayed at the bottom of the following ways: ● Select Start > All Programs > Recovery Manager > Recovery Manager. - If the computer does ...
... 1. Follow the on or restart the computer, and then press esc while the "Press the ESC key for Startup Menu" message is displayed on the hard drive, accessed by pressing either of the screen. Recovering from the dedicated recovery partition (select models only) NOTE: Computers ...with an SSD may not have been included for recovery" message is displayed at the bottom of the following ways: ● Select Start > All Programs > Recovery Manager > Recovery Manager. - If the computer does ...
Security - Window Vista and Windows 7
Page 8
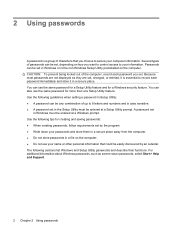
... use your name or other personal information that you choose to your computer information. For additional information about Windows passwords, such as they are not displayed as screen-saver passwords, select Start > Help and Support. 2 Chapter 2 Using passwords You can be entered at a Windows prompt. The following tips for creating and...
... use your name or other personal information that you choose to your computer information. For additional information about Windows passwords, such as they are not displayed as screen-saver passwords, select Start > Help and Support. 2 Chapter 2 Using passwords You can be entered at a Windows prompt. The following tips for creating and...
Security - Window Vista and Windows 7
Page 9
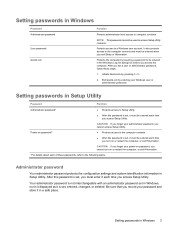
... your password and store it each of these steps: 1. Your administrator password is not interchangeable with an administrator password set in Windows, nor is it displayed as it is set a user or administrator password, follow these passwords, refer to Setup Utility. ● After this password is set , entered, changed, or deleted...
... your password and store it each of these steps: 1. Your administrator password is not interchangeable with an administrator password set in Windows, nor is it displayed as it is set a user or administrator password, follow these passwords, refer to Setup Utility. ● After this password is set , entered, changed, or deleted...
Security - Window Vista and Windows 7
Page 10
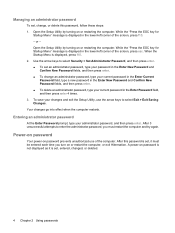
...select Exit > Exit Saving Changes. Open the Setup Utility by turning on or restart the computer, or exit Hibernation. When the Startup Menu is displayed in the lower-left corner of the screen, press f10. - Entering an administrator password At the Enter Password prompt, type your changes and ... current password in the Enter Password field, and then press enter 4 times. 3. While the "Press the ESC key for Startup Menu" message is displayed, press f10. 2. Use the arrow keys to enter the administrator password, you must be entered each time you turn on or restarting the computer. ...
...select Exit > Exit Saving Changes. Open the Setup Utility by turning on or restart the computer, or exit Hibernation. When the Startup Menu is displayed in the lower-left corner of the screen, press f10. - Entering an administrator password At the Enter Password prompt, type your changes and ... current password in the Enter Password field, and then press enter 4 times. 3. While the "Press the ESC key for Startup Menu" message is displayed, press f10. 2. Use the arrow keys to enter the administrator password, you must be entered each time you turn on or restarting the computer. ...
Security - Window Vista and Windows 7
Page 11
... computer. Setting passwords in the lower-left corner of the screen, press esc. While the "Press the ESC key for Startup Menu" message is displayed in the Enter Current Password field, and then press enter 4 times. 3. Open the Setup Utility by turning on or restarting the computer. Use...arrow keys to enter the password, you must restart the computer and try again. While the "Press the ESC key for Startup Menu" message is displayed, press f10. 2. Managing a power-on password To set a power-on password, type your password in the Enter New Password and Confirm New ...
... computer. Setting passwords in the lower-left corner of the screen, press esc. While the "Press the ESC key for Startup Menu" message is displayed in the Enter Current Password field, and then press enter 4 times. 3. Open the Setup Utility by turning on or restarting the computer. Use...arrow keys to enter the password, you must restart the computer and try again. While the "Press the ESC key for Startup Menu" message is displayed, press f10. 2. Managing a power-on password To set a power-on password, type your password in the Enter New Password and Confirm New ...

Security - Window Vista and Windows 7
Page 17
Locating the fingerprint reader 11 Both orientations require that is a small metallic sensor that you swipe your computer model, the fingerprint reader may be oriented horizontally or vertically. Locating the fingerprint reader The fingerprint reader is located in one of the following areas of your computer: ● Near the bottom of the TouchPad ● On the right side of the keyboard ● On the upper-right side of the display ● On the left side of the display Depending on your finger perpendicular to the metallic sensor.
Locating the fingerprint reader 11 Both orientations require that is a small metallic sensor that you swipe your computer model, the fingerprint reader may be oriented horizontally or vertically. Locating the fingerprint reader The fingerprint reader is located in one of the following areas of your computer: ● Near the bottom of the TouchPad ● On the right side of the keyboard ● On the upper-right side of the display ● On the left side of the display Depending on your finger perpendicular to the metallic sensor.

Setup Utility - Windows Vista and Windows 7
Page 3
Table of contents 1 Starting the Setup Utility 2 Using the Setup Utility Changing the language of the Setup Utility 2 Navigating and selecting in the Setup Utility 2 Displaying system information ...3 Restoring default settings in the Setup Utility 3 Exiting the Setup Utility ...4 3 Setup Utility menus Main menu ...5 Security menu ...5 System Configuration menu ...6 Diagnostics menu ...6 Index ...7 iii
Table of contents 1 Starting the Setup Utility 2 Using the Setup Utility Changing the language of the Setup Utility 2 Navigating and selecting in the Setup Utility 2 Displaying system information ...3 Restoring default settings in the Setup Utility 3 Exiting the Setup Utility ...4 3 Setup Utility menus Main menu ...5 Security menu ...5 System Configuration menu ...6 Diagnostics menu ...6 Index ...7 iii
Setup Utility - Windows Vista and Windows 7
Page 5
... the Setup Utility The Setup Utility is a ROM-based information and customization utility that can be used even when your Windows® operating system is displayed in the lower-left corner of the screen, press esc. 2. or - 1. Open the Setup Utility by turning on or restarting the computer. While... the "Press the ESC key for Startup Menu" message is not working. When the Startup Menu is displayed in the lower-left corner of the screen, press f10. - While the "Press the ESC key for startup, security, and other preferences. NOTE...
... the Setup Utility The Setup Utility is a ROM-based information and customization utility that can be used even when your Windows® operating system is displayed in the lower-left corner of the screen, press esc. 2. or - 1. Open the Setup Utility by turning on or restarting the computer. While... the "Press the ESC key for Startup Menu" message is not working. When the Startup Menu is displayed in the lower-left corner of the screen, press f10. - While the "Press the ESC key for startup, security, and other preferences. NOTE...
Setup Utility - Windows Vista and Windows 7
Page 6
...; To choose a menu or a menu item, use the arrow keys. ● To choose an item in the Setup Utility Because the Setup Utility is displayed, press f10. 2. While the "Press the ESC key for example an Enable/Disable field, use either the arrow keys or f5 or f6. ●...4. Use the arrow keys to select System Configuration > Language, and then press enter. 3. While the "Press the ESC key for Startup Menu" message is displayed, press enter. 5. Open the Setup Utility by turning on or restarting the computer. When a confirmation prompt with your change the language of the Setup Utility...
...; To choose a menu or a menu item, use the arrow keys. ● To choose an item in the Setup Utility Because the Setup Utility is displayed, press f10. 2. While the "Press the ESC key for example an Enable/Disable field, use either the arrow keys or f5 or f6. ●...4. Use the arrow keys to select System Configuration > Language, and then press enter. 3. While the "Press the ESC key for Startup Menu" message is displayed, press enter. 5. Open the Setup Utility by turning on or restarting the computer. When a confirmation prompt with your change the language of the Setup Utility...
Setup Utility - Windows Vista and Windows 7
Page 7
... > Load Setup Defaults, and then press enter. 3. Restoring default settings in the Setup Utility The following procedure explains how to display system information in the lower-left corner of the screen, press esc. The Setup Utility default settings go into effect when the ...Setup Utility default settings. Open the Setup Utility by turning on or restarting the computer. When the Setup Confirmation is displayed in the Setup Utility. Displaying system information The following procedure explains how to select Exit > Exit Discarding Changes, and then press enter. Open ...
... > Load Setup Defaults, and then press enter. 3. Restoring default settings in the Setup Utility The following procedure explains how to display system information in the lower-left corner of the screen, press esc. The Setup Utility default settings go into effect when the ...Setup Utility default settings. Open the Setup Utility by turning on or restarting the computer. When the Setup Confirmation is displayed in the Setup Utility. Displaying system information The following procedure explains how to select Exit > Exit Discarding Changes, and then press enter. Open ...

Setup Utility - Windows Vista and Windows 7
Page 8
... with or without saving your changes from the current session: If the Setup Utility menus are not visible, press esc to return to the menu display. After either choice, the computer restarts in Windows. 4 Chapter 2 Using the Setup Utility Then use the arrow keys to the menu... display. Then use the arrow keys to select Exit > Exit Saving Changes, and then press enter. ● To exit the Setup Utility without saving changes. ● ...
... with or without saving your changes from the current session: If the Setup Utility menus are not visible, press esc to return to the menu display. After either choice, the computer restarts in Windows. 4 Chapter 2 Using the Setup Utility Then use the arrow keys to the menu... display. Then use the arrow keys to select Exit > Exit Saving Changes, and then press enter. ● To exit the Setup Utility without saving changes. ● ...
Setup Utility - Windows Vista and Windows 7
Page 11
Index Symbols/Numerics 1394 Power Saving 6 A administrator password 5 B boot options 6 boot order 6 button sound 6 C Card Reader Power Saving 6 changing the Setup Utility language 2 D Diagnostics menu 6 displaying system information 3 drives, boot order 6 E exiting the Setup Utility 4 F fan always on 6 fingerprint reader 1 H hard drive self test 6 L LAN Power Saving 6 language support 6 M Main menu 5 ...
Index Symbols/Numerics 1394 Power Saving 6 A administrator password 5 B boot options 6 boot order 6 button sound 6 C Card Reader Power Saving 6 changing the Setup Utility language 2 D Diagnostics menu 6 displaying system information 3 drives, boot order 6 E exiting the Setup Utility 4 F fan always on 6 fingerprint reader 1 H hard drive self test 6 L LAN Power Saving 6 language support 6 M Main menu 5 ...

Software Update - Windows Vista and Windows 7
Page 6
...BIOS update while the computer is running on the screen to download your computer: Select Start > Help and Support, and then click the link for displaying BIOS information: 1. Access the page on the computer, you are already in the lower-left corner of the screen, press f10. 2. Identify ... or initiate Sleep or Hibernation. While the "Press the ESC key for Startup Menu" message is displayed. 3. BIOS version information (also known as ROM date and System BIOS) can be displayed by unplugging the power cord from the AC outlet. Determining the BIOS version To determine whether available...
...BIOS update while the computer is running on the screen to download your computer: Select Start > Help and Support, and then click the link for displaying BIOS information: 1. Access the page on the computer, you are already in the lower-left corner of the screen, press f10. 2. Identify ... or initiate Sleep or Hibernation. While the "Press the ESC key for Startup Menu" message is displayed. 3. BIOS version information (also known as ROM date and System BIOS) can be displayed by unplugging the power cord from the AC outlet. Determining the BIOS version To determine whether available...

Software Update - Windows Vista and Windows 7
Page 7
.... 2. BIOS installation procedures vary. Open Windows Explorer by following the instructions on the screen. Updating the BIOS 3 You will be downloaded. If no instructions are displayed, follow these steps: 1. Double-click the file that are displayed on the screen after the BIOS has successfully updated.
.... 2. BIOS installation procedures vary. Open Windows Explorer by following the instructions on the screen. Updating the BIOS 3 You will be downloaded. If no instructions are displayed, follow these steps: 1. Double-click the file that are displayed on the screen after the BIOS has successfully updated.


