

Wireless Setup Guide
Page 3
If the light is on, turn on the computer according to the router using the Ethernet cable included with the router. Location of the network and to configure the wireless router. 1 ... for technical assistance. After you cannot access a Web site, repeat steps 1 5 During router configuration, check whether the wireless router security level is set up and turn it off by opening your router is temporarily connected to the instructions included with these instructions until you can have the necessary components to get...
If the light is on, turn on the computer according to the router using the Ethernet cable included with the router. Location of the network and to configure the wireless router. 1 ... for technical assistance. After you cannot access a Web site, repeat steps 1 5 During router configuration, check whether the wireless router security level is set up and turn it off by opening your router is temporarily connected to the instructions included with these instructions until you can have the necessary components to get...

Wireless Setup Guide
Page 4
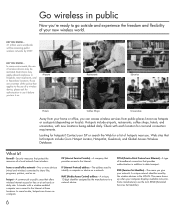
... and accessing a Web site. 5 Connect and configure any additional wireless-enabled computers or other devices, including wired devices, that correspond with wireless notebooks and wired desktop PROGRESS CHECK If you successfully complete step 6, all computers on your network can access a Web site. 4 6 Run the ... network Now that you've set up correctly. b Follow the instructions on the taskbar. PROGRESS CHECK After step 1, the blue wireless light turns on. 1 Press the wireless on/off button on the computer to enable the wireless function. 2 Connect to your wireless connection while you'...
... and accessing a Web site. 5 Connect and configure any additional wireless-enabled computers or other devices, including wired devices, that correspond with wireless notebooks and wired desktop PROGRESS CHECK If you successfully complete step 6, all computers on your network can access a Web site. 4 6 Run the ... network Now that you've set up correctly. b Follow the instructions on the taskbar. PROGRESS CHECK After step 1, the blue wireless light turns on. 1 Press the wireless on/off button on the computer to enable the wireless function. 2 Connect to your wireless connection while you'...

Wireless Setup Guide
Page 5
The SSID should be a unique name that connects a computer to a phone line, which in turn connects to the Internet. b Right-click Wireless Network Connection and select Properties. (The Properties window is usually required to decrypt the data. What Is? DHCP (... don't go to sleep at speeds up Internet access. DID YOU KNOW... • Windows XP and some types of someone piggybacking on each computer in turn connects to the Internet.
The SSID should be a unique name that connects a computer to a phone line, which in turn connects to the Internet. b Right-click Wireless Network Connection and select Properties. (The Properties window is usually required to decrypt the data. What Is? DHCP (... don't go to sleep at speeds up Internet access. DID YOU KNOW... • Windows XP and some types of someone piggybacking on each computer in turn connects to the Internet.
Wireless Setup Guide
Page 6
... identify a computer or device on . A traveler with new locations being added daily. SSID (Services Set Identifier)-The name you give your home or office, you turn it on locale). In some locales, hotspots are uncertain of the policy that list hotspots include Cisco Hotspot Locator, Hotspotlist, Geektools, and Global Access Wireless...
... identify a computer or device on . A traveler with new locations being added daily. SSID (Services Set Identifier)-The name you give your home or office, you turn it on locale). In some locales, hotspots are uncertain of the policy that list hotspots include Cisco Hotspot Locator, Hotspotlist, Geektools, and Global Access Wireless...

HP USB Digital Drive
Page 5
To connect the Digital Drive to a USB port directly (with the connector cable in the unextended position): » Insert the USB connector on the Digital Drive into a USB port on when the connection is successful. The status light on the Digital Drive turns on your computer. If the status light does not turn on, remove the Digital Drive from the USB port, then reinsert the USB connector. 4 User Guide
To connect the Digital Drive to a USB port directly (with the connector cable in the unextended position): » Insert the USB connector on the Digital Drive into a USB port on when the connection is successful. The status light on the Digital Drive turns on your computer. If the status light does not turn on, remove the Digital Drive from the USB port, then reinsert the USB connector. 4 User Guide

HP USB Digital Drive
Page 7
Insert the USB connector on the Digital Drive into a USB port on when the connection is successful. The status light on the Digital Drive turns on your computer. 2. If the status light does not turn on, remove the Digital Drive from the USB port, then reinsert the USB connector. 6 User Guide
Insert the USB connector on the Digital Drive into a USB port on when the connection is successful. The status light on the Digital Drive turns on your computer. 2. If the status light does not turn on, remove the Digital Drive from the USB port, then reinsert the USB connector. 6 User Guide
Security - Windows Vista
Page 9
...these steps: 1. Protects the computer by requiring a password to be used to access Setup Utility contents. Power-on password* CAUTION: If you turn on or restart the computer, or exit Hibernation. It also protects access to the computer contents and must be entered when you access Setup ..., refer to the following topics. CAUTION: If you access Setup Utility. Initiate QuickLock by entering your power-on password, you cannot turn on or restart the computer, or exit Hibernation. *For details about each time you forget your Windows user or administrator password.
...these steps: 1. Protects the computer by requiring a password to be used to access Setup Utility contents. Power-on password* CAUTION: If you turn on or restart the computer, or exit Hibernation. It also protects access to the computer contents and must be entered when you access Setup ..., refer to the following topics. CAUTION: If you access Setup Utility. Initiate QuickLock by entering your power-on password, you cannot turn on or restart the computer, or exit Hibernation. *For details about each time you forget your Windows user or administrator password.
Security - Windows Vista
Page 10
... fields, and then press enter. ● To delete an administrator password, type your administrator password (using the same kind of keys you turn on password prevents unauthorized use of the screen. 2. To save your preferences and exit Setup Utility, press f10, and then follow the instructions... f10 while the setup message is displayed in the Enter Current Password field, and then press enter 4 times. 3. Open Setup Utility by turning on or restarting the computer, and then pressing f10 while the setup message is displayed in the Enter Password field, and then press enter ...
... fields, and then press enter. ● To delete an administrator password, type your administrator password (using the same kind of keys you turn on password prevents unauthorized use of the screen. 2. To save your preferences and exit Setup Utility, press f10, and then follow the instructions... f10 while the setup message is displayed in the Enter Current Password field, and then press enter 4 times. 3. Open Setup Utility by turning on or restarting the computer, and then pressing f10 while the setup message is displayed in the Enter Password field, and then press enter ...

Security - Windows Vista
Page 18
... registration of the taskbar. 2. When you need to show it will be outlined to start over the fingerprint sensor until the finger on the screen turns green. NOTE: If you click a finger, it has been selected. 6. After you to log on the screen and then click Start Over. 7. To set up...
... registration of the taskbar. 2. When you need to show it will be outlined to start over the fingerprint sensor until the finger on the screen turns green. NOTE: If you click a finger, it has been selected. 6. After you to log on the screen and then click Start Over. 7. To set up...
Software Updates - Windows Vista
Page 8
... to know the version of the system BIOS currently installed. BIOS version information (also known as ROM date and System BIOS) can be displayed by turning on or restarting the computer, and then pressing f10 while the "Press to enter Setup" message is running on the computer, you are already in...
... to know the version of the system BIOS currently installed. BIOS version information (also known as ROM date and System BIOS) can be displayed by turning on or restarting the computer, and then pressing f10 while the "Press to enter Setup" message is running on the computer, you are already in...
Setup Utility - Windows Vista and XP
Page 5
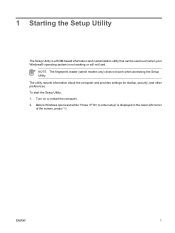
Before Windows opens and while "Press to enter setup" is not working or will not load. Turn on or restart the computer. 2. The utility reports information about the computer and provides settings for startup, security, and other preferences. ENWW 1 NOTE The fingerprint ...
Before Windows opens and while "Press to enter setup" is not working or will not load. Turn on or restart the computer. 2. The utility reports information about the computer and provides settings for startup, security, and other preferences. ENWW 1 NOTE The fingerprint ...
Setup Utility - Windows Vista and XP
Page 6
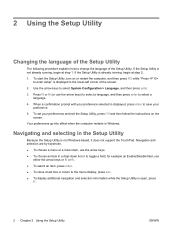
... display additional navigation and selection information while the Setup Utility is displayed in the lower-left corner of the screen. 2. To start the Setup Utility, turn on the screen. If the Setup Utility is already running , begin at step 1. If the Setup Utility is not already running , begin at step 2. 1. Press...
... display additional navigation and selection information while the Setup Utility is displayed in the lower-left corner of the screen. 2. To start the Setup Utility, turn on the screen. If the Setup Utility is already running , begin at step 1. If the Setup Utility is not already running , begin at step 2. 1. Press...
Setup Utility - Windows Vista and XP
Page 7
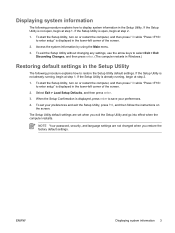
...left corner of the screen. 2. If the Setup Utility is not already running , begin at step 2. 1. To start the Setup Utility, turn on or restart the computer, and then press f10 while "Press to restore the Setup Utility default settings. Select Exit > Load Setup Defaults,...security, and language settings are set your preferences. 4. Access the system information by using the Main menu. 3. To start the Setup Utility, turn on the screen. ENWW Displaying system information 3 The Setup Utility default settings are not changed when you exit the Setup Utility and go into...
...left corner of the screen. 2. If the Setup Utility is not already running , begin at step 2. 1. To start the Setup Utility, turn on or restart the computer, and then press f10 while "Press to restore the Setup Utility default settings. Select Exit > Load Setup Defaults,...security, and language settings are set your preferences. 4. Access the system information by using the Main menu. 3. To start the Setup Utility, turn on the screen. ENWW Displaying system information 3 The Setup Utility default settings are not changed when you exit the Setup Utility and go into...
Drives - Windows Vista
Page 8
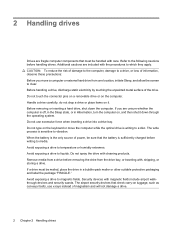
.... Security devices with the procedures to which they apply. 2 Handling drives Drives are fragile computer components that must be mailed, place the drive in Hibernation, turn the computer on luggage, such as conveyor belts, use excessive force when inserting a drive into a drive bay. Do not touch the connector pins on a removable...
.... Security devices with the procedures to which they apply. 2 Handling drives Drives are fragile computer components that must be mailed, place the drive in Hibernation, turn the computer on luggage, such as conveyor belts, use excessive force when inserting a drive into a drive bay. Do not touch the connector pins on a removable...
Drives - Windows Vista
Page 10
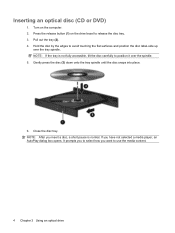
... tray. Pull out the tray (2). 4. Hold the disc by the edges to position it over the tray spindle. Inserting an optical disc (CD or DVD) 1. Turn on the drive bezel to use the media content. 4 Chapter 3 Using an optical drive It prompts you to select how you have not selected a media...
... tray. Pull out the tray (2). 4. Hold the disc by the edges to position it over the tray spindle. Inserting an optical disc (CD or DVD) 1. Turn on the drive bezel to use the media content. 4 Chapter 3 Using an optical drive It prompts you to select how you have not selected a media...
Drives - Windows Vista
Page 14
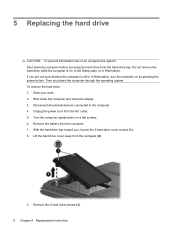
.... 3. With the hard drive bay toward you are not sure whether the computer is on, in the Sleep state, or in Hibernation, turn the computer on a flat surface. 6. Turn the computer upside down on by pressing the power button. Do not remove the hard drive while the computer is off or in...
.... 3. With the hard drive bay toward you are not sure whether the computer is on, in the Sleep state, or in Hibernation, turn the computer on a flat surface. 6. Turn the computer upside down on by pressing the power button. Do not remove the hard drive while the computer is off or in...

Memory Modules - Windows Vista
Page 7
The memory capacity of static electricity by pressing the power button. Turn the computer upside down the computer and close the display. Save your work. 2. If you are the same size. Unplug the power cord from the ... the power cord and remove all external devices connected to the vacant expansion memory module slot or by upgrading the existing memory module in Hibernation, turn the computer on by touching a grounded metal object. WARNING! To add or replace a memory module: 1. Adding or replacing a memory module The computer has one memory...
The memory capacity of static electricity by pressing the power button. Turn the computer upside down the computer and close the display. Save your work. 2. If you are the same size. Unplug the power cord from the ... the power cord and remove all external devices connected to the vacant expansion memory module slot or by upgrading the existing memory module in Hibernation, turn the computer on by touching a grounded metal object. WARNING! To add or replace a memory module: 1. Adding or replacing a memory module The computer has one memory...
Memory Modules - Windows Vista
Page 10
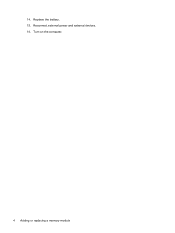
Reconnect external power and external devices. 16. Turn on the computer. 4 Adding or replacing a memory module 14. Replace the battery. 15.
Reconnect external power and external devices. 16. Turn on the computer. 4 Adding or replacing a memory module 14. Replace the battery. 15.
Notebook Tour - Windows Vista
Page 10
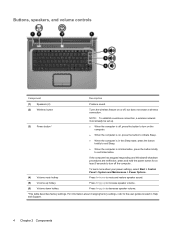
... in the Sleep state, press the button briefly to exit Sleep. ● When the computer is in Hibernation, press the button briefly to turn off , but does not create a wireless connection. (3) Power button* NOTE: To establish a wireless connection, a wireless network must already be...to increase speaker volume. (6) Volume down hotkey Press fn+pg dn to the user guides located in Help and Support. 4 Chapter 2 Components Turns the wireless feature on or off the computer. Buttons, speakers, and volume controls Component Description (1) Speakers (2) (2) Wireless button Produce sound. ...
... in the Sleep state, press the button briefly to exit Sleep. ● When the computer is in Hibernation, press the button briefly to turn off , but does not create a wireless connection. (3) Power button* NOTE: To establish a wireless connection, a wireless network must already be...to increase speaker volume. (6) Volume down hotkey Press fn+pg dn to the user guides located in Help and Support. 4 Chapter 2 Components Turns the wireless feature on or off the computer. Buttons, speakers, and volume controls Component Description (1) Speakers (2) (2) Wireless button Produce sound. ...
Notebook Tour - Windows Vista
Page 11
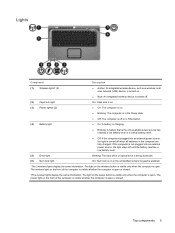
...Description (1) Wireless lights* (2) ● Amber: An integrated wireless device, such as a wireless local area network (LAN) device, is turned on. ● Blue: An integrated wireless device is turned off. (2) Caps lock light (3) Power lights† (2) (4) Battery light On: Caps lock is on. ● On: The ...low battery level or a critical battery level. ● Off: If the computer is plugged into an external power source, the light is turned off until the battery reaches a low battery level. (5) Drive light Blinking: The hard drive or optical drive is being accessed. (6) Num ...
...Description (1) Wireless lights* (2) ● Amber: An integrated wireless device, such as a wireless local area network (LAN) device, is turned on. ● Blue: An integrated wireless device is turned off. (2) Caps lock light (3) Power lights† (2) (4) Battery light On: Caps lock is on. ● On: The ...low battery level or a critical battery level. ● Off: If the computer is plugged into an external power source, the light is turned off until the battery reaches a low battery level. (5) Drive light Blinking: The hard drive or optical drive is being accessed. (6) Num ...


