
Presario 1800XL Series Maintenance and Service Guide
Page 72
...placement for each cable: • Hard Drive Ribbon Cable • CD/DVD Ribbon Cable • Diskette Drive Ribbon Cable • Speaker Assembly Cable • Keyboard Ribbon Cable 4 REMOVAL AND REPLACEMENT PRESARIO NOTEBOOK MAINTENANCE AND SERVICE GUIDE 1800 SERIES they cannot be handled with extreme...and Notebook: • Always handle cables by their connectors. • In all cases, avoid bending, twisting, pulling, or tearing cables. • Apply only the minimum force required to seat or unseat cables from their proper location during the reassembly process. Presario 1800 Series...
...placement for each cable: • Hard Drive Ribbon Cable • CD/DVD Ribbon Cable • Diskette Drive Ribbon Cable • Speaker Assembly Cable • Keyboard Ribbon Cable 4 REMOVAL AND REPLACEMENT PRESARIO NOTEBOOK MAINTENANCE AND SERVICE GUIDE 1800 SERIES they cannot be handled with extreme...and Notebook: • Always handle cables by their connectors. • In all cases, avoid bending, twisting, pulling, or tearing cables. • Apply only the minimum force required to seat or unseat cables from their proper location during the reassembly process. Presario 1800 Series...
Presario 1800XL Series Maintenance and Service Guide
Page 73
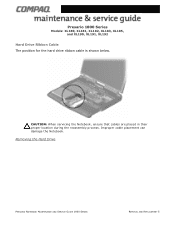
Removing the Hard Drive PRESARIO NOTEBOOK MAINTENANCE AND SERVICE GUIDE 1800 SERIES REMOVAL AND REPLACEMENT 5 Improper cable placement can damage the Notebook. Presario 1800 Series Models: XL180, XL181, XL182, XL183, XL185, and XL190, XL191, XL192 Hard Drive Ribbon Cable The position for the hard drive ribbon cable is shown below. Ä CAUTION: When servicing the Notebook, ensure that cables are placed in their proper location during the reassembly process.
Removing the Hard Drive PRESARIO NOTEBOOK MAINTENANCE AND SERVICE GUIDE 1800 SERIES REMOVAL AND REPLACEMENT 5 Improper cable placement can damage the Notebook. Presario 1800 Series Models: XL180, XL181, XL182, XL183, XL185, and XL190, XL191, XL192 Hard Drive Ribbon Cable The position for the hard drive ribbon cable is shown below. Ä CAUTION: When servicing the Notebook, ensure that cables are placed in their proper location during the reassembly process.
Presario 1800XL Series Maintenance and Service Guide
Page 102
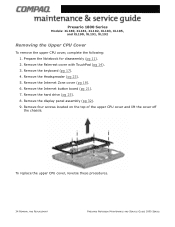
...). 6. Remove the Internet button board (pg 21). 7. Prepare the Notebook for disassembly (pg 11). 2. Remove the Heatspreader (pg 23). 5. Remove four screws located on the top of the upper CPU cover and lift the cover off the chassis. Remove the hard drive (pg 25). 8. Presario 1800 Series Models: XL180, XL181, XL182, XL183, XL185, and XL190, XL191...
...). 6. Remove the Internet button board (pg 21). 7. Prepare the Notebook for disassembly (pg 11). 2. Remove the Heatspreader (pg 23). 5. Remove four screws located on the top of the upper CPU cover and lift the cover off the chassis. Remove the hard drive (pg 25). 8. Presario 1800 Series Models: XL180, XL181, XL182, XL183, XL185, and XL190, XL191...
Presario Selct 1800 Series Maintenance and Service Guide
Page 7
Serial Number Location Disassembly Sequence Electrostatic Discharge Service Considerations Cables and Connectors Preparing the Computer for the computer. Maintenance & Service Guide Presario 1800 Series Models: 1805 and 1810 | Home Page | Notice | Preface | Product Description | Troubleshooting Illustrated Parts... serial number to Compaq when requesting information or ordering spare parts. Modem Processor Status Panel Interface Board Hard Drives Battery Charger Board CD or DVD Drive Display Panel Assembly Upper CPU Cover Speaker Assembly Diskette Drive Fan Assembly Audio ...
Serial Number Location Disassembly Sequence Electrostatic Discharge Service Considerations Cables and Connectors Preparing the Computer for the computer. Maintenance & Service Guide Presario 1800 Series Models: 1805 and 1810 | Home Page | Notice | Preface | Product Description | Troubleshooting Illustrated Parts... serial number to Compaq when requesting information or ordering spare parts. Modem Processor Status Panel Interface Board Hard Drives Battery Charger Board CD or DVD Drive Display Panel Assembly Upper CPU Cover Speaker Assembly Diskette Drive Fan Assembly Audio ...
Presario Selct 1800 Series Maintenance and Service Guide
Page 39
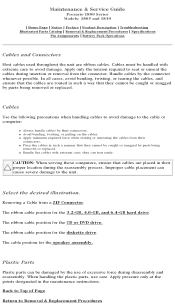
... or replaced. Improper cable placement can tear easily. The ribbon cable position for the 3.2-GB, 4.0-GB, and 6.4-GB hard drive. When handling the plastic parts, use of Page Return to the unit. Cables must be caught or snagged by parts ...Service Guide Presario 1800 Series Models: 1805 and 1810 | Home Page | Notice | Preface | Product Description | Troubleshooting Illustrated Parts Catalog | Removal & Replacement Procedures | Specifications Pin Assignments | Battery Pack Operations Cables and Connectors Most cables used throughout the unit are placed in their proper location during the...
... or replaced. Improper cable placement can tear easily. The ribbon cable position for the 3.2-GB, 4.0-GB, and 6.4-GB hard drive. When handling the plastic parts, use of Page Return to the unit. Cables must be caught or snagged by parts ...Service Guide Presario 1800 Series Models: 1805 and 1810 | Home Page | Notice | Preface | Product Description | Troubleshooting Illustrated Parts Catalog | Removal & Replacement Procedures | Specifications Pin Assignments | Battery Pack Operations Cables and Connectors Most cables used throughout the unit are placed in their proper location during the...
Presario Selct 1800 Series Maintenance and Service Guide
Page 45
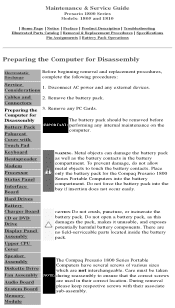
...Diskette Drive Fan Assembly Audio Board System Board Memory Module The Compaq Presario 1800 Series Portable Computers have several screws of various sizes which are no field-serviceable parts located ...removed before IMPORTANT: performing any PC Cards. Considerations Cables and Connectors Preparing the Computer for Disassembly Battery Pack Palmrest Cover with their correct location. The battery pack should ... makes it unusable, and exposes potentially harmful battery components. Hard Drives Battery Charger Board CD or DVD Drive Display Panel Assembly Upper CPU Cover CAUTION: Do not crush...
...Diskette Drive Fan Assembly Audio Board System Board Memory Module The Compaq Presario 1800 Series Portable Computers have several screws of various sizes which are no field-serviceable parts located ...removed before IMPORTANT: performing any PC Cards. Considerations Cables and Connectors Preparing the Computer for Disassembly Battery Pack Palmrest Cover with their correct location. The battery pack should ... makes it unusable, and exposes potentially harmful battery components. Hard Drives Battery Charger Board CD or DVD Drive Display Panel Assembly Upper CPU Cover CAUTION: Do not crush...
Presario Selct 1800 Series Maintenance and Service Guide
Page 52
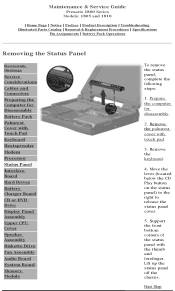
...the status panel with touch pad. 3. Next Step Move the lever (located below the CD Play button on the status panel) to the right to release the status panel cover. 5. Remove the keyboard. 4. Maintenance & Service Guide Presario 1800 Series Models: 1805 and 1810 | Home Page | Notice | Preface... Palmrest Cover with Touch Pad Keyboard Heatspreader Modem Processor Status Panel Interface Board Hard Drives Battery Charger Board CD or DVD Drive Display Panel Assembly Upper CPU Cover Speaker Assembly Diskette Drive Fan Assembly Audio Board System Board Memory Module To remove the status panel,...
...the status panel with touch pad. 3. Next Step Move the lever (located below the CD Play button on the status panel) to the right to release the status panel cover. 5. Remove the keyboard. 4. Maintenance & Service Guide Presario 1800 Series Models: 1805 and 1810 | Home Page | Notice | Preface... Palmrest Cover with Touch Pad Keyboard Heatspreader Modem Processor Status Panel Interface Board Hard Drives Battery Charger Board CD or DVD Drive Display Panel Assembly Upper CPU Cover Speaker Assembly Diskette Drive Fan Assembly Audio Board System Board Memory Module To remove the status panel,...
Presario Selct 1800 Series Maintenance and Service Guide
Page 61
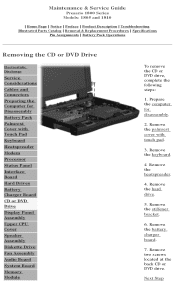
... Maintenance & Service Guide Presario 1800 Series Models: 1805 and 1810 | Home Page | Notice | Preface | Product Description | Troubleshooting Illustrated Parts Catalog | Removal & Replacement Procedures | Specifications Pin Assignments | Battery Pack Operations Removing the CD or DVD Drive Electrostatic Discharge Service Considerations Cables and Connectors Preparing the Computer for disassembly. 2. Remove two screws located at the back...
... Maintenance & Service Guide Presario 1800 Series Models: 1805 and 1810 | Home Page | Notice | Preface | Product Description | Troubleshooting Illustrated Parts Catalog | Removal & Replacement Procedures | Specifications Pin Assignments | Battery Pack Operations Removing the CD or DVD Drive Electrostatic Discharge Service Considerations Cables and Connectors Preparing the Computer for disassembly. 2. Remove two screws located at the back...
Presario Selct 1800 Series Maintenance and Service Guide
Page 64
...Hard Drives Battery Charger Board CD or DVD Drive Display Panel Assembly Upper CPU Cover Speaker Assembly Diskette Drive Fan Assembly Audio Board System Board Memory Module To remove the Upper CPU cover complete the following steps: 1. Remove the keyboard. 5. Remove the display panel assembly. 7. Remove the heatspreader. 6. Maintenance & Service Guide Presario 1800... Considerations Cables and Connectors Preparing the Computer for disassembly. 2. Remove three screws located on the top and release the snap located in the left corner of the unit near the battery pack which secures the...
...Hard Drives Battery Charger Board CD or DVD Drive Display Panel Assembly Upper CPU Cover Speaker Assembly Diskette Drive Fan Assembly Audio Board System Board Memory Module To remove the Upper CPU cover complete the following steps: 1. Remove the keyboard. 5. Remove the display panel assembly. 7. Remove the heatspreader. 6. Maintenance & Service Guide Presario 1800... Considerations Cables and Connectors Preparing the Computer for disassembly. 2. Remove three screws located on the top and release the snap located in the left corner of the unit near the battery pack which secures the...
Presario Select 1800 Series Maintenance and Service Guide
Page 7
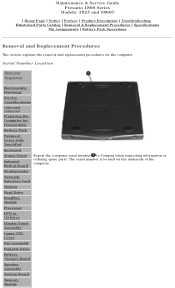
Maintenance & Service Guide Presario 1800 Series Models: 1825 and 1800T | Home Page | Notice | Preface | Product Description | Troubleshooting Illustrated Parts Catalog | Removal & Replacement Procedures | Specifications Pin... computer serial number to Compaq when requesting information or ordering spare parts. Serial Number Location Removal Sequence Electrostatic Discharge Service Considerations Cables and Connectors Preparing the Computer for the computer. Heatspreader Network Interface Card Modem Hard Drive DisqPlay Module Processor DVD or CD Drive Display Panel Assembly Upper ...
Maintenance & Service Guide Presario 1800 Series Models: 1825 and 1800T | Home Page | Notice | Preface | Product Description | Troubleshooting Illustrated Parts Catalog | Removal & Replacement Procedures | Specifications Pin... computer serial number to Compaq when requesting information or ordering spare parts. Serial Number Location Removal Sequence Electrostatic Discharge Service Considerations Cables and Connectors Preparing the Computer for the computer. Heatspreader Network Interface Card Modem Hard Drive DisqPlay Module Processor DVD or CD Drive Display Panel Assembly Upper ...
Presario Select 1800 Series Maintenance and Service Guide
Page 43
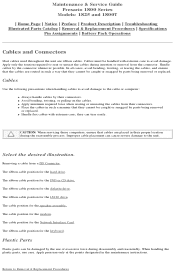
... the unit. Plastic Parts Plastic parts can be caught or snagged by their proper location during insertion or removal from the connector. q Avoid bending, twisting, or pulling on...Always handle cables by parts being removed or replaced. The cable position for the hard drive. Handle cables by parts being removed or replaced. Improper cable placement can tear ... cable position for the diskette drive. The ribbon cable position for the DVD or CD drive. The ribbon cable position for the speaker assembly. Maintenance & Service Guide Presario 1800 Series Models: 1825 and 1800T...
... the unit. Plastic Parts Plastic parts can be caught or snagged by their proper location during insertion or removal from the connector. q Avoid bending, twisting, or pulling on...Always handle cables by parts being removed or replaced. The cable position for the hard drive. Handle cables by parts being removed or replaced. Improper cable placement can tear ... cable position for the diskette drive. The ribbon cable position for the DVD or CD drive. The ribbon cable position for the speaker assembly. Maintenance & Service Guide Presario 1800 Series Models: 1825 and 1800T...

Presario Select 1800 Series Maintenance and Service Guide
Page 53
... harmful battery components. Service Considerations 3. Remove any external devices. Hard Drive DisqPlay Module Processor DVD or CD Drive Display Panel Assembly The Compaq Presario 1800 Series Portable Computers have several screws of various sizes which are no field-serviceable parts located inside the battery pack. Maintenance & Service Guide Presario 1800 Series Models: 1825 and 1800T | Home Page | Notice | Preface...
... harmful battery components. Service Considerations 3. Remove any external devices. Hard Drive DisqPlay Module Processor DVD or CD Drive Display Panel Assembly The Compaq Presario 1800 Series Portable Computers have several screws of various sizes which are no field-serviceable parts located inside the battery pack. Maintenance & Service Guide Presario 1800 Series Models: 1825 and 1800T | Home Page | Notice | Preface...

Presario Select 1800 Series Maintenance and Service Guide
Page 54
... down and remove it from the chassis by the tab located on the end of the battery pack. To replace the battery pack, reverse the previous procedures. Pull the battery pack from the chassis. 2. Maintenance & Service Guide Presario 1800 Series Models: 1825 and 1800T | Home Page | Notice... Touch Pad Keyboard Status Panel Internet Button Board Heatspreader Network Interface Card Modem Hard Drive DisqPlay Module Processor DVD or CD Drive Display Panel Assembly Upper CPU Cover Fan Assembly Diskette Drive Battery Charger Board Speaker Assembly System Board Memory Module Removing the Battery Pack...
... down and remove it from the chassis by the tab located on the end of the battery pack. To replace the battery pack, reverse the previous procedures. Pull the battery pack from the chassis. 2. Maintenance & Service Guide Presario 1800 Series Models: 1825 and 1800T | Home Page | Notice... Touch Pad Keyboard Status Panel Internet Button Board Heatspreader Network Interface Card Modem Hard Drive DisqPlay Module Processor DVD or CD Drive Display Panel Assembly Upper CPU Cover Fan Assembly Diskette Drive Battery Charger Board Speaker Assembly System Board Memory Module Removing the Battery Pack...
Presario Select 1800 Series Maintenance and Service Guide
Page 79
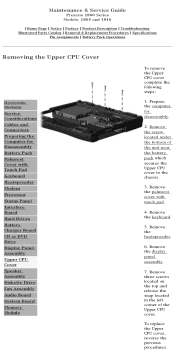
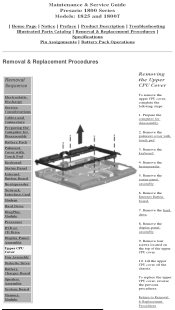
...Remove the Internet Button board. 7. Lift the upper CPU cover off the chassis. Return to Removal & Replacement Procedures Maintenance & Service Guide Presario 1800 Series Models: 1825 and 1800T | Home Page | Notice | Preface | Product Description | Troubleshooting Illustrated Parts Catalog | Removal & Replacement...To remove the upper CPU cover, complete the following steps: 1. Remove the heatspreader. 5. Remove the hard drive. 8. Remove the display panel assembly. 9. Remove four screws located on the top of the upper CPU cover. 10. Remove the status panel assembly. 6. Prepare the...
...Remove the Internet Button board. 7. Lift the upper CPU cover off the chassis. Return to Removal & Replacement Procedures Maintenance & Service Guide Presario 1800 Series Models: 1825 and 1800T | Home Page | Notice | Preface | Product Description | Troubleshooting Illustrated Parts Catalog | Removal & Replacement...To remove the upper CPU cover, complete the following steps: 1. Remove the heatspreader. 5. Remove the hard drive. 8. Remove the display panel assembly. 9. Remove four screws located on the top of the upper CPU cover. 10. Remove the status panel assembly. 6. Prepare the...
Presario Select 1800 Series Maintenance and Service Guide
Page 85
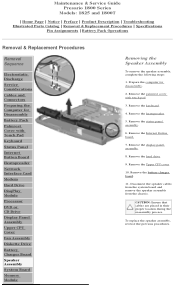
...Speaker Assembly To remove the speaker assembly, complete the following steps: 1. Remove the status panel assembly. 6. Remove the hard drive. 9. Disconnect the speaker cables from the system board and remove the speaker assembly from the chassis. Remove the heatspreader. ... panel assembly. 8. Remove the battery charger board. 11. CAUTION: Ensure that cables are placed in their proper location during the reassembly process. Maintenance & Service Guide Presario 1800 Series Models: 1825 and 1800T | Home Page | Notice | Preface | Product Description | Troubleshooting Illustrated Parts Catalog...
...Speaker Assembly To remove the speaker assembly, complete the following steps: 1. Remove the status panel assembly. 6. Remove the hard drive. 9. Disconnect the speaker cables from the system board and remove the speaker assembly from the chassis. Remove the heatspreader. ... panel assembly. 8. Remove the battery charger board. 11. CAUTION: Ensure that cables are placed in their proper location during the reassembly process. Maintenance & Service Guide Presario 1800 Series Models: 1825 and 1800T | Home Page | Notice | Preface | Product Description | Troubleshooting Illustrated Parts Catalog...

