
End User License Agreement
Page 1
... agreement accompanying such Freeware whether in its online documentation. You do not have Software Product into Your Computer's AGREE TO ALL TERMS AND temporary memory (RAM) for use on those computers. d. e. DOWNLOADING, OR b. Use. You may use the Software Product on or made available by HP for use with all rights...
... agreement accompanying such Freeware whether in its online documentation. You do not have Software Product into Your Computer's AGREE TO ALL TERMS AND temporary memory (RAM) for use on those computers. d. e. DOWNLOADING, OR b. Use. You may use the Software Product on or made available by HP for use with all rights...
Startup Guide
Page 9
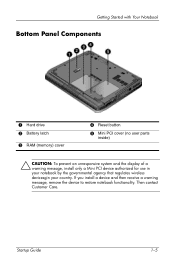
Startup Guide 1-5 If you install a device and then receive a warning message, remove the device to restore notebook functionality. Then contact Customer Care. Getting Started with Your Notebook Bottom Panel Components 1 Hard drive 2 Battery latch 3 RAM (memory) cover 4 Reset button 5 Mini PCI cover (no user parts inside) Ä CAUTION: To prevent an unresponsive system and the display of a warning message, install only a Mini PCI device authorized for use in your notebook by the governmental agency that regulates wireless devicesgin your country.
Startup Guide 1-5 If you install a device and then receive a warning message, remove the device to restore notebook functionality. Then contact Customer Care. Getting Started with Your Notebook Bottom Panel Components 1 Hard drive 2 Battery latch 3 RAM (memory) cover 4 Reset button 5 Mini PCI cover (no user parts inside) Ä CAUTION: To prevent an unresponsive system and the display of a warning message, install only a Mini PCI device authorized for use in your notebook by the governmental agency that regulates wireless devicesgin your country.

Startup Guide
Page 18
...then Press Fn+F12. Standby-Power status light blinks. Hibernation-Power If the notebook is already on the Documentation CD included with your notebook. 2-2 Startup Guide connections. See the "Battery Packs and Power Management" chapter in RAM. ■ Restarts quickly. ■ Restores network connections. button. ■...Operation Default Power Settings Power mode To enter this mode Function ON-Power status light is on the notebook. and other components. ■ Maintains current session in the Reference Guide on , ■ Saves maximum status light is off...
...then Press Fn+F12. Standby-Power status light blinks. Hibernation-Power If the notebook is already on the Documentation CD included with your notebook. 2-2 Startup Guide connections. See the "Battery Packs and Power Management" chapter in RAM. ■ Restarts quickly. ■ Restores network connections. button. ■...Operation Default Power Settings Power mode To enter this mode Function ON-Power status light is on the notebook. and other components. ■ Maintains current session in the Reference Guide on , ■ Saves maximum status light is off...
Startup Guide
Page 38
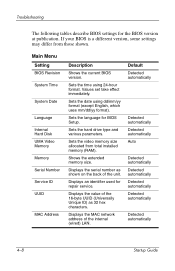
... Detected automatically 4-8 Startup Guide Sets the date using 24-hour format. If your BIOS is a different version, some settings may differ from total installed memory (RAM).
... Detected automatically 4-8 Startup Guide Sets the date using 24-hour format. If your BIOS is a different version, some settings may differ from total installed memory (RAM).
Startup Guide
Page 46
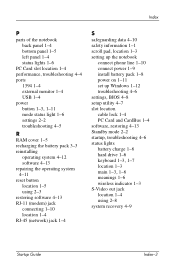
Index P parts of the notebook back panel 1-4 bottom panel 1-5 left panel 1-4 status lights 1-6 PC Card slot location 1-4 performance, troubleshooting 4-4 ports 1394 1-4 external monitor 1-4 USB 1-4 power button 1-3, 1-11 mode status light 1-6 settings 2-2 troubleshooting 4-5 R RAM cover 1-5 recharging the battery pack 3-3 reinstalling operating system 4-12 software 4-13 repairing the operating system 4-11 reset button location 1-5 using...
Index P parts of the notebook back panel 1-4 bottom panel 1-5 left panel 1-4 status lights 1-6 PC Card slot location 1-4 performance, troubleshooting 4-4 ports 1394 1-4 external monitor 1-4 USB 1-4 power button 1-3, 1-11 mode status light 1-6 settings 2-2 troubleshooting 4-5 R RAM cover 1-5 recharging the battery pack 3-3 reinstalling operating system 4-12 software 4-13 repairing the operating system 4-11 reset button location 1-5 using...

Armada 100S Series Reference Guide
Page 9
... is in Chapter 2 for information on top of your notebook. Top-Open View 1. AC Power Indicator • Turns on when the notebook is using AC power. • Blinks when the notebook, using AC power, is in Suspend-to-RAM mode. (See "Introducing Power Management" in Suspend-to -RAM mode.) 1-8 Getting Started Top-Open View 1 2 3 4 5 6 Figure...
... is in Chapter 2 for information on top of your notebook. Top-Open View 1. AC Power Indicator • Turns on when the notebook is using AC power. • Blinks when the notebook, using AC power, is in Suspend-to-RAM mode. (See "Introducing Power Management" in Suspend-to -RAM mode.) 1-8 Getting Started Top-Open View 1 2 3 4 5 6 Figure...

Armada 100S Series Reference Guide
Page 12
...on the screen. If the POST has detected a mismatch between the actual hardware configuration and the configuration information stored in CMOS RAM, you will see Chapter 3.) Starting Up The notebook starts up the display. 2. To adjust brightness, press [Fn]+[F6] or [Fn]+[F7]. 4. This checks the status ...ROM depending on , it performs a Power-On Self Test (POST). This process is turned on the "Boot Sequence" setting in CMOS RAM. Open the notebook by sliding the display latch toward the right and lifting up with an operating system preinstalled on the hard drive, a CD-ROM, or...
...on the screen. If the POST has detected a mismatch between the actual hardware configuration and the configuration information stored in CMOS RAM, you will see Chapter 3.) Starting Up The notebook starts up the display. 2. To adjust brightness, press [Fn]+[F6] or [Fn]+[F7]. 4. This checks the status ...ROM depending on , it performs a Power-On Self Test (POST). This process is turned on the "Boot Sequence" setting in CMOS RAM. Open the notebook by sliding the display latch toward the right and lifting up with an operating system preinstalled on the hard drive, a CD-ROM, or...

Armada 100S Series Reference Guide
Page 19
...brightness. Fn+F12 activates the "Suspend-to-RAM" or "Suspend-to-Disk" mode according to the setting of the keyboard are the function keys: [F1] to [F12]. Using the Notebook 2-5 Function keys are multi-purpose keys which perform functions defined by your notebook. The function keys and hotkeys are assigned... a cyclic way. Fn+F8 decrease display contrast (for non-TFT panel only). Fn+F10 toggles between video display output to the notebook display screen, external monitor, and simultaneous (display on both). Function Keys and Hotkeys On the top row of SCU. Keyboard Your...
...brightness. Fn+F12 activates the "Suspend-to-RAM" or "Suspend-to-Disk" mode according to the setting of the keyboard are the function keys: [F1] to [F12]. Using the Notebook 2-5 Function keys are multi-purpose keys which perform functions defined by your notebook. The function keys and hotkeys are assigned... a cyclic way. Fn+F8 decrease display contrast (for non-TFT panel only). Fn+F10 toggles between video display output to the notebook display screen, external monitor, and simultaneous (display on both). Function Keys and Hotkeys On the top row of SCU. Keyboard Your...

Armada 100S Series Reference Guide
Page 24
... available, you to create the suspend-to-disk partition. (See "HIBERNAT Utility" in a "suspend-to-disk partition" on Suspend-to -disk partition is detected (e.g. The notebook suspends to RAM (memory) or disk (hard drive) depending on your notebook with all have to close the applications as a file in Chapter 6 for information.) When the...
... available, you to create the suspend-to-disk partition. (See "HIBERNAT Utility" in a "suspend-to-disk partition" on Suspend-to -disk partition is detected (e.g. The notebook suspends to RAM (memory) or disk (hard drive) depending on your notebook with all have to close the applications as a file in Chapter 6 for information.) When the...

Armada 100S Series Reference Guide
Page 37
Those settings are for your notebook to identify the types of installed devices as well as shown in this chapter are vital for your reference only. The settings information is stored in the CMOS (Complementary Metal Oxide Semiconductor) RAM, which is built into the system board. Starting ...the SCU Program The SCU program is powered by a RTC backup battery. The actual items on the screen requesting you to configure your notebook may have been updated after the publication ...
Those settings are for your notebook to identify the types of installed devices as well as shown in this chapter are vital for your reference only. The settings information is stored in the CMOS (Complementary Metal Oxide Semiconductor) RAM, which is built into the system board. Starting ...the SCU Program The SCU program is powered by a RTC backup battery. The actual items on the screen requesting you to configure your notebook may have been updated after the publication ...

Armada 100S Series Reference Guide
Page 38
..., IRQ 4 640 KB Serial Port 2 = COM2, 2F8, IRQ 3 56320 KB Parallel Port = LPT1, Addr 378, IRQ 7 CPU Clock = 350 MHz Base = Extended = Shadow Reserved Total RAM Cache (Ext) = 64 KB = 320 KB = 57344 KB = 1024 KB Figure 5-1. Normally it gives the keyboard/mouse instructions for an item. When a menu item is...
..., IRQ 4 640 KB Serial Port 2 = COM2, 2F8, IRQ 3 56320 KB Parallel Port = LPT1, Addr 378, IRQ 7 CPU Clock = 350 MHz Base = Extended = Shadow Reserved Total RAM Cache (Ext) = 64 KB = 320 KB = 57344 KB = 1024 KB Figure 5-1. Normally it gives the keyboard/mouse instructions for an item. When a menu item is...

Armada 100S Series Reference Guide
Page 50
... It can also wake up from Suspend-to -Disk. "Resume Timer" and "Ring Resume" items, if enabled, can be Suspend-to-RAM or Suspend-to -RAM mode. When Suspend-to -disk mode if it is initiated, the system preserves all the running application programs as a file in the "Suspend... functions regardless of "Suspend Timeout", the system will directly enter Suspend-to-disk mode if staying inactive for the system to enter suspend-to -RAM mode is initiated, the system preserves all the running application programs as a file in use during the set period. Suspend-to-disk The ...
... It can also wake up from Suspend-to -Disk. "Resume Timer" and "Ring Resume" items, if enabled, can be Suspend-to-RAM or Suspend-to -RAM mode. When Suspend-to -disk mode if it is initiated, the system preserves all the running application programs as a file in the "Suspend... functions regardless of "Suspend Timeout", the system will directly enter Suspend-to-disk mode if staying inactive for the system to enter suspend-to -RAM mode is initiated, the system preserves all the running application programs as a file in use during the set period. Suspend-to-disk The ...

Armada 100S Series Reference Guide
Page 51
...several suspend features. Power Button Function: Power On/Off Lid Switch Function: Blank LCD ( ) Suspend To Disk (• ) Suspend To RAM The followings describe in "Timeout Settings" menu). The available options are Blank LCD and Suspend/Resume. The available options are Suspend To Disk... and Suspend To RAM. A check mark (√) indicates Enabled; Suspend Type This item sets the suspend mode the system will display. Lid Switch Function...
...several suspend features. Power Button Function: Power On/Off Lid Switch Function: Blank LCD ( ) Suspend To Disk (• ) Suspend To RAM The followings describe in "Timeout Settings" menu). The available options are Blank LCD and Suspend/Resume. The available options are Suspend To Disk... and Suspend To RAM. A check mark (√) indicates Enabled; Suspend Type This item sets the suspend mode the system will display. Lid Switch Function...

Armada 100S Series Reference Guide
Page 60
... to create the suspend-to-disk partition in video memory. HIBERNAT Utility NOTE: Select the suspend-to-disk option in the SCU and reboot the notebook to find out if the suspend-to-disk partition is 206MB to allow for future upgrade of your memory. The HIBERNAT.EXE utility program allows... the parameter, the default size will get an error message. You must specify a memory size larger than your system RAM plus 8MB. Use the command "HIBERNAT -p206" to -Disk function of your notebook. The extra 8MB is required for the overhead of the program and data held in your hard drive, which...
... to create the suspend-to-disk partition in video memory. HIBERNAT Utility NOTE: Select the suspend-to-disk option in the SCU and reboot the notebook to find out if the suspend-to-disk partition is 206MB to allow for future upgrade of your memory. The HIBERNAT.EXE utility program allows... the parameter, the default size will get an error message. You must specify a memory size larger than your system RAM plus 8MB. Use the command "HIBERNAT -p206" to -Disk function of your notebook. The extra 8MB is required for the overhead of the program and data held in your hard drive, which...

Armada 100S Series Reference Guide
Page 61
... • System Processor AMD K6-2+ series processor Note: For the latest information on the processor supported by your notebook, ask your Compaq authorized dealer or reseller. • RAM 64MB or 32MB SDRAM on-board, expandable to192 or 160MB with one 3.3V 144pin-DIMM of SDRAM module (model...13.3-inch TFT XGA (1024 x 768) or 12.1-inch HPA or TFT SVGA (800 x 600) color LCD, integrated power conservation mode • Notebook Keyboard Microsoft Windows compatible keyboard, numeric keypad, 12 function keys, a special Fn (Function) key • Diskette Disk Drive 3.5-inch, 135TPI, double sided...
... • System Processor AMD K6-2+ series processor Note: For the latest information on the processor supported by your notebook, ask your Compaq authorized dealer or reseller. • RAM 64MB or 32MB SDRAM on-board, expandable to192 or 160MB with one 3.3V 144pin-DIMM of SDRAM module (model...13.3-inch TFT XGA (1024 x 768) or 12.1-inch HPA or TFT SVGA (800 x 600) color LCD, integrated power conservation mode • Notebook Keyboard Microsoft Windows compatible keyboard, numeric keypad, 12 function keys, a special Fn (Function) key • Diskette Disk Drive 3.5-inch, 135TPI, double sided...

Compaq Notebook 100 Series Reference Guide
Page 9
...Set This is low. 2. Diskette Drive In-use Indicator turns on when the notebook is accessing the CD-ROM drive. N Num Lock Indicator turns on when the Num Lock function is in Suspend-to -RAM mode.) Battery Charge Indicator • Lights green when the battery is fully charged...keyboard. (See "Keyboard" in Chapter 2 for information on Suspend-to -RAM mode. (See "Introducing Power Management" in Suspend-to -RAM mode.) Battery Power Indicator • Turns on when the notebook is operating on when the notebook is accessing the diskette drive. Hard Drive In-use Indicator turns on ...
...Set This is low. 2. Diskette Drive In-use Indicator turns on when the notebook is accessing the CD-ROM drive. N Num Lock Indicator turns on when the Num Lock function is in Suspend-to -RAM mode.) Battery Charge Indicator • Lights green when the battery is fully charged...keyboard. (See "Keyboard" in Chapter 2 for information on Suspend-to -RAM mode. (See "Introducing Power Management" in Suspend-to -RAM mode.) Battery Power Indicator • Turns on when the notebook is operating on when the notebook is accessing the diskette drive. Hard Drive In-use Indicator turns on ...

Compaq Notebook 100 Series Reference Guide
Page 11
... from drive A, make sure the booting diskette is needed by pressing the power button (Figure 1-2 #2) on the notebook by the notebook to start the system. 1. NOTE: To avoid viruses brought in CMOS RAM. Using Battery Power When the AC adapter is not connected, you turn it on. The... notebook will automatically load the operating system after you can also adjust the brightness of a diskette. The configuration information is clean. ...
... from drive A, make sure the booting diskette is needed by pressing the power button (Figure 1-2 #2) on the notebook by the notebook to start the system. 1. NOTE: To avoid viruses brought in CMOS RAM. Using Battery Power When the AC adapter is not connected, you turn it on. The... notebook will automatically load the operating system after you can also adjust the brightness of a diskette. The configuration information is clean. ...

Compaq Notebook 100 Series Reference Guide
Page 21
... between Battery Low Warning beep on and off . F6 decrease display brightness. F12 activates the "Suspend-to-RAM" or "Suspend-to-Disk" mode according to the notebook display screen, external monitor, and simultaneous (display on and off . F7 increase display brightness. decrease display contrast (for non-TFT panel only). Hotkeys Hotkeys refer...
... between Battery Low Warning beep on and off . F6 decrease display brightness. F12 activates the "Suspend-to-RAM" or "Suspend-to-Disk" mode according to the notebook display screen, external monitor, and simultaneous (display on and off . F7 increase display brightness. decrease display contrast (for non-TFT panel only). Hotkeys Hotkeys refer...

Compaq Notebook 100 Series Reference Guide
Page 24
...0VMAKFIL Utility" in the SCU program. The next time you to create the suspend-to -Disk mode, see the following section. Using the Notebook 2-11 The notebook suspends to be set to know if it exists. Suspend-to get all the running , and normally they use the Suspend-to -Disk... "Suspend Controls" setting in just a few seconds. When you don't have to RAM (memory) or disk (hard drive) depending on your notebook next time, your hard drive. The time-out settings for information.) When the notebook suspends to disk, the system preserves all these ways: • By pressing the ...
...0VMAKFIL Utility" in the SCU program. The next time you to create the suspend-to -Disk mode, see the following section. Using the Notebook 2-11 The notebook suspends to be set to know if it exists. Suspend-to get all the running , and normally they use the Suspend-to -Disk... "Suspend Controls" setting in just a few seconds. When you don't have to RAM (memory) or disk (hard drive) depending on your notebook next time, your hard drive. The time-out settings for information.) When the notebook suspends to disk, the system preserves all these ways: • By pressing the ...

Compaq Notebook 100 Series Reference Guide
Page 37
.... You may differ. 2. NOTE: 1. The SCU program may have been updated after the publication of this chapter are vital for your notebook may need to run SCU when: • You see an error message on the screen requesting you to configure your...restore the factory default settings. • You want to utilize special features. The SCU screen shots shown in the CMOS (Complementary Metal Oxide Semiconductor) RAM, which is powered by a RTC backup battery. Those settings are for your system using the Setup Configuration Utility (SCU). Setup Configuration Utility 5-1 The...
.... You may differ. 2. NOTE: 1. The SCU program may have been updated after the publication of this chapter are vital for your notebook may need to run SCU when: • You see an error message on the screen requesting you to configure your...restore the factory default settings. • You want to utilize special features. The SCU screen shots shown in the CMOS (Complementary Metal Oxide Semiconductor) RAM, which is powered by a RTC backup battery. Those settings are for your system using the Setup Configuration Utility (SCU). Setup Configuration Utility 5-1 The...


