Compaq Evo D300v User`s Guide
Page 3
... Operating System......... 1-6 Step 7: Turning Off the Personal Computer 1-6 2 Hardware Upgrades Installation Sequence ...2-1 Removing the Access Panels 2-2 Removing the Front Bezel 2-3 Installing Additional Memory 2-4 Memory Module Installation 2-5 Installing or Removing an Expansion Card 2-7 Removing a 5.25 Inch Drive 2-8 Removing a Diskette Drive or Hard Drive 2-10 3 Setup Utility (Intel Pentium... Setup Screen 3-6 PCI/Plug and Play Setup Screen 3-7 Peripheral Setup Screen 3-8 Hardware Monitor Setup Screen 3-8 Auto-Detect Hard Disks Screen 3-9 Compaq Evo D300v User's Guide iii
... Operating System......... 1-6 Step 7: Turning Off the Personal Computer 1-6 2 Hardware Upgrades Installation Sequence ...2-1 Removing the Access Panels 2-2 Removing the Front Bezel 2-3 Installing Additional Memory 2-4 Memory Module Installation 2-5 Installing or Removing an Expansion Card 2-7 Removing a 5.25 Inch Drive 2-8 Removing a Diskette Drive or Hard Drive 2-10 3 Setup Utility (Intel Pentium... Setup Screen 3-6 PCI/Plug and Play Setup Screen 3-7 Peripheral Setup Screen 3-8 Hardware Monitor Setup Screen 3-8 Auto-Detect Hard Disks Screen 3-9 Compaq Evo D300v User's Guide iii
Compaq Evo D300v User`s Guide
Page 14
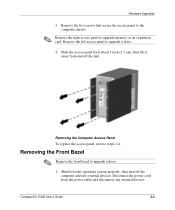
... steps 1-4. Remove the right access panel to the computer chassis. Hardware Upgrades 3. Remove the two screws that secure the access panel to upgrade memory or an expansion card. Compaq Evo D300 User's Guide 2-3 Shut down the operating system properly, then turn off the unit. Slide the access panel back about 1 inch (2.5 cm), then...
... steps 1-4. Remove the right access panel to the computer chassis. Hardware Upgrades 3. Remove the two screws that secure the access panel to upgrade memory or an expansion card. Compaq Evo D300 User's Guide 2-3 Shut down the operating system properly, then turn off the unit. Slide the access panel back about 1 inch (2.5 cm), then...
Compaq Evo D300v User`s Guide
Page 15
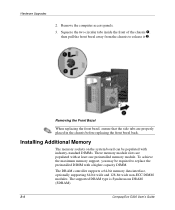
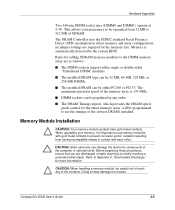
... on the system board can be required to release it 2. The DRAM controller supports a 64-bit memory data interface, optionally supporting 64-bit wide and 128-bit wide non-ECC DIMM modules. Removing the Front Bezel When replacing the front bezel, ensure that the ... before replacing the front bezel back. Hardware Upgrades 2. To achieve the maximum memory support, you may be populated with at least one preinstalled memory module. The supported DRAM type is Synchronous DRAM (SDRAM). 2-4 Compaq Evo D300 User's Guide Remove the computer access panels. 3. Squeeze the two circular...
... on the system board can be required to release it 2. The DRAM controller supports a 64-bit memory data interface, optionally supporting 64-bit wide and 128-bit wide non-ECC DIMM modules. Removing the Front Bezel When replacing the front bezel, ensure that the ... before replacing the front bezel back. Hardware Upgrades 2. To achieve the maximum memory support, you may be populated with at least one preinstalled memory module. The supported DRAM type is Synchronous DRAM (SDRAM). 2-4 Compaq Evo D300 User's Guide Remove the computer access panels. 3. Squeeze the two circular...
Compaq Evo D300v User`s Guide
Page 16
...DRAM speed grade control for more information. CAUTION: When handling a memory module, be either single or double-sided "Unbuffered DIMM" modules. ■ The installed DRAM type can be 32 MB, 64 MB, 128 MB, or 256 MB DIMMs. ■ The installed DRAM can be careful not to ... mechanism to 512 MB of static electricity by the system BIOS. Memory Module Installation CAUTION: Your memory module sockets have gold metal contacts. Refer to the DIMM memory array are as follows: ■ The DIMM sockets support either PC100 or PC133. Compaq Evo D300 User's Guide 2-5 Memory is 133 MHz....
...DRAM speed grade control for more information. CAUTION: When handling a memory module, be either single or double-sided "Unbuffered DIMM" modules. ■ The installed DRAM type can be 32 MB, 64 MB, 128 MB, or 256 MB DIMMs. ■ The installed DRAM can be careful not to ... mechanism to 512 MB of static electricity by the system BIOS. Memory Module Installation CAUTION: Your memory module sockets have gold metal contacts. Refer to the DIMM memory array are as follows: ■ The DIMM sockets support either PC100 or PC133. Compaq Evo D300 User's Guide 2-5 Memory is 133 MHz....
Compaq Evo D300v User`s Guide
Page 17
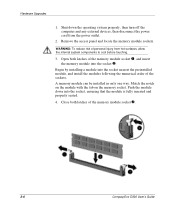
...memory module socket 3. 2-6 Compaq Evo D300 User's Guide Match the notch on the module with the tab on the memory socket. Begin by installing a module into the socket nearest the preinstalled module, and install the modules following the numerical order of the memory module socket 1, and insert the memory... Upgrades 1. Shut down into the socket 2. Close both latches of the sockets. Remove the access panel and locate the memory module sockets. A memory module can be installed in only one way. Push the module down the operating system properly, then turn off the computer...
...memory module socket 3. 2-6 Compaq Evo D300 User's Guide Match the notch on the module with the tab on the memory socket. Begin by installing a module into the socket nearest the preinstalled module, and install the modules following the numerical order of the memory module socket 1, and insert the memory... Upgrades 1. Shut down into the socket 2. Close both latches of the sockets. Remove the access panel and locate the memory module sockets. A memory module can be installed in only one way. Push the module down the operating system properly, then turn off the computer...
Compaq Evo D300v User`s Guide
Page 25
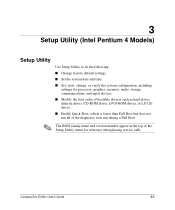
...default settings. ■ Set the system date and time. ■ Set, view, change, or verify the system configuration, including settings for processor, graphics, memory, audio, storage, communications, and input devices. ■ Modify the boot order of bootable devices such as hard drives, diskette drives, CD-ROM drives, DVD-..., which is faster than Full Boot but does not run all of the Setup Utility menu for reference when placing service calls. Compaq Evo D300v User's Guide 3-1 The BIOS family name and version number appear at the top of the diagnostic tests run during a Full Boot.
...default settings. ■ Set the system date and time. ■ Set, view, change, or verify the system configuration, including settings for processor, graphics, memory, audio, storage, communications, and input devices. ■ Modify the boot order of bootable devices such as hard drives, diskette drives, CD-ROM drives, DVD-..., which is faster than Full Boot but does not run all of the Setup Utility menu for reference when placing service calls. Compaq Evo D300v User's Guide 3-1 The BIOS family name and version number appear at the top of the diagnostic tests run during a Full Boot.
Compaq Evo D300v User`s Guide
Page 27
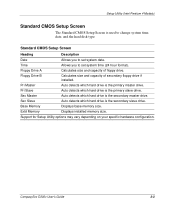
Pri Slave Auto detects which hard drive is the primary slave drive. Compaq Evo D300v User's Guide 3-3 Time Allows you to set system time (24 hour format). Sec Slave Auto detects which hard drive is the secondary slave drive.... Floppy Drive B Calculates size and capacity of floppy drive. Floppy Drive A Calculates size and capacity of secondary floppy drive if installed. Extd Memory Displays installed memory size. Pri Master Auto detects which hard drive is the primary master drive. Sec Master Auto detects which hard drive is the secondary master...
Pri Slave Auto detects which hard drive is the primary slave drive. Compaq Evo D300v User's Guide 3-3 Time Allows you to set system time (24 hour format). Sec Slave Auto detects which hard drive is the secondary slave drive.... Floppy Drive B Calculates size and capacity of floppy drive. Floppy Drive A Calculates size and capacity of secondary floppy drive if installed. Extd Memory Displays installed memory size. Pri Master Auto detects which hard drive is the primary master drive. Sec Master Auto detects which hard drive is the secondary master...
Compaq Evo D300v User`s Guide
Page 36
... mouse remain locked until the power-on password is turned on password is displayed regardless of Power-On Self-Test (POST) messages. Compaq Evo D300v User's Guide 4-1 To manually switch to Post Messages Enabled during a Full Boot. ■ Enable or disable Network Server Mode, ...Disabled to change , or verify the system configuration, including settings for processor, graphics, memory, audio, storage, communications, and input devices. ■ Modify the boot order of bootable devices such as memory count, product name, and other non-error text messages. 4 Setup Utility (Intel Celeron...
... mouse remain locked until the power-on password is turned on password is displayed regardless of Power-On Self-Test (POST) messages. Compaq Evo D300v User's Guide 4-1 To manually switch to Post Messages Enabled during a Full Boot. ■ Enable or disable Network Server Mode, ...Disabled to change , or verify the system configuration, including settings for processor, graphics, memory, audio, storage, communications, and input devices. ■ Modify the boot order of bootable devices such as memory count, product name, and other non-error text messages. 4 Setup Utility (Intel Celeron...
Compaq Evo D300v User`s Guide
Page 39
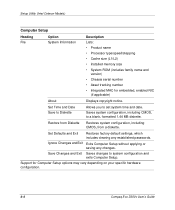
...Diskette Restores system configuration, including CMOS, from a diskette. Save Changes and Exit Saves changes to a blank, formatted 1.44 MB diskette. Support for embedded, enabled NIC (if applicable) About Displays copyright notice. Setup Utility (Intel Celeron Models) Computer Setup...) • Installed memory size • System ROM (includes family name and version) • Chassis serial number • Asset tracking number • Integrated MAC for Computer Setup options may vary depending on your specific hardware configuration. 4-4 Compaq Evo D300v User's Guide Set ...
...Diskette Restores system configuration, including CMOS, from a diskette. Save Changes and Exit Saves changes to a blank, formatted 1.44 MB diskette. Support for embedded, enabled NIC (if applicable) About Displays copyright notice. Setup Utility (Intel Celeron Models) Computer Setup...) • Installed memory size • System ROM (includes family name and version) • Chassis serial number • Asset tracking number • Integrated MAC for Computer Setup options may vary depending on your specific hardware configuration. 4-4 Compaq Evo D300v User's Guide Set ...
Compaq Evo D300v User`s Guide
Page 50
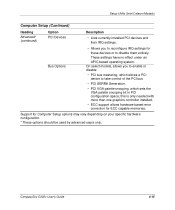
... Computer Setup options may vary depending on your specific hardware configuration. * These options should be used by advanced users only. Compaq Evo D300v User's Guide 4-15 Setup Utility (Intel Celeron Models) Computer Setup (Continued) Heading Advanced* (continued) Option PCI Devices Description... • Lists currently installed PCI devices and their IRQ settings. Support for ECC capable memories. Bus Options • Allows you to enable or disable: • PCI bus mastering, which sets the VGA palette snooping ...
... Computer Setup options may vary depending on your specific hardware configuration. * These options should be used by advanced users only. Compaq Evo D300v User's Guide 4-15 Setup Utility (Intel Celeron Models) Computer Setup (Continued) Heading Advanced* (continued) Option PCI Devices Description... • Lists currently installed PCI devices and their IRQ settings. Support for ECC capable memories. Bus Options • Allows you to enable or disable: • PCI bus mastering, which sets the VGA palette snooping ...

Compaq Evo D300v User`s Guide
Page 52
... Celeron Models) Computer Setup (Continued) Heading Option Description Advanced* (continued) Device Options (continued) Allows you to specify the amount of system memory reserved for use by your specific hardware configuration. * These options should be the "boot" or primary VGA controller. Allows ROM to set...a boot from the S3 sleep state. • ACPI S3 PS2 Mouse Wake Up (enable/disable). Support for Pentium III processors. Compaq Evo D300v User's Guide 4-17 PCI VGA Configuration Appears only if there are multiple PCI video adapters in the system. Resets the hard disk on...
... Celeron Models) Computer Setup (Continued) Heading Option Description Advanced* (continued) Device Options (continued) Allows you to specify the amount of system memory reserved for use by your specific hardware configuration. * These options should be the "boot" or primary VGA controller. Allows ROM to set...a boot from the S3 sleep state. • ACPI S3 PS2 Mouse Wake Up (enable/disable). Support for Pentium III processors. Compaq Evo D300v User's Guide 4-17 PCI VGA Configuration Appears only if there are multiple PCI video adapters in the system. Resets the hard disk on...
Compaq Evo D300v User`s Guide
Page 71
... time/date, changing 3-3 T text conventions 1-ii time, changing system 3-3 W warnings battery replacement A-1 hot surfaces 2-6 misuse of computer 1-1 power cords 1-4 Index-2 Compaq Evo D300v User's Guide Index F FCC compliance (agency notice) E-1 front bezel removing 2-4 H hard disk auto-detect 3-9 I identification numbers (agency notice) E- 1 installation sequence 2-1...1-1 computer turn-off 1-6 connect external devices 1-3 connect power cords 1-4 external devices 1-3 front panel components 1-5 power cords 1-4 voltage 1-2 R RAM (random access memory). See memory regulatory agency notices.
... time/date, changing 3-3 T text conventions 1-ii time, changing system 3-3 W warnings battery replacement A-1 hot surfaces 2-6 misuse of computer 1-1 power cords 1-4 Index-2 Compaq Evo D300v User's Guide Index F FCC compliance (agency notice) E-1 front bezel removing 2-4 H hard disk auto-detect 3-9 I identification numbers (agency notice) E- 1 installation sequence 2-1...1-1 computer turn-off 1-6 connect external devices 1-3 connect power cords 1-4 external devices 1-3 front panel components 1-5 power cords 1-4 voltage 1-2 R RAM (random access memory). See memory regulatory agency notices.


