Safety and Regulatory Information Desktops, Thin Clients, and Personal Workstations
Page 16
There shall be set to operate within any 30-minute period for compliance with Telecom's Specifications: a. Where automatic calls are made to any single manual call attempts to the same number within the following limits for any other party. This requires that at least one party to the conversation is ...
There shall be set to operate within any 30-minute period for compliance with Telecom's Specifications: a. Where automatic calls are made to any single manual call attempts to the same number within the following limits for any other party. This requires that at least one party to the conversation is ...
Warranty
Page 11
... calls: Incoming calls shall be followed to reduce the risk of fire, electric shock, and injury to operate within any 30-minute period for a single manual call attempts to its network. for example, near a bathtub, wash bowl, kitchen sink, or laundry tub, in all times. The AC power cord is provided...
... calls: Incoming calls shall be followed to reduce the risk of fire, electric shock, and injury to operate within any 30-minute period for a single manual call attempts to its network. for example, near a bathtub, wash bowl, kitchen sink, or laundry tub, in all times. The AC power cord is provided...

Warranty and Support Guide
Page 11
... Arrow button next to perform the system recovery. The feature does this document. When a new program is a software program that can also set restore points manually. You can remain after you to restore your computer. Or To revert to that of a driver, click Rollback Driver, and follow provide detailed instructions for...
... Arrow button next to perform the system recovery. The feature does this document. When a new program is a software program that can also set restore points manually. You can remain after you to restore your computer. Or To revert to that of a driver, click Rollback Driver, and follow provide detailed instructions for...
Warranty and Support Guide
Page 12
... the onscreen instructions. 5 When you have finished reinstalling, restart the computer. Reinstall these programs directly from a set of installable programs in the computer box. To manually add restore points: 1 Close all open programs. 2 Click the Windows Vista start button, All Programs, PC Help & Tools, and then click Recovery Manager. 2 Click Advanced...
... the onscreen instructions. 5 When you have finished reinstalling, restart the computer. Reinstall these programs directly from a set of installable programs in the computer box. To manually add restore points: 1 Close all open programs. 2 Click the Windows Vista start button, All Programs, PC Help & Tools, and then click Recovery Manager. 2 Click Advanced...

Warranty and Support Guide
Page 19
... operators require that the approval is for connection to the PSTN via the telephone line interface supplied with no guarantee of correct working in all manually programmed telephone numbers are advised that intended users of their network request permission to connect and for use this product to report a gas leak in...
... operators require that the approval is for connection to the PSTN via the telephone line interface supplied with no guarantee of correct working in all manually programmed telephone numbers are advised that intended users of their network request permission to connect and for use this product to report a gas leak in...
Warranty and Support Guide
Page 11
... different numbers: The equipment shall be followed to reduce the risk of fire, electric shock, and injury to persons, including the following limits for a single manual call initiation. Some parameters required for use in a wet basement, or near water; For your safety, the power cord provided with your computer and void...
... different numbers: The equipment shall be followed to reduce the risk of fire, electric shock, and injury to persons, including the following limits for a single manual call initiation. Some parameters required for use in a wet basement, or near water; For your safety, the power cord provided with your computer and void...
Getting Started Guide
Page 6
... 86 Searching the Internet 86 Restricting Internet content 87 Using the Norton Internet Security Antivirus Software 88 Configuring and registering Norton Internet Security software 88 Manually running a scan 88 Setting a Full System Scan time 89 Setting up a Custom Scan time 89 Sending and Receiving E-Mail 90 Using Windows Mail 90 Using...
... 86 Searching the Internet 86 Restricting Internet content 87 Using the Norton Internet Security Antivirus Software 88 Configuring and registering Norton Internet Security software 88 Manually running a scan 88 Setting a Full System Scan time 89 Setting up a Custom Scan time 89 Sending and Receiving E-Mail 90 Using Windows Mail 90 Using...
Getting Started Guide
Page 7
... the Drive to a Computer Without a Drive Bay 117 Locating the Drive and Assigning a Drive Letter 118 Using the Drive 119 Transferring files to another computer manually 119 Disconnecting the Drive 120 Troubleshooting the HP Media Drive 121 Table of Contents vii
... the Drive to a Computer Without a Drive Bay 117 Locating the Drive and Assigning a Drive Letter 118 Using the Drive 119 Transferring files to another computer manually 119 Disconnecting the Drive 120 Troubleshooting the HP Media Drive 121 Table of Contents vii
Getting Started Guide
Page 14
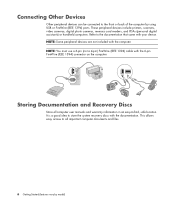
... or FireWire (IEEE 1394) ports. It is a good idea to the documentation that came with the documentation. This allows easy access to all computer user manuals and warranty information in an easy-to the front or back of the computer by model) Connecting Other Devices Other peripheral devices can be connected...
... or FireWire (IEEE 1394) ports. It is a good idea to the documentation that came with the documentation. This allows easy access to all computer user manuals and warranty information in an easy-to the front or back of the computer by model) Connecting Other Devices Other peripheral devices can be connected...

Getting Started Guide
Page 41
...browser. 2 Select your country/region and language. 3 Click Support and Drivers. 4 Enter the model number of your computer, and then click Search . 5 Click Manuals. 6 Locate the manual you want, and then do one of the following: Click the title to display the file in Adobe Acrobat Reader (which you want to... item to save the file, rename the file (retaining the .pdf extension), and then click Save. on the Web You can download from the Manuals page if it . NOTE: If there are available in the folder, your computer). Finding Guides on the taskbar. Getting Help 33 Getting Help Finding...
...browser. 2 Select your country/region and language. 3 Click Support and Drivers. 4 Enter the model number of your computer, and then click Search . 5 Click Manuals. 6 Locate the manual you want, and then do one of the following: Click the title to display the file in Adobe Acrobat Reader (which you want to... item to save the file, rename the file (retaining the .pdf extension), and then click Save. on the Web You can download from the Manuals page if it . NOTE: If there are available in the folder, your computer). Finding Guides on the taskbar. Getting Help 33 Getting Help Finding...
Getting Started Guide
Page 45
.... (When you can do not want to the Internet." 7 Norton Internet Security automatically opens. See "Connecting to set up the computer by manually starting Easy Internet Services. NOTE: If you stop the setup procedure, when you are ready to turn on the computer. 1 Press the Power...and get online. If you do so later by following the onscreen instructions. 6 Follow the onscreen instructions to register with HP or Compaq, sign up Microsoft Windows Vista by following the onscreen instructions. If prompted, select the country/region in which protects the computer and your privacy...
.... (When you can do not want to the Internet." 7 Norton Internet Security automatically opens. See "Connecting to set up the computer by manually starting Easy Internet Services. NOTE: If you stop the setup procedure, when you are ready to turn on the computer. 1 Press the Power...and get online. If you do so later by following the onscreen instructions. 6 Follow the onscreen instructions to register with HP or Compaq, sign up Microsoft Windows Vista by following the onscreen instructions. If prompted, select the country/region in which protects the computer and your privacy...

Getting Started Guide
Page 47
... password. The next time that you use the computer, any programs, folders, and documents that were open before you put the computer into Sleep mode manually: Press the Sleep button on the keyboard, if it to do so. Or on the taskbar. 1 Click the Windows Start Button on the front of...
... password. The next time that you use the computer, any programs, folders, and documents that were open before you put the computer into Sleep mode manually: Press the Sleep button on the keyboard, if it to do so. Or on the taskbar. 1 Click the Windows Start Button on the front of...

Getting Started Guide
Page 48
... taskbar. 2 Click the Arrow button next to the Lock button. 3 Click Hibernate, if it is in Hibernate mode, it saves to go into Hibernate mode manually: 1 Click the Windows Start Button on the taskbar. 2 Click the Arrow button next to the Lock button. 3 Click Restart. 40 Getting Started (features vary by...
... taskbar. 2 Click the Arrow button next to the Lock button. 3 Click Hibernate, if it is in Hibernate mode, it saves to go into Hibernate mode manually: 1 Click the Windows Start Button on the taskbar. 2 Click the Arrow button next to the Lock button. 3 Click Restart. 40 Getting Started (features vary by...

Getting Started Guide
Page 80
... for Realtek to display the Speakers tab. 5 Click the Speakers tab to All Programs. 3 Click Creative, Sound Blaster X-Fi, and then click Documentation. 4 Click Online Manual. Configuring speakers with Realtek HD Audio Manager After you have your computer model has type 6 connectors and is capable of multistreaming audio: 1 Click the Windows...
... for Realtek to display the Speakers tab. 5 Click the Speakers tab to All Programs. 3 Click Creative, Sound Blaster X-Fi, and then click Documentation. 4 Click Online Manual. Configuring speakers with Realtek HD Audio Manager After you have your computer model has type 6 connectors and is capable of multistreaming audio: 1 Click the Windows...

Getting Started Guide
Page 81
... digital, and select the digital audio output and digital audio input devices. Under Equalizer, you can select an environment, such as Pop or Live, or manually adjust the settings and then save them for easy selection later. The Realtek HD Audio Manager control screens Digital Output: Enables you to select the...
... digital, and select the digital audio output and digital audio input devices. Under Equalizer, you can select an environment, such as Pop or Live, or manually adjust the settings and then save them for easy selection later. The Realtek HD Audio Manager control screens Digital Output: Enables you to select the...

Getting Started Guide
Page 83
... later. Configuring Speaker and Sound Options 75 see "Retasking front panel audio connectors." NOTE: You can select an environment, such as Pop or Live, or manually adjust the settings and then save them for recording sound. HDMI Output: Enables you to perform other audio functions; You can retask the front pink...
... later. Configuring Speaker and Sound Options 75 see "Retasking front panel audio connectors." NOTE: You can select an environment, such as Pop or Live, or manually adjust the settings and then save them for recording sound. HDMI Output: Enables you to perform other audio functions; You can retask the front pink...
Getting Started Guide
Page 96
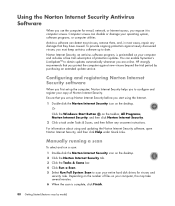
...-click the Norton Internet Security icon on the taskbar, All Programs, Norton Internet Security, and then click Norton Internet Security. 2 Click a task under Quick Links. Manually running a scan To select and run a scan: 1 Double-click the Norton Internet Security icon on the desktop. 2 Click the Norton Internet Security tab. 3 Click the...
...-click the Norton Internet Security icon on the taskbar, All Programs, Norton Internet Security, and then click Norton Internet Security. 2 Click a task under Quick Links. Manually running a scan To select and run a scan: 1 Double-click the Norton Internet Security icon on the desktop. 2 Click the Norton Internet Security tab. 3 Click the...
Getting Started Guide
Page 107
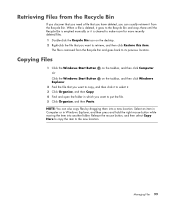
... you want to its previous location. When a file is deleted, it goes to the Recycle Bin and stays there until the Recycle Bin is emptied manually or it is removed from the Recycle Bin and goes back to retrieve, and then click Restore this item. Select an item in Computer or...
... you want to its previous location. When a file is deleted, it goes to the Recycle Bin and stays there until the Recycle Bin is emptied manually or it is removed from the Recycle Bin and goes back to retrieve, and then click Restore this item. Select an item in Computer or...

Getting Started Guide
Page 108
... pages). If it does not, follow the instructions that came with the printer to install the specific printer driver manually. To print: 1 Click File on connecting and using a printer, refer to the user manual that came with the printer. Using a Printer For instructions on the program menu bar, and then click Print...
... pages). If it does not, follow the instructions that came with the printer to install the specific printer driver manually. To print: 1 Click File on connecting and using a printer, refer to the user manual that came with the printer. Using a Printer For instructions on the program menu bar, and then click Print...

Getting Started Guide
Page 127
To transfer your files manually: 1 Connect the drive to the computer. 2 Select your files, and then drag and drop them to the computer, place the drive in a well-ventilated area. ... letter Z. 7 Click Change. 8 Select a letter from using the HP Media Drive connected externally to the new computer's hard disk drive. Transferring files to another computer manually You can transfer your files and then drag and drop them to the HP Media Drive in , low-noise fan is completely normal. Using the...
To transfer your files manually: 1 Connect the drive to the computer. 2 Select your files, and then drag and drop them to the computer, place the drive in a well-ventilated area. ... letter Z. 7 Click Change. 8 Select a letter from using the HP Media Drive connected externally to the new computer's hard disk drive. Transferring files to another computer manually You can transfer your files and then drag and drop them to the HP Media Drive in , low-noise fan is completely normal. Using the...


