User Manual
Page 1
ngli h DVDICDIMP3 PLAYER DVD- 537 USER'S MANUAL VIDEO dOMAM DIGITAL AUDIO 00 DOLBY DIGITAL Please read this manual before connection and use:.
ngli h DVDICDIMP3 PLAYER DVD- 537 USER'S MANUAL VIDEO dOMAM DIGITAL AUDIO 00 DOLBY DIGITAL Please read this manual before connection and use:.
User Manual
Page 4
... alert the user to qualified service personnel under the following the instruction manual.. Do not use of the lead- This will help avoid any service or repairs to this video product from electrical shock or fire. Do not use this video product near a swimming pool and the like. Powerline operated equipment or accessories connected to this A The lightning flash with an extension cord, receptacle...
... alert the user to qualified service personnel under the following the instruction manual.. Do not use of the lead- This will help avoid any service or repairs to this video product from electrical shock or fire. Do not use this video product near a swimming pool and the like. Powerline operated equipment or accessories connected to this A The lightning flash with an extension cord, receptacle...

User Manual
Page 5
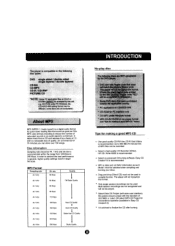
... Digital audio output (coaxial) Dolby Digita output DTS Digital output DVD features: Multi Subtitle selection Multi Language selection Multi Angle selection Other features: On screen display menu Digital zooming Slow motion Parental control Auto screen saver JPEG picture view Manufactured umlei floonoe from a DVD disc to any media. itAs prorAAA tAchnotEllf thAt is connected to digital amplifier GETTING STARTED Playa disc Problem disc message Power management ON SCREEN DISPLAY DVD mode CD mode MP3 mode FUNCTION BUTTONS SETUP MENU LANGUAGE SCREEN SETUP AUDIO SETUP CUSTOM SETUP TROUBLE...
... Digital audio output (coaxial) Dolby Digita output DTS Digital output DVD features: Multi Subtitle selection Multi Language selection Multi Angle selection Other features: On screen display menu Digital zooming Slow motion Parental control Auto screen saver JPEG picture view Manufactured umlei floonoe from a DVD disc to any media. itAs prorAAA tAchnotEllf thAt is connected to digital amplifier GETTING STARTED Playa disc Problem disc message Power management ON SCREEN DISPLAY DVD mode CD mode MP3 mode FUNCTION BUTTONS SETUP MENU LANGUAGE SCREEN SETUP AUDIO SETUP CUSTOM SETUP TROUBLE...
User Manual
Page 6
... DVD Regional Code System that z.,r. The MPEG II video compression technology provides capacity for an excellent picture of disc Video disc contains high-density compressed data that needs proper handling • Hold the disc with a soft, dry cleaning cloth. Some features cannot be distorted during recording, REMARK Some features contained in this DVD player are some of the symbols representing the features: Number of Audio...
... DVD Regional Code System that z.,r. The MPEG II video compression technology provides capacity for an excellent picture of disc Video disc contains high-density compressed data that needs proper handling • Hold the disc with a soft, dry cleaning cloth. Some features cannot be distorted during recording, REMARK Some features contained in this DVD player are some of the symbols representing the features: Number of Audio...
User Manual
Page 7
... a digital audio format for quick down loading files that does not match the pleyerls-Region code. MP3 uses entropy encoding to reduce the number of 74 minutes you can be recorded. Disc information Sampling rate should comply with Regan code that sound as good as such Model must be selected when compiling and burning your discs. • Drag and drop (Direct CD) must not be used . Plea the disc.'s region code...
... a digital audio format for quick down loading files that does not match the pleyerls-Region code. MP3 uses entropy encoding to reduce the number of 74 minutes you can be recorded. Disc information Sampling rate should comply with Regan code that sound as good as such Model must be selected when compiling and burning your discs. • Drag and drop (Direct CD) must not be used . Plea the disc.'s region code...
User Manual
Page 8
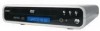
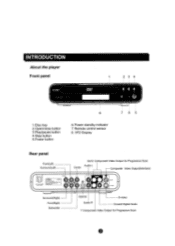
Disc tray 2.Open/close button 3.Play/pause button 4.Stop button 5.Power button 6. COBYI rn(p.p NN. 8 1. Power standby indicator 7. VFD Display 23 4 7 65 Rear panel Front(Left) Surround(Left) Center Cb/Cr Component Video Output for Progressive Scan Audio L Composite Video Output(Interlace) COBYe ovoe37 SL 0 Fl CENT 0 ,0 Sp 0 0 F EOP, TIC O o Surround(Right) Front(Right) Subwoofer Optical Audio R S-video oaxial Digital Audio Y Component Video Output for Progressive Scan INTRODUCTION About the player Front panel WV. Remote control sensor 8.
Disc tray 2.Open/close button 3.Play/pause button 4.Stop button 5.Power button 6. COBYI rn(p.p NN. 8 1. Power standby indicator 7. VFD Display 23 4 7 65 Rear panel Front(Left) Surround(Left) Center Cb/Cr Component Video Output for Progressive Scan Audio L Composite Video Output(Interlace) COBYe ovoe37 SL 0 Fl CENT 0 ,0 Sp 0 0 F EOP, TIC O o Surround(Right) Front(Right) Subwoofer Optical Audio R S-video oaxial Digital Audio Y Component Video Output for Progressive Scan INTRODUCTION About the player Front panel WV. Remote control sensor 8.
User Manual
Page 9
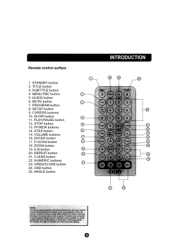
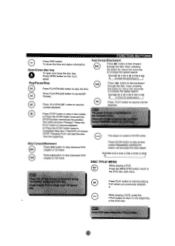
PROGRAM button 8. FF/REW buttons 14. ENTER button 17. CLEAR button 22. OPEN/CLOSE button 24. OSD button 25. r the sensor cannot receive signeq€E(E1Silii1ilfiit may not be able tr illrOr sunlight or a strung In this case change direct STANDBY button 2. CURSOR buttons 10. SLOW button 11. STEP button 15. MENU PBC button 5. STOP button 13. MUTE button 7. SETUP button 9. A-B button 20. Remote control surface 1. TITLE button 3. PLAY/PAUSE button 12. VOLUME buttons 16. ZOOM button 19. REPEAT button 21. When the stsStSkillItil covered or...
PROGRAM button 8. FF/REW buttons 14. ENTER button 17. CLEAR button 22. OPEN/CLOSE button 24. OSD button 25. r the sensor cannot receive signeq€E(E1Silii1ilfiit may not be able tr illrOr sunlight or a strung In this case change direct STANDBY button 2. CURSOR buttons 10. SLOW button 11. STEP button 15. MENU PBC button 5. STOP button 13. MUTE button 7. SETUP button 9. A-B button 20. Remote control surface 1. TITLE button 3. PLAY/PAUSE button 12. VOLUME buttons 16. ZOOM button 19. REPEAT button 21. When the stsStSkillItil covered or...
User Manual
Page 10
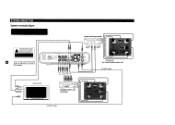
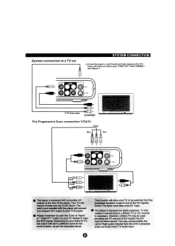
SYSTEM CONNECTION System connection figure A The player has built in copyright protection technology athat prevents copying from DVD disc to purchase a RF modulator Digital decoding amplifier 00 === 0 0 r. Ifyour TV does not have AV input jacks you will need to any media. o Coaxial Input Optical Input 0 O 0 0 Q Connect to the Coaxial/Optical output only S-VIDEO Cable Television Set I=I 000 ese Amplifier with 5.1ch connector S-VIDEO Cable all ail Ce
SYSTEM CONNECTION System connection figure A The player has built in copyright protection technology athat prevents copying from DVD disc to purchase a RF modulator Digital decoding amplifier 00 === 0 0 r. Ifyour TV does not have AV input jacks you will need to any media. o Coaxial Input Optical Input 0 O 0 0 Q Connect to the Coaxial/Optical output only S-VIDEO Cable Television Set I=I 000 ese Amplifier with 5.1ch connector S-VIDEO Cable all ail Ce
User Manual
Page 11
... audio channel from the DVD Composite audio out to view the DVD signal. The player is necessary. O The patch cord supplied with composite AN outputs at least one AN input. That function will have more than one set 0 S • Connect the player's L and R Audio and Video Outputs to the TV's Audio L&R Audio and Video Inputs."VIDEO OUT" setup"NORMAL", see Diagram 1. 0 0 O To TV Video input DIAGRAM1 The Progressive Scan connection Y/Cb/Cr Green Blue Red 0 AXIAL 0 0 Blue IMINO Green Red ......., • The player...
... audio channel from the DVD Composite audio out to view the DVD signal. The player is necessary. O The patch cord supplied with composite AN outputs at least one AN input. That function will have more than one set 0 S • Connect the player's L and R Audio and Video Outputs to the TV's Audio L&R Audio and Video Inputs."VIDEO OUT" setup"NORMAL", see Diagram 1. 0 0 O To TV Video input DIAGRAM1 The Progressive Scan connection Y/Cb/Cr Green Blue Red 0 AXIAL 0 0 Blue IMINO Green Red ......., • The player...
User Manual
Page 12
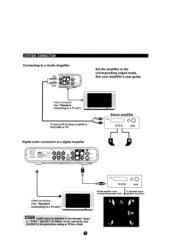
... White Set the amplifier to the 15.1 decoded output corresponding output mode. ♦ speakers connection OR sw S See"SET UP MENU" of this manual for the appropriate setting of stereo amplifier's AUX,LINE or CD Stereo amplifier I=I 0 0 S *CI Digital audio connection to a digital Amplifier oo+ 9 0w 00 000 Video connection (See "Standard connecting to a TV set ") NOTE Digital output is selective in two formats:" RAW " or " PCM ". See your amplifier for your amplifier's user guide...
... White Set the amplifier to the 15.1 decoded output corresponding output mode. ♦ speakers connection OR sw S See"SET UP MENU" of this manual for the appropriate setting of stereo amplifier's AUX,LINE or CD Stereo amplifier I=I 0 0 S *CI Digital audio connection to a digital Amplifier oo+ 9 0w 00 000 Video connection (See "Standard connecting to a TV set ") NOTE Digital output is selective in two formats:" RAW " or " PCM ". See your amplifier for your amplifier's user guide...
User Manual
Page 13
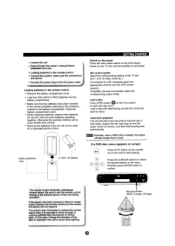
... time to load. In this owner's manual before Installation and use. • Loading batteries in the remote control. • Connect the system, make sure the connections are secure. • Connect the power plug to the AC power outlet. Set up and then close the door by hand. If amplifier has been connected, select the corresponding output mode. Automatic playback The unit will not respond. Battery compartment cover "illk 2 x "AAA" 1.5V batteries If a DVD disc menu appears on screen Press PLAY button...
... time to load. In this owner's manual before Installation and use. • Loading batteries in the remote control. • Connect the system, make sure the connections are secure. • Connect the power plug to the AC power outlet. Set up and then close the door by hand. If amplifier has been connected, select the corresponding output mode. Automatic playback The unit will not respond. Battery compartment cover "illk 2 x "AAA" 1.5V batteries If a DVD disc menu appears on screen Press PLAY button...
User Manual
Page 14
... loaded disc: "WRONG REGIONAL DISC " Region code of time, please unplug the unit for a long period of the disc does not match the player's region code (region 1 to enjoy DTS audio system. DTS DISC For DTS digital audio stream only No analog audio output. "WRONG PASSWORD" The rating level of the disc is higher than the rating level of DTS setting. • Connect the digital audio output (coaxial) to a digital amplifier, in no analog audio output if DTS sound output...
... loaded disc: "WRONG REGIONAL DISC " Region code of time, please unplug the unit for a long period of the disc does not match the player's region code (region 1 to enjoy DTS audio system. DTS DISC For DTS digital audio stream only No analog audio output. "WRONG PASSWORD" The rating level of the disc is higher than the rating level of DTS setting. • Connect the digital audio output (coaxial) to a digital amplifier, in no analog audio output if DTS sound output...
User Manual
Page 17
.... Open/Close disc tray To open and close the disc tray. 0 Press OPEN button on the front panel. Keep pressing the button for about two seconds to the beginning of a DVD ritSt. NI O Press PLAY/PAUSE button to skip backward DVD chapter or CD track. Press the PLAY button to fast forward through the disc. The player is muted in two modes. FUNCTION BUTTONS Press OSD button. To show "Prestop". Fast forward/backward Press NI button to resume playback. Normal...
.... Open/Close disc tray To open and close the disc tray. 0 Press OPEN button on the front panel. Keep pressing the button for about two seconds to the beginning of a DVD ritSt. NI O Press PLAY/PAUSE button to skip backward DVD chapter or CD track. Press the PLAY button to fast forward through the disc. The player is muted in two modes. FUNCTION BUTTONS Press OSD button. To show "Prestop". Fast forward/backward Press NI button to resume playback. Normal...
User Manual
Page 18
Press ENTER button to normal play =LE Some DVD discs do not allow the A-S function playback. Press the A-B button again to return to confirm a ENTER selection. Numeric Key Pad (Random Program access) 000 1) Access a DVD Chapteror a CD track 000 directly. 000, 2) Input data while editing menu. 00f NOTE Some DVD discs do not allow direct access function. ENTER Press ENTER button to select the repeat mode. REPEAT Press REPEAT button repeatedly to execute the search. In DVD mode REP. Press the...
Press ENTER button to normal play =LE Some DVD discs do not allow the A-S function playback. Press the A-B button again to return to confirm a ENTER selection. Numeric Key Pad (Random Program access) 000 1) Access a DVD Chapteror a CD track 000 directly. 000, 2) Input data while editing menu. 00f NOTE Some DVD discs do not allow direct access function. ENTER Press ENTER button to select the repeat mode. REPEAT Press REPEAT button repeatedly to execute the search. In DVD mode REP. Press the...
User Manual
Page 19
.... Volume level will display: 25%-->50%-->100%-->150%-->200% While at 150% or 200%, press the direction button to 32 Set Up Menu. Press CLEAR again to digital audio output level when a DVD PRO. • • Multi - A DVD disc may contain up to move the picture position. The Set Up Menu allows the viewer to adjust the setting details of the player .Please read SUS While playing a DVD disc, press SUBTITLE TITLE button to 8 selectable audio sound tracks. A DVD disc...
.... Volume level will display: 25%-->50%-->100%-->150%-->200% While at 150% or 200%, press the direction button to 32 Set Up Menu. Press CLEAR again to digital audio output level when a DVD PRO. • • Multi - A DVD disc may contain up to move the picture position. The Set Up Menu allows the viewer to adjust the setting details of the player .Please read SUS While playing a DVD disc, press SUBTITLE TITLE button to 8 selectable audio sound tracks. A DVD disc...

User Manual
Page 20
... MP3 mode When the program menu appears, input the O Track number and press 0 button to cancel incorrect input informationor cancel the desired track. Press CLEAR again to quit the program mode. (CLEAR) --- Neither single track nor mp3 disc can be programmed. Highlight LANGUAGE with the directional keys and press ENTER. NOTE Make sure the DVD player is in STOP mode before selecting items in the SETUP menu: 1, Press SETUP button , SETUP menu appears. The screen will display...
... MP3 mode When the program menu appears, input the O Track number and press 0 button to cancel incorrect input informationor cancel the desired track. Press CLEAR again to quit the program mode. (CLEAR) --- Neither single track nor mp3 disc can be programmed. Highlight LANGUAGE with the directional keys and press ENTER. NOTE Make sure the DVD player is in STOP mode before selecting items in the SETUP menu: 1, Press SETUP button , SETUP menu appears. The screen will display...
User Manual
Page 23
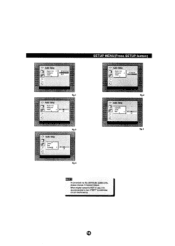
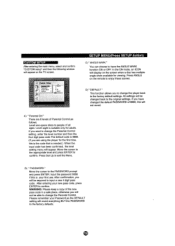
fig.2 LJl AnalogSul sirj Conkr Per off fig 4 fig 5 NOTE If connected via the L&R Audio cables only. please choose 2 Channel Output. on flg.1 cii, ) Audio Setup fig 3 on SETUP MENU(Press SETUP button) - _ CB Digital Out Anal:m.4 -El Cantor 2 Channel Or- When digital output is NOT In use, It is recommended to turn irOFP to minimize circuit interfenence. i,so.S.oup rn Digital Out Analog out el, Cantor he SPDIF/PCM OFF Au* Setup T1 Digital Out Analog otff Conte/ ot.
fig.2 LJl AnalogSul sirj Conkr Per off fig 4 fig 5 NOTE If connected via the L&R Audio cables only. please choose 2 Channel Output. on flg.1 cii, ) Audio Setup fig 3 on SETUP MENU(Press SETUP button) - _ CB Digital Out Anal:m.4 -El Cantor 2 Channel Or- When digital output is NOT In use, It is recommended to turn irOFP to minimize circuit interfenence. i,so.S.oup rn Digital Out Analog out el, Cantor he SPDIF/PCM OFF Au* Setup T1 Digital Out Analog otff Conte/ ot.
User Manual
Page 24
..., you to change the player back to change the Parental Control setting, enter the level number and then the four digit pass code.The default code is needed.) When the input code has been confirmed, the level setting menu will be required to input a new 4 digit pass code. If you have the ANGLE MARK function ON or OFF. A) " Parental Ctrl " There are using the player for the first time, this is the code that is...
..., you to change the player back to change the Parental Control setting, enter the level number and then the four digit pass code.The default code is needed.) When the input code has been confirmed, the level setting menu will be required to input a new 4 digit pass code. If you have the ANGLE MARK function ON or OFF. A) " Parental Ctrl " There are using the player for the first time, this is the code that is...
User Manual
Page 25
... not connected through a VCR,Cable or Satellite dish. " of this manual. • Select the screen setup from the player's Set Up Menu. When the player detects a problem or damaged disc, the player may keep playing the disc at lower quality or stop playing, which will be condensed inside the player. Remove the disc and leave the unit power on for one . • Moisture may be displayed when there is a problem with the loaded disc: • "WRONG REGIONAL DISC": Disc's region code...
... not connected through a VCR,Cable or Satellite dish. " of this manual. • Select the screen setup from the player's Set Up Menu. When the player detects a problem or damaged disc, the player may keep playing the disc at lower quality or stop playing, which will be condensed inside the player. Remove the disc and leave the unit power on for one . • Moisture may be displayed when there is a problem with the loaded disc: • "WRONG REGIONAL DISC": Disc's region code...

User Manual
Page 26
... function • Make sure the Power button on the unit has been turned on manually. • Remove the obstacles between the remote control and the player. • Point the remote control towards the remote sensor on the player. • Check if the batteries of the remote control have been switched on disc are so programmed that do not remove the cover (or back) of the unit.Refer servicing only to qualified service personnel. Type...
... function • Make sure the Power button on the unit has been turned on manually. • Remove the obstacles between the remote control and the player. • Point the remote control towards the remote sensor on the player. • Check if the batteries of the remote control have been switched on disc are so programmed that do not remove the cover (or back) of the unit.Refer servicing only to qualified service personnel. Type...


