Instruction Manual
Page 7
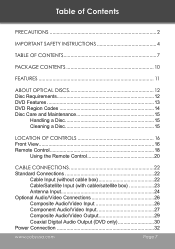
... 10 Features 11 About Optical Discs 12 Disc Requirements 12 DVD Features 13 DVD Region Codes 14 Disc Care and Maintenance 15 Handling a Disc 15 Cleaning a Disc 15 Location of Controls 16 Front View 16 Remote Control 18 Using the Remote Control 20 Cable Connections 22 Standard Connections 22 Cable Input (without cable...
... 10 Features 11 About Optical Discs 12 Disc Requirements 12 DVD Features 13 DVD Region Codes 14 Disc Care and Maintenance 15 Handling a Disc 15 Cleaning a Disc 15 Location of Controls 16 Front View 16 Remote Control 18 Using the Remote Control 20 Cable Connections 22 Standard Connections 22 Cable Input (without cable...
Instruction Manual
Page 10
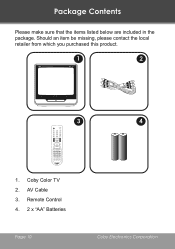
Remote Control 4. 2 x "AA" Batteries Page 10 Coby Electronics Corporation Coby Color TV 2. AV Cable 3. Should an item be missing, please contact the local retailer from which you purchased this product. 2 3 4 1. Package Contents Please make sure that the items listed below are included in the package.
Remote Control 4. 2 x "AA" Batteries Page 10 Coby Electronics Corporation Coby Color TV 2. AV Cable 3. Should an item be missing, please contact the local retailer from which you purchased this product. 2 3 4 1. Package Contents Please make sure that the items listed below are included in the package.
Instruction Manual
Page 16
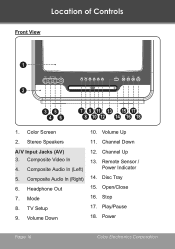
Stereo Speakers A/V Input Jacks (AV) 3. Headphone Out 7. Mode 8. Volume Down 10. Volume Up 11. Open/Close 16. Play/Pause 18. Color Screen 2. Composite Audio In (Right) 6. Stop 17. Composite Video In 4. TV Setup 9. Location of Controls Front View 1 2 35 46 7 9 11 13 15 17 8 10 12 14 16 18 1. Disc Tray 15. Composite Audio In (Left) 5. Channel Down 12. Channel Up 13. Power Page 16 Coby Electronics Corporation Remote Sensor / Power Indicator 14.
Stereo Speakers A/V Input Jacks (AV) 3. Headphone Out 7. Mode 8. Volume Down 10. Volume Up 11. Open/Close 16. Play/Pause 18. Color Screen 2. Composite Audio In (Right) 6. Stop 17. Composite Video In 4. TV Setup 9. Location of Controls Front View 1 2 35 46 7 9 11 13 15 17 8 10 12 14 16 18 1. Disc Tray 15. Composite Audio In (Left) 5. Channel Down 12. Channel Up 13. Power Page 16 Coby Electronics Corporation Remote Sensor / Power Indicator 14.
Instruction Manual
Page 19
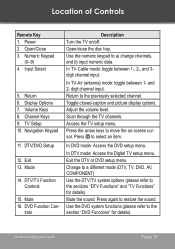
...arrow keys to a) change channels, and b) input numeric data. Exit the DTV or DVD setup menu. Input Select 5. Exit 13. DTV/TV Function Controls 15. Access the TV setup menu. In DVD mode: Access the DVD setup menu. Power 2. Open/Close 3. Mute 16. Use the numeric keypad to... a different mode (DTV, TV, DVD, AV, COMPONENT) Use the DTV/TV system options (please refer to the previously selected channel. Return 6. Open/close the disc tray. In DTV mode: Access the Digital TV setup menu. In TV-Cable mode: toggle between 1- Location of Controls Remote Key 1. Press again to restore...
...arrow keys to a) change channels, and b) input numeric data. Exit the DTV or DVD setup menu. Input Select 5. Exit 13. DTV/TV Function Controls 15. Access the TV setup menu. In DVD mode: Access the DVD setup menu. Power 2. Open/Close 3. Mute 16. Use the numeric keypad to... a different mode (DTV, TV, DVD, AV, COMPONENT) Use the DTV/TV system options (please refer to the previously selected channel. Return 6. Open/close the disc tray. In DTV mode: Access the Digital TV setup menu. In TV-Cable mode: toggle between 1- Location of Controls Remote Key 1. Press again to restore...
Instruction Manual
Page 20
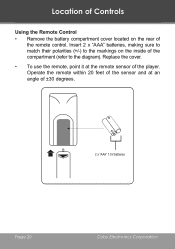
Operate the remote within 20 feet of the sensor and at the remote sensor of the player. Replace the cover. • To use the remote, point it at an angle of ±30 degrees. 2 x "AAA" 1.5V batteries Page 20 Coby Electronics Corporation Location of Controls Using the Remote Control • Remove the battery compartment cover located on the inside of the compartment (refer to the markings on the rear of the remote control. Insert 2 x "AAA" batteries, making sure to match their polarities (+/-) to the diagram).
Operate the remote within 20 feet of the sensor and at the remote sensor of the player. Replace the cover. • To use the remote, point it at an angle of ±30 degrees. 2 x "AAA" 1.5V batteries Page 20 Coby Electronics Corporation Location of Controls Using the Remote Control • Remove the battery compartment cover located on the inside of the compartment (refer to the markings on the rear of the remote control. Insert 2 x "AAA" batteries, making sure to match their polarities (+/-) to the diagram).
Instruction Manual
Page 21
... 6 months under normal use this device may present a fire or chemical burn if mistreated. Keep batteries away from the remote if it will not be used in the remote will last for an extended period of any other equipment. Do not recharge, disassemble, incinerate, or heat the battery (~...212ºF). Replace the batteries if the remote control does not work. www.cobyusa.com Page 21 Do not mix old with new batteries, or different types of Controls Do not point ...
... 6 months under normal use this device may present a fire or chemical burn if mistreated. Keep batteries away from the remote if it will not be used in the remote will last for an extended period of any other equipment. Do not recharge, disassemble, incinerate, or heat the battery (~...212ºF). Replace the batteries if the remote control does not work. www.cobyusa.com Page 21 Do not mix old with new batteries, or different types of Controls Do not point ...
Instruction Manual
Page 32
...wall outlet. Attempting to play DVDs through a receiver without the correct Dolby Digital or MPEG decoder may produce extreme levels of time, turn the TV off all system connections have been made , connect the AC Power Cord to the section "DVD Mode > DVD Setup > Audio" for a... until all system connections before making system connections. Turn off , unplug the unit, and remove the batteries from the remote control. Make all connections have been made . Page 32 Coby Electronics Corporation Cable Connections The receiver MUST contain a Dolby Digital or MPEG audio decoder.
...wall outlet. Attempting to play DVDs through a receiver without the correct Dolby Digital or MPEG decoder may produce extreme levels of time, turn the TV off all system connections have been made , connect the AC Power Cord to the section "DVD Mode > DVD Setup > Audio" for a... until all system connections before making system connections. Turn off , unplug the unit, and remove the batteries from the remote control. Make all connections have been made . Page 32 Coby Electronics Corporation Cable Connections The receiver MUST contain a Dolby Digital or MPEG audio decoder.
Instruction Manual
Page 71
... for 30 minutes. There is not engaged. The remote control doesn't work. • Ensure that there are no obstacles between the remote and the player. • Point the remote at the remote sensor on and properly set up. • Ensure that the TV and amplifier connections are secure and correct. •.... • Ensure that the batteries in , the restore function should reset the TV. www.cobyusa.com Page 71 Troubleshooting tion. The unit has malfunctioned. • Unplug the TV and let it back in the remote retain a charge and have been turned on the main unit. • Ensure ...
... for 30 minutes. There is not engaged. The remote control doesn't work. • Ensure that there are no obstacles between the remote and the player. • Point the remote at the remote sensor on and properly set up. • Ensure that the TV and amplifier connections are secure and correct. •.... • Ensure that the batteries in , the restore function should reset the TV. www.cobyusa.com Page 71 Troubleshooting tion. The unit has malfunctioned. • Unplug the TV and let it back in the remote retain a charge and have been turned on the main unit. • Ensure ...