

User Manual
Page 3
English Audio/Video Connections (optional 15 Using Headphones or Earphones 15 Audio/Video (AV) Input...16 Getting Started...17 Using the TV for the First Time...17 Step 1: Set the unit to TV mode 17 Step 2: Perform a channel scan 17 Basic TV Controls...18 Changing Channels...19 Adjusting the Volume...19 System Menu...20 System Menu Controls...20 Picture Setup...21 Audio Setup...22 Time Setup...22 General Setup...23 Channel Setup...23 Safety Notices...25 Troubleshooting & Support 31 Specifications...34 Page 3 Table Of Contents
English Audio/Video Connections (optional 15 Using Headphones or Earphones 15 Audio/Video (AV) Input...16 Getting Started...17 Using the TV for the First Time...17 Step 1: Set the unit to TV mode 17 Step 2: Perform a channel scan 17 Basic TV Controls...18 Changing Channels...19 Adjusting the Volume...19 System Menu...20 System Menu Controls...20 Picture Setup...21 Audio Setup...22 Time Setup...22 General Setup...23 Channel Setup...23 Safety Notices...25 Troubleshooting & Support 31 Specifications...34 Page 3 Table Of Contents

User Manual
Page 4
English ÂÂ Thank You Congratulations on your new TV right away. Be sure to help you purchased this manual carefully and retain it for the car/boat) Remote control If any of ... AC power adapter DC power adapter (for future reference. Please read this product. This manual is designed to safely dispose of a Coby portable LCD television. Package Contents Features Coby portable LCD TV (main unit) to children.
English ÂÂ Thank You Congratulations on your new TV right away. Be sure to help you purchased this manual carefully and retain it for the car/boat) Remote control If any of ... AC power adapter DC power adapter (for future reference. Please read this product. This manual is designed to safely dispose of a Coby portable LCD television. Package Contents Features Coby portable LCD TV (main unit) to children.

User Manual
Page 5
Stereo speakers 4. Volume - Volume + button 8. Mode button 5. Power indicator light Page 5 Unit At A Glance button 7. Remote control sensor 3. Menu button 6. button 9. English ÂÂ Unit at a Glance Front View 1. CH - TV screen 2. CH + button 10.
Stereo speakers 4. Volume - Volume + button 8. Mode button 5. Power indicator light Page 5 Unit At A Glance button 7. Remote control sensor 3. Menu button 6. button 9. English ÂÂ Unit at a Glance Front View 1. CH - TV screen 2. CH + button 10.

User Manual
Page 8
... (widescreen) and 4:3 aspect ratio formats. Access the system menu. Browse and select menu items (Up/Down, Left/Right, OK). 2 Num Pad Numeric keypad. Change between TV and AV IN mode. Unit At A Glance Disable audio output. Return to a previously viewed channel. English Remote Control 1 2 Key Description 1 Nav Pad Navigation keypad. Change...
... (widescreen) and 4:3 aspect ratio formats. Access the system menu. Browse and select menu items (Up/Down, Left/Right, OK). 2 Num Pad Numeric keypad. Change between TV and AV IN mode. Unit At A Glance Disable audio output. Return to a previously viewed channel. English Remote Control 1 2 Key Description 1 Nav Pad Navigation keypad. Change...

User Manual
Page 9
... of time. Place the battery in the remote: 1. Simply pull the tab to close 1 2 3 4 To use for other equipment at the remote sensor of the TV from the battery compartment. Remote control performance may present a fire or chemical hazard if mistreated. The battery used in use the remote: Point...
... of time. Place the battery in the remote: 1. Simply pull the tab to close 1 2 3 4 To use for other equipment at the remote sensor of the TV from the battery compartment. Remote control performance may present a fire or chemical hazard if mistreated. The battery used in use the remote: Point...

User Manual
Page 10
... of the supplied AC adapter to an AC 100-240V wall outlet. The AC adapter operates on again. current: 0.5A max). If the TV will not be in use for portable use the included AC or DC adapters, respectively), or by the rechargeable battery pack for a long period of... the adapter to the Power Input jack of the unit, avoid power-cycling the TV rapidly. To prolong the operating life of the TV. When turning the TV off , unplug it, and remove any batteries, as applicable. Page 10 Connections At A Glance English ÂÂ Connections at...
... of the supplied AC adapter to an AC 100-240V wall outlet. The AC adapter operates on again. current: 0.5A max). If the TV will not be in use for portable use the included AC or DC adapters, respectively), or by the rechargeable battery pack for a long period of... the adapter to the Power Input jack of the unit, avoid power-cycling the TV rapidly. To prolong the operating life of the TV. When turning the TV off , unplug it, and remove any batteries, as applicable. Page 10 Connections At A Glance English ÂÂ Connections at...

User Manual
Page 11
... battery when an AC outlet is not available. Connect one end of the supplied AC adapter into the Power In jack of the TV. 2. When using the supplied DC adapter when an AC outlet is not available. Using the Rechargeable Battery This unit may be powered using the player... in vehicles. Connect one end of the supplied DC adapter into the Power In jack of the TV. English DC Car/Boat Adapter This unit may be powered by the driver.
... battery when an AC outlet is not available. Connect one end of the supplied AC adapter into the Power In jack of the TV. 2. When using the supplied DC adapter when an AC outlet is not available. Using the Rechargeable Battery This unit may be powered using the player... in vehicles. Connect one end of the supplied DC adapter into the Power In jack of the TV. English DC Car/Boat Adapter This unit may be powered by the driver.

User Manual
Page 14
... 14 Connections At A Glance For indoor installations, it is also possible to connect a coaxial cable or satellite TV line to the Coaxial antenna input jack. Disconnect the built-in a location with very weak TV reception, it can be conveniently mounted on any metal surface. The base of the external antenna is weak...
... 14 Connections At A Glance For indoor installations, it is also possible to connect a coaxial cable or satellite TV line to the Coaxial antenna input jack. Disconnect the built-in a location with very weak TV reception, it can be conveniently mounted on any metal surface. The base of the external antenna is weak...

User Manual
Page 15
...plug to the documentation supplied by the manufacturer of personal stereos played at high volume. please refer to the Headphone Out jack of the TV. 3. Hearing experts advise against the constant use immediately and seek medical advice. Constant high volume use can output audio to hearing loss. ...Using Headphones or Earphones Your TV can lead to a pair of the TV. 2. Connect a pair of headphones or earphones terminating in the ears or hearing loss, discontinue use of your equipment;...
...plug to the documentation supplied by the manufacturer of personal stereos played at high volume. please refer to the Headphone Out jack of the TV. 3. Hearing experts advise against the constant use immediately and seek medical advice. Constant high volume use can output audio to hearing loss. ...Using Headphones or Earphones Your TV can lead to a pair of the TV. 2. Connect a pair of headphones or earphones terminating in the ears or hearing loss, discontinue use of your equipment;...

User Manual
Page 16
Turn on the TV and the AV device. 4. Refer to choose "AV IN". Connections At A Glance The Input Source menu will... Black AUDIO OUT VIDEO OUT White + Red Yellow Signal An AV patch cable (included) is required for additional help. Connect the TV's 3.5mm Audio input jack to the RCA composite Video Out jack (yellow) of your AV device. 2. Always disconnect the power before...Press . English Audio/Video (AV) Input This unit can be used as a monitor to AV IN mode: a. Connect the TV's 3.5mm Video input jack to the RCA Stereo Out jacks (red and white) of your AV device. 3.
Turn on the TV and the AV device. 4. Refer to choose "AV IN". Connections At A Glance The Input Source menu will... Black AUDIO OUT VIDEO OUT White + Red Yellow Signal An AV patch cable (included) is required for additional help. Connect the TV's 3.5mm Audio input jack to the RCA composite Video Out jack (yellow) of your AV device. 2. Always disconnect the power before...Press . English Audio/Video (AV) Input This unit can be used as a monitor to AV IN mode: a. Connect the TV's 3.5mm Video input jack to the RCA Stereo Out jacks (red and white) of your AV device. 3.

User Manual
Page 17
.... 2. Press once, then press channel scan. Use the navigation keypad ( or ) to turn the TV on. Page 17 Getting Started English ÂÂ Getting Started Using the TV for the First Time After charging the battery and making all necessary connections, set the Power switch to ... instructions given refer to choose the Auto Scan option. 4. Press twice to the remote control. to find channels that are within range of the TV. 3. The Input Source menu will appear. 2. Press . Step 2: Perform a channel scan. Press . Perform a scan to start the 1. Press once to ...
.... 2. Press once, then press channel scan. Use the navigation keypad ( or ) to turn the TV on. Page 17 Getting Started English ÂÂ Getting Started Using the TV for the First Time After charging the battery and making all necessary connections, set the Power switch to ... instructions given refer to choose the Auto Scan option. 4. Press twice to the remote control. to find channels that are within range of the TV. 3. The Input Source menu will appear. 2. Press . Step 2: Perform a channel scan. Press . Perform a scan to start the 1. Press once to ...
User Manual
Page 18
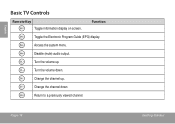
English Basic TV Controls Remote Key Toggle information display on screen. Turn the volume up . Return to a previously viewed channel. Change the channel up . Disable (mute) audio output. Access the system menu. Change the channel down . Page 18 Getting Started Turn the volume down . Function Toggle the Electronic Program Guide (EPG) display.
English Basic TV Controls Remote Key Toggle information display on screen. Turn the volume up . Return to a previously viewed channel. Change the channel up . Disable (mute) audio output. Access the system menu. Change the channel down . Page 18 Getting Started Turn the volume down . Function Toggle the Electronic Program Guide (EPG) display.

User Manual
Page 19
... adjust the volume level up or down, respectively. Press to enter the dash. Page 19 Getting Started Digital TV broadcasts may contain multiple sub-channels (5-1, 5-2, 5-3, etc). If available, analog TV broadcasts can be found on the first subchannel (e.g., 5-1). English Changing Channels To browse channels, press or . To tune to restore...
... adjust the volume level up or down, respectively. Press to enter the dash. Page 19 Getting Started Digital TV broadcasts may contain multiple sub-channels (5-1, 5-2, 5-3, etc). If available, analog TV broadcasts can be found on the first subchannel (e.g., 5-1). English Changing Channels To browse channels, press or . To tune to restore...

User Manual
Page 20
...;Â System Menu The system menu allows you to access the System menu, then use the following controls. System Menu Controls Press to adjust your TV's options and access advanced functions. Remote Key Unit Key [CH +] [CH -] [VOL +] Function Browse up through the menu options. Please read this section carefully before...
...;Â System Menu The system menu allows you to access the System menu, then use the following controls. System Menu Controls Press to adjust your TV's options and access advanced functions. Remote Key Unit Key [CH +] [CH -] [VOL +] Function Browse up through the menu options. Please read this section carefully before...

User Manual
Page 22
... stereo balance (left, right). Turn the daylight saving time adjustment on -screen information will turn off . When the sleep timer is set automatically by the TV. Time Setup Menu Option OSD Duration Sleep Timer Time Zone Daylight Saving Time Clock Description Adjust the period of time that on or off automatically... when the timer counts down to zero. Set the default audio language for without interruption. This value is active, the TV will be displayed for TV broadcasts that support secondary audio (e.g., SAP).
... stereo balance (left, right). Turn the daylight saving time adjustment on -screen information will turn off . When the sleep timer is set automatically by the TV. Time Setup Menu Option OSD Duration Sleep Timer Time Zone Daylight Saving Time Clock Description Adjust the period of time that on or off automatically... when the timer counts down to zero. Set the default audio language for without interruption. This value is active, the TV will be displayed for TV broadcasts that support secondary audio (e.g., SAP).
User Manual
Page 23
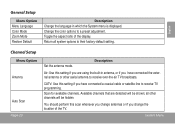
... whenever you change the location of the display. Scan for available channels. Return all other aerial antenna to receive over-the-air TV broadcasts. System Menu all system options to a preset adjustment. English General Setup Menu Option Menu Language Color Mode Zoom Mode Restore ...Default Description Change the language in antenna, or if you have connected a coaxial cable or satellite line to receive TV programming. You should perform this setting if you change antennas or if you have connected the external antenna or other channels will be...
... whenever you change the location of the display. Scan for available channels. Return all other aerial antenna to receive over-the-air TV broadcasts. System Menu all system options to a preset adjustment. English General Setup Menu Option Menu Language Color Mode Zoom Mode Restore ...Default Description Change the language in antenna, or if you have connected a coaxial cable or satellite line to receive TV programming. You should perform this setting if you change antennas or if you have connected the external antenna or other channels will be...

User Manual
Page 26
... harmful interference to comply with Class B limits in Subpart B of Part 15 of shielded cable is connected. • Consult the dealer or an experienced radio/TV technician for Class B digital devices, pursuant to radio communications. Do not make any interference received, including interference that interference will not occur in accordance with...
... harmful interference to comply with Class B limits in Subpart B of Part 15 of shielded cable is connected. • Consult the dealer or an experienced radio/TV technician for Class B digital devices, pursuant to radio communications. Do not make any interference received, including interference that interference will not occur in accordance with...

User Manual
Page 32
English There is no picture. Ensure that the TV set has been powered on the main unit is physically set to a different channel. Ensure that all connections are secure and correct, and ... the AC adapter cord is securely connected to a dif- Page 32 Troubleshooting & Support Try repositioning or changing the antenna, or tune to the correct mode (TV or AV INPUT). The current channel may not be in use, try repositioning it for better reception. Ensure that all connections...
English There is no picture. Ensure that the TV set has been powered on the main unit is physically set to a different channel. Ensure that all connections are secure and correct, and ... the AC adapter cord is securely connected to a dif- Page 32 Troubleshooting & Support Try repositioning or changing the antenna, or tune to the correct mode (TV or AV INPUT). The current channel may not be in use, try repositioning it for better reception. Ensure that all connections...

User Manual
Page 33
... to change the aspect ratio setting. Page 33 Troubleshooting & Support The picture is not full-screen or is pointed at the remote sensor of the TV. Ensure that the plastic tab that protects the battery during shipping has been removed. Ensure that the battery in and power...
... to change the aspect ratio setting. Page 33 Troubleshooting & Support The picture is not full-screen or is pointed at the remote sensor of the TV. Ensure that the plastic tab that protects the battery during shipping has been removed. Ensure that the battery in and power...

User Manual
Page 34
English ÂÂ Specifications Display Type TV Tuner System Channel Range AV Output AV Input Operating Conditions Power AC Adapter DC Adapter Battery 7" TFT LCD @ 480 x 234 ATSC, QAM, NTSC VHF-L ch.2 to change without notice. LL to 69 (369~803MHz) 3.5mm Headphone High-Output Stereo Speakers (8Ω, 3W total) 3....
English ÂÂ Specifications Display Type TV Tuner System Channel Range AV Output AV Input Operating Conditions Power AC Adapter DC Adapter Battery 7" TFT LCD @ 480 x 234 ATSC, QAM, NTSC VHF-L ch.2 to change without notice. LL to 69 (369~803MHz) 3.5mm Headphone High-Output Stereo Speakers (8Ω, 3W total) 3....


