Operating Instructions
Page 2
... Digital Video Disc player employs a Laser System. DO NOT STARE INTO BEAM LASER Type Wave length Output Power Beam divergence Semiconductor laser GaAIAs 650 nm/780nm 5mW 60degree CLASS 1 LASER PRODUCT -1- Please read this manual carefully before operating and reserve it for purchasing Portable DVD player. see service procedure. Visible and invisible laser radiation when open the enclosure. DO NOT OPEN THE CABINET. It will be helpful...
... Digital Video Disc player employs a Laser System. DO NOT STARE INTO BEAM LASER Type Wave length Output Power Beam divergence Semiconductor laser GaAIAs 650 nm/780nm 5mW 60degree CLASS 1 LASER PRODUCT -1- Please read this manual carefully before operating and reserve it for purchasing Portable DVD player. see service procedure. Visible and invisible laser radiation when open the enclosure. DO NOT OPEN THE CABINET. It will be helpful...

Operating Instructions
Page 5
... 13 Replacing the battery 13 Remote control unit operating range 14 PARTS AND FUNCTIONS 1 5 Liquid crystal display 15 Main unit control section 15 Main unit left side 16 Main unit right panel 17 Main unit rear side 18 How to stand 18 Main unit bottom side 18 Remote control unit (frequently used buttons 19 Remote control unit (other buttons 20 Names of battery parts and their functions 21 CONNECTING THE PLAYER TO OTHER DEVICES 2 2 Connecting...
... 13 Replacing the battery 13 Remote control unit operating range 14 PARTS AND FUNCTIONS 1 5 Liquid crystal display 15 Main unit control section 15 Main unit left side 16 Main unit right panel 17 Main unit rear side 18 How to stand 18 Main unit bottom side 18 Remote control unit (frequently used buttons 19 Remote control unit (other buttons 20 Names of battery parts and their functions 21 CONNECTING THE PLAYER TO OTHER DEVICES 2 2 Connecting...
Operating Instructions
Page 6
... 34 Removing the disc 34 TURNING OFF THE POWER 35 Searching for a specific scene... 37 Viewing in slow motion DVDs and video CDs 37 Repeating DVDs, video CDs and CDs 37 Selecting angle (multi-angle 37 Changing from AV OUT to AV IN 38 Setting Parental Lock Level.........3. 8 Video Enhance 38 CAUTIONS ON USING.. 39 TROUBLE SHOOTING.. 40 ADVANCED OPERATCONS VARIOUS LANGUAGE AND SUBTITLE SETTINGS 3 6 Setting the on-screen display language 36 Setting the subtitle language........36 Setting the audio language...........36 ADVANCED FUNCTIONS...
... 34 Removing the disc 34 TURNING OFF THE POWER 35 Searching for a specific scene... 37 Viewing in slow motion DVDs and video CDs 37 Repeating DVDs, video CDs and CDs 37 Selecting angle (multi-angle 37 Changing from AV OUT to AV IN 38 Setting Parental Lock Level.........3. 8 Video Enhance 38 CAUTIONS ON USING.. 39 TROUBLE SHOOTING.. 40 ADVANCED OPERATCONS VARIOUS LANGUAGE AND SUBTITLE SETTINGS 3 6 Setting the on-screen display language 36 Setting the subtitle language........36 Setting the audio language...........36 ADVANCED FUNCTIONS...

Operating Instructions
Page 7
... remove the disc and turn off the power when not using the player while driving. When carrying in midsummer. Doing so may also be sure to connect the player. Install the player away from cassette decks or other devices which prohibit or severely restrict the use of the player in places where the temperature is connected to your normal TV picture. Special note regarding use then switch the power...
... remove the disc and turn off the power when not using the player while driving. When carrying in midsummer. Doing so may also be sure to connect the player. Install the player away from cassette decks or other devices which prohibit or severely restrict the use of the player in places where the temperature is connected to your normal TV picture. Special note regarding use then switch the power...
Operating Instructions
Page 9
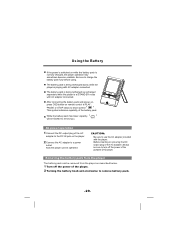
... battery pack Charge the battery pack fully before use . This is left attached, continual flow of recharging and operations. Service life and disposal When the charging time or available operation time becomes extremely short, the battery may be reaching the end of protection circuitry. When the surrounding temperature is switched on , the player will turn off automatically. (Auto power off) The battery pack becomes hot after use and the portable DVD player...
... battery pack Charge the battery pack fully before use . This is left attached, continual flow of recharging and operations. Service life and disposal When the charging time or available operation time becomes extremely short, the battery may be reaching the end of protection circuitry. When the surrounding temperature is switched on , the player will turn off automatically. (Auto power off) The battery pack becomes hot after use and the portable DVD player...

Operating Instructions
Page 10
... DVDs DVD discs or packages include the marks shown below are indicated on the table below . The marks shown on the disc's label, package or jacket. Types of Discs Playable on this player without an adapter. These marks indicate the type of video or audio signals recorded on this Player The discs listed on the table below can be played on the disc and the functions that can be used...
... DVDs DVD discs or packages include the marks shown below are indicated on the table below . The marks shown on the disc's label, package or jacket. Types of Discs Playable on this player without an adapter. These marks indicate the type of video or audio signals recorded on this Player The discs listed on the table below can be played on the disc and the functions that can be used...
Operating Instructions
Page 12
... of the many functions of this player, be sure to a TV or AV amplifier, the setup screen should be displayed. Choose the various corresponding settings according to change the subtitle and audio languages and select the desired sound mode from among multiple sound tracks. With DVDs it is connected to store this OPERATING INSTRUCTIONS in an accessible place. -11- Using These Operating Instructions Be sure to read the operating instructions carefully before using the player. It can...
... of the many functions of this player, be sure to a TV or AV amplifier, the setup screen should be displayed. Choose the various corresponding settings according to change the subtitle and audio languages and select the desired sound mode from among multiple sound tracks. With DVDs it is connected to store this OPERATING INSTRUCTIONS in an accessible place. -11- Using These Operating Instructions Be sure to read the operating instructions carefully before using the player. It can...
Operating Instructions
Page 16
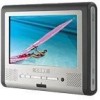
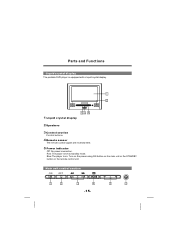
Main unit control section ON OFF 1 2 3 4 -15- 5 6 Parts and Functions Liquid crystal display The portable DVD player is set to standby mode. Turn on the power using ON button on the main unit or the STANDBY button on . Red: The player is equipped with a liquid crystal display. 1 2 1 Liquid crystal display 34 5 2 Speakers 3 Control section Control buttons 4 Remote sensor The remote control signals are received here. 5 Power indicator Off: No power connection. Blue:The player is on the remote control unit.
Main unit control section ON OFF 1 2 3 4 -15- 5 6 Parts and Functions Liquid crystal display The portable DVD player is set to standby mode. Turn on the power using ON button on the main unit or the STANDBY button on . Red: The player is equipped with a liquid crystal display. 1 2 1 Liquid crystal display 34 5 2 Speakers 3 Control section Control buttons 4 Remote sensor The remote control signals are received here. 5 Power indicator Off: No power connection. Blue:The player is on the remote control unit.

Operating Instructions
Page 18
... AV cable or optical digital cable is connected here. 4 Audio in Connect the included AC adapter here. Please turn off the unit before this hole, the tray will slide out. Output optical audio signals to connected device by setting AV IN/OUT mode value. Parts and Functions 1 Phone jack For connecting stereo headphone or an amplifier. 2 Volume control Use it to adjust the volume of the speakers or headphone. 3 Video in/out jack Input or output video signals to connected device.
... AV cable or optical digital cable is connected here. 4 Audio in Connect the included AC adapter here. Please turn off the unit before this hole, the tray will slide out. Output optical audio signals to connected device by setting AV IN/OUT mode value. Parts and Functions 1 Phone jack For connecting stereo headphone or an amplifier. 2 Volume control Use it to adjust the volume of the speakers or headphone. 3 Video in/out jack Input or output video signals to connected device.

Operating Instructions
Page 20
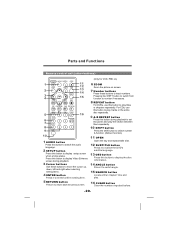
...step. 8 TITLE button Press this button to display the DVD's title. 3 Scan buttons ( and Use these buttons to search for the beginnings of playing forward or backward. -19- Parts and Functions Remote control unit (frequently used buttons) ( ( ( ( AUDIO SUBTITLE OPEN 1 SETUP ANGLE OSD SEARCH PREV NEXT STOP 2 6 REV PLAY/PAUSE FWD STEP/SLOW 2 3 7 4 MENU TITLE CLEAR 3 5 ZOOM C 8 : Forward direction : Backward direction 4 PLAY/PAUSE button ( Use this button to play or pause playback. 5 MENU button Press this button to display the DVD's menu screen. 6 STOP button ( Press this...
...step. 8 TITLE button Press this button to display the DVD's title. 3 Scan buttons ( and Use these buttons to search for the beginnings of playing forward or backward. -19- Parts and Functions Remote control unit (frequently used buttons) ( ( ( ( AUDIO SUBTITLE OPEN 1 SETUP ANGLE OSD SEARCH PREV NEXT STOP 2 6 REV PLAY/PAUSE FWD STEP/SLOW 2 3 7 4 MENU TITLE CLEAR 3 5 ZOOM C 8 : Forward direction : Backward direction 4 PLAY/PAUSE button ( Use this button to play or pause playback. 5 MENU button Press this button to display the DVD's menu screen. 6 STOP button ( Press this...
Operating Instructions
Page 21
... selecting setting items . 4 ENTER button Press it to enter/confirm setting item. 5 RETURN button Press it to display setup screen when at stop status. For CDs, use this button to display Video Enhance screen during playback to set two points and play the section between them repeatedly. 10 SHIFT button Press the shift button to switch number & function. (Defaut: function) 11 OPEN Open the tray and replace/take disk. 12 SUBTITLE button Press it to switch the DVD's subtitle language. 13 OSD button Press this button to switch...
... selecting setting items . 4 ENTER button Press it to enter/confirm setting item. 5 RETURN button Press it to display setup screen when at stop status. For CDs, use this button to display Video Enhance screen during playback to set two points and play the section between them repeatedly. 10 SHIFT button Press the shift button to switch number & function. (Defaut: function) 11 OPEN Open the tray and replace/take disk. 12 SUBTITLE button Press it to switch the DVD's subtitle language. 13 OSD button Press this button to switch...
Operating Instructions
Page 27
... the earphone is produced when DTS discs are played, so do not listen to such discs through the earphone, first use the VOLUME CONTROL on the player. Strong noise is securely connected. VOLUME Earphone Note: It is not possible to hear the sound of the main unit to lower the volume to minimum level, then adjust the volume to too high level when...
... the earphone is produced when DTS discs are played, so do not listen to such discs through the earphone, first use the VOLUME CONTROL on the player. Strong noise is securely connected. VOLUME Earphone Note: It is not possible to hear the sound of the main unit to lower the volume to minimum level, then adjust the volume to too high level when...
Operating Instructions
Page 30
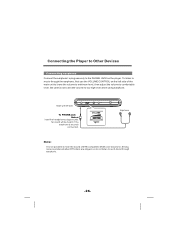
... portable DVD player. After connecting the battery pack and power on, press OSD button on remote control at STAND BY mode with AC adapter connected. AC power operation 1 Connect the DC output plug of the AC adapter, always be removed from the player as recharged separately while the player is playing with the player. Now the player can be sure to use the AC adapter provided with AC adapter connected. Be sure to charge the battery pack fully before using...
... portable DVD player. After connecting the battery pack and power on, press OSD button on remote control at STAND BY mode with AC adapter connected. AC power operation 1 Connect the DC output plug of the AC adapter, always be removed from the player as recharged separately while the player is playing with the player. Now the player can be sure to use the AC adapter provided with AC adapter connected. Be sure to charge the battery pack fully before using...

Operating Instructions
Page 31
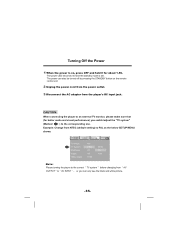
...player can be turned on by pressing the standby button on the remote control unit. At standby mode (when the power LED is lit blue. Turning On the Power 2 1 Main unit (front panel) 3 ON OFF Remote control unit 3 4 1 Connect the AC adapter to a power outlet. 2 Connect the DC output plug of the adapter to 240 V, you are travelling. -30- Note that you need... AC adapter is compatible with voltage from 100 to the DC input jack on the main unit. 3 Keep pressing the ON button on trips overseas. The power LED is lit red), the power can use it on the main unit for the region in ...
...player can be turned on by pressing the standby button on the remote control unit. At standby mode (when the power LED is lit blue. Turning On the Power 2 1 Main unit (front panel) 3 ON OFF Remote control unit 3 4 1 Connect the AC adapter to a power outlet. 2 Connect the DC output plug of the adapter to 240 V, you are travelling. -30- Note that you need... AC adapter is compatible with voltage from 100 to the DC input jack on the main unit. 3 Keep pressing the ON button on trips overseas. The power LED is lit red), the power can use it on the main unit for the region in ...

Operating Instructions
Page 32
... not have signals recorded on .) 2 If no disk is heard). Loading 1 2 3 , Playback Functions 1 Press OPEN button to open. (If no power supply, the tray will open automatically after power on both sides, so be careful not to scratch them when removing them from the player. 4 Push the tray into the hole to open it securely could result in with your fingers. Notes: Set the disc securely. The player starts loading. -31...
... not have signals recorded on .) 2 If no disk is heard). Loading 1 2 3 , Playback Functions 1 Press OPEN button to open. (If no power supply, the tray will open automatically after power on both sides, so be careful not to scratch them when removing them from the player. 4 Push the tray into the hole to open it securely could result in with your fingers. Notes: Set the disc securely. The player starts loading. -31...

Operating Instructions
Page 33
.... Playback Functions Playing 1 Load the disc. Number buttons For the disc which is displayed on the screen: DVD, VCD, CD. In order to use the number buttons on the remote control unit to select the item, first press the SHIFT button until NUMBER is called PBC (playback control). Example: For DVDs with playback control (PBC), a menu screen appears. For CDs, in the programmed order. 2 Press the play a disc without displaying the menu screen. Press any button to play /pause button. For some discs, a menu screen appears. Hint: For video...
.... Playback Functions Playing 1 Load the disc. Number buttons For the disc which is displayed on the screen: DVD, VCD, CD. In order to use the number buttons on the remote control unit to select the item, first press the SHIFT button until NUMBER is called PBC (playback control). Example: For DVDs with playback control (PBC), a menu screen appears. For CDs, in the programmed order. 2 Press the play a disc without displaying the menu screen. Press any button to play /pause button. For some discs, a menu screen appears. Hint: For video...
Operating Instructions
Page 36
... (default setting) to PAL as the below SETUP MENU shows: ALanguage Video Audio Parental TV Shape TV System Brightness Edges Video Output 16:9 NTSC Off Off CVBS NTSC PAL Auto Note: Please turning the player to the corresponding one. The power LED becomes red and the standby mode is on the remote control unit. 2 Unplug the power cord from the power outlet. 3 Disconnect the AC adapter from AV OUTPUT to AV INPUT or you switch/adjust the...
... (default setting) to PAL as the below SETUP MENU shows: ALanguage Video Audio Parental TV Shape TV System Brightness Edges Video Output 16:9 NTSC Off Off CVBS NTSC PAL Auto Note: Please turning the player to the corresponding one. The power LED becomes red and the standby mode is on the remote control unit. 2 Unplug the power cord from the power outlet. 3 Disconnect the AC adapter from AV OUTPUT to AV INPUT or you switch/adjust the...
Operating Instructions
Page 37
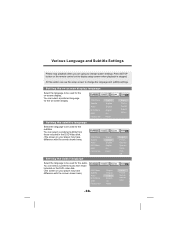
...-screen display. Setting the on-screen display language Select the language to change the language and subtitle settings. You can select a preferred language for the subtitles. Press SETUP button on -screen display. ALanguage Video Audio OSD Menu Subtitle Audio DVD Menu OSD Factory Set English English English English On Reset Parental English Franc, is stopped. At this section we use the setup screen to be used for the on the remote control unit to display setup screen when playback is Deutsch Espa~nol Italiano Setting the subtitle language Select the language to change...
...-screen display. Setting the on-screen display language Select the language to change the language and subtitle settings. You can select a preferred language for the subtitles. Press SETUP button on -screen display. ALanguage Video Audio OSD Menu Subtitle Audio DVD Menu OSD Factory Set English English English English On Reset Parental English Franc, is stopped. At this section we use the setup screen to be used for the on the remote control unit to display setup screen when playback is Deutsch Espa~nol Italiano Setting the subtitle language Select the language to change...
Operating Instructions
Page 39
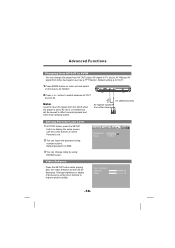
... to input AV signals from other device AV cable(included) Setting Parental Lock Level 1 At STOP status, press the SETUP button to display the setup screen, use it as a TFT Monitor. Advanced Functions Changing from AV OUT to AV IN You can change rating by using number buttons. Default password is 9999. 3 You can input new password using ENTER button. AV signals inputted from other device)and use the cursor buttons to select Parental Lock . 2 You can change the player from AV OUT(output AV signal to TV...
... to input AV signals from other device AV cable(included) Setting Parental Lock Level 1 At STOP status, press the SETUP button to display the setup screen, use it as a TFT Monitor. Advanced Functions Changing from AV OUT to AV IN You can change rating by using number buttons. Default password is 9999. 3 You can input new password using ENTER button. AV signals inputted from other device)and use the cursor buttons to select Parental Lock . 2 You can change the player from AV OUT(output AV signal to TV...

Operating Instructions
Page 41
.... Audio digital output is dirty . Bad playback quality The player is set . Such recorded discs can not solve it in again. Liquid crystal display A few picture elements may cause some discs, 96 kHz digital output of linear PCM audio signals is set to set to a non-compatible AV amplifier,etc. Disc is connected to AV OUT but there are not firmly plugged in . MPaauinseunoirt,sslovwolupmlaey mode is is prohibited. Connection cables are other AV signals inputted...
.... Audio digital output is dirty . Bad playback quality The player is set . Such recorded discs can not solve it in again. Liquid crystal display A few picture elements may cause some discs, 96 kHz digital output of linear PCM audio signals is set to set to a non-compatible AV amplifier,etc. Disc is connected to AV OUT but there are not firmly plugged in . MPaauinseunoirt,sslovwolupmlaey mode is is prohibited. Connection cables are other AV signals inputted...


