User Manual
Page 2
... specified may result in hazardous radiation exposure. Use of controls, adjustments or the performance of this product, please read this owner s manual carefully and retain for future reference. LASER: This Digital Video Disc player employs a Laser System. DANGEROUS HIGH VOLTAGES ARE PRESENT INSIDE THE ENCLOSURE. Precautions Thank you encounter any operational problem. Please read this manual carefully before operating and reserve it for purchasing Portable DVD player.
... specified may result in hazardous radiation exposure. Use of controls, adjustments or the performance of this product, please read this owner s manual carefully and retain for future reference. LASER: This Digital Video Disc player employs a Laser System. DANGEROUS HIGH VOLTAGES ARE PRESENT INSIDE THE ENCLOSURE. Precautions Thank you encounter any operational problem. Please read this manual carefully before operating and reserve it for purchasing Portable DVD player.
User Manual
Page 5
... ON USING THIS PLAYER 6 PRECAUTIONS FOR BATTERY PACK OPERATION 8 Operation of the battery pack 8 Storage 8 Service life and disposal 8 TYPES OF DISCS PLAYABLE ON THIS PLAYER 9 Marks indicated on DVDs 9 Disc structure 10 USING THESE OPERATING INSTRUCTIONS 1 1 BEFORE USING CHECKING THE ACCESSORIES 1 2 REMOTE CONTROL UNIT AND MAIN UNIT PREPARATIONS 13 Notes on using the remote control unit 13 Replacing the battery 13 Remote control unit operating range 14 PARTS AND FUNCTIONS 1 5 Liquid crystal display 15 Main unit control section...
... ON USING THIS PLAYER 6 PRECAUTIONS FOR BATTERY PACK OPERATION 8 Operation of the battery pack 8 Storage 8 Service life and disposal 8 TYPES OF DISCS PLAYABLE ON THIS PLAYER 9 Marks indicated on DVDs 9 Disc structure 10 USING THESE OPERATING INSTRUCTIONS 1 1 BEFORE USING CHECKING THE ACCESSORIES 1 2 REMOTE CONTROL UNIT AND MAIN UNIT PREPARATIONS 13 Notes on using the remote control unit 13 Replacing the battery 13 Remote control unit operating range 14 PARTS AND FUNCTIONS 1 5 Liquid crystal display 15 Main unit control section...
User Manual
Page 6
... 34 Removing the disc 34 TURNING OFF THE POWER 35 Searching for a specific scene... 37 Viewing in slow motion DVDs and video CDs 37 Repeating DVDs, video CDs and CDs 37 Selecting angle (multi-angle 37 Changing from AV OUT to AV IN 38 Setting Parental Lock Level.........3. 8 Video Enhance 38 CAUTIONS ON USING.. 39 TROUBLE SHOOTING.. 40 ADVANCED OPERATCONS VARIOUS LANGUAGE AND SUBTITLE SETTINGS 3 6 Setting the on-screen display language 36 Setting the subtitle language........36 Setting the audio language...
... 34 Removing the disc 34 TURNING OFF THE POWER 35 Searching for a specific scene... 37 Viewing in slow motion DVDs and video CDs 37 Repeating DVDs, video CDs and CDs 37 Selecting angle (multi-angle 37 Changing from AV OUT to AV IN 38 Setting Parental Lock Level.........3. 8 Video Enhance 38 CAUTIONS ON USING.. 39 TROUBLE SHOOTING.. 40 ADVANCED OPERATCONS VARIOUS LANGUAGE AND SUBTITLE SETTINGS 3 6 Setting the on-screen display language 36 Setting the subtitle language........36 Setting the audio language...
User Manual
Page 7
... the use of the battery pack. Place of player in use of installation Select a stable place near a radio. Special note regarding use then switch the power off this Player Do not move the player during playback During playback, the disc spins at high speed, so do not lift or move the player. When carrying on top of a TV or color monitor. Do not place the player on...
... the use of the battery pack. Place of player in use of installation Select a stable place near a radio. Special note regarding use then switch the power off this Player Do not move the player during playback During playback, the disc spins at high speed, so do not lift or move the player. When carrying on top of a TV or color monitor. Do not place the player on...

User Manual
Page 10
... Marks indicated on DVDs DVD discs or packages include the marks shown below are indicated on the disc's label, package or jacket. Types of Discs Playable on this player without an adapter. Mark 2 3 16 : 9 LB 2 ALL Meaning -9- These marks indicate the type of video or audio signals recorded on the disc and the functions that can be played on this Player The discs listed on the...
... Marks indicated on DVDs DVD discs or packages include the marks shown below are indicated on the disc's label, package or jacket. Types of Discs Playable on this player without an adapter. Mark 2 3 16 : 9 LB 2 ALL Meaning -9- These marks indicate the type of video or audio signals recorded on the disc and the functions that can be played on this Player The discs listed on the...
User Manual
Page 12
... subtitle and audio languages and select the desired sound mode from among multiple sound tracks. With DVDs it is connected to a TV or AV amplifier, the setup screen should be sure to store this OPERATING INSTRUCTIONS in an accessible place. -11- When this player is possible to use setup to read the operating instructions carefully before using the player. It can ensure you taking maximum advantage of all functions of this player...
... subtitle and audio languages and select the desired sound mode from among multiple sound tracks. With DVDs it is connected to a TV or AV amplifier, the setup screen should be sure to store this OPERATING INSTRUCTIONS in an accessible place. -11- When this player is possible to use setup to read the operating instructions carefully before using the player. It can ensure you taking maximum advantage of all functions of this player...

User Manual
Page 13
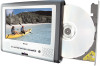
AC/DC adapter AV cable Ear phone Car power cable * Only some models have this accessory. -12- Operating instructions (this manual) OPERATIOINNSTRUCTIONS Soft carrying bag Accessories bag Battery pack Short car bag * Only some models have this accessory. * Only some models have this accessory. Checking the Accessories After unpacking, check that all the accessories listed below are included. Card-type remote control unit * Only some models have this accessory.
AC/DC adapter AV cable Ear phone Car power cable * Only some models have this accessory. -12- Operating instructions (this manual) OPERATIOINNSTRUCTIONS Soft carrying bag Accessories bag Battery pack Short car bag * Only some models have this accessory. * Only some models have this accessory. Checking the Accessories After unpacking, check that all the accessories listed below are included. Card-type remote control unit * Only some models have this accessory.
User Manual
Page 16
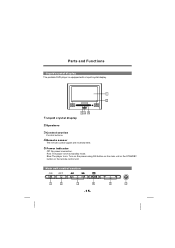
Turn on the power using ON button on the main unit or the STANDBY button on . Blue:The player is equipped with a liquid crystal display. 1 2 1 Liquid crystal display 34 5 2 Speakers 3 Control section Control buttons 4 Remote sensor The remote control signals are received here. 5 Power indicator Off: No power connection. Main unit control section ON OFF 1 2 3 4 -15- 5 6 Parts and Functions Liquid crystal display The portable DVD player is on the remote control unit. Red: The player is set to standby mode.
Turn on the power using ON button on the main unit or the STANDBY button on . Blue:The player is equipped with a liquid crystal display. 1 2 1 Liquid crystal display 34 5 2 Speakers 3 Control section Control buttons 4 Remote sensor The remote control signals are received here. 5 Power indicator Off: No power connection. Main unit control section ON OFF 1 2 3 4 -15- 5 6 Parts and Functions Liquid crystal display The portable DVD player is on the remote control unit. Red: The player is set to standby mode.

User Manual
Page 17
... it for about 1.5 seconds to turn off button Press it to stop playback. AV INPUT/OUTPUT: switch the AV function between 16:9 and 4:3. TFT MODE: switch screen between input and output. VIEW MODE: switch screen between reverse and observe. Keep pressing the button about 1.5 seconds during playback mode, pause mode is set. COLOR: Level 0 to adjust after entering one mode. key to 8. Parts and Functions 1 Play/pause button Press it to slide the tray out Main unit left side 1 2 34...
... it for about 1.5 seconds to turn off button Press it to stop playback. AV INPUT/OUTPUT: switch the AV function between 16:9 and 4:3. TFT MODE: switch screen between input and output. VIEW MODE: switch screen between reverse and observe. Keep pressing the button about 1.5 seconds during playback mode, pause mode is set. COLOR: Level 0 to adjust after entering one mode. key to 8. Parts and Functions 1 Play/pause button Press it to slide the tray out Main unit left side 1 2 34...

User Manual
Page 18
... open-stick into this operation. 12 3 1 2 -17- The included AV cable is connected here. 5 DC in Connect the included AC adapter here. Parts and Functions 1 Phone jack For connecting stereo headphone or an amplifier. 2 Volume control Use it to adjust the volume of the speakers or headphone. 3 Video in/out jack Input or output video signals to connected device by setting AV IN/OUT mode value. The included AV cable or optical digital cable is connected here. 4 Audio...
... open-stick into this operation. 12 3 1 2 -17- The included AV cable is connected here. 5 DC in Connect the included AC adapter here. Parts and Functions 1 Phone jack For connecting stereo headphone or an amplifier. 2 Volume control Use it to adjust the volume of the speakers or headphone. 3 Video in/out jack Input or output video signals to connected device by setting AV IN/OUT mode value. The included AV cable or optical digital cable is connected here. 4 Audio...

User Manual
Page 20
... playback. REPEAT A-B SHIFT 1 STANDBY button Press this button to turn on or off the power. 2 PREVIOUS/NEXT button( and Use these buttons to slow playback at 1/2, 1/4,1/6,1/7 speed. Parts and Functions Remote control unit (frequently used buttons) ( ( ( ( AUDIO SUBTITLE OPEN 1 SETUP ANGLE OSD SEARCH PREV NEXT STOP 2 6 REV PLAY/PAUSE FWD STEP/SLOW 2 3 7 4 MENU TITLE CLEAR 3 5 ZOOM C 8 : Forward direction : Backward direction 4 PLAY/PAUSE button ( Use this button to play or pause playback. 5 MENU button Press this button to display the DVD's menu screen. 6 STOP button...
... playback. REPEAT A-B SHIFT 1 STANDBY button Press this button to turn on or off the power. 2 PREVIOUS/NEXT button( and Use these buttons to slow playback at 1/2, 1/4,1/6,1/7 speed. Parts and Functions Remote control unit (frequently used buttons) ( ( ( ( AUDIO SUBTITLE OPEN 1 SETUP ANGLE OSD SEARCH PREV NEXT STOP 2 6 REV PLAY/PAUSE FWD STEP/SLOW 2 3 7 4 MENU TITLE CLEAR 3 5 ZOOM C 8 : Forward direction : Backward direction 4 PLAY/PAUSE button ( Use this button to play or pause playback. 5 MENU button Press this button to display the DVD's menu screen. 6 STOP button...

User Manual
Page 21
.... 8 REPEAT button For DVDs, use this button to play tracks or the entire disc repeatedly. 9 A-B REPEAT button Press this button during playback. 3 Cursor buttons Use these buttons to input numbers. Press this button to display setup screen when at stop status. Parts and Functions Remote control unit (other buttons) AUDIO SUBTITLE OPEN 1 SETUP 2 ANGLE OSD 3 4 PREV SEARCH NEXT STOP 11 12 13 14 15 REV PLAY/PAUSE FWD STEP/SLOW 5 6 7 8 9 10 MENU ZOOM TITLE CLEAR C REPEAT A-B SHIFT 16 1 AUDIO button Press this button to switch the audio language. 2 SETUP button Press...
.... 8 REPEAT button For DVDs, use this button to play tracks or the entire disc repeatedly. 9 A-B REPEAT button Press this button during playback. 3 Cursor buttons Use these buttons to input numbers. Press this button to display setup screen when at stop status. Parts and Functions Remote control unit (other buttons) AUDIO SUBTITLE OPEN 1 SETUP 2 ANGLE OSD 3 4 PREV SEARCH NEXT STOP 11 12 13 14 15 REV PLAY/PAUSE FWD STEP/SLOW 5 6 7 8 9 10 MENU ZOOM TITLE CLEAR C REPEAT A-B SHIFT 16 1 AUDIO button Press this button to switch the audio language. 2 SETUP button Press...
User Manual
Page 30
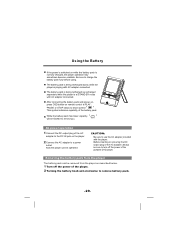
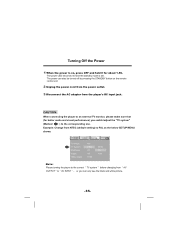
... inserting or removing the DC output plug of the AC adapter, always be flashed to turn off the power of the portable DVD player. This symbol indicates capability of the AC adapter to the DC IN jack on remote control at STAND BY mode with AC adapter connected. Now the player can be operated. AC power operation 1 Connect the DC output plug of the battery pack. Using the Battery If the power is switched on while the battery pack is...
... inserting or removing the DC output plug of the AC adapter, always be flashed to turn off the power of the portable DVD player. This symbol indicates capability of the AC adapter to the DC IN jack on remote control at STAND BY mode with AC adapter connected. Now the player can be operated. AC power operation 1 Connect the DC output plug of the battery pack. Using the Battery If the power is switched on while the battery pack is...

User Manual
Page 31
... region in stores) suited for about 1.5 seconds. Hint: The included AC adapter is lit blue. At standby mode (when the power LED is lit red), the power can be turned on by pressing the standby button on the remote control unit. The player can also be used now. Turning On the Power 2 1 Main unit (front panel) 3 ON OFF Remote control unit 3 4 1 Connect the AC adapter to a power outlet. 2 Connect the DC output plug...
... region in stores) suited for about 1.5 seconds. Hint: The included AC adapter is lit blue. At standby mode (when the power LED is lit red), the power can be turned on by pressing the standby button on the remote control unit. The player can also be used now. Turning On the Power 2 1 Main unit (front panel) 3 ON OFF Remote control unit 3 4 1 Connect the AC adapter to a power outlet. 2 Connect the DC output plug...

User Manual
Page 32
...-sided DVDs, you must insert the open it securely could result in damage. Notes: Set the disc securely. The player starts loading. -31- Loading 1 2 3 , Playback Functions 1 Press OPEN button to open. (If no disk is placed in, the tray will open automatically after power on.) 2 If no power supply, the tray will not open, you do not have signals recorded on both sides, so be careful not to scratch them when removing...
...-sided DVDs, you must insert the open it securely could result in damage. Notes: Set the disc securely. The player starts loading. -31- Loading 1 2 3 , Playback Functions 1 Press OPEN button to open. (If no disk is placed in, the tray will open automatically after power on.) 2 If no power supply, the tray will not open, you do not have signals recorded on both sides, so be careful not to scratch them when removing...

User Manual
Page 33
... menu screen -32- In order to use the number buttons on the remote control unit to select the item. Example: For DVDs with playback control (PBC), a menu screen appears. Shift Next For some discs, playback starts automatically when the tray is closed automatically if no button is displayed on the disc's menu screen which had been programmed and stored in memories, playback starts automatically in order to play a disc without displaying the menu screen. For example, press 1 ( number button) while at STOP mode...
... menu screen -32- In order to use the number buttons on the remote control unit to select the item. Example: For DVDs with playback control (PBC), a menu screen appears. Shift Next For some discs, playback starts automatically when the tray is closed automatically if no button is displayed on the disc's menu screen which had been programmed and stored in memories, playback starts automatically in order to play a disc without displaying the menu screen. For example, press 1 ( number button) while at STOP mode...
User Manual
Page 36
... the Power 1 When the power is set. Example: Change from NTSC (default setting) to PAL as the below SETUP MENU shows: ALanguage Video Audio Parental TV Shape TV System Brightness Edges Video Output 16:9 NTSC Off Off CVBS NTSC PAL Auto Note: Please turning the player to the correct TV system before changing from the player's DC input jack. CAUTION: When connecting the player to the corresponding one. The power can only see the black and white picture...
... the Power 1 When the power is set. Example: Change from NTSC (default setting) to PAL as the below SETUP MENU shows: ALanguage Video Audio Parental TV Shape TV System Brightness Edges Video Output 16:9 NTSC Off Off CVBS NTSC PAL Auto Note: Please turning the player to the correct TV system before changing from the player's DC input jack. CAUTION: When connecting the player to the corresponding one. The power can only see the black and white picture...

User Manual
Page 37
... the DVD video disk. (The screen on -screen display. You can select a preferred language for the on the remote control unit to display setup screen when playback is Deutsch Espa~nol Italiano Setting the subtitle language Select the language to be used for the on your player may have difference with the screen shown here) ALanguage Video Audio OSD Menu Subtitle Audio DVD Menu OSD Factory Set English English English English On Reset Parental English French German Spanish Italian Auto Off Parental English...
... the DVD video disk. (The screen on -screen display. You can select a preferred language for the on the remote control unit to display setup screen when playback is Deutsch Espa~nol Italiano Setting the subtitle language Select the language to be used for the on your player may have difference with the screen shown here) ALanguage Video Audio OSD Menu Subtitle Audio DVD Menu OSD Factory Set English English English English On Reset Parental English French German Spanish Italian Auto Off Parental English...

User Manual
Page 39
... can change the player from AV OUT(output AV signal to TV, etc) to AV IN(input AV signal from other device AV cable(included) Setting Parental Lock Level 1 At STOP status, press the SETUP button to display the setup screen, use it as a TFT Monitor. of pictures Cbyhaunsgine,gbcruigrhsotnrebsusttoornesdtgoes Edges 08 improve picture quality. -38- ALanguage Video Audio PASSWORD Rating ---8.Adult Parental Video Enhance Press the SETUP button disk, the Video Enhance swchreilee,nplwaiyllinbge Video Enhance Brightness 08 displayed. Default setting is set...
... can change the player from AV OUT(output AV signal to TV, etc) to AV IN(input AV signal from other device AV cable(included) Setting Parental Lock Level 1 At STOP status, press the SETUP button to display the setup screen, use it as a TFT Monitor. of pictures Cbyhaunsgine,gbcruigrhsotnrebsusttoornesdtgoes Edges 08 improve picture quality. -38- ALanguage Video Audio PASSWORD Rating ---8.Adult Parental Video Enhance Press the SETUP button disk, the Video Enhance swchreilee,nplwaiyllinbge Video Enhance Brightness 08 displayed. Default setting is set...

User Manual
Page 41
... LCD screen. MPaauinseunoirt,sslovwolupmlaey mode is is due to a non-compatible AV amplifier,etc. Have wrong DTS setting. If still can not be operated with wireless remote control to static electricity or other device operates erroneously The player,s remote control unit may cause some TVs with the remote control unit Remote control unit is too far from speakers or sound is distorted For some discs, 96 kHz digital output of linear PCM audio signals...
... LCD screen. MPaauinseunoirt,sslovwolupmlaey mode is is due to a non-compatible AV amplifier,etc. Have wrong DTS setting. If still can not be operated with wireless remote control to static electricity or other device operates erroneously The player,s remote control unit may cause some TVs with the remote control unit Remote control unit is too far from speakers or sound is distorted For some discs, 96 kHz digital output of linear PCM audio signals...


