User Manual
Page 2
... the cabinet. Reverse engineering or disassembly is a safety feature. For products intended to the product, be sure the antenna or cable system is grounded so as opening or removing covers may expose you are defeated, visible laser radiation is connected to operate from ...CAUTION: To prevent electric shock, match wide blade plug to proper grounding conductors, location or antenna- CAUTION: This Digital Video Disc Player employs a laser System. Pursuant with an attachment plug having overload protection. The mains plug or an appliance coupler was used replacement parts...
... the cabinet. Reverse engineering or disassembly is a safety feature. For products intended to the product, be sure the antenna or cable system is grounded so as opening or removing covers may expose you are defeated, visible laser radiation is connected to operate from ...CAUTION: To prevent electric shock, match wide blade plug to proper grounding conductors, location or antenna- CAUTION: This Digital Video Disc Player employs a laser System. Pursuant with an attachment plug having overload protection. The mains plug or an appliance coupler was used replacement parts...
User Manual
Page 3
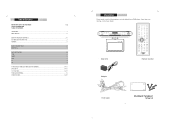
......3-5 BUTTONS ON THE MAIN UNIT...3 REMOTE...5 CABLE CONNECTIONS...6 MOUNTING...7 BASIC OPERATION...8-9 TIME...8 RADIO...8 DVD...8 TV...9 AV...9 FUNCTION BUTTONS (BUTTONS ON THE REMOTE 10-13 DVD SETUP...14-15 TV FUNCTION...16-17 TROUBLE SHOOTING...18 SPECIFICATION...19-20 Unpacking Please make sure the following items are missing, contact your DVD player. Main Unit Adapter Remote Control RCA...
......3-5 BUTTONS ON THE MAIN UNIT...3 REMOTE...5 CABLE CONNECTIONS...6 MOUNTING...7 BASIC OPERATION...8-9 TIME...8 RADIO...8 DVD...8 TV...9 AV...9 FUNCTION BUTTONS (BUTTONS ON THE REMOTE 10-13 DVD SETUP...14-15 TV FUNCTION...16-17 TROUBLE SHOOTING...18 SPECIFICATION...19-20 Unpacking Please make sure the following items are missing, contact your DVD player. Main Unit Adapter Remote Control RCA...
User Manual
Page 6
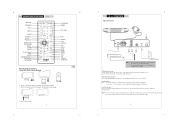
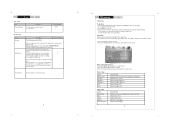
...and remove the battery from the remote. 2. You can use 75 Ohm coaxial cable to the manual of the RCA cable. AV Signal Input RCA - - a e onnections Cable Connections External AV Source Wall Outlet 100-240V~50/60Hz NOTE: 1. TV RF signals include: receiving antenna/CATV net. Connect the "Video" port to... connect the outdoor antenna. If the unit will not be used for a long period of Controls DISPLAY STANDBY TITLE GOTO AUDIO SUBTITLE SETUP TV SETUP DIRECTION /OK/TUN/CH MENU F.FWD F.BWD PLAY/PAUSE STOP CLEAR ZOOM/MEMORY EPG/FM/AM AUTO/FAV Remote Control Drawing Using The...
...and remove the battery from the remote. 2. You can use 75 Ohm coaxial cable to the manual of the RCA cable. AV Signal Input RCA - - a e onnections Cable Connections External AV Source Wall Outlet 100-240V~50/60Hz NOTE: 1. TV RF signals include: receiving antenna/CATV net. Connect the "Video" port to... connect the outdoor antenna. If the unit will not be used for a long period of Controls DISPLAY STANDBY TITLE GOTO AUDIO SUBTITLE SETUP TV SETUP DIRECTION /OK/TUN/CH MENU F.FWD F.BWD PLAY/PAUSE STOP CLEAR ZOOM/MEMORY EPG/FM/AM AUTO/FAV Remote Control Drawing Using The...
User Manual
Page 7
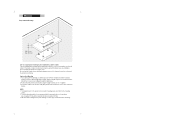
... chosen will facilitate a neat, easy installation. Upon opening the final package, you have to drive through the cabinet base. 2. Connect the cables. Close proximity to an electrical outlet, a TV antenna or cable connection and a telephone jack will provide adequate access to the mounting surface. 2. Under-cabinet Mounting 1. Do not over tighten. 3. Take care...
... chosen will facilitate a neat, easy installation. Upon opening the final package, you have to drive through the cabinet base. 2. Connect the cables. Close proximity to an electrical outlet, a TV antenna or cable connection and a telephone jack will provide adequate access to the mounting surface. 2. Under-cabinet Mounting 1. Do not over tighten. 3. Take care...
User Manual
Page 8
...on the main unit to save by the MODE button. 3. DVD Operation 1. Press MODE to set the player into the TV mode. 3. Press STOP to stop searching. 4. to the preset channel. Connect the cables. Press CH+/- Press VOL+/- See "Cable Connections" section. 2. Adjust the screen effect through the TFT ...through the TFT setting menu. For the initial use . Various TV features are listed clearly under the "Function Button" section and the "DVD Setup" section, please read the "TV Function" section carefully. Connect the AV cable and the power supply. NOTE: When input the AV signal...
...on the main unit to save by the MODE button. 3. DVD Operation 1. Press MODE to set the player into the TV mode. 3. Press STOP to stop searching. 4. to the preset channel. Connect the cables. Press CH+/- Press VOL+/- See "Cable Connections" section. 2. Adjust the screen effect through the TFT ...through the TFT setting menu. For the initial use . Various TV features are listed clearly under the "Function Button" section and the "DVD Setup" section, please read the "TV Function" section carefully. Connect the AV cable and the power supply. NOTE: When input the AV signal...
User Manual
Page 12
... working with the menu, 1. Press EXIT to turn on the the player. Adjust the display sharpness Adjust the image color. Setup the audio language. .1.6 . Level 8 will restrict 8 playback to enter the menu. See " Cable Connections" section. 2. Press the left /right button to select the ...verify Restore function will not play any discs rated higher than this password cannot be preset through the TV setup menu. TV setup menu consists of the player. The player will not reset the password. this setting. Default Setting Enter the old password, the new password,...
... working with the menu, 1. Press EXIT to turn on the the player. Adjust the display sharpness Adjust the image color. Setup the audio language. .1.6 . Level 8 will restrict 8 playback to enter the menu. See " Cable Connections" section. 2. Press the left /right button to select the ...verify Restore function will not play any discs rated higher than this password cannot be preset through the TV setup menu. TV setup menu consists of the player. The player will not reset the password. this setting. Default Setting Enter the old password, the new password,...
User Manual
Page 13
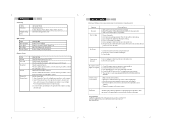
...move left /right direction button to release. Disc is fully charged. 1. Check if the connection cables are secured. 3. Setup the color mode. (Normal, Warm, Cool) Adjust the display mode....are damaged. 3. Remove the obstacles between the remote control and the player. 3. ro e ootin Should your DVD player develop a problem, please check below before requesting service: Symptom No ... proper and secure. 2. Remove the disc and leave the unit power on . . 2. TV Function Time Setup ITEM Time Zone Daylight Saving Time DESCRIPTION Select the time zone. (Central,...
...move left /right direction button to release. Disc is fully charged. 1. Check if the connection cables are secured. 3. Setup the color mode. (Normal, Warm, Cool) Adjust the display mode....are damaged. 3. Remove the obstacles between the remote control and the player. 3. ro e ootin Should your DVD player develop a problem, please check below before requesting service: Symptom No ... proper and secure. 2. Remove the disc and leave the unit power on . . 2. TV Function Time Setup ITEM Time Zone Daylight Saving Time DESCRIPTION Select the time zone. (Central,...