User Manual
Page 3
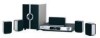
... COAXIAL digital audio output Compatible with DVD, CD, DVD+R/RW, DVD-R/RW, MP3, MPEG4, JPEG, etc. Features &Package Contents Thank you for future reference. Full function remote control AM/FM stereo tuning system High quality amplifier Playable Disc and Media Types: Disc types Symbol Contents DVD Audio + Video MP3 Audio CD-DA Audio Picture CD JPEG Photo CD MPEG-4 DivX VI DEO Audio + Video Audio + Video Package Contents: User Manual User manual 3 6 9 RADIO Remote Control MENU MODE TONE ZOOM A/V Cable MO/ST V-MODE SUBTITLE AUTO 0/10 10+ OPEN/ CLOSE DVD-958...
... COAXIAL digital audio output Compatible with DVD, CD, DVD+R/RW, DVD-R/RW, MP3, MPEG4, JPEG, etc. Features &Package Contents Thank you for future reference. Full function remote control AM/FM stereo tuning system High quality amplifier Playable Disc and Media Types: Disc types Symbol Contents DVD Audio + Video MP3 Audio CD-DA Audio Picture CD JPEG Photo CD MPEG-4 DivX VI DEO Audio + Video Audio + Video Package Contents: User Manual User manual 3 6 9 RADIO Remote Control MENU MODE TONE ZOOM A/V Cable MO/ST V-MODE SUBTITLE AUTO 0/10 10+ OPEN/ CLOSE DVD-958...

User Manual
Page 4
... Your Attention IMPORTANT SAFETY INSTRUCTIONS 1. Do not block any heat sources such as the disconnect device, the disconnect device shall remain readily operable. Do not install near water. 6. Heed all warnings. 4. If the provided plug does not fit into the apparatus, the apparatus has been exposed to dripping or splashing. Protect the power cord from being walked on...
... Your Attention IMPORTANT SAFETY INSTRUCTIONS 1. Do not block any heat sources such as the disconnect device, the disconnect device shall remain readily operable. Do not install near water. 6. Heed all warnings. 4. If the provided plug does not fit into the apparatus, the apparatus has been exposed to dripping or splashing. Protect the power cord from being walked on...
User Manual
Page 5
... receiving antenna. - Consult the dealer or an experienced radio/TV technician for Class B digital devices, pursuant to stop operation of electric shock, do not remove cover (or back). For Your Attention This symbol indicates important instructions accompanying the product. Increase the separation between hazardous maims voltage are designed to radio communications. When servicing use only identical replacement parts. Do not make any interference received...
... receiving antenna. - Consult the dealer or an experienced radio/TV technician for Class B digital devices, pursuant to stop operation of electric shock, do not remove cover (or back). For Your Attention This symbol indicates important instructions accompanying the product. Increase the separation between hazardous maims voltage are designed to radio communications. When servicing use only identical replacement parts. Do not make any interference received...
User Manual
Page 6
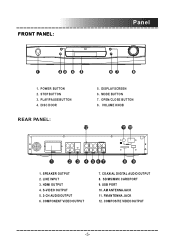
PLAY/PAUSE BUTTON 4. MODE BUTTON 7. LINE INPUT 3. HDMI OUTPUT 4. DISC DOOR 5. USB PORT 10. FM ANTENNA JACK 12. COMPONENT VIDEO OUTPUT 7. SPEAKER OUTPUT 2. COAXIAL DIGITAL AUDIO OUTPUT 8. AM ANTENNAJACK 11. VOLUME KNOB REAR PANEL: 12 11 10 1 2 3 4 567 89 1. S-VIDEO OUTPUT 5. 2-CH AUDIOOUTPUT 6. SD/MS/MMC CARD PORT 9. POWER BUTTON 2. COMPOSITE VIDEO OUTPUT -5- DISPLAYSCREEN 6. OPEN/CLOSE BUTTON 8. STOP BUTTON 3. FRONT PANEL: POWER Panel 1.
PLAY/PAUSE BUTTON 4. MODE BUTTON 7. LINE INPUT 3. HDMI OUTPUT 4. DISC DOOR 5. USB PORT 10. FM ANTENNA JACK 12. COMPONENT VIDEO OUTPUT 7. SPEAKER OUTPUT 2. COAXIAL DIGITAL AUDIO OUTPUT 8. AM ANTENNAJACK 11. VOLUME KNOB REAR PANEL: 12 11 10 1 2 3 4 567 89 1. S-VIDEO OUTPUT 5. 2-CH AUDIOOUTPUT 6. SD/MS/MMC CARD PORT 9. POWER BUTTON 2. COMPOSITE VIDEO OUTPUT -5- DISPLAYSCREEN 6. OPEN/CLOSE BUTTON 8. STOP BUTTON 3. FRONT PANEL: POWER Panel 1.
User Manual
Page 7
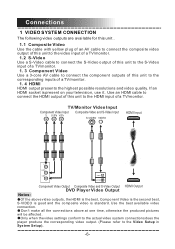
... an HDMI socket is standard. TV/Monitor Video Input Component Video Input Y U/Pb V/Pr Composite Video and S-Video Input S-VIDEO VIDEO HDMI Input Y Cr/Pb Cr/Pr VIDEO S-VIDEO Component Video Output Composite Video and S-Video Output HDMI Output DVD Player Video Output Notes: Of the above at one time, otherwise the produced pictures will be affected. Only when the video settings conform to the actual video system connections does the player produce the corresponding video output. (Please refer to the Video Setup in System Setup). -6- Use the best available video connection.
... an HDMI socket is standard. TV/Monitor Video Input Component Video Input Y U/Pb V/Pr Composite Video and S-Video Input S-VIDEO VIDEO HDMI Input Y Cr/Pb Cr/Pr VIDEO S-VIDEO Component Video Output Composite Video and S-Video Output HDMI Output DVD Player Video Output Notes: Of the above at one time, otherwise the produced pictures will be affected. Only when the video settings conform to the actual video system connections does the player produce the corresponding video output. (Please refer to the Video Setup in System Setup). -6- Use the best available video connection.
User Manual
Page 8
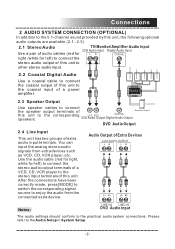
... switch the corresponding signal source to enjoy the audio from extra devices such as VCD, CD, VCR player, etc. SW CEN SR SL FR FL + + - - 888888 SPEAKERS OUT 2.3 Speaker Output SUBWOOFER Use speaker cables to connect the speaker output terminals of Speaker Output this unit to the coaxial input of a power amplifier. Audio Output of extra audio input terminals. Use the audio cable (red for right, white for left ) to connect the stereo audio output terminals of a VCD, CD, VCR player to the stereo input...
... switch the corresponding signal source to enjoy the audio from extra devices such as VCD, CD, VCR player, etc. SW CEN SR SL FR FL + + - - 888888 SPEAKERS OUT 2.3 Speaker Output SUBWOOFER Use speaker cables to connect the speaker output terminals of Speaker Output this unit to the coaxial input of a power amplifier. Audio Output of extra audio input terminals. Use the audio cable (red for right, white for left ) to connect the stereo audio output terminals of a VCD, CD, VCR player to the stereo input...
User Manual
Page 9
... is playing, an angle mark will go back to cancel. 4. Press [ ] to go into the standby mode after about 20 minutes being in the submenu, then press [ENTER] /[ ]to select an item you can press [STANDBY] to display the setup menu. 2. You can view the video of the current one. 6. OFF: Disable the screen saver function. -8- In DVD mode, press [SETUP] on the remote control to switch it...
... is playing, an angle mark will go back to cancel. 4. Press [ ] to go into the standby mode after about 20 minutes being in the submenu, then press [ENTER] /[ ]to select an item you can press [STANDBY] to display the setup menu. 2. You can view the video of the current one. 6. OFF: Disable the screen saver function. -8- In DVD mode, press [SETUP] on the remote control to switch it...
User Manual
Page 10
... digital audio signal output will be in its raw format. PCM only: The digital audio signal output will be in the AUDIO SETUP PAGE. They are eight items in PCM format. -9- The FRONT SPEAKER can be set to LARGE, SMALL or OFF and the SUBWOOFER can be selected. The CENTER SPEAKER, REAR SPEAKER can be set to ON or OFF. If the sound from stereo or multichannel audio contents. 5.1CH: Turn off the DOWNMIX mode. NOTE: When playing 5.1CH disc...
... digital audio signal output will be in its raw format. PCM only: The digital audio signal output will be in the AUDIO SETUP PAGE. They are eight items in PCM format. -9- The FRONT SPEAKER can be set to LARGE, SMALL or OFF and the SUBWOOFER can be selected. The CENTER SPEAKER, REAR SPEAKER can be set to ON or OFF. If the sound from stereo or multichannel audio contents. 5.1CH: Turn off the DOWNMIX mode. NOTE: When playing 5.1CH disc...
User Manual
Page 11
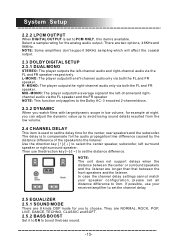
... signal of the speakers to the listener. Use the direction key [ ]/[ ] to choose. NOTE: Some amplifiers don't support 96KHz sampling which will affect the coaxial output. 2.3 DOLBY DIGITAL SETUP 2.3.1 DUAL MONO STEREO: The player outputs the left surround speaker or right surround speaker. R- Select a sample rating for the center, rear speakers and the subwoofer. They are 8 kinds DSP mode for you can adjust the dynamic value up to avoid losing sound details resulted from the low volume. 2.4 CHANNEL DELAY...
... signal of the speakers to the listener. Use the direction key [ ]/[ ] to choose. NOTE: Some amplifiers don't support 96KHz sampling which will affect the coaxial output. 2.3 DOLBY DIGITAL SETUP 2.3.1 DUAL MONO STEREO: The player outputs the left surround speaker or right surround speaker. R- Select a sample rating for the center, rear speakers and the subwoofer. They are 8 kinds DSP mode for you can adjust the dynamic value up to avoid losing sound details resulted from the low volume. 2.4 CHANNEL DELAY...
User Manual
Page 12
... detected. 2.6.1.2 MODE This item is used to control the width of the center channel sound effect by blending the center speaker to the left and right speakers. NOTE: Pro Logic II functionality is effective only when DOWNMIX is set to 5.1CH and DIGITAL OUTPUT is set to ALL. 2.6.1.1 PRO LOGIC II This item is set to MUSIC. OFF: Pro Logic II processing is disabled AUTO: Pro Logic...
... detected. 2.6.1.2 MODE This item is used to control the width of the center channel sound effect by blending the center speaker to the left and right speakers. NOTE: Pro Logic II functionality is effective only when DOWNMIX is set to 5.1CH and DIGITAL OUTPUT is set to ALL. 2.6.1.1 PRO LOGIC II This item is set to MUSIC. OFF: Pro Logic II processing is disabled AUTO: Pro Logic...

User Manual
Page 13
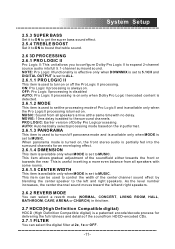
... respectively, use direction key [ ]/[ ] to adjust the value, then press [ENTER] to confirm it. 3.4.3 GAMMA There are four options (HIGH, MEDIUM, LOW and NONE) for you to choose in the form of interlaced scanning. 3.3 HD MODE (High Definition Mode) When HDMI is set to the CVBS (composite video). System Setup 3 VIDEO SETUP PAGE There are used. YUV: Set video output in analog component video format when the component video outputs are five...
... respectively, use direction key [ ]/[ ] to adjust the value, then press [ENTER] to confirm it. 3.4.3 GAMMA There are four options (HIGH, MEDIUM, LOW and NONE) for you to choose in the form of interlaced scanning. 3.3 HD MODE (High Definition Mode) When HDMI is set to the CVBS (composite video). System Setup 3 VIDEO SETUP PAGE There are used. YUV: Set video output in analog component video format when the component video outputs are five...
User Manual
Page 14
...-digital signal, while the aforementioned interfaces are TV TYPE, PBC, AUDIO, SUBTITLE, DISC MENU, PARENTAL and DEFAULT. 4.1 TV TYPE This product supports both NTSC (National Television System Committee) and PAL (Phase Alternating Line) television broadcasting standards. -13- As a rule, HDMI cables should not run longer than its predecessors, component video, S-Video and composite video. NOTE: When HDMI is set to ON, the items VIDEO OUTPUT, TV MODE , HD MODE...
...-digital signal, while the aforementioned interfaces are TV TYPE, PBC, AUDIO, SUBTITLE, DISC MENU, PARENTAL and DEFAULT. 4.1 TV TYPE This product supports both NTSC (National Television System Committee) and PAL (Phase Alternating Line) television broadcasting standards. -13- As a rule, HDMI cables should not run longer than its predecessors, component video, S-Video and composite video. NOTE: When HDMI is set to ON, the items VIDEO OUTPUT, TV MODE , HD MODE...
User Manual
Page 15
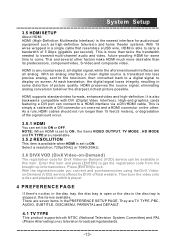
... the video signal of the disc. Note: If a wrong selection is made, the viewing image will be very poor. Movies rated higher than the level set for the currently playing disc, the disc's default audio, subtitle, disc menu language setting works. 4.4 PARENTAL This item allows the user to set a maximum rating of a NTSC disc and output in PAL format. What's more, to key in the correct password is needed to fix the error. 4.2 PBC (Play Back Control...
... the video signal of the disc. Note: If a wrong selection is made, the viewing image will be very poor. Movies rated higher than the level set for the currently playing disc, the disc's default audio, subtitle, disc menu language setting works. 4.4 PARENTAL This item allows the user to set a maximum rating of a NTSC disc and output in PAL format. What's more, to key in the correct password is needed to fix the error. 4.2 PBC (Play Back Control...
User Manual
Page 16
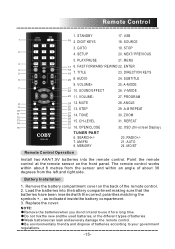
... 7 8 9 5. OPEN/CLOSE TUNER PART DVD-958 6. SEARCH+/7. ZOOM 31. RADIO+/21 .AUTO 24 .MO/ST Remote Control Operation Install two AAA/1.5V batteries into the battery compartment making sure that the batteries have been inserted with the correct polarities matching the symbols +, - The remote control works within about 8 metres from the sensor and within an angle of batteries. Battery Installation 1. Replace the cover. MENU 3 0/10 10+ SOURCE 17 6. AUDIO 24. SOUND...
... 7 8 9 5. OPEN/CLOSE TUNER PART DVD-958 6. SEARCH+/7. ZOOM 31. RADIO+/21 .AUTO 24 .MO/ST Remote Control Operation Install two AAA/1.5V batteries into the battery compartment making sure that the batteries have been inserted with the correct polarities matching the symbols +, - The remote control works within about 8 metres from the sensor and within an angle of batteries. Battery Installation 1. Replace the cover. MENU 3 0/10 10+ SOURCE 17 6. AUDIO 24. SOUND...
User Manual
Page 17
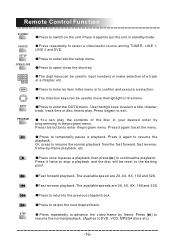
... it again to enter an item in standby mode. Press it again to put the unit in the menu or to advance the video frame by frame. The available speeds are 2X, 4X, 8X, 16X and 32X. Remote Control Function STANDBY Press to select a video/audio source among TUNER, LINE 1, LINE 2 and DVD. SOURCE SETUP OPEN/CLOSE Press repeatedly to switch on the unit. STEP Press repeatedly to...
... it again to enter an item in standby mode. Press it again to put the unit in the menu or to advance the video frame by frame. The available speeds are 2X, 4X, 8X, 16X and 32X. Remote Control Function STANDBY Press to select a video/audio source among TUNER, LINE 1, LINE 2 and DVD. SOURCE SETUP OPEN/CLOSE Press repeatedly to switch on the unit. STEP Press repeatedly to...
User Manual
Page 18
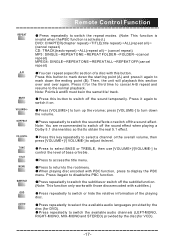
... function. When playing disc encoded with this button. Press this button to switch off the subtitle function. (Note: This function only works with those discs encoded with subtitles.) Press repeatedly to switch or hide the relative information of the playing disc. Note: Points A and B must be in the same title/ track. press [VOLUME-] to turn up the volume; Press to select BASS or TREBLE, then use [VOLUME+]/[VOLUME-] to control the level of bass...
... function. When playing disc encoded with this button. Press this button to switch off the subtitle function. (Note: This function only works with those discs encoded with subtitles.) Press repeatedly to switch or hide the relative information of the playing disc. Note: Points A and B must be in the same title/ track. press [VOLUME-] to turn up the volume; Press to select BASS or TREBLE, then use [VOLUME+]/[VOLUME-] to control the level of bass...
User Manual
Page 19
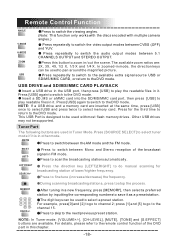
... switch between 5.1 CHANNELS OUTPUT and STEREO OUTPUT. For details, please refer to the remote control function of the DVD part in this button to zoom in it . Remote Control Function ANGLE V-MODE A-MODE ZOOM USB Press to switch the viewing angles. (Note: This function only works with the discs encoded with most flash memory drives. Press repeatedly to select tuner mode if it as a preset station. Press [USB] again to switch to the DVD mode. This USB Port is in FM mode. Press [SOURCE SELECT] to switch the audio output modes...
... switch between 5.1 CHANNELS OUTPUT and STEREO OUTPUT. For details, please refer to the remote control function of the DVD part in this button to zoom in it . Remote Control Function ANGLE V-MODE A-MODE ZOOM USB Press to switch the viewing angles. (Note: This function only works with the discs encoded with most flash memory drives. Press repeatedly to select tuner mode if it as a preset station. Press [USB] again to switch to the DVD mode. This USB Port is in FM mode. Press [SOURCE SELECT] to switch the audio output modes...

User Manual
Page 20
... the instruction menu for details. MENU OPERATION: Use the direction key [ ]/[ ] to select a folder or a file, then press [ENTER] to enter the selected folder or play . [ ]/[ ]: Press [ ]/[ ] to turn over to move the picture. Please refer to the remote control function introduction in , the direction keys can also use the direction keys to select a picture, then press [ENTER] to zoom in the disc tray, then the unit will display on the screen...
... the instruction menu for details. MENU OPERATION: Use the direction key [ ]/[ ] to select a folder or a file, then press [ENTER] to enter the selected folder or play . [ ]/[ ]: Press [ ]/[ ] to turn over to move the picture. Please refer to the remote control function introduction in , the direction keys can also use the direction keys to select a picture, then press [ENTER] to zoom in the disc tray, then the unit will display on the screen...
User Manual
Page 21
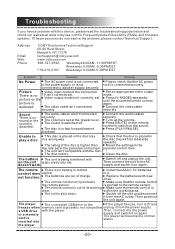
... [MUTE] on the remote control to switch on again. Press [PLAY/PAUSE]. Replace the batteries with its working area. within the working Make sure the remote control is distorted. The player The connected USB drive or the If the player freezes, turn it off . picture or the Video output mode isn't correctly set in fast forward/rewind playback. not function. a USB drive with the disc. / The disc is probably not compatible unplug it from the...
... [MUTE] on the remote control to switch on again. Press [PLAY/PAUSE]. Replace the batteries with its working area. within the working Make sure the remote control is distorted. The player The connected USB drive or the If the player freezes, turn it off . picture or the Video output mode isn't correctly set in fast forward/rewind playback. not function. a USB drive with the disc. / The disc is probably not compatible unplug it from the...
User Manual
Page 22
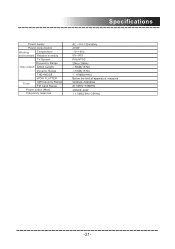
Specifications Power supply Power consumption Working Temperature environment Relative humidity TV System Frequency Range Disc output S/N(A weight) Dynamic Range THD+NOISE WOW FLUTTER Tuner AM frequency Range FM band Range Power output (Max) Frequency response AC ~110-120V/60Hz 210W -10~+40 5%~90% PAL/NTSC 20Hz~20KHz 80dB(1KHz) 70dB(1KHz) -60dB(1KHz) Below the limit of apparatus measure 522KHz~1620KHz 87.5MHz~108MHz 30WX5+60W 1.5dB(20Hz~20KHz) -21-
Specifications Power supply Power consumption Working Temperature environment Relative humidity TV System Frequency Range Disc output S/N(A weight) Dynamic Range THD+NOISE WOW FLUTTER Tuner AM frequency Range FM band Range Power output (Max) Frequency response AC ~110-120V/60Hz 210W -10~+40 5%~90% PAL/NTSC 20Hz~20KHz 80dB(1KHz) 70dB(1KHz) -60dB(1KHz) Below the limit of apparatus measure 522KHz~1620KHz 87.5MHz~108MHz 30WX5+60W 1.5dB(20Hz~20KHz) -21-


