
User Manual
Page 14
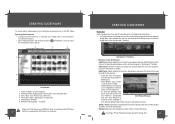
...Computer" and double-click the Vividshare icon to access the Vividshare shown below. 4 2 3 1 6 5 Vividshare 1. Opening the Vividshare • Connect the DP frame to a computer by size, name etc. 4. Click OK to save the settings, click Save. Background: Sets the background color of the selected disk. 3. Storyboard...8226; To save it from the Preview panel and click Add Photo to confirm them on this button to access the Edit Photo window. • Click the Add Text button to active the Text panel for creating photo slideshow. • In Preview Panel, hold down the Ctrl ...
...Computer" and double-click the Vividshare icon to access the Vividshare shown below. 4 2 3 1 6 5 Vividshare 1. Opening the Vividshare • Connect the DP frame to a computer by size, name etc. 4. Click OK to save the settings, click Save. Background: Sets the background color of the selected disk. 3. Storyboard...8226; To save it from the Preview panel and click Add Photo to confirm them on this button to access the Edit Photo window. • Click the Add Text button to active the Text panel for creating photo slideshow. • In Preview Panel, hold down the Ctrl ...
User Manual
Page 15
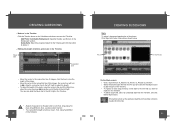
... style. 29 You can edit the length of the bar to the left /right. Click Style tab to access the Timeline. File List Preview Window On the Style screen: • Click a style file from the Timeline, and click Delete Style button. CREATING SLIDESHOWS Style To select / change...the end of the Music bar, when the cursor becomes ,drag the end of photos, music, Text, Clipart and Effect 28 in the Timeline. The number shown on the Vividshare window to enter Style screen shown below. Add Photo / Add Audio /Background: Operation details, see Decoration Section. • You can...
... style. 29 You can edit the length of the bar to the left /right. Click Style tab to access the Timeline. File List Preview Window On the Style screen: • Click a style file from the Timeline, and click Delete Style button. CREATING SLIDESHOWS Style To select / change...the end of the Music bar, when the cursor becomes ,drag the end of photos, music, Text, Clipart and Effect 28 in the Timeline. The number shown on the Vividshare window to enter Style screen shown below. Add Photo / Add Audio /Background: Operation details, see Decoration Section. • You can...
User Manual
Page 16
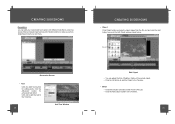
... • Click the OK button to add the Clipart in the Timeline. 31 Click Ok to add the text in the Timeline. 2350 Add Text Window CREATING SLIDESHOWS • Clipart Click Clipart button and select a clipart image from the File List and click the Add button to access the Edit Clipart... in the Timeline. • Effect • Click Effect button and select a file from the File List. • Click the Add button to make your photo slideshows more funny and lively. Decoration Screen • Text Click the Add Text button for editing texts, click the Advanced button for advanced text effect.
... • Click the OK button to add the Clipart in the Timeline. 31 Click Ok to add the text in the Timeline. 2350 Add Text Window CREATING SLIDESHOWS • Clipart Click Clipart button and select a clipart image from the File List and click the Add button to access the Edit Clipart... in the Timeline. • Effect • Click Effect button and select a file from the File List. • Click the Add button to make your photo slideshows more funny and lively. Decoration Screen • Text Click the Add Text button for editing texts, click the Advanced button for advanced text effect.
User Manual
Page 17
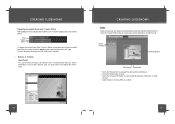
...set the text effects like movie style. CREATING SLIDESHOWS Create After you preview the whole photo slideshow and feel satisfied with the effect, click the Create VVD button to the left / right. Create VVD Button Preview Window Play button Stop button • Click the Play button to preview the whole... photo slideshow. • Click the Stop button to stop. • Click the Create VVD button to start ...
...set the text effects like movie style. CREATING SLIDESHOWS Create After you preview the whole photo slideshow and feel satisfied with the effect, click the Create VVD button to the left / right. Create VVD Button Preview Window Play button Stop button • Click the Play button to preview the whole... photo slideshow. • Click the Stop button to stop. • Click the Create VVD button to start ...
User Manual
Page 22
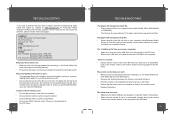
... file is poor. • Try playing the file on your computer using Windows Media Player 10. If the file works on the computer, use SDHC memory cards. ADDRESS COBY Electronics Technical Support 56-65 Rust Street Maspeth, NY 11378 EMAIL [email protected] WEB www.... on your computer. If these resources do not resolve the problem, please contact Technical Support. TROUBLESHOOTING If you have a problem with this DP frame. 42 TROUBLESHOOTING The player will not play my video file. • Ensure that the power cord has been properly connected to a ...
... file is poor. • Try playing the file on your computer using Windows Media Player 10. If the file works on the computer, use SDHC memory cards. ADDRESS COBY Electronics Technical Support 56-65 Rust Street Maspeth, NY 11378 EMAIL [email protected] WEB www.... on your computer. If these resources do not resolve the problem, please contact Technical Support. TROUBLESHOOTING If you have a problem with this DP frame. 42 TROUBLESHOOTING The player will not play my video file. • Ensure that the power cord has been properly connected to a ...
User Manual
Page 24
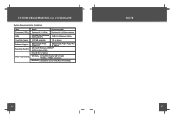
... for VIVIDSHARE System Requirements for Vividshare Item Basic Recommended Processor (CPU) Pentium IV 1.0 GHz Pentium IV 2.4 GHz or above RAM 256 MB (For Windows 2000 and XP) 1GB (For Windows Vista) Free Disk Space 512 MB available 1G or above Software Support Operating System Macromedia Flash Player 8.0 Macromedia Flash Player 9.0 or above Microsoft...
... for VIVIDSHARE System Requirements for Vividshare Item Basic Recommended Processor (CPU) Pentium IV 1.0 GHz Pentium IV 2.4 GHz or above RAM 256 MB (For Windows 2000 and XP) 1GB (For Windows Vista) Free Disk Space 512 MB available 1G or above Software Support Operating System Macromedia Flash Player 8.0 Macromedia Flash Player 9.0 or above Microsoft...


