Instruction Manual
Page 1
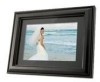
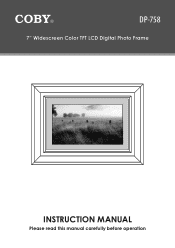
DP-758 7" Widescreen Color TFT LCD Digital Photo Frame Instruction Manual Please read this manual carefully before operation
DP-758 7" Widescreen Color TFT LCD Digital Photo Frame Instruction Manual Please read this manual carefully before operation
Instruction Manual
Page 7
... View...10 Right View...10 Getting Started 11 Installing a Memory Card 11 Powering your Digital Picture Frame 11 Item List Screen 12 Select Card Screen 13 Photo Slideshow 13 To View Next / Previous Photo 13 Photo Mode 13 To Rotate the Photo / Change the screen ratio 14 Calendar with Time Screen 15 Clock Mode 15 Setup...
... View...10 Right View...10 Getting Started 11 Installing a Memory Card 11 Powering your Digital Picture Frame 11 Item List Screen 12 Select Card Screen 13 Photo Slideshow 13 To View Next / Previous Photo 13 Photo Mode 13 To Rotate the Photo / Change the screen ratio 14 Calendar with Time Screen 15 Clock Mode 15 Setup...
Instruction Manual
Page 11
... cause electric shock. Use only the AC adapter supplied with wet hands. Do not handle the power plug with the photo frame. Powering your Digital Picture Frame Your Photo Frame should be easier! Take care to an AC 100-240V wall outlet. • Using the supplied power adapter, plug... is indicated here or on the left panel of the photo frame. www.cobyusa.com Page 11 Getting Started Installing a Memory Card Your photo frame supports the following types of memory cards: • Compact Flash cards (CF) • Secure Digital cards (SD) • MultiMedia Card (MMC) Simply ...
... cause electric shock. Use only the AC adapter supplied with wet hands. Do not handle the power plug with the photo frame. Powering your Digital Picture Frame Your Photo Frame should be easier! Take care to an AC 100-240V wall outlet. • Using the supplied power adapter, plug... is indicated here or on the left panel of the photo frame. www.cobyusa.com Page 11 Getting Started Installing a Memory Card Your photo frame supports the following types of memory cards: • Compact Flash cards (CF) • Secure Digital cards (SD) • MultiMedia Card (MMC) Simply ...
Instruction Manual
Page 12
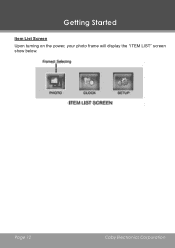
Page 12 Coby Electronics Corporation Getting Started Item List Screen Upon turning on the power, your photo frame will display the "ITEM LIST" screen show below.
Page 12 Coby Electronics Corporation Getting Started Item List Screen Upon turning on the power, your photo frame will display the "ITEM LIST" screen show below.
Instruction Manual
Page 13
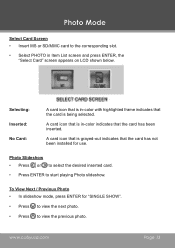
... To View Next / Previous Photo • In slideshow mode, press ENTER for use. Photo Mode Select Card Screen • Insert MS or SD/MMC card to view the previous photo. Selecting: Inserted: No Card: A card icon that is in -color with highlighted frame indicates that the card has ...not been installed for "SINGLE SHOW". • Press to view the next photo. • Press to the corresponding slot. • Select PHOTO in Item List screen and press ENTER, the "Select Card" screen...
... To View Next / Previous Photo • In slideshow mode, press ENTER for use. Photo Mode Select Card Screen • Insert MS or SD/MMC card to view the previous photo. Selecting: Inserted: No Card: A card icon that is in -color with highlighted frame indicates that the card has ...not been installed for "SINGLE SHOW". • Press to view the next photo. • Press to the corresponding slot. • Select PHOTO in Item List screen and press ENTER, the "Select Card" screen...
Instruction Manual
Page 15
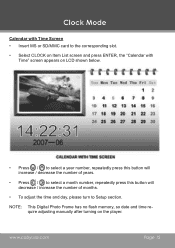
www.cobyusa.com Page 15 NOTE: This Digital Photo Frame has no flash memory, so date and time re- Clock Mode Calendar with Time Screen • Insert MS or SD/MMC card to Setup section. ...
www.cobyusa.com Page 15 NOTE: This Digital Photo Frame has no flash memory, so date and time re- Clock Mode Calendar with Time Screen • Insert MS or SD/MMC card to Setup section. ...
Instruction Manual
Page 18
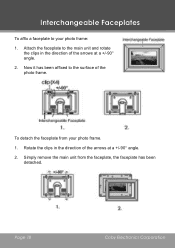
Rotate the clips in the direction of the arrows at a +/-90° angle. 2. Page 18 Coby Electronics Corporation Simply remove the main unit from your photo frame: 1. Interchangeable Faceplates To affix a faceplate to your photo frame. 1. To detach the faceplate from the faceplate, the faceplate has been detached. Attach the faceplate to the surface of the arrows at a +/-90° angle. 2. Now it has been affixed to the main unit and rotate the clips in the direction of the photo frame.
Rotate the clips in the direction of the arrows at a +/-90° angle. 2. Page 18 Coby Electronics Corporation Simply remove the main unit from your photo frame: 1. Interchangeable Faceplates To affix a faceplate to your photo frame. 1. To detach the faceplate from the faceplate, the faceplate has been detached. Attach the faceplate to the surface of the arrows at a +/-90° angle. 2. Now it has been affixed to the main unit and rotate the clips in the direction of the photo frame.

Instruction Manual
Page 19
Firmware Upgrades From time to time, COBY may release firmware updates to improve the performance of the DP-758 or to see if new firmware has been released for your photo frame. Please check the COBY website periodically at www.cobyusa.com to add additional features. www.cobyusa.com Page 19
Firmware Upgrades From time to time, COBY may release firmware updates to improve the performance of the DP-758 or to see if new firmware has been released for your photo frame. Please check the COBY website periodically at www.cobyusa.com to add additional features. www.cobyusa.com Page 19

Instruction Manual
Page 20
If these resources do not resolve the problem, please contact Technical Support. COBY Electronics Technical Support 56-65 Rust Street Maspeth, NY 11378 Email: [email protected] Web: www.cobyusa.com Phone: 800-727-3592 (8:00 AM-11:... the power cord has been properly connected to the power outlet. Page 20 Coby Electronics Corporation The picture is noisy or distorted. • Reset the color system of the TV set to the ON position). • Ensure that the photo frame is not defective. I cannot select a memory card. • Ensure that a memory card...
If these resources do not resolve the problem, please contact Technical Support. COBY Electronics Technical Support 56-65 Rust Street Maspeth, NY 11378 Email: [email protected] Web: www.cobyusa.com Phone: 800-727-3592 (8:00 AM-11:... the power cord has been properly connected to the power outlet. Page 20 Coby Electronics Corporation The picture is noisy or distorted. • Reset the color system of the TV set to the ON position). • Ensure that the photo frame is not defective. I cannot select a memory card. • Ensure that a memory card...

Instruction Manual
Page 21
www.cobyusa.com Page 21 the restore function should reset the photo frame. • Try updating the player's firmware. After that, turn on the photo frame -- Troubleshooting The photo frame has malfunctioned. • Turn the photo frame off and let it rest for detailed instructions. Please refer to the Firmware Upgrade section of this manual for 30 minutes.
www.cobyusa.com Page 21 the restore function should reset the photo frame. • Try updating the player's firmware. After that, turn on the photo frame -- Troubleshooting The photo frame has malfunctioned. • Turn the photo frame off and let it rest for detailed instructions. Please refer to the Firmware Upgrade section of this manual for 30 minutes.


