
Specsheet
Page 1
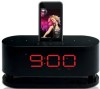
CSMP162 DUAL ALARM CLOCK/RADIO for iPod® • Universal dock for iPod charges and plays your iPod, radio, or buzzer • High-output, full-range stereo speakers • 3.5mm audio line-in the USA. Features and specifications are subject to your favorite iPod music • Digital AM/FM radio • Digital clock with 2 independent alarms and snooze/sleep timers •...
CSMP162 DUAL ALARM CLOCK/RADIO for iPod® • Universal dock for iPod charges and plays your iPod, radio, or buzzer • High-output, full-range stereo speakers • 3.5mm audio line-in the USA. Features and specifications are subject to your favorite iPod music • Digital AM/FM radio • Digital clock with 2 independent alarms and snooze/sleep timers •...

User Manual
Page 4
.... CSMP162 (main unit) Remote control with 1 x CR2025 battery FM antenna 3.5mm auxiliary cable AC 100-240V power adapter Features Universal dock for iPod charges and plays your favorite iPod music Digital AM/FM radio Digital clock with 2 independent alarms and snooze...
.... CSMP162 (main unit) Remote control with 1 x CR2025 battery FM antenna 3.5mm auxiliary cable AC 100-240V power adapter Features Universal dock for iPod charges and plays your favorite iPod music Digital AM/FM radio Digital clock with 2 independent alarms and snooze...

User Manual
Page 6
Carefully unpack the unit speaker, remote control, and power cord. 2. Avoid placing the system in direct sunlight. 4. To turn the system on, press the POWER touch pad on a stable, flat surface. Place the system on the top panel. The blue light on the rear of the unit will illuminate. Unwind power cord and connect to your iPod speaker system, please follow these simple steps: 1. Connect the other end to the socket on the underside of the system. Page 6 Coby Electronics Corporation English Operation To set up your power outlet. 3.
Carefully unpack the unit speaker, remote control, and power cord. 2. Avoid placing the system in direct sunlight. 4. To turn the system on, press the POWER touch pad on a stable, flat surface. Place the system on the top panel. The blue light on the rear of the unit will illuminate. Unwind power cord and connect to your iPod speaker system, please follow these simple steps: 1. Connect the other end to the socket on the underside of the system. Page 6 Coby Electronics Corporation English Operation To set up your power outlet. 3.

User Manual
Page 7
... iPod, please follow the instructions below: 1. www.cobyusa.com Page 7 Carefully insert your iPod into the dock. 4. Adjust the volume using the remote control, system controls, or controls on your iPod. 6. Press POWER to 'iPod', please manually select iPod input by pressing the MODE touch pad.... Select desired song using the remote control, or the volume pad on the unit's top panel. Your iPod should slide easily into the dock. 2. iPod will automatically switch ...
... iPod, please follow the instructions below: 1. www.cobyusa.com Page 7 Carefully insert your iPod into the dock. 4. Adjust the volume using the remote control, system controls, or controls on your iPod. 6. Press POWER to 'iPod', please manually select iPod input by pressing the MODE touch pad.... Select desired song using the remote control, or the volume pad on the unit's top panel. Your iPod should slide easily into the dock. 2. iPod will automatically switch ...
User Manual
Page 8
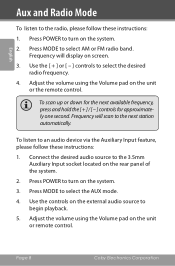
... system. 2. Press POWER to begin playback. 5. Press MODE to select the desired radio frequency. 4. Adjust the volume using the Volume pad on screen. 3. Frequency will scan to select AM or FM radio band. To scan up or down for the next available frequency, press and hold ...the controls for approximately one second. Press MODE to the next station automatically. Frequency will display on the unit or the remote control. Page 8 Coby Electronics Corporation
... system. 2. Press POWER to begin playback. 5. Press MODE to select the desired radio frequency. 4. Adjust the volume using the Volume pad on screen. 3. Frequency will scan to select AM or FM radio band. To scan up or down for the next available frequency, press and hold ...the controls for approximately one second. Press MODE to the next station automatically. Frequency will display on the unit or the remote control. Page 8 Coby Electronics Corporation
User Manual
Page 11
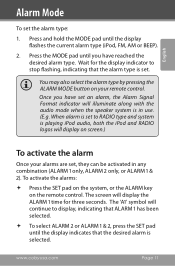
...FM, AM or BEEP). 2. Press and hold the MODE pad until the display indicates that the alarm type is set , they can be activated in use. (E.g. English Alarm Mode To set to RADIO type and system is playing iPod audio, both the iPod and RADIO logos will display on screen.) To activate the alarm Once your remote... control. When alarm is set the alarm type: ...
...FM, AM or BEEP). 2. Press and hold the MODE pad until the display indicates that the alarm type is set , they can be activated in use. (E.g. English Alarm Mode To set to RADIO type and system is playing iPod audio, both the iPod and RADIO logos will display on screen.) To activate the alarm Once your remote... control. When alarm is set the alarm type: ...

User Manual
Page 12
... a set the sleep timer, turn on the system and press the SLEEP button on your remote control until the desired time interval is displayed. Page 12 Coby Electronics Corporation English Alarm Mode Snooze and Timer Snooze/Off Your alarm clock includes a snooze function, which will temporarily turn off completely, press and hold the POWER pad...
... a set the sleep timer, turn on the system and press the SLEEP button on your remote control until the desired time interval is displayed. Page 12 Coby Electronics Corporation English Alarm Mode Snooze and Timer Snooze/Off Your alarm clock includes a snooze function, which will temporarily turn off completely, press and hold the POWER pad...
User Manual
Page 15
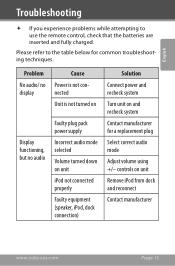
...; If you experience problems while attempting to the table below for a replacement plug Select correct audio mode Adjust volume using +/- Please refer to use the remote control, check that the batteries are inserted and fully charged.
...; If you experience problems while attempting to the table below for a replacement plug Select correct audio mode Adjust volume using +/- Please refer to use the remote control, check that the batteries are inserted and fully charged.
