

User Manual
Page 2
English ÂÂ Table of Contents Thank You...4 Package Contents...4 Features...4 CSMP145 at a Glance...5 Main Unit...5 Remote Control...7 About the Remote Control Battery 9 Getting Started...10 Connections...10 Connecting Power...10 Connecting an iPod® or iPhone 10 Connecting an Auxiliary Device 11 Basic Controls...11 Using iPod®/iPhone® Mode...12 Controls...12 Browsing iPod/iPhone Menus with the Remote 13 Page 2 Table Of Contents
English ÂÂ Table of Contents Thank You...4 Package Contents...4 Features...4 CSMP145 at a Glance...5 Main Unit...5 Remote Control...7 About the Remote Control Battery 9 Getting Started...10 Connections...10 Connecting Power...10 Connecting an iPod® or iPhone 10 Connecting an Auxiliary Device 11 Basic Controls...11 Using iPod®/iPhone® Mode...12 Controls...12 Browsing iPod/iPhone Menus with the Remote 13 Page 2 Table Of Contents

User Manual
Page 4
...; CSMP145 Power adapter Remote control 3.5mm auxiliary cable Instruction manual If any of all packing materials after opening. Features Premium sound system designed for iPod® & iPhone® Built-in Universal dock charges and plays your iPod/iPhone Bass Boost circuitry for low end frequency enhancement Supports iPod shuffle and other materials...
...; CSMP145 Power adapter Remote control 3.5mm auxiliary cable Instruction manual If any of all packing materials after opening. Features Premium sound system designed for iPod® & iPhone® Built-in Universal dock charges and plays your iPod/iPhone Bass Boost circuitry for low end frequency enhancement Supports iPod shuffle and other materials...
User Manual
Page 5
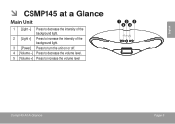
English ÂÂ CSMP145 at a Glance Main Unit 1 [Light -] Press to decrease the intensity of the background light. 2 [Light +] Press to increase the intensity of the background light. 3 [Power] Press to turn the unit on or off. 4 [Volume -] Press to decrease the volume level. 5 [Volume +] Press to increase the volume level Csmp145 At A Glance Page 5
English ÂÂ CSMP145 at a Glance Main Unit 1 [Light -] Press to decrease the intensity of the background light. 2 [Light +] Press to increase the intensity of the background light. 3 [Power] Press to turn the unit on or off. 4 [Volume -] Press to decrease the volume level. 5 [Volume +] Press to increase the volume level Csmp145 At A Glance Page 5
User Manual
Page 6
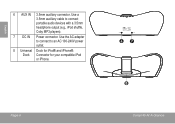
Use the AC adapter to connect to connect portable audio devices with a 3.5mm headphone output (e.g., iPod shuffle, Coby MP3 players). 7 DC IN Power connector. Dock Connector for iPod® and iPhone®. Use a 3.5mm auxiliary cable to an AC 100-240V power outlet. 8 Universal Dock for your compatible iPod or iPhone. English 6 AUX IN 3.5mm auxiliary connector. Page 6 Csmp145 At A Glance
Use the AC adapter to connect to connect portable audio devices with a 3.5mm headphone output (e.g., iPod shuffle, Coby MP3 players). 7 DC IN Power connector. Dock Connector for iPod® and iPhone®. Use a 3.5mm auxiliary cable to an AC 100-240V power outlet. 8 Universal Dock for your compatible iPod or iPhone. English 6 AUX IN 3.5mm auxiliary connector. Page 6 Csmp145 At A Glance
User Manual
Page 7
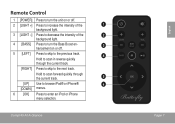
... . 5 [LEFT] Press to skip to the previous track. Remote Control 1 [POWER] Press to turn the unit on or off . 2 [LIGHT +] Press to increase the intensity of the background light. 3 [LIGHT -] Press to decrease the intensity of the background light. 4 [BASS] Press to turn the Bass Boost en- Hold to scan in reverse quickly through the current track. [UP] Use to browse iPod® or iPhone®...
... . 5 [LEFT] Press to skip to the previous track. Remote Control 1 [POWER] Press to turn the unit on or off . 2 [LIGHT +] Press to increase the intensity of the background light. 3 [LIGHT -] Press to decrease the intensity of the background light. 4 [BASS] Press to turn the Bass Boost en- Hold to scan in reverse quickly through the current track. [UP] Use to browse iPod® or iPhone®...
User Manual
Page 8
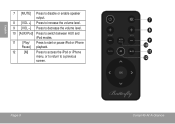
Page 8 Csmp145 At A Glance English 7 [MUTE] Press to disable or enable speaker output. 8 [VOL +] Press to increase the volume level. 9 [VOL -] Press to decrease the volume level. 10 [AUX/iPod] Press to switch between AUX and iPod modes. 11 [Play/ Press to start or pause iPod or iPhone Pause] playback. 12 [M] Press to access the iPod or iPhone menu, or to return to a previous screen.
Page 8 Csmp145 At A Glance English 7 [MUTE] Press to disable or enable speaker output. 8 [VOL +] Press to increase the volume level. 9 [VOL -] Press to decrease the volume level. 10 [AUX/iPod] Press to switch between AUX and iPod modes. 11 [Play/ Press to start or pause iPod or iPhone Pause] playback. 12 [M] Press to access the iPod or iPhone menu, or to return to a previous screen.
User Manual
Page 9
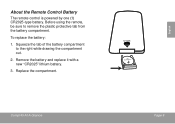
Csmp145 At A Glance Page 9 English Remove the battery and replace it with a new "CR2025" lithium battery. 3. Replace the compartment. About the Remote Control Battery The remote control is powered by one (1) CR2025-type battery. Squeeze the tab of the battery compartment to remove the plastic protective tab from the battery compartment. Before using the remote, be sure to the right while drawing the compartment out. 2. To replace the battery: 1.
Csmp145 At A Glance Page 9 English Remove the battery and replace it with a new "CR2025" lithium battery. 3. Replace the compartment. About the Remote Control Battery The remote control is powered by one (1) CR2025-type battery. Squeeze the tab of the battery compartment to remove the plastic protective tab from the battery compartment. Before using the remote, be sure to the right while drawing the compartment out. 2. To replace the battery: 1.

User Manual
Page 10
...;Â Getting Started Connections Connecting Power This unit is indicated here or on the rear of this manual. To connect your compatible iPod/iPhone into the Universal Dock. Do not handle the power plug with wet hands. For the latest product information and specifications, please visit the Coby Electronics website at www.cobyusa.com. Plug your iPod/iPhone: 1. If you have a compatible iPod or iPhone, you have a dock adapter cartridge, seat...
...;Â Getting Started Connections Connecting Power This unit is indicated here or on the rear of this manual. To connect your compatible iPod/iPhone into the Universal Dock. Do not handle the power plug with wet hands. For the latest product information and specifications, please visit the Coby Electronics website at www.cobyusa.com. Plug your iPod/iPhone: 1. If you have a compatible iPod or iPhone, you have a dock adapter cartridge, seat...
User Manual
Page 11
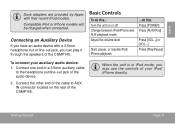
... connected. Connect one end of a 3.5mm auxiliary cable to AUX IN connector located on or off Change between iPod/iPhone and AUX playback mode Adjust the volume level Start, pause, or resume iPod/ iPhone playback ...do this . Turn the unit on the rear of the CSMP145. English Dock adapters are provided by Apple with a 3.5mm headphone out or line-out jack, you may use the controls of your auxiliary audio...
... connected. Connect one end of a 3.5mm auxiliary cable to AUX IN connector located on or off Change between iPod/iPhone and AUX playback mode Adjust the volume level Start, pause, or resume iPod/ iPhone playback ...do this . Turn the unit on the rear of the CSMP145. English Dock adapters are provided by Apple with a 3.5mm headphone out or line-out jack, you may use the controls of your auxiliary audio...

User Manual
Page 12
... an iPod/iPhone is connected to the Universal Dock and the CSMP145 is in reverse quickly through the current [RIGHT] track. Page 12 Using Ipod®/iphone® Mode Press [Play/Pause] to start music playback if it does not start playing automatically. Remote Key Function Hold Scan forward quickly through the current track. [VOL +] Increase the volume level. [VOL -] Decrease the volume level. [MUTE] Disable or enable speaker output. Remote...
... an iPod/iPhone is connected to the Universal Dock and the CSMP145 is in reverse quickly through the current [RIGHT] track. Page 12 Using Ipod®/iphone® Mode Press [Play/Pause] to start music playback if it does not start playing automatically. Remote Key Function Hold Scan forward quickly through the current track. [VOL +] Increase the volume level. [VOL -] Decrease the volume level. [MUTE] Disable or enable speaker output. Remote...
User Manual
Page 13
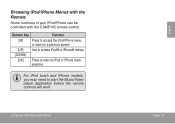
For iPod touch and iPhone models, you may need to enter an iPod or iPhone menu selection. Remote Key Function [M] Press to access the iPod/iPhone menu, or return to a previous screen. [UP] Use to browse iPod® or iPhone® menus. [DOWN] [OK] Press to start the Music/Video player application before the remote controls will work. Browsing iPod/iPhone Menus with the Remote Some functions of your iPod/iPhone can be controlled with the CSMP145 remote control. Using Ipod®/iphone® Mode Page 13 English
For iPod touch and iPhone models, you may need to enter an iPod or iPhone menu selection. Remote Key Function [M] Press to access the iPod/iPhone menu, or return to a previous screen. [UP] Use to browse iPod® or iPhone® menus. [DOWN] [OK] Press to start the Music/Video player application before the remote controls will work. Browsing iPod/iPhone Menus with the Remote Some functions of your iPod/iPhone can be controlled with the CSMP145 remote control. Using Ipod®/iphone® Mode Page 13 English
User Manual
Page 14
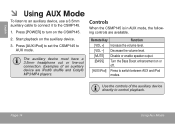
...] Disable or enable speaker output. [BASS] Turn the Bass Boost enhancement on or off. [AUX/iPod] Press to AUX mode. Press [AUX/iPod] to set the CSMP145 to switch between AUX and iPod modes. Use the controls of an auxiliary device are available. 2. Page 14 Using Aux Mode Controls When the CSMP145 is in AUX mode, the following controls are iPod® shuffle and Coby® MP3/MP4 players. Start playback on the...
...] Disable or enable speaker output. [BASS] Turn the Bass Boost enhancement on or off. [AUX/iPod] Press to AUX mode. Press [AUX/iPod] to set the CSMP145 to switch between AUX and iPod modes. Use the controls of an auxiliary device are available. 2. Page 14 Using Aux Mode Controls When the CSMP145 is in AUX mode, the following controls are iPod® shuffle and Coby® MP3/MP4 players. Start playback on the...

User Manual
Page 15
... latest iPod/iPhone compatibility information. Specifications Page 15 Speaker Output (RMS) Frequency Response Impedance Aux Input Power Unit Dimensions (LWH) 10W x 2 40 - 20,000Hz 4Ω 3.5mm stereo Input: AC 100-240V ~50/60Hz Output: DC 20V, ~1.8A Remote: CR2025 battery x 1 4.4 x 15.9 x 6.2 in. Design, specifications, and manual are subject to change without notice. Made for* iPhone 3GS iPhone 3G iPhone iPod classic iPod touch iPod touch 2G iPod nano iPod nano 2G iPod nano 3G iPod...
... latest iPod/iPhone compatibility information. Specifications Page 15 Speaker Output (RMS) Frequency Response Impedance Aux Input Power Unit Dimensions (LWH) 10W x 2 40 - 20,000Hz 4Ω 3.5mm stereo Input: AC 100-240V ~50/60Hz Output: DC 20V, ~1.8A Remote: CR2025 battery x 1 4.4 x 15.9 x 6.2 in. Design, specifications, and manual are subject to change without notice. Made for* iPhone 3GS iPhone 3G iPhone iPod classic iPod touch iPod touch 2G iPod nano iPod nano 2G iPod nano 3G iPod...
User Manual
Page 16
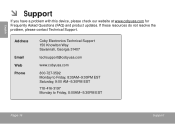
Address Email Web Phone Coby Electronics Technical Support 150 Knowlton Way Savannah, Georgia 31407 [email protected] www.cobyusa.com 800-727-3592 Monday to Friday, 8:30AM-9:00PM EST Saturday, 9:00 AM-5:30PM EST 718-416-3197 Monday to Friday, 8:00AM-5:30PM EST Page 16 Support English ÂÂ Support If you have a problem with this device, please check our website at www.cobyusa.com for Frequently Asked Questions (FAQ) and product updates. If these resources do not resolve the problem, please contact Technical Support.
Address Email Web Phone Coby Electronics Technical Support 150 Knowlton Way Savannah, Georgia 31407 [email protected] www.cobyusa.com 800-727-3592 Monday to Friday, 8:30AM-9:00PM EST Saturday, 9:00 AM-5:30PM EST 718-416-3197 Monday to Friday, 8:00AM-5:30PM EST Page 16 Support English ÂÂ Support If you have a problem with this device, please check our website at www.cobyusa.com for Frequently Asked Questions (FAQ) and product updates. If these resources do not resolve the problem, please contact Technical Support.
User Manual
Page 17
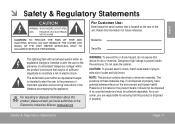
...shock, match wide blade of plug to the presence of uninsulated "dangerous voltage" within an equilateral triangle is located on the rear of the unit. Do not open the cabinet. Presence of this device to the presence of important operation and servicing instructions in the literature accompanying the ...www.eiae.org. ÂÂ Safety & Regulatory Statements For Customer Use: Enter below the serial number that is intended to alert the user to wide slot of outlet and fully insert. The lightning flash with arrowhead symbol within the product's enclosure that may , if ...
...shock, match wide blade of plug to the presence of uninsulated "dangerous voltage" within an equilateral triangle is located on the rear of the unit. Do not open the cabinet. Presence of this device to the presence of important operation and servicing instructions in the literature accompanying the ...www.eiae.org. ÂÂ Safety & Regulatory Statements For Customer Use: Enter below the serial number that is intended to alert the user to wide slot of outlet and fully insert. The lightning flash with arrowhead symbol within the product's enclosure that may , if ...

User Manual
Page 18
... help Use of shielded cable is required to comply with the instructions, may cause undesired operation. Note: This equipment has been tested and found to radio communications. If this equipment does cause harmful interference to radio or television reception, which the receiver is connected. • Consult the dealer or an experienced radio/TV technician for Class B digital devices, pursuant to Part...
... help Use of shielded cable is required to comply with the instructions, may cause undesired operation. Note: This equipment has been tested and found to radio communications. If this equipment does cause harmful interference to radio or television reception, which the receiver is connected. • Consult the dealer or an experienced radio/TV technician for Class B digital devices, pursuant to Part...

User Manual
Page 19
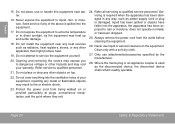
... support the weight of the serial/model plate. 10. Safety & Regulatory Statements Page 19 Before operating this manual completely, and keep it nearby for future reference. Always place the equipment on the floor or on the rear of the equipment. 6. Use and handle the power cord with care. Do not touch the power cord and antenna cable during lightning. 14. Remove the plug...
... support the weight of the serial/model plate. 10. Safety & Regulatory Statements Page 19 Before operating this manual completely, and keep it nearby for future reference. Always place the equipment on the floor or on the rear of the equipment. 6. Use and handle the power cord with care. Do not touch the power cord and antenna cable during lightning. 14. Remove the plug...
User Manual
Page 20
... moisture, does not operate normally, or has been dropped. 25. Opening and removing the covers may heat up and suffer damage. 18. Do not place or drop any way, such as power-supply cord or plug is damaged, liquid has been spilled or objects have fallen into the equipment. 17. Refer service to dangerous voltage or other hazards...
... moisture, does not operate normally, or has been dropped. 25. Opening and removing the covers may heat up and suffer damage. 18. Do not place or drop any way, such as power-supply cord or plug is damaged, liquid has been spilled or objects have fallen into the equipment. 17. Refer service to dangerous voltage or other hazards...
User Manual
Page 21
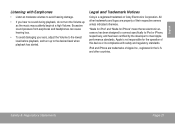
...respective owners unless indicated otherwise. Legal and Trademark Notices Coby is not responsible for iPhone" mean that an electronic accessory has been designed to connect specifically to iPod or iPhone, respectively, and has been certified by the developer to the desired level when playback has started. ...damaging your ears, adjust the Volume to the lowest level before playback, and turn the Volume up as the music may suddenly begin at moderate volumes to avoid hearing damage. • If you hear no sound during playback, do not turn up to meet Apple performance standards...
...respective owners unless indicated otherwise. Legal and Trademark Notices Coby is not responsible for iPhone" mean that an electronic accessory has been designed to connect specifically to iPod or iPhone, respectively, and has been certified by the developer to the desired level when playback has started. ...damaging your ears, adjust the Volume to the lowest level before playback, and turn the Volume up as the music may suddenly begin at moderate volumes to avoid hearing damage. • If you hear no sound during playback, do not turn up to meet Apple performance standards...

