
Hardware Maintenance Manual
Page 2
... installed and used to provide reasonable protection against such interference in accordance with Cisco's installation instructions, it is an adaptation of a program developed by the Cisco equipment or one side or the other technical information regarding the products contained in this manual ... limits for FCC compliance of this manual. Copyright © 1981, Regents of the University of California. These specifications are based in part 15 of its peripheral devices. The following information is operated in which case users will be subject to cause harmful...
... installed and used to provide reasonable protection against such interference in accordance with Cisco's installation instructions, it is an adaptation of a program developed by the Cisco equipment or one side or the other technical information regarding the products contained in this manual ... limits for FCC compliance of this manual. Copyright © 1981, Regents of the University of California. These specifications are based in part 15 of its peripheral devices. The following information is operated in which case users will be subject to cause harmful...

Hardware Maintenance Manual
Page 3
... been installed, operated, repaired, or maintained in Technical Data and Computer Software clause at Cisco's option and potentially through the Sales or Service Partner, either (i) to the party that a license fee was exported under the multinational uplift program. IF YOU DO NOT AGREE WITH THE TERMS OF THIS LICENSE, PROMPTLY RETURN THE UNUSED SOFTWARE, MANUAL, AND...
... been installed, operated, repaired, or maintained in Technical Data and Computer Software clause at Cisco's option and potentially through the Sales or Service Partner, either (i) to the party that a license fee was exported under the multinational uplift program. IF YOU DO NOT AGREE WITH THE TERMS OF THIS LICENSE, PROMPTLY RETURN THE UNUSED SOFTWARE, MANUAL, AND...

Hardware Maintenance Manual
Page 4
... this License shall remain in accordance with all warranted problems within the warranty period to the restrictions as appropriate) will supply replacement parts for shipment of the defect. Cisco's software and supporting documentation are provided with any installation, handling, maintenance, or operating instructions supplied by Cisco, (2) has not been installed, operated, repaired, or maintained in accordance with the laws of...
... this License shall remain in accordance with all warranted problems within the warranty period to the restrictions as appropriate) will supply replacement parts for shipment of the defect. Cisco's software and supporting documentation are provided with any installation, handling, maintenance, or operating instructions supplied by Cisco, (2) has not been installed, operated, repaired, or maintained in accordance with the laws of...

Hardware Maintenance Manual
Page 5
TABLE OF CONTENTS About This Manual xv Document Objectives xv Audience xv Document Organization xv Document Conventions xvi Chapter 1 Cisco 4000 Series Overview 1-1 External Differences in Models of the Cisco 4000 Series 1-1 Series Specifications 1-2 Memory Systems 1-4 Chapter 2 Preparing for Installation 2-1 Safety Recommendations 2-2 Safety with Electricity... Connections 2-32 ATM Connections 2-34 Inspecting the System 2-36 Chapter 3 Installing the Router 3-1 Rack-Mount and Wall-Mount Procedures Overview 3-1 Making Console Port Connections 3-1 Making Network Connections 3-2 Table of Contents v
TABLE OF CONTENTS About This Manual xv Document Objectives xv Audience xv Document Organization xv Document Conventions xvi Chapter 1 Cisco 4000 Series Overview 1-1 External Differences in Models of the Cisco 4000 Series 1-1 Series Specifications 1-2 Memory Systems 1-4 Chapter 2 Preparing for Installation 2-1 Safety Recommendations 2-2 Safety with Electricity... Connections 2-32 ATM Connections 2-34 Inspecting the System 2-36 Chapter 3 Installing the Router 3-1 Rack-Mount and Wall-Mount Procedures Overview 3-1 Making Console Port Connections 3-1 Making Network Connections 3-2 Table of Contents v

Hardware Maintenance Manual
Page 15
... the Cisco 4000 Series Hardware Installation and Maintenance publication. Audience This publication is updated and shipped monthly, so it may be familiar with a DC-input power supply. About This Manual This section discusses the objectives, audience, organization, and conventions of product information. Document Objectives This publication contains the initial site preparation, installation, troubleshooting, and selected upgrade and...
... the Cisco 4000 Series Hardware Installation and Maintenance publication. Audience This publication is updated and shipped monthly, so it may be familiar with a DC-input power supply. About This Manual This section discusses the objectives, audience, organization, and conventions of product information. Document Objectives This publication contains the initial site preparation, installation, troubleshooting, and selected upgrade and...

Hardware Maintenance Manual
Page 16
... Initial Hardware Configuration," includes a troubleshooting overview, problem-solving instructions, environmental reporting features, and understanding front-panel and network-processor module LED indicators. • Chapter 5, "Maintaining and Upgrading the Router," includes instructions for opening the chassis, replacing or adding network processor modules, and replacing single in-line memory modules (SIMMs). • Appendix A, "Cabling Specifications," provides cable illustrations, cable pinouts...
... Initial Hardware Configuration," includes a troubleshooting overview, problem-solving instructions, environmental reporting features, and understanding front-panel and network-processor module LED indicators. • Chapter 5, "Maintaining and Upgrading the Router," includes instructions for opening the chassis, replacing or adding network processor modules, and replacing single in-line memory modules (SIMMs). • Appendix A, "Cabling Specifications," provides cable illustrations, cable pinouts...

Hardware Maintenance Manual
Page 20
...DATA OK 2 DATA OK 3 DATA OK OK POWER SERIES H3590 Series Specifications Design specifications for the Cisco 4000 series follow: • Modular router platform • Flash memory capability • User-upgradable network processor modules, shared memory, and processor local memory • Hardware...Specifications Figure 1-1 shows the front panel of the single and dual Token Ring, dual Ethernet, and FDDI modules. 1-2 Cisco 4000 Series Hardware Installation and Maintenance The Cisco 4500-M and Cisco 4700 can support only one is present. Note The Cisco 4500-M and Cisco 4700 support...
...DATA OK 2 DATA OK 3 DATA OK OK POWER SERIES H3590 Series Specifications Design specifications for the Cisco 4000 series follow: • Modular router platform • Flash memory capability • User-upgradable network processor modules, shared memory, and processor local memory • Hardware...Specifications Figure 1-1 shows the front panel of the single and dual Token Ring, dual Ethernet, and FDDI modules. 1-2 Cisco 4000 Series Hardware Installation and Maintenance The Cisco 4500-M and Cisco 4700 can support only one is present. Note The Cisco 4500-M and Cisco 4700 support...

Hardware Maintenance Manual
Page 25
...properly prepared before beginning installation. Optional rack-mount kits are extremely important for safe installation and operation of your ... surface. For desktop mounting, use the rubber feet provided. General Site Requirements In addition, use the guidelines that follow ESD prevention procedures when removing and replacing ...Installation 2-3 If you isolate the cause of failures and prevent future problems. Preparing for wet locations. • Never touch uninsulated telephone wires or terminals unless the telephone line is available, ground yourself by touching the metal part...
...properly prepared before beginning installation. Optional rack-mount kits are extremely important for safe installation and operation of your ... surface. For desktop mounting, use the rubber feet provided. General Site Requirements In addition, use the guidelines that follow ESD prevention procedures when removing and replacing ...Installation 2-3 If you isolate the cause of failures and prevent future problems. Preparing for wet locations. • Never touch uninsulated telephone wires or terminals unless the telephone line is available, ground yourself by touching the metal part...

Hardware Maintenance Manual
Page 26
...have louvered sides and a fan to provide cooling air. • When mounting a chassis in turn interrupt and redirect the flow of cooling air across internal... under test a maximum of cooling air and clean power. The best placement of the baffles depends on slides, check the position of the... can help to flow within. If the chassis is installed on the airflow patterns in an enclosed rack, try operating the equipment by side... to 60 Hz) • 6-foot electrical power cord 2-4 Cisco 4000 Series Hardware Installation and Maintenance Ensure that the rack is not overly congested because ...
...have louvered sides and a fan to provide cooling air. • When mounting a chassis in turn interrupt and redirect the flow of cooling air across internal... under test a maximum of cooling air and clean power. The best placement of the baffles depends on slides, check the position of the... can help to flow within. If the chassis is installed on the airflow patterns in an enclosed rack, try operating the equipment by side... to 60 Hz) • 6-foot electrical power cord 2-4 Cisco 4000 Series Hardware Installation and Maintenance Ensure that the rack is not overly congested because ...
Hardware Maintenance Manual
Page 31
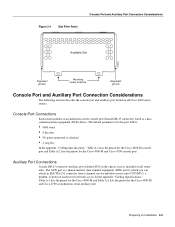
...service unit/data service unit (CSU/DSU), a modem, or protocol analyzer for Installation 2-9 In the appendix "Cabling Specifications," Table A-1 lists the pinout for the Cisco 4000-M and Table A-2 lists the pinout for the Cisco 4500-M and Cisco ...4700 console port. Console Port Connections Each router includes an asynchronous router console port (female DB-25 connector) wired as a data communications equipment (DCE) device. Figure 2-4 Slot Filler Panel Console Port and Auxiliary Port Connection Considerations Available Slot H1034a Alignment groove Mounting screw...
...service unit/data service unit (CSU/DSU), a modem, or protocol analyzer for Installation 2-9 In the appendix "Cabling Specifications," Table A-1 lists the pinout for the Cisco 4000-M and Table A-2 lists the pinout for the Cisco 4500-M and Cisco ...4700 console port. Console Port Connections Each router includes an asynchronous router console port (female DB-25 connector) wired as a data communications equipment (DCE) device. Figure 2-4 Slot Filler Panel Console Port and Auxiliary Port Connection Considerations Available Slot H1034a Alignment groove Mounting screw...

Hardware Maintenance Manual
Page 42
...NRZ (not NRZI), the jumpers that connect pins 2 and 3 can be removed. 2-20 Cisco 4000 Series Hardware Installation and Maintenance Network Connection Considerations Figure 2-20 Dual Serial Network Processor Module Ports LEDs (4 green)...configured for NRZI mode on the cards. The factory-configured (default) jumper setting is for NRZ. To prevent damage from stress or from ESD, do not...Figure 2-21 LEDs Dual Serial Network Processor Module-Top View Indicates port 0 LED daughter cards Mounting screw location Indicates port 1 Serial ports J5 J4 Port 1 Port 0 H1036a Module handle Caution ...
...NRZ (not NRZI), the jumpers that connect pins 2 and 3 can be removed. 2-20 Cisco 4000 Series Hardware Installation and Maintenance Network Connection Considerations Figure 2-20 Dual Serial Network Processor Module Ports LEDs (4 green)...configured for NRZI mode on the cards. The factory-configured (default) jumper setting is for NRZ. To prevent damage from stress or from ESD, do not...Figure 2-21 LEDs Dual Serial Network Processor Module-Top View Indicates port 0 LED daughter cards Mounting screw location Indicates port 1 Serial ports J5 J4 Port 1 Port 0 H1036a Module handle Caution ...
Hardware Maintenance Manual
Page 47
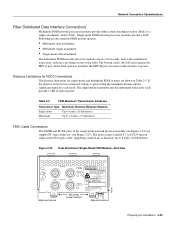
...Connections The distance limitations for Installation 2-25 The ports accept standard 8.7 to 10/125-micron single-mode fiber-optic cable, supporting connections at distances up ...RADIATION IS EMITTED FROM THESE APERTURES. 1300 NM CLASS 1 LASER PRODUCT LASERKLASSE 1 CISCO SYSTEMS, INC. 170 WEST TASMAN DRIVE SAN JOSE, CA 95134-1706 DATE:... transceiver, with FDA Radiation Performance Standards, 21 CFR, Subchapter J" Alignment groove Mounting screw locations Alignment groove H1614a Preparing for single-mode and multimode FDDI stations are the...use simplex FC-type connectors (see Figure 2-25).
...Connections The distance limitations for Installation 2-25 The ports accept standard 8.7 to 10/125-micron single-mode fiber-optic cable, supporting connections at distances up ...RADIATION IS EMITTED FROM THESE APERTURES. 1300 NM CLASS 1 LASER PRODUCT LASERKLASSE 1 CISCO SYSTEMS, INC. 170 WEST TASMAN DRIVE SAN JOSE, CA 95134-1706 DATE:... transceiver, with FDA Radiation Performance Standards, 21 CFR, Subchapter J" Alignment groove Mounting screw locations Alignment groove H1614a Preparing for single-mode and multimode FDDI stations are the...use simplex FC-type connectors (see Figure 2-25).
Hardware Maintenance Manual
Page 49
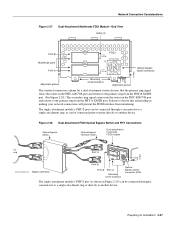
...directly to the primary ring from initializing. Network Connection Considerations Figure 2-27 Dual-Attachment Multimode FDDI Module-End View LEDs (2) PHY-B Multimode ports PHY-A PHY-B PHY-A PHY-B RING OP FDDI OPT-BYPASS PHY-A RING OP Optical bypass switch connector H1400a Alignment groove Mounting screw locations Alignment groove The standard connection scheme for Installation... PHY-A RING OP FDDI OPT-BYPASS RING OP H1405a Bypass operation PHY-B PHY-B PHY-A Mounting screw locations Optical bypass switch connector (DIN) The single-attachment module's PHY-S port (as shown ...
...directly to the primary ring from initializing. Network Connection Considerations Figure 2-27 Dual-Attachment Multimode FDDI Module-End View LEDs (2) PHY-B Multimode ports PHY-A PHY-B PHY-A PHY-B RING OP FDDI OPT-BYPASS PHY-A RING OP Optical bypass switch connector H1400a Alignment groove Mounting screw locations Alignment groove The standard connection scheme for Installation... PHY-A RING OP FDDI OPT-BYPASS RING OP H1405a Bypass operation PHY-B PHY-B PHY-A Mounting screw locations Optical bypass switch connector (DIN) The single-attachment module's PHY-S port (as shown ...

Hardware Maintenance Manual
Page 50
... the optical bypass switch if a problem is a passive optical device powered by the FDDI module. An optical bypass switch is detected or if the operator chooses to take the router out of the ring. 2-28 Cisco 4000 Series Hardware Installation and Maintenance The optical bypass switch ... LED PHY-S Multimode port Alignment groove PHY-S FDDI OPT-BYPASS PHY-S RING OPT Optical bypass switch connector H1401a Mounting screw locations Alignment groove Optical Bypass Switch Connections Both the dual-attachment and single-attachment FDDI modules have an optical bypass switch connector.
... the optical bypass switch if a problem is a passive optical device powered by the FDDI module. An optical bypass switch is detected or if the operator chooses to take the router out of the ring. 2-28 Cisco 4000 Series Hardware Installation and Maintenance The optical bypass switch ... LED PHY-S Multimode port Alignment groove PHY-S FDDI OPT-BYPASS PHY-S RING OPT Optical bypass switch connector H1401a Mounting screw locations Alignment groove Optical Bypass Switch Connections Both the dual-attachment and single-attachment FDDI modules have an optical bypass switch connector.

Hardware Maintenance Manual
Page 58
...best way to tell the difference is the yellow laser warning label on the single-mode module's front panel, or the specific part number visible on the upper surface...Cisco 4000 Series Hardware Installation and Maintenance Inspecting the System Before unpacking the system, make certain that you encounter problems when installing or configuring your Product Registration (found in its shipping container to install it. If the final installation...customer service representative. When you unpack each shipping container, check the packing list to ensure that you want the system installed, ...
...best way to tell the difference is the yellow laser warning label on the single-mode module's front panel, or the specific part number visible on the upper surface...Cisco 4000 Series Hardware Installation and Maintenance Inspecting the System Before unpacking the system, make certain that you encounter problems when installing or configuring your Product Registration (found in its shipping container to install it. If the final installation...customer service representative. When you unpack each shipping container, check the packing list to ensure that you want the system installed, ...

Hardware Maintenance Manual
Page 59
... mounted directly above another chassis in the same rack. CHAPTER 3 Installing the Router This chapter describes the tasks you must perform to accommodate cables with thumbscrews. The optional rack-mount/wall-mount kit ships with the rack-mount kit. If your system. If you must connect an EIA/TIA-232 cable between the chassis and the supporting surface for rack and wall mounting...
... mounted directly above another chassis in the same rack. CHAPTER 3 Installing the Router This chapter describes the tasks you must perform to accommodate cables with thumbscrews. The optional rack-mount/wall-mount kit ships with the rack-mount kit. If your system. If you must connect an EIA/TIA-232 cable between the chassis and the supporting surface for rack and wall mounting...

Hardware Maintenance Manual
Page 88
... DCE H1046a 4-8 Cisco 4000 Series Hardware Installation and Maintenance Figure 4-9 shows the dual serial port network processor module LED card. Figure 4-8 LEDs Dual Serial Network Processor Module-Top View Indicates port 0 LED daughter cards Mounting screw location Indicates Port 1 Serial ports J5 J4 Port 1 Port 0 H1777 Module handle When DCE cables are used and when...
... DCE H1046a 4-8 Cisco 4000 Series Hardware Installation and Maintenance Figure 4-9 shows the dual serial port network processor module LED card. Figure 4-8 LEDs Dual Serial Network Processor Module-Top View Indicates port 0 LED daughter cards Mounting screw location Indicates Port 1 Serial ports J5 J4 Port 1 Port 0 H1777 Module handle When DCE cables are used and when...

Hardware Maintenance Manual
Page 100
... (cutaway view) Chassis wall H1048a Safety latch Module mounting screw Female module connector on the motherboard Memory Replacement Procedures There are two dynamic random-access memory (DRAM) systems in Cisco 4000 series routers. The Cisco 4500-M main memory upgrade requires replacing the main memory configuration of...MB SIMMs. For the Cisco 4000-M shared memory upgrade, replace the 4-MB shared memory SIMM with an 8-MB SIMM or a 16-MB SIMM. 5-6 Cisco 4000 Series Hardware Installation and Maintenance To avoid damaging the underlying system card, avoid using excessive force when you ...
... (cutaway view) Chassis wall H1048a Safety latch Module mounting screw Female module connector on the motherboard Memory Replacement Procedures There are two dynamic random-access memory (DRAM) systems in Cisco 4000 series routers. The Cisco 4500-M main memory upgrade requires replacing the main memory configuration of...MB SIMMs. For the Cisco 4000-M shared memory upgrade, replace the 4-MB shared memory SIMM with an 8-MB SIMM or a 16-MB SIMM. 5-6 Cisco 4000 Series Hardware Installation and Maintenance To avoid damaging the underlying system card, avoid using excessive force when you ...

Hardware Maintenance Manual
Page 114
...wall. (See Figure 5-4.) Step 2 Gently, without bending the connector pins, push the network processor module into place, inserting the male network processor module connector into the ROM monitor or the operating system mode. The maximum screw torque is 7 inch-lb. Replacing Network Processor Modules Replacing...handle, align it , straighten its pins, reinsert the boot ROM, and try booting again. 5-20 Cisco 4000 Series Hardware Installation and Maintenance Step 3 Replace the module mounting screw on the end of the network processor module. (See Figure 5-4.) Step 4 If the module has ...
...wall. (See Figure 5-4.) Step 2 Gently, without bending the connector pins, push the network processor module into place, inserting the male network processor module connector into the ROM monitor or the operating system mode. The maximum screw torque is 7 inch-lb. Replacing Network Processor Modules Replacing...handle, align it , straighten its pins, reinsert the boot ROM, and try booting again. 5-20 Cisco 4000 Series Hardware Installation and Maintenance Step 3 Replace the module mounting screw on the end of the network processor module. (See Figure 5-4.) Step 4 If the module has ...

Hardware Maintenance Manual
Page 141
...5-6 removing 5-4 replacing 5-20 Token Ring 2-13 nonreturn to zero See NRZ nonreturn to zero-inverted See NRZI note, description xvi NRZ, configuring interface for NRZI, configuring interface for NT1 connection 3-6 numbering interfaces 2-7 slot... 3-22 light 4-3 specifications 1-3 supply features 2-4 system, troubleshooting 4-2 preparing for installation 2-1 to make connections 2-7 preventing ESD damage 2-3 preventive site configuration 2-4 printing summary of ROM monitor commands problem indications 4-3 temperature 4-3 problem solving 4-1 processor specifications 1-3 protocol analyzer, attaching...
...5-6 removing 5-4 replacing 5-20 Token Ring 2-13 nonreturn to zero See NRZ nonreturn to zero-inverted See NRZI note, description xvi NRZ, configuring interface for NRZI, configuring interface for NT1 connection 3-6 numbering interfaces 2-7 slot... 3-22 light 4-3 specifications 1-3 supply features 2-4 system, troubleshooting 4-2 preparing for installation 2-1 to make connections 2-7 preventing ESD damage 2-3 preventive site configuration 2-4 printing summary of ROM monitor commands problem indications 4-3 temperature 4-3 problem solving 4-1 processor specifications 1-3 protocol analyzer, attaching...