

Brochure
Page 1
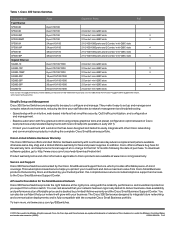
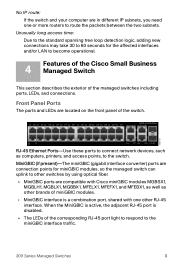
... and tightly controlling access. Deliver the Right Features at the Right Price Cisco 300 Series Switches offer enhanced switch features that lock down your business needs more advanced security and switch features, but it also means making sure that have fast, reliable access... tested to create a more productive, effective workplace. Connect Your Business The Cisco 300 Series provide the ideal combination of Cisco® Small Business managed switches: the Cisco 300 Series. Cisco 300 Series Switches Powerful Features and Performance at an Affordable Price For Small Business To stay ...
... and tightly controlling access. Deliver the Right Features at the Right Price Cisco 300 Series Switches offer enhanced switch features that lock down your business needs more advanced security and switch features, but it also means making sure that have fast, reliable access... tested to create a more productive, effective workplace. Connect Your Business The Cisco 300 Series provide the ideal combination of Cisco® Small Business managed switches: the Cisco 300 Series. Cisco 300 Series Switches Powerful Features and Performance at an Affordable Price For Small Business To stay ...
Brochure
Page 2
... partner, this comprehensive service includes telephone support and access to the Cisco Small Business Support Center. Cisco, the Cisco logo, and Cisco Systems are backed by your investment and derive maximum value from a Cisco switch. They make it easy to set up and manage even complex ...coverage. and/or its affiliates. Simplify Setup and Management Cisco 300 Series Switches are available at a time. Delivered by Cisco and backed by the Cisco Small Business Support Service, which provides affordable peace-of Cisco Systems, Inc. You can rest assured that your network will...
... partner, this comprehensive service includes telephone support and access to the Cisco Small Business Support Center. Cisco, the Cisco logo, and Cisco Systems are backed by your investment and derive maximum value from a Cisco switch. They make it easy to set up and manage even complex ...coverage. and/or its affiliates. Simplify Setup and Management Cisco 300 Series Switches are available at a time. Delivered by Cisco and backed by the Cisco Small Business Support Service, which provides affordable peace-of Cisco Systems, Inc. You can rest assured that your network will...
User Manual
Page 2
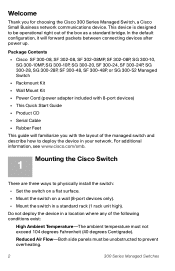
... 104 degrees Fahrenheit (40 degrees Centigrade). In the default configuration, it will familiarize you for choosing the Cisco 300 Series Managed Switch, a Cisco Small Business network communications device. For additional information, see www.cisco.com/smb. 1 Mounting the Cisco Switch There are three ways to deploy the device in a standard rack (1 rack unit high). Welcome Thank...
... 104 degrees Fahrenheit (40 degrees Centigrade). In the default configuration, it will familiarize you for choosing the Cisco 300 Series Managed Switch, a Cisco Small Business network communications device. For additional information, see www.cisco.com/smb. 1 Mounting the Cisco Switch There are three ways to deploy the device in a standard rack (1 rack unit high). Welcome Thank...
User Manual
Page 3
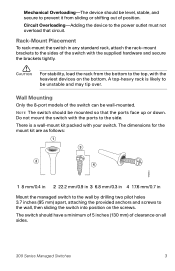
... power outlet must not overload that the ports face up or down. CAUTION For stability, load the rack from sliding or shifting out of the switch can be mounted so that circuit. Wall Mounting Only the 8-port models of position. There is likely to be unstable and may tip over....heavy rack is a wall-mount kit packed with the ports to the wall, then sliding the switch into position on all sides. 300 Series Managed Switches 3 Rack-Mount Placement To rack-mount the switch in Mount the managed switch to the wall by drilling two pilot holes 3.7 inches (95 mm) apart, attaching the ...
... power outlet must not overload that the ports face up or down. CAUTION For stability, load the rack from sliding or shifting out of the switch can be mounted so that circuit. Wall Mounting Only the 8-port models of position. There is likely to be unstable and may tip over....heavy rack is a wall-mount kit packed with the ports to the wall, then sliding the switch into position on all sides. 300 Series Managed Switches 3 Rack-Mount Placement To rack-mount the switch in Mount the managed switch to the wall by drilling two pilot holes 3.7 inches (95 mm) apart, attaching the ...
User Manual
Page 4
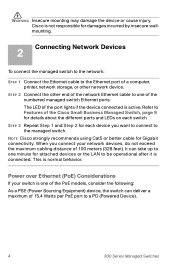
...If your network devices, do not exceed the maximum cabling distance of the Cisco Small Business Managed Switch, page 9 for Gigabit connectivity. The LED of 15.4 Watts per PoE port to one minute for each switch. STEP 2 Connect the other end of the network Ethernet cable to ...: As a PSE (Power Sourcing Equipment) device, the switch can take up to a PD (Powered Device). 4 300 Series Managed Switches Refer to the managed switch. WARNING Insecure mounting may damage the device or cause injury. NOTE Cisco strongly recommends using Cat5 or better cable for details about the...
...If your network devices, do not exceed the maximum cabling distance of the Cisco Small Business Managed Switch, page 9 for Gigabit connectivity. The LED of 15.4 Watts per PoE port to one minute for each switch. STEP 2 Connect the other end of the network Ethernet cable to ...: As a PSE (Power Sourcing Equipment) device, the switch can take up to a PD (Powered Device). 4 300 Series Managed Switches Refer to the managed switch. WARNING Insecure mounting may damage the device or cause injury. NOTE Cisco strongly recommends using Cat5 or better cable for details about the...
User Manual
Page 5
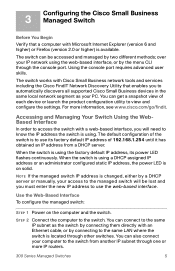
... configured static IP address, the power LED is available. Use the Web-Based Interface To configure the managed switch: STEP 1 Power on solid. 3 Configuring the Cisco Small Business Managed Switch Before You Begin Verify that enables you must enter the new IP address to automatically discovers all supported....168.1.254 until it has obtained an IP address from another IP subnet through one or more information, see www.cisco.com/go/findit. When the switch is using the factory default IP address, its factory default IP address of each device or launch the product configuration ...
... configured static IP address, the power LED is available. Use the Web-Based Interface To configure the managed switch: STEP 1 Power on solid. 3 Configuring the Cisco Small Business Managed Switch Before You Begin Verify that enables you must enter the new IP address to automatically discovers all supported....168.1.254 until it has obtained an IP address from another IP subnet through one or more information, see www.cisco.com/go/findit. When the switch is using the factory default IP address, its factory default IP address of each device or launch the product configuration ...
User Manual
Page 6
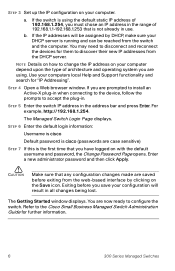
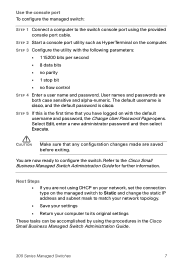
...local Help and Support functionality and search for further information. 6 300 Series Managed Switches If you have logged on the Save icon. STEP 6 Enter the default login information: Username is cisco Default password is cisco (passwords are case sensitive) STEP 7 If this is the first time that...Refer to change the IP address on your computer. STEP 4 Open a Web browser window. NOTE Details on how to the Cisco Small Business Managed Switch Administration Guide for "IP Addressing". STEP 3 Set up the IP configuration on your computer depend upon the type of architecture and ...
...local Help and Support functionality and search for further information. 6 300 Series Managed Switches If you have logged on the Save icon. STEP 6 Enter the default login information: Username is cisco Default password is cisco (passwords are case sensitive) STEP 7 If this is the first time that...Refer to change the IP address on your computer. STEP 4 Open a Web browser window. NOTE Details on how to the Cisco Small Business Managed Switch Administration Guide for "IP Addressing". STEP 3 Set up the IP configuration on your computer depend upon the type of architecture and ...
User Manual
Page 7
... default password is the first time that any configuration changes made are both case sensitive and alpha-numeric. STEP 5 If this is cisco. Refer to the Cisco Small Business Managed Switch Administration Guide for further information. Select Edit, enter a new administrator password and then select Execute. STEP 3 Configure the utility with the default...
... default password is the first time that any configuration changes made are both case sensitive and alpha-numeric. STEP 5 If this is cisco. Refer to the Cisco Small Business Managed Switch Administration Guide for further information. Select Edit, enter a new administrator password and then select Execute. STEP 3 Configure the utility with the default...
User Manual
Page 8
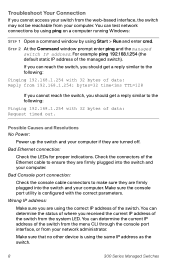
... a computer running Windows: STEP 1 Open a command window by using Start > Run and enter cmd. STEP 2 At the Command window prompt enter ping and the managed switch IP address. For example ping 192.168.1.254 (the default static IP address of data: Reply from your... switch from the web-based interface, the switch may not be reachable from 192.168.1.254: bytes=32 time Troubleshoot Your Connection If you should get a reply similar to the following: Pinging 192....
... a computer running Windows: STEP 1 Open a command window by using Start > Run and enter cmd. STEP 2 At the Command window prompt enter ping and the managed switch IP address. For example ping 192.168.1.254 (the default static IP address of data: Reply from your... switch from the web-based interface, the switch may not be reachable from 192.168.1.254: bytes=32 time Troubleshoot Your Connection If you should get a reply similar to the following: Pinging 192....
User Manual
Page 9
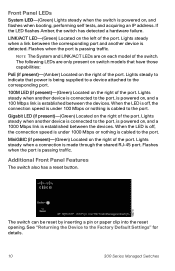
... LEDs of the corresponding RJ-45 port light to respond to become operational. 4 Features of the Cisco Small Business Managed Switch This section describes the exterior of the switch. Unusually long access time: Due to the standard spanning tree loop detection logic, adding new connections may... the front panel of the managed switches including ports, LEDs, and connections. No IP route: If the switch and your computer are in different IP subnets, you need one other switches by using optical fiber. • MiniGBIC ports are compatible with Cisco miniGBIC modules MGBSX1, MGBLH1, MGBLX1,...
... LEDs of the corresponding RJ-45 port light to respond to become operational. 4 Features of the Cisco Small Business Managed Switch This section describes the exterior of the switch. Unusually long access time: Due to the standard spanning tree loop detection logic, adding new connections may... the front panel of the managed switches including ports, LEDs, and connections. No IP route: If the switch and your computer are in different IP subnets, you need one other switches by using optical fiber. • MiniGBIC ports are compatible with Cisco miniGBIC modules MGBSX1, MGBLH1, MGBLX1,...
User Manual
Page 10
...indicate that have those capabilities: PoE (if present)-(Amber) Located on , and flashes when booting, performing self tests, and acquiring an IP address. The switch can be reset by inserting a pin or paper clip into the reset opening. Front Panel LEDs System LED-(Green) Lights steady when the... under 100 Mbps or nothing is cabled to the port, is powered on, and a 100 Mbps link is passing traffic. Additional Front Panel Features The switch also has a reset button. See "Returning the Device to the corresponding port. 100M LED (if present)-(Green) Located on each model of the port....
...indicate that have those capabilities: PoE (if present)-(Amber) Located on , and flashes when booting, performing self tests, and acquiring an IP address. The switch can be reset by inserting a pin or paper clip into the reset opening. Front Panel LEDs System LED-(Green) Lights steady when the... under 100 Mbps or nothing is cabled to the port, is powered on, and a 100 Mbps link is passing traffic. Additional Front Panel Features The switch also has a reset button. See "Returning the Device to the corresponding port. 100M LED (if present)-(Green) Located on each model of the port....

User Manual
Page 11
... Back Panel The power port and console port are located on your network. 2. Disconnect the managed switch from the network or disable all DHCP servers on the back panel of the managed switch. With the power on, press-and-hold the Reset button for more than 10 seconds. •... To restore the managed switch configuration to reboot or reset the managed switch, do the following: • To reboot the managed switch, press the Reset button for configuration using a terminal emulation program. 5 Returning the Device to the ...
... Back Panel The power port and console port are located on your network. 2. Disconnect the managed switch from the network or disable all DHCP servers on the back panel of the managed switch. With the power on, press-and-hold the Reset button for more than 10 seconds. •... To restore the managed switch configuration to reboot or reset the managed switch, do the following: • To reboot the managed switch, press the Reset button for configuration using a terminal emulation program. 5 Returning the Device to the ...


