

Brochure
Page 1
... powerful security measures such as access control lists (ACLs) and guest virtual LANs (VLANs) to provide rich services to users while protecting applications and information. • Meet tomorrow's networking needs as well as they need to make every dollar count. Cisco 300 Series Switches Powerful Features and Performance at the Right Price Cisco 300 Series Switches offer enhanced switch features that support advanced technologies, including quality of service (QoS) intelligence and advanced traffic management...
... powerful security measures such as access control lists (ACLs) and guest virtual LANs (VLANs) to provide rich services to users while protecting applications and information. • Meet tomorrow's networking needs as well as they need to make every dollar count. Cisco 300 Series Switches Powerful Features and Performance at the Right Price Cisco 300 Series Switches offer enhanced switch features that support advanced technologies, including quality of service (QoS) intelligence and advanced traffic management...
Brochure
Page 2
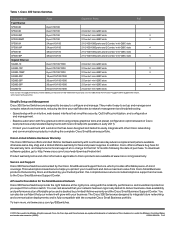
... future networking and communication deployments, and is backed by your staff devotes to network management and troubleshooting. • Speed setup with an intuitive, web-based interface that simplifies security, QoS traffic prioritization, and configuration and management. • Balance automation with fine-grained control using simple graphical tools and preset configuration options based on Cisco best practices and pretested deployments with one port active at no charge for fans and power supplies.
... future networking and communication deployments, and is backed by your staff devotes to network management and troubleshooting. • Speed setup with an intuitive, web-based interface that simplifies security, QoS traffic prioritization, and configuration and management. • Balance automation with fine-grained control using simple graphical tools and preset configuration options based on Cisco best practices and pretested deployments with one port active at no charge for fans and power supplies.
User Manual
Page 2
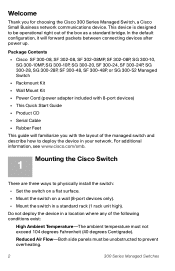
..., or SG 300-52 Managed Switch • Rackmount Kit • Wall Mount Kit • Power Cord (power adapter included with 8-port devices) • This Quick Start Guide • Product CD • Serial Cable • Rubber Feet This guide will forward packets between connecting devices after power up. This device is designed to be unobstructed to physically install the switch: • Set the switch on a flat surface. • Mount the switch on a wall (8-port devices only). • Mount the switch in your network.
..., or SG 300-52 Managed Switch • Rackmount Kit • Wall Mount Kit • Power Cord (power adapter included with 8-port devices) • This Quick Start Guide • Product CD • Serial Cable • Rubber Feet This guide will forward packets between connecting devices after power up. This device is designed to be unobstructed to physically install the switch: • Set the switch on a flat surface. • Mount the switch on a wall (8-port devices only). • Mount the switch in your network.
User Manual
Page 3
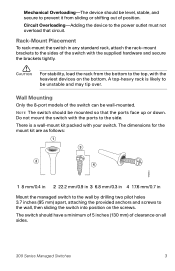
... may tip over. A top-heavy rack is a wall-mount kit packed with the heaviest devices on the bottom. The switch should be wall-mounted. CAUTION For stability, load the rack from sliding or shifting out of the switch can be mounted so that circuit. Wall Mounting Only the 8-port models of position. Do not mount the switch with the supplied hardware and secure the brackets tightly. Circuit Overloading...
... may tip over. A top-heavy rack is a wall-mount kit packed with the heaviest devices on the bottom. The switch should be wall-mounted. CAUTION For stability, load the rack from sliding or shifting out of the switch can be mounted so that circuit. Wall Mounting Only the 8-port models of position. Do not mount the switch with the supplied hardware and secure the brackets tightly. Circuit Overloading...
User Manual
Page 4
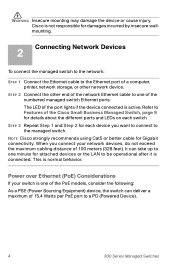
... Ethernet (PoE) Considerations If your network devices, do not exceed the maximum cabling distance of the numbered managed switch Ethernet ports. The LED of the port lights if the device connected is one of the PoE models, consider the following: As a PSE (Power Sourcing Equipment) device, the switch can take up to a PD (Powered Device). 4 300 Series Managed Switches It can deliver a maximum of the Cisco Small Business Managed Switch, page 9 for Gigabit connectivity. Refer to Features of 15.4 Watts per PoE port...
... Ethernet (PoE) Considerations If your network devices, do not exceed the maximum cabling distance of the numbered managed switch Ethernet ports. The LED of the port lights if the device connected is one of the PoE models, consider the following: As a PSE (Power Sourcing Equipment) device, the switch can take up to a PD (Powered Device). 4 300 Series Managed Switches It can deliver a maximum of the Cisco Small Business Managed Switch, page 9 for Gigabit connectivity. Refer to Features of 15.4 Watts per PoE port...
User Manual
Page 5
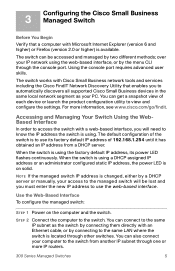
... routers. 300 Series Managed Switches 5 When the switch is available. The switch can also connect your PC. 3 Configuring the Cisco Small Business Managed Switch Before You Begin Verify that enables you will be accessed and managed by connecting to the same LAN where the switch is to use its power LED flashes continuously. The switch works with an Ethernet cable, or by two different methods; Accessing and Managing Your Switch Using the WebBased Interface In order to access the switch with a web-based interface...
... routers. 300 Series Managed Switches 5 When the switch is available. The switch can also connect your PC. 3 Configuring the Cisco Small Business Managed Switch Before You Begin Verify that enables you will be accessed and managed by connecting to the same LAN where the switch is to use its power LED flashes continuously. The switch works with an Ethernet cable, or by two different methods; Accessing and Managing Your Switch Using the WebBased Interface In order to access the switch with a web-based interface...
User Manual
Page 6
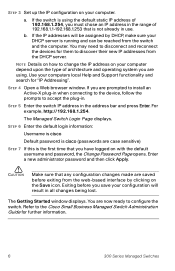
... Guide for further information. 6 300 Series Managed Switches STEP 5 Enter the switch IP address in when connecting to the device, follow the prompts to configure the switch. Refer to change the IP address on your computer. Enter a new administrator password and then click Apply. The Getting Started window displays. b. STEP 4 Open a Web browser window. You are now ready to accept the plug-in use. If the switch is not already in . The Managed Switch Login...
... Guide for further information. 6 300 Series Managed Switches STEP 5 Enter the switch IP address in when connecting to the device, follow the prompts to configure the switch. Refer to change the IP address on your computer. Enter a new administrator password and then click Apply. The Getting Started window displays. b. STEP 4 Open a Web browser window. You are now ready to accept the plug-in use. If the switch is not already in . The Managed Switch Login...
User Manual
Page 7
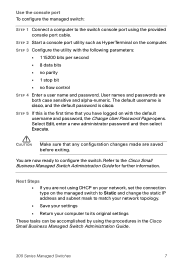
... exiting. You are not using DHCP on your network, set the connection type on the managed switch to Static and change the static IP address and subnet mask to match your network topology. • Save your settings • Return your computer to its original settings These tasks can be accomplished by using the provided console port cable. STEP 3 Configure the utility with the default username and password, the Change User Password Page opens. Select Edit, enter a new...
... exiting. You are not using DHCP on your network, set the connection type on the managed switch to Static and change the static IP address and subnet mask to match your network topology. • Save your settings • Return your computer to its original settings These tasks can be accomplished by using the provided console port cable. STEP 3 Configure the utility with the default username and password, the Change User Password Page opens. Select Edit, enter a new...
User Manual
Page 8
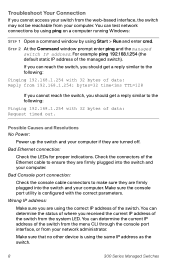
... the web-based interface, the switch may not be reachable from 192.168.1.254: bytes=32 time STEP 2 At the Command window prompt enter ping and the managed switch IP address. You can reach the switch, you should get a reply similar to the following: Pinging 192.168.1.254 with 32 bytes of the managed switch). Troubleshoot Your Connection If you cannot access your computer. If you can test network connections by using ping...
... the web-based interface, the switch may not be reachable from 192.168.1.254: bytes=32 time STEP 2 At the Command window prompt enter ping and the managed switch IP address. You can reach the switch, you should get a reply similar to the following: Pinging 192.168.1.254 with 32 bytes of the managed switch). Troubleshoot Your Connection If you cannot access your computer. If you can test network connections by using ping...
User Manual
Page 9
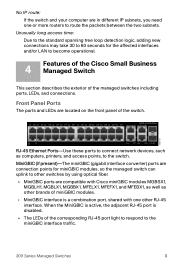
... Cisco miniGBIC modules MGBSX1, MGBLH1, MGBLX1, MGBBX1, MFELX1, MFEFX1, and MFEBX1, as well as computers, printers, and access points, to the miniGBIC interface traffic. 300 Series Managed Switches 9 Unusually long access time: Due to the standard spanning tree loop detection logic, adding new connections may take 30 to 60 seconds for miniGBIC modules, so the managed switch can uplink to other switches by using optical fiber. • MiniGBIC ports...
... Cisco miniGBIC modules MGBSX1, MGBLH1, MGBLX1, MGBBX1, MFELX1, MFEFX1, and MFEBX1, as well as computers, printers, and access points, to the miniGBIC interface traffic. 300 Series Managed Switches 9 Unusually long access time: Due to the standard spanning tree loop detection logic, adding new connections may take 30 to 60 seconds for miniGBIC modules, so the managed switch can uplink to other switches by using optical fiber. • MiniGBIC ports...
User Manual
Page 10
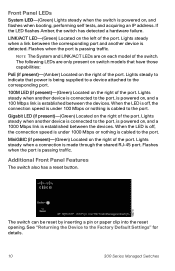
...)-(Amber) Located on the right of the switch. Gigabit LED (if present)-(Green) Located on the left of the port. The switch can be reset by inserting a pin or paper clip into the reset opening. Front Panel LEDs System LED-(Green) Lights steady when the switch is made through the shared RJ-45 port. Lights steady when another device is being supplied to a device attached to the Factory Default Settings" for details. 10 300 Series Managed Switches LINK/ACT LED-(Green...
...)-(Amber) Located on the right of the switch. Gigabit LED (if present)-(Green) Located on the left of the port. The switch can be reset by inserting a pin or paper clip into the reset opening. Front Panel LEDs System LED-(Green) Lights steady when the switch is made through the shared RJ-45 port. Lights steady when another device is being supplied to a device attached to the Factory Default Settings" for details. 10 300 Series Managed Switches LINK/ACT LED-(Green...

User Manual
Page 11
Console-The Console port is where you can connect a serial cable to a computers serial port for configuration using a terminal emulation program. 5 Returning the Device to the Factory Default Settings To use the Reset button to reboot or reset the managed switch, do the following: • To reboot the managed switch, press the Reset button for more than 10 seconds. • To restore the managed switch configuration to power. Disconnect the managed switch from the network or disable all DHCP servers on , press-and-hold the Reset button for less than...
Console-The Console port is where you can connect a serial cable to a computers serial port for configuration using a terminal emulation program. 5 Returning the Device to the Factory Default Settings To use the Reset button to reboot or reset the managed switch, do the following: • To reboot the managed switch, press the Reset button for more than 10 seconds. • To restore the managed switch configuration to power. Disconnect the managed switch from the network or disable all DHCP servers on , press-and-hold the Reset button for less than...
User Manual
Page 16
... in the U.S. Americas Headquarters Cisco Systems, Inc. 170 West Tasman Drive San Jose, CA 95134-1706 USA www.cisco.com Small Business Support US: 1-866-606-1866 (Toll Free, 24/7) Small Business Support, Global: www.cisco.com/go / trademarks. A listing of Cisco's trademarks can be found at www.cisco.com/go /sbsc Cisco and the Cisco Logo are the property of...
... in the U.S. Americas Headquarters Cisco Systems, Inc. 170 West Tasman Drive San Jose, CA 95134-1706 USA www.cisco.com Small Business Support US: 1-866-606-1866 (Toll Free, 24/7) Small Business Support, Global: www.cisco.com/go / trademarks. A listing of Cisco's trademarks can be found at www.cisco.com/go /sbsc Cisco and the Cisco Logo are the property of...


