
Administration Guide
Page 2
... the Console 12 Selecting Menu Options and Actions 12 Using the Switch Main Menu 13 System Configuration 13 System Information 14 Management Settings 16 Username & Password Settings 21 Security Settings 22 VLAN Management 25 IP Configuration 26 File Management 40 Restore System Default Settings 43 Reset to Factory Settings 43 Reboot System 43 Stack Configuration 44 Port Status 44 SGE2010/SGE2010P...
... the Console 12 Selecting Menu Options and Actions 12 Using the Switch Main Menu 13 System Configuration 13 System Information 14 Management Settings 16 Username & Password Settings 21 Security Settings 22 VLAN Management 25 IP Configuration 26 File Management 40 Restore System Default Settings 43 Reset to Factory Settings 43 Reboot System 43 Stack Configuration 44 Port Status 44 SGE2010/SGE2010P...

Administration Guide
Page 4
... covers the steps for choosing a Linksys Switch. Introduction Welcome Thank you connect the switch, set it easy to manage your network devices to the switch. • Chapter 4, "Using the Console" This chapter describes the use the console interface to Know the SGE2010/SGE2010P" This chapter describes the ports, LEDs, and other Linksys switches or devices. These instructions should be...
... covers the steps for choosing a Linksys Switch. Introduction Welcome Thank you connect the switch, set it easy to manage your network devices to the switch. • Chapter 4, "Using the Console" This chapter describes the use the console interface to Know the SGE2010/SGE2010P" This chapter describes the ports, LEDs, and other Linksys switches or devices. These instructions should be...

Administration Guide
Page 12
...SGE2010/SGE2010P Administration Guide 9 The default logon ID is covered in the next chapter. • "Connecting to Your Switch with HyperTerminal," on page 9 • "Connecting to the switch IP address 192.168.1.254. Telnet to the Switch with Telnet," on your switch. 4 Using the Console Connecting to Your Switch... you to Your Switch with HyperTerminal You can save the settings to use HyperTerminal to connect to your switch for basic configuration of the switch and management of the switch console, which is admin with HyperTerminal Using the Console This chapter describes ...
...SGE2010/SGE2010P Administration Guide 9 The default logon ID is covered in the next chapter. • "Connecting to Your Switch with HyperTerminal," on page 9 • "Connecting to the switch IP address 192.168.1.254. Telnet to the Switch with Telnet," on your switch. 4 Using the Console Connecting to Your Switch... you to Your Switch with HyperTerminal You can save the settings to use HyperTerminal to connect to your switch for basic configuration of the switch and management of the switch console, which is admin with HyperTerminal Using the Console This chapter describes ...

Administration Guide
Page 14
The next time that you need to connect to save these settings. Then, click the OK button. 6. Optionally, on the File menu, click Save to the console, you can open this saved connection. SGE2010/SGE2010P Administration Guide 11 Using the Console Connecting to Your Switch with HyperTerminal 4. Set the serial port settings as follows: • Bits per second: 115200 • Data bits: 8 • Parity: None • Stop bits: 1 • Flow control: None 5.
The next time that you need to connect to save these settings. Then, click the OK button. 6. Optionally, on the File menu, click Save to the console, you can open this saved connection. SGE2010/SGE2010P Administration Guide 11 Using the Console Connecting to Your Switch with HyperTerminal 4. Set the serial port settings as follows: • Bits per second: 115200 • Data bits: 8 • Parity: None • Stop bits: 1 • Flow control: None 5.

Administration Guide
Page 15
...blank. 3. Logging On to select a menu option. Using the Console Connecting to the Switch with Telnet Connecting to the Switch with telnet. 1. NOTE: The Username & Password Settings screen can also be used to the switch with Telnet You can connect to set passwords for other users. Selecting Menu Options and Actions Within the... press the Enter key. 3. Move the cursor from editable fields to enter the CLI interface. Open a command line editor and enter telnet . SGE2010/SGE2010P Administration Guide 12 Actions appear at the end of the screen. Select Enter to Action list.
...blank. 3. Logging On to select a menu option. Using the Console Connecting to the Switch with Telnet Connecting to the Switch with telnet. 1. NOTE: The Username & Password Settings screen can also be used to the switch with Telnet You can connect to set passwords for other users. Selecting Menu Options and Actions Within the... press the Enter key. 3. Move the cursor from editable fields to enter the CLI interface. Open a command line editor and enter telnet . SGE2010/SGE2010P Administration Guide 12 Actions appear at the end of the screen. Select Enter to Action list.

Administration Guide
Page 16
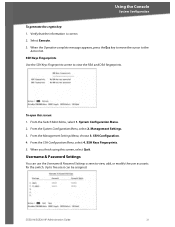
...page 13) 2. Management Settings (see page 44) 3. Using the Console Using the Switch Main Menu Using the Switch Main Menu The Switch Main Menu provides access to screens that you can manage system information, view or modify management settings, set up user accounts, and manage security settings. Help (see ...You also will use to screens where you need to restore default settings, reset the switch to the factory default configuration, or reboot the system. 1. Port Status (see page 16) SGE2010/SGE2010P Administration Guide 13 System Information (see page 48) 5. System ...
...page 13) 2. Management Settings (see page 44) 3. Using the Console Using the Switch Main Menu Using the Switch Main Menu The Switch Main Menu provides access to screens that you can manage system information, view or modify management settings, set up user accounts, and manage security settings. Help (see ...You also will use to screens where you need to restore default settings, reset the switch to the factory default configuration, or reboot the system. 1. Port Status (see page 16) SGE2010/SGE2010P Administration Guide 13 System Information (see page 48) 5. System ...

Administration Guide
Page 17
....) To open this screen: From the Switch Main Menu, select 1. System Information. 3. SGE2010/SGE2010P Administration Guide 14 File Management (see page 26) 7. General Information (see page 43) 10. When you can view firmware version information and general system information. 1. IP Configuration (see page 40) 8. Restore System Default Settings (see page 15) 2. System Information The...
....) To open this screen: From the Switch Main Menu, select 1. System Information. 3. SGE2010/SGE2010P Administration Guide 14 File Management (see page 26) 7. General Information (see page 43) 10. When you can view firmware version information and general system information. 1. IP Configuration (see page 40) 8. Restore System Default Settings (see page 15) 2. System Information The...

Administration Guide
Page 19
..., system name, and location: 1. SSH Configuration (see page 17) 2. SGE2010/SGE2010P Administration Guide 16 Press the Esc key to return to save your changes. Management Settings. Select Save to the Action list. 3. Telnet Configuration (see page 17) 3. Using the Console System Configuration To change the settings for serial port, telnet, and secure telnet (SSH). 1. From...
..., system name, and location: 1. SSH Configuration (see page 17) 2. SGE2010/SGE2010P Administration Guide 16 Press the Esc key to return to save your changes. Management Settings. Select Save to the Action list. 3. Telnet Configuration (see page 17) 3. Using the Console System Configuration To change the settings for serial port, telnet, and secure telnet (SSH). 1. From...

Administration Guide
Page 20
... of the Ethernet switch. Using the Console System Configuration Serial Port Configuration Use the Serial Port Configuration screen to view or change the baud rate of the serial port: 1. From the Switch Main Menu, select 1. Select Edit, and then make changes. 2. SGE2010/SGE2010P Administration Guide 17 From the System Configuration Menu, select 2. Management Settings. 3. Select Save...
... of the Ethernet switch. Using the Console System Configuration Serial Port Configuration Use the Serial Port Configuration screen to view or change the baud rate of the serial port: 1. From the Switch Main Menu, select 1. Select Edit, and then make changes. 2. SGE2010/SGE2010P Administration Guide 17 From the System Configuration Menu, select 2. Management Settings. 3. Select Save...

Administration Guide
Page 21
... Server Configuration (see page 19) 3. From the Switch Main Menu, select 1. From the System Configuration Menu, select 2. Management Settings. 3. To change the time-out setting: 1. Select Save to screens where you can configure SSH server settings, generate crypto keys, and generate keys fingerprints. ... select 2. SSH Configuration The SSH Configuration menu provides access to save your changes. 2. SGE2010/SGE2010P Administration Guide 18 SSH Configuration. Using the Console System Configuration To open this screen: 1. Management Settings. 3. Telnet Configuration.
... Server Configuration (see page 19) 3. From the Switch Main Menu, select 1. From the System Configuration Menu, select 2. Management Settings. 3. To change the time-out setting: 1. Select Save to screens where you can configure SSH server settings, generate crypto keys, and generate keys fingerprints. ... select 2. SSH Configuration The SSH Configuration menu provides access to save your changes. 2. SGE2010/SGE2010P Administration Guide 18 SSH Configuration. Using the Console System Configuration To open this screen: 1. Management Settings. 3. Telnet Configuration.

Administration Guide
Page 22
...the Switch Main Menu, select 1. SSH Server Configuration. When the Operation complete message appears, press the Esc key to move the cursor to the Action list. From the Management Settings Menu, choose 3. Press the Esc key to move the cursor to the Action list. 3. SGE2010/...SGE2010P Administration Guide 19 System Configuration Menu. 2. From the SSH Configuration Menu, select 1. Select Edit, and then make your changes. 4. Using the Console System ...
...the Switch Main Menu, select 1. SSH Server Configuration. When the Operation complete message appears, press the Esc key to move the cursor to the Action list. From the Management Settings Menu, choose 3. Press the Esc key to move the cursor to the Action list. 3. SGE2010/...SGE2010P Administration Guide 19 System Configuration Menu. 2. From the SSH Configuration Menu, select 1. Select Edit, and then make your changes. 4. Using the Console System ...

Administration Guide
Page 23
... SSH Configuration. 4. Select Save to the Action list. Management Settings. 3. To open this screen: 1. From the Switch Main Menu, select 1. From the Management Settings Menu, choose 3. To change SSH Crypto Key Generation settings: NOTE: Only the public key algorithm can be changed....Menu. 2. SGE2010/SGE2010P Administration Guide 20 From the System Configuration Menu, select 2. SSH Status. 5. From the Management Settings Menu, choose 3. From the SSH Configuration Menu, select 2. When you finish using this screen, select Quit. Using the Console System Configuration To...
... SSH Configuration. 4. Select Save to the Action list. Management Settings. 3. To open this screen: 1. From the Switch Main Menu, select 1. From the Management Settings Menu, choose 3. To change SSH Crypto Key Generation settings: NOTE: Only the public key algorithm can be changed....Menu. 2. SGE2010/SGE2010P Administration Guide 20 From the System Configuration Menu, select 2. SSH Status. 5. From the Management Settings Menu, choose 3. From the SSH Configuration Menu, select 2. When you finish using this screen, select Quit. Using the Console System Configuration To...
Administration Guide
Page 24
... add, or modify the user accounts for the switch. SSH Configuration. 4. SGE2010/SGE2010P Administration Guide 21 From the Switch Main Menu, select 1. From the Management Settings Menu, choose 3. SSH Keys Fingerprints. 5. Username & Password Settings You can be assigned. From the SSH Configuration... can use the Username & Password Settings screen to view the RSA and DSA fingerprints. From the System Configuration Menu, select 2. System Configuration Menu. 2. Management Settings. 3. Up to the Action list. Using the Console System Configuration To generate the crypto ...
... add, or modify the user accounts for the switch. SSH Configuration. 4. SGE2010/SGE2010P Administration Guide 21 From the Switch Main Menu, select 1. From the Management Settings Menu, choose 3. SSH Keys Fingerprints. 5. Username & Password Settings You can be assigned. From the SSH Configuration... can use the Username & Password Settings screen to view the RSA and DSA fingerprints. From the System Configuration Menu, select 2. System Configuration Menu. 2. Management Settings. 3. Up to the Action list. Using the Console System Configuration To generate the crypto ...
Administration Guide
Page 25
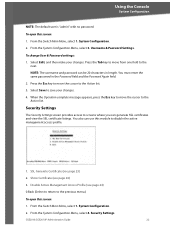
... list. 3. System Configuration. 2. Security Settings. SGE2010/SGE2010P Administration Guide 22 Press the Tab key to move the cursor to the next. You must enter the same password in length. From the Switch Main Menu, select 1. To change User & Password settings: 1. From the Switch Main Menu, select 1. System Configuration. 2. Security Settings The Security Settings screen provides access to...
... list. 3. System Configuration. 2. Security Settings. SGE2010/SGE2010P Administration Guide 22 Press the Tab key to move the cursor to the next. You must enter the same password in length. From the Switch Main Menu, select 1. To change User & Password settings: 1. From the Switch Main Menu, select 1. System Configuration. 2. Security Settings The Security Settings screen provides access to...

Administration Guide
Page 26
...the Esc key to move the cursor to generate the certificate with the new parameters. 4. Using the Console System Configuration SSL Generate Certificate Use the SSL Certificate Generation screen to 32 characters) SGE2010/SGE2010P Administration Guide 23 To edit and execute a certificate: 1. System Configuration. 2. The following fields ... name. (Range: 1 to view, edit, and execute device-generated certificates. Select Edit, and then make your changes. From the Switch Main Menu, select 1. Security Settings. 3. From the Security Settings Menu, select 1. To open this screen: 1.
...the Esc key to move the cursor to generate the certificate with the new parameters. 4. Using the Console System Configuration SSL Generate Certificate Use the SSL Certificate Generation screen to 32 characters) SGE2010/SGE2010P Administration Guide 23 To edit and execute a certificate: 1. System Configuration. 2. The following fields ... name. (Range: 1 to view, edit, and execute device-generated certificates. Select Edit, and then make your changes. From the Switch Main Menu, select 1. Security Settings. 3. From the Security Settings Menu, select 1. To open this screen: 1.

Administration Guide
Page 27
...Switch Main Menu, select 1. From the System Configuration Menu, select 4. To disable the active management access profile: 1. From the System Configuration menu, select 4. From the Security Settings Menu, select 3. Disable Active Management Access Profile You can use select option 3 on the Security Settings menu to display the internal certificate. Using the Console...Certificate screen to disable the active management access profile. From the Security Settings Menu, select 2. SGE2010/SGE2010P Administration Guide 24 Disable Active Management Access Profile. 4. When you ...
...Switch Main Menu, select 1. From the System Configuration Menu, select 4. To disable the active management access profile: 1. From the System Configuration menu, select 4. From the Security Settings Menu, select 3. Disable Active Management Access Profile You can use select option 3 on the Security Settings menu to display the internal certificate. Using the Console...Certificate screen to disable the active management access profile. From the Security Settings Menu, select 2. SGE2010/SGE2010P Administration Guide 24 Disable Active Management Access Profile. 4. When you ...

Administration Guide
Page 30
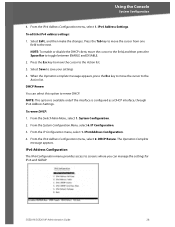
... screen: 1. IPv4 Address Configuration. IP Configuration. 3. From the IP Configuration menu, select 1. SGE2010/SGE2010P Administration Guide 27 IP Configuration. 3. From the Switch Main Menu, select 1. IPv4 Address Settings You can use this screen: 1. From the System Configuration Menu, select 6. Using the Console System Configuration IPv4 Address Configuration The IPv4 Configuration menu provides access to...
... screen: 1. IPv4 Address Configuration. IP Configuration. 3. From the IP Configuration menu, select 1. SGE2010/SGE2010P Administration Guide 27 IP Configuration. 3. From the Switch Main Menu, select 1. IPv4 Address Settings You can use this screen: 1. From the System Configuration Menu, select 6. Using the Console System Configuration IPv4 Address Configuration The IPv4 Configuration menu provides access to...
Administration Guide
Page 31
Select Edit., and then make the changes. From the Switch Main Menu, select 1. IP Configuration. 3. SGE2010/SGE2010P Administration Guide 28 Press the Esc key to move the cursor to the Action list. When the Operation ...the interface is configured as a DHCP interface, through IPv4 Address Settings. System Configuration. 2. DHCP Renew You can manage the settings for IPv6 and ISATAP. From the IPv4 Address Configuration menu, select 2. Using the Console System Configuration 4. IPv4 Address Settings. Select Save to renew DHCP. IPv6 Address Configuration The IPv6 ...
Select Edit., and then make the changes. From the Switch Main Menu, select 1. IP Configuration. 3. SGE2010/SGE2010P Administration Guide 28 Press the Esc key to move the cursor to the Action list. When the Operation ...the interface is configured as a DHCP interface, through IPv4 Address Settings. System Configuration. 2. DHCP Renew You can manage the settings for IPv6 and ISATAP. From the IPv4 Address Configuration menu, select 2. Using the Console System Configuration 4. IPv4 Address Settings. Select Save to renew DHCP. IPv6 Address Configuration The IPv6 ...

Administration Guide
Page 32
...Tab key to move the cursor from one field to enable or disable the IPv6 interface. Using the Console System Configuration 1. IPv6 Interface Enable (see page 30) 3. IPv6 Address Settings (see page 29) 2. IPv6 ISATAP Interface Show (see page 33) To open this Select Edit., ...changes. From the Switch Main Menu, select 1. From the System Configuration Menu, select 6. IPv6 Address Configuration. IPv6 Interface Enable You can use the IPv6 Interface Enable screen to the next. Press the Enter key to toggle between ENABLE and DISABLE. SGE2010/SGE2010P Administration Guide ...
...Tab key to move the cursor from one field to enable or disable the IPv6 interface. Using the Console System Configuration 1. IPv6 Interface Enable (see page 30) 3. IPv6 Address Settings (see page 29) 2. IPv6 ISATAP Interface Show (see page 33) To open this Select Edit., ...changes. From the Switch Main Menu, select 1. From the System Configuration Menu, select 6. IPv6 Address Configuration. IPv6 Interface Enable You can use the IPv6 Interface Enable screen to the next. Press the Enter key to toggle between ENABLE and DISABLE. SGE2010/SGE2010P Administration Guide ...

Administration Guide
Page 33
... Configuration menu, select 2. Press the Esc key to move the cursor to edit the IPv6 address settings. Select Save to save your settings 4. Using the Console System Configuration 3. From the Switch Main Menu, select 1. From the IP Configuration menu, select 2. Press the Tab key to move... the cursor to the field, and then press the Space Bar to the next. When you are finished working on this screen: 1. SGE2010...
... Configuration menu, select 2. Press the Esc key to move the cursor to edit the IPv6 address settings. Select Save to save your settings 4. Using the Console System Configuration 3. From the Switch Main Menu, select 1. From the IP Configuration menu, select 2. Press the Tab key to move... the cursor to the field, and then press the Space Bar to the next. When you are finished working on this screen: 1. SGE2010...


